Comprehensive, easy-to-use patient charts in Axxess Hospice eliminate redundant documentation and enable users to seamlessly capture patient data.
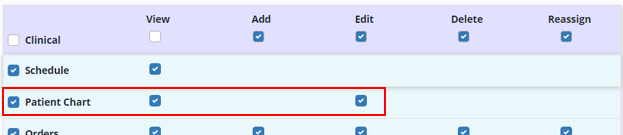
Permission to access patient charts can be granted when creating a new user or by editing an existing user’s profile. To grant patient chart permissions to an existing user, navigate to the People Center under the People tab. Edit the user’s profile and navigate to the Permissions tab using the left-side menu. Scroll to the Clinical section and check the View and Edit boxes next to Patient Chart. Click Save to complete the process.
People tab ➜ People Center ➜ Edit ➜ Permissions tab ➜ Clinical section ➜ Patient Chart ➜ Save
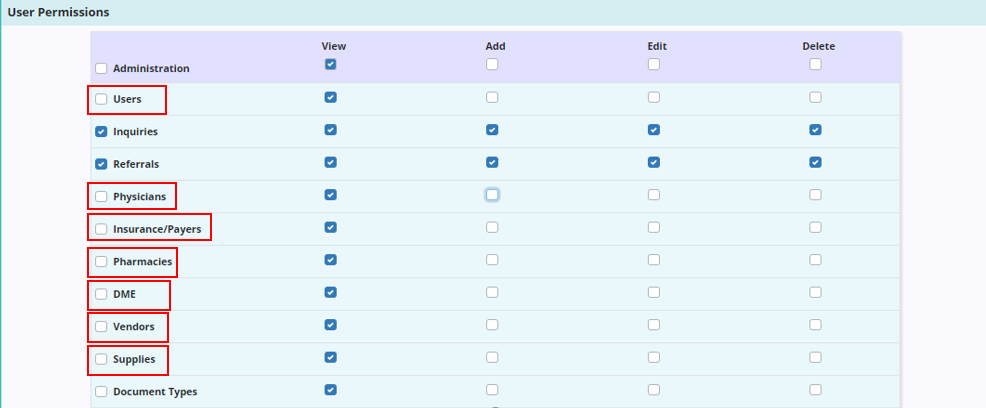
Users must also have access to view the following items, as information in these lists is used when adding and updating patient information. In the Administration section, select View next to Users, Physicians, Insurance/Payers, Vendors, and Document Types.
The patient profile has been updated to correspond to the updated referral, so information entered during the referral process flows seamlessly to the patient profile and can be updated any time.
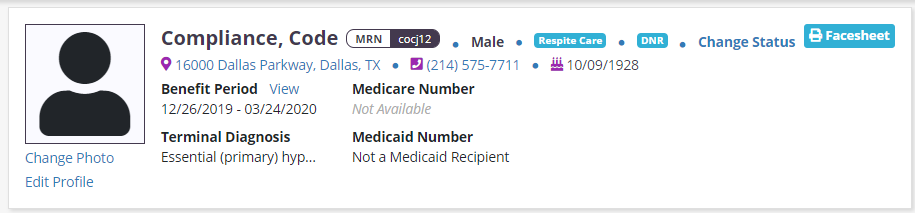
To access the patient profile, navigate to the Patient Charts under the Patients tab. Click Edit Profile under the photo in the patient’s chart.
Patients tab ➜ Patient Charts ➜ Edit Profile
Use the menu on the left side of the patient profile to navigate to each of the following sections and view the respective updates.
The Facility Name field has been added under Patient Primary Address, Patient Visit Address, and Patient Mailing Address. When adding a facility, start typing in the Facility Name field to filter facilities on your agency’s Vendors list. Select a facility to auto-populate its address based on information in the Vendors list. If the facility is not on the list, click Add Facility to add the facility to your agency’s vendors.
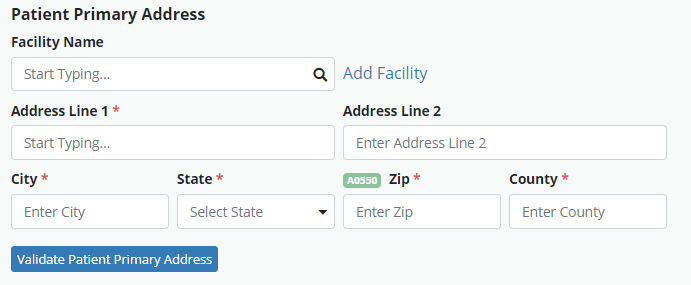
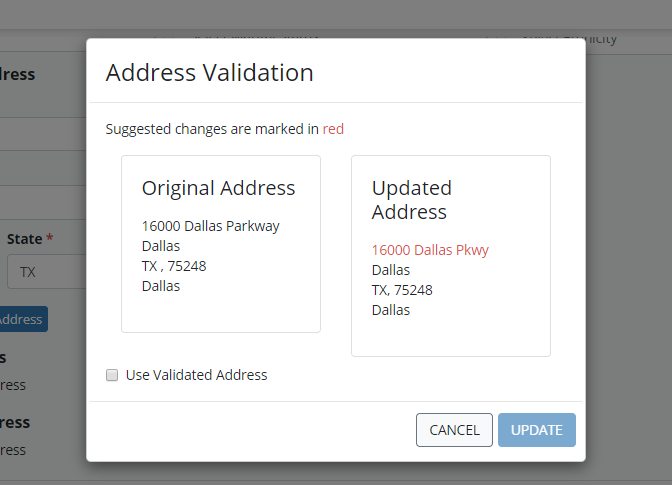
Once the Patient Primary Address has been entered, click Validate Patient Primary Address to ensure the address is correct. Select to use the validated address or keep the address as you entered it.
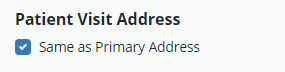
By default, the Same as Primary Address box is checked for the visit address. If the visit address is different from the primary address, deselect the box and enter the patient’s visit address.
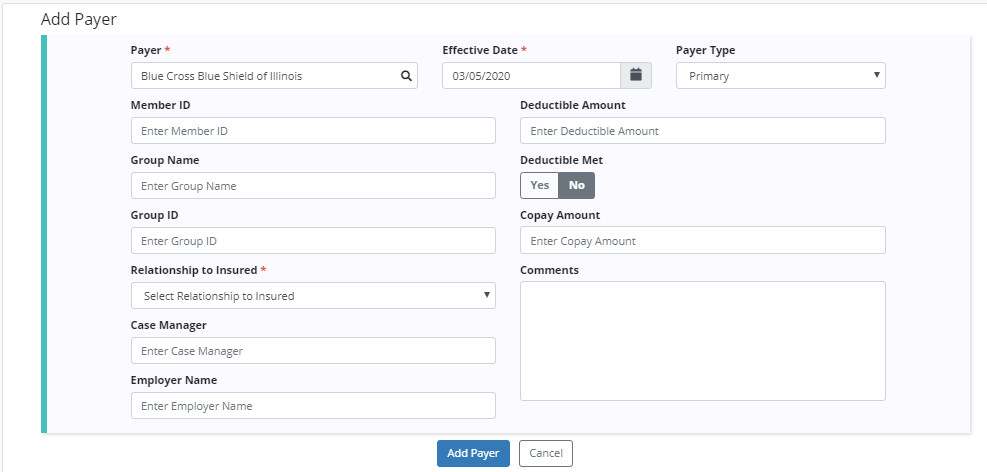
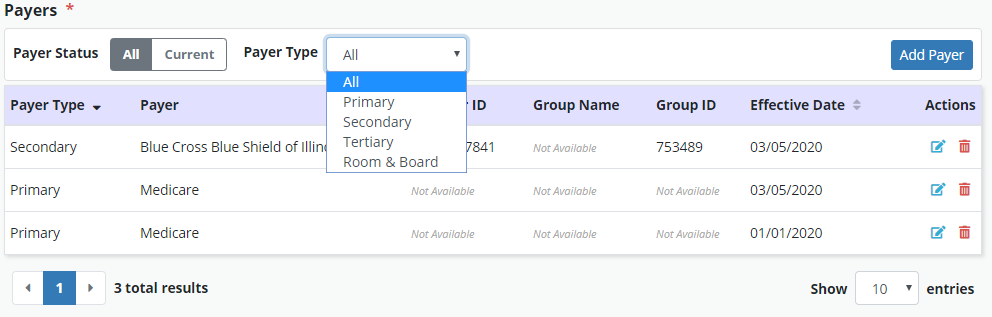
The Payer field is enhanced with a streamlined ability to add multiple payers per patient and track each patient’s payer history. A primary payer is still required when saving or converting a referral.
To add a payer, click the Add Payer button. Enter the payer name, effective date for the patient, and select a payer type. Note that multiple primary payers cannot have the same effective date.
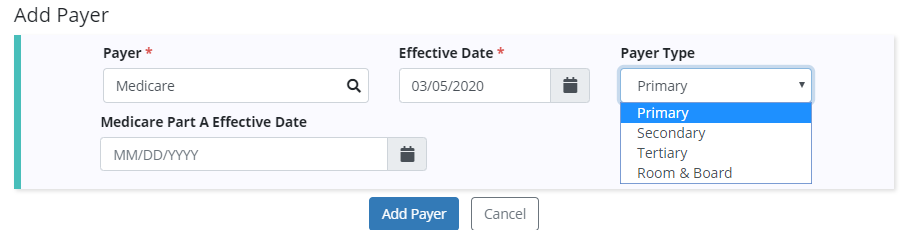
Complete the payer fields and click Add Payer to save the information to the referral or Cancel to go back.
To add another payer, repeat this process. The payer status will enable you to view current payers for the patient by default. To view previous payers for the patient, select All next to Payer Status. To filter by payer type, select an option from the Payer Type drop-down menu.
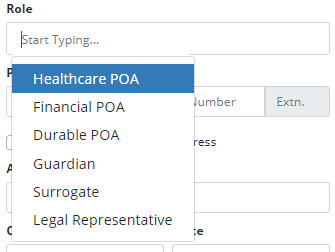
New fields have been added to capture pertinent information about each patient’s authorized contacts.
The Role field enables users to identify the role of the authorized contact. Users can select one or more roles from the drop-down menu.
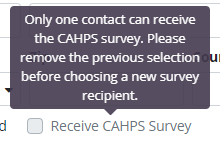
At the bottom of each contact card, check if the contact is the patient’s Emergency Contact or Primary Bereaved and if this person is the appropriate recipient for the CAHPS survey.

Only one contact can be selected to receive the CAHPS survey. To change the CAHPS survey recipient, deselect the box for the existing recipient before selecting the Receive CAHPS Survey box for the new CAHPS survey recipient.
Up to ten contacts can be added for a patient. Click Add Additional Authorized Contact to add contacts. To remove a contact, click Delete. To update the order of the contacts, select Move Up or Move Down.

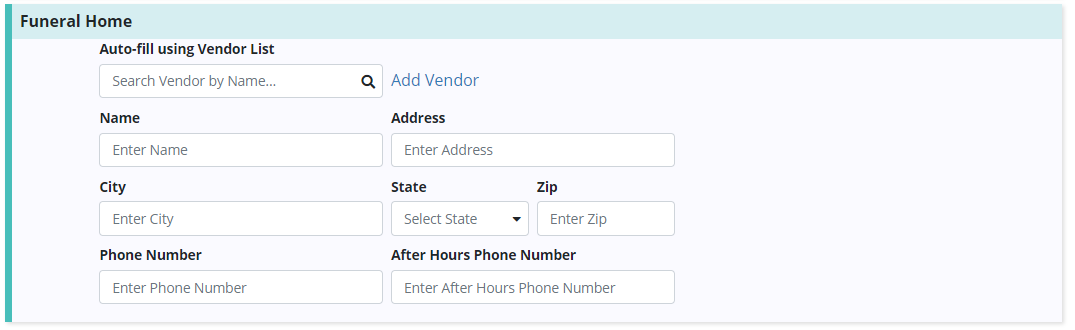
On the the Advance Directives tab, the Funeral Home section has been updated to enable users to search the Vendors list for funeral homes and auto-populate its fields.
Select a funeral home to auto-populate the fields with the funeral home’s information. If the funeral home is not on your agency’s Vendors list, click Add Vendor to add the funeral home to your agency’s vendors.
The new Patient Current Location field enables users to document the patient’s location at the time of referral, which may be different from where the patient will be admitted. If the referral was converted from an Inquiry, the information that was previously documented will flow here and can be updated as needed.

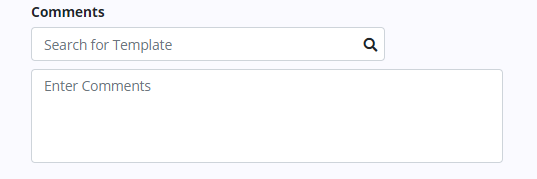
A Comment field has also been added to enable users to document notes on referral status. If the referral was converted from an Inquiry, the information that was previously documented will flow here and can be updated as needed.
The Referral Source fields have been streamlined to help capture where your referrals come from. When documenting referral source, select one of the following options:
Physician:
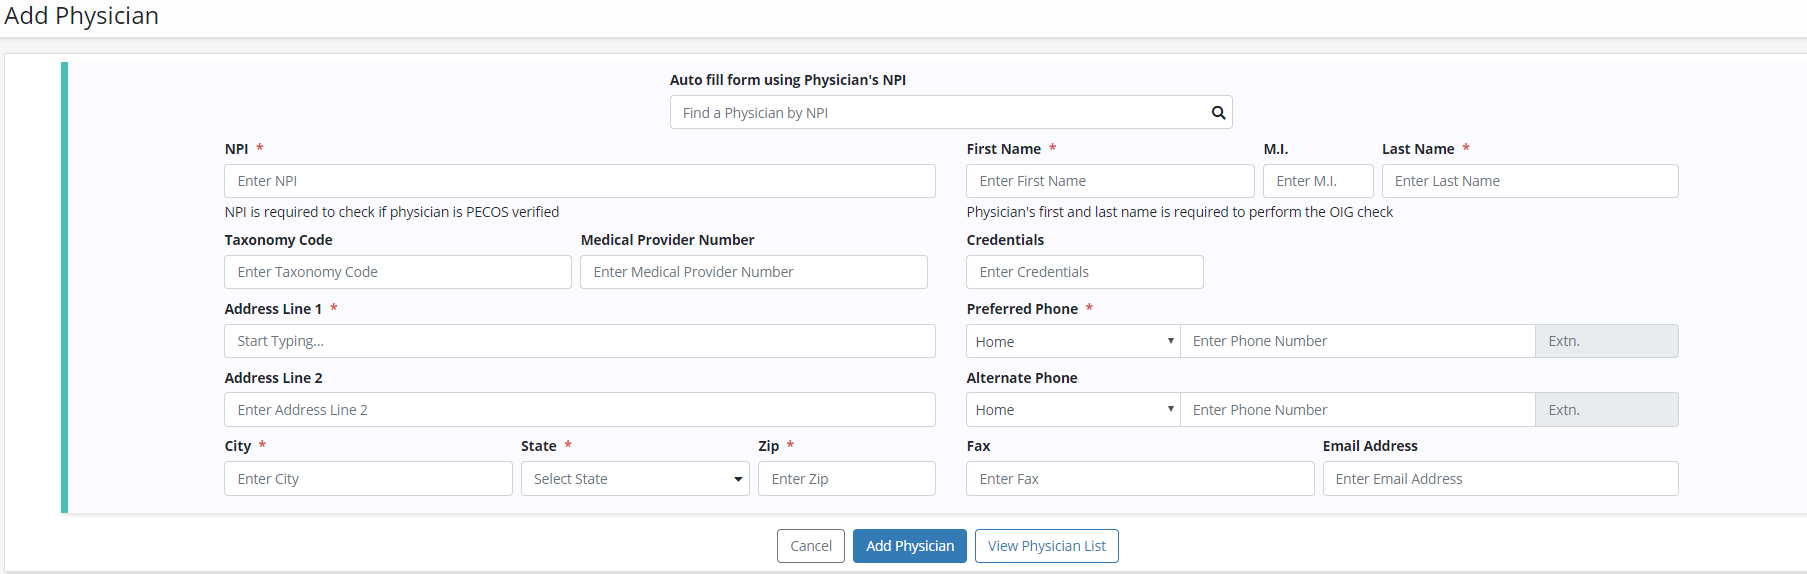
Start typing in the Referring Physician Name field to select a physician from your agency’s Physicians list. If the referring physician is not on your agency’s Physicians list, click Add Physician.

The Add Physician form will open in a separate browser tab so that you do not lose your place in the referral. Once the physician has been added, close the browser tab to return to the referral. The new physician will immediately be available to add to the referral.
Facility:
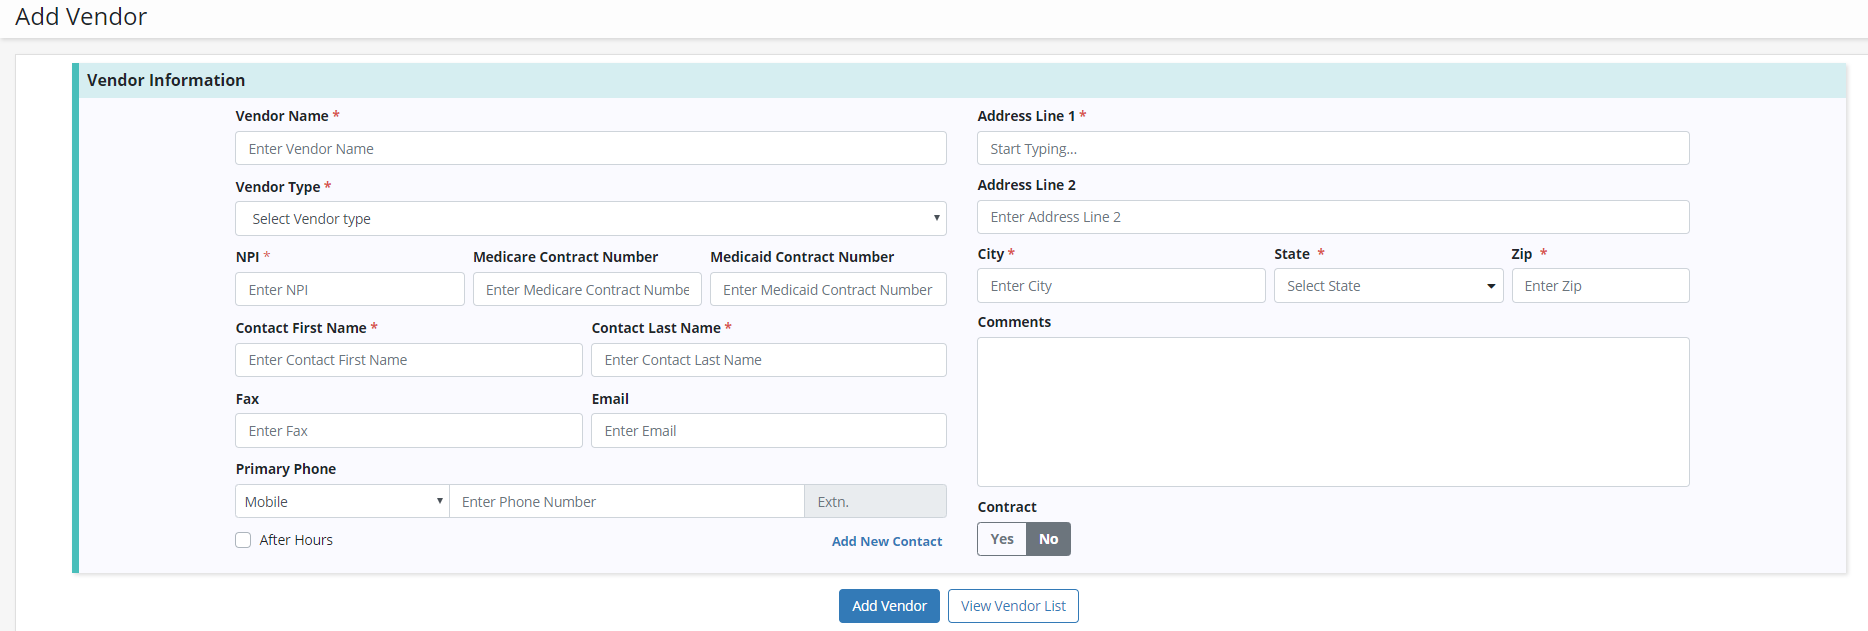
Start typing in the Facility Name field to select a facility from your agency’s list of vendors. If the facility is not on your agency’s Vendors list, click Add Facility.

The Add Vendor form will open in a separate browser tab so that you do not lose your place in the referral. Once the vendor has been added, close the browser tab to return to the referral. The new vendor will immediately be available to add to the referral.
Internal:
When entering an Internal Referral Source, you can select from any active user who has been added to your agency. Start typing in the Internal Referral Source Name search box to filter results.

Other:
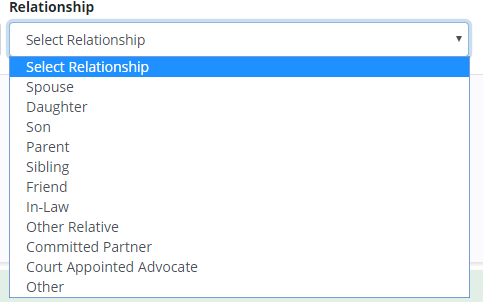
When entering an Other Referral Source, type the name of the referral source and select the relationship of the referral source to the patient.

Updated on 3/05/2020
