There are two ways to enter a new patient in the Axxess Hospice system. An agency may wish to restrict which method is used, but many organizations will use both methods, depending on the source and nature of each potential patient.
A new patient should be entered through an inquiry/lead when there is a communication about a potential new hospice patient without a physician order.
Adding an inquiry/lead allows the user to track communication about potential new patients with minimal information entered.
Examples of circumstances when a patient should be entered through an inquiry/lead include:
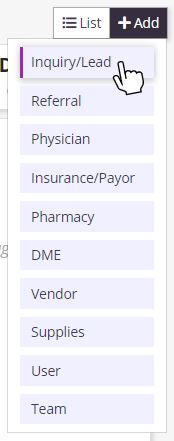
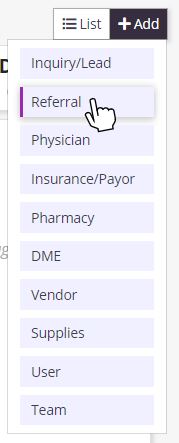
Add an inquiry/lead by clicking the +Add button in the top right corner of any screen in the Axxess Hospice system.
Select Inquiry/Lead from the drop-down menu.
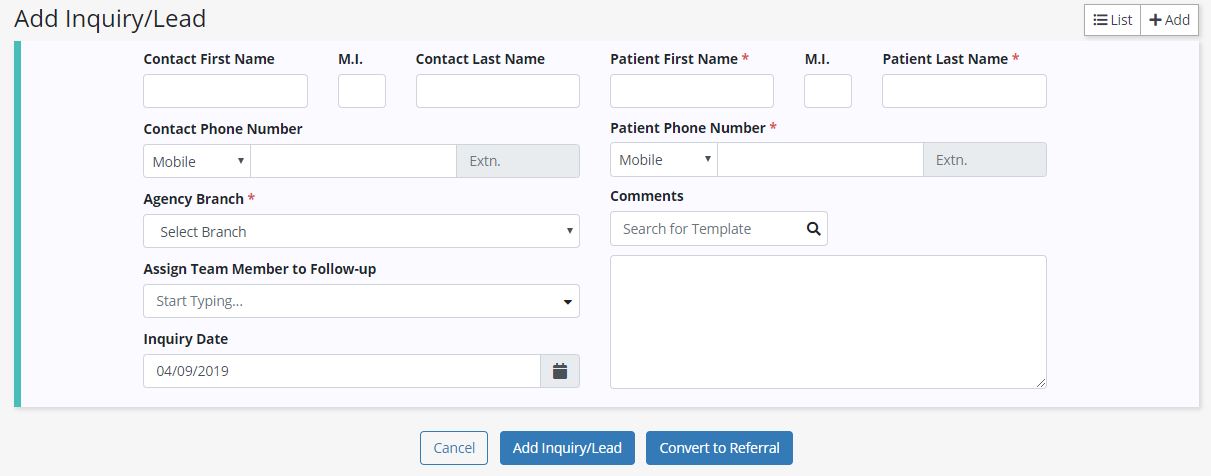
Enter the patient’s information in the Add Inquiry/Lead box. Fields with red asterisks* are required.
Once the appropriate fields are completed, finish by clicking the blue Add Inquiry/Lead button at the bottom.
You will be directed to the Inquiries List, where you can confirm that your inquiry/lead was added successfully.
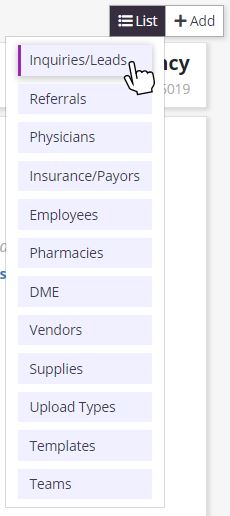
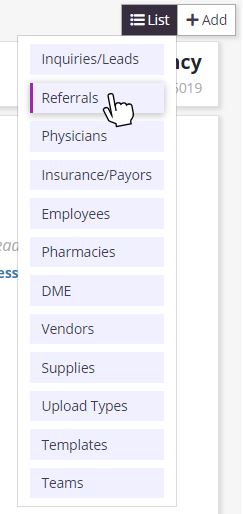
The Inquiries List can also be accessed by clicking the List menu that appears in the top right corner of any page in the system, and selecting Inquiries/Leads from the drop-down menu.
The Inquiries List screen allows you to add a new inquiry by clicking the blue Add Inquiry button in the top right corner of the screen.

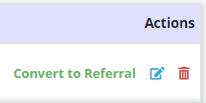
When enough information about a patient is obtained, the inquiry can be converted to a referral by clicking Convert to Referral on the right side of the Inquiries List under Actions.
The inquiry will be converted to a referral and added to the Referrals List in the system. The following information will flow from the inquiry to the referral:
Inquiries can also be edited or deleted using the icons in the Actions column of the Inquiries List.
A new patient should be entered through a referral when a physician order is provided for a potential patient and patient demographic data is available.
Add a referral by clicking the +Add button in the top right corner of any screen in the Axxess Hospice system.
Select Referral from the drop-down menu.
Enter the patient’s information in the referral form. Fields with red asterisks* are required.
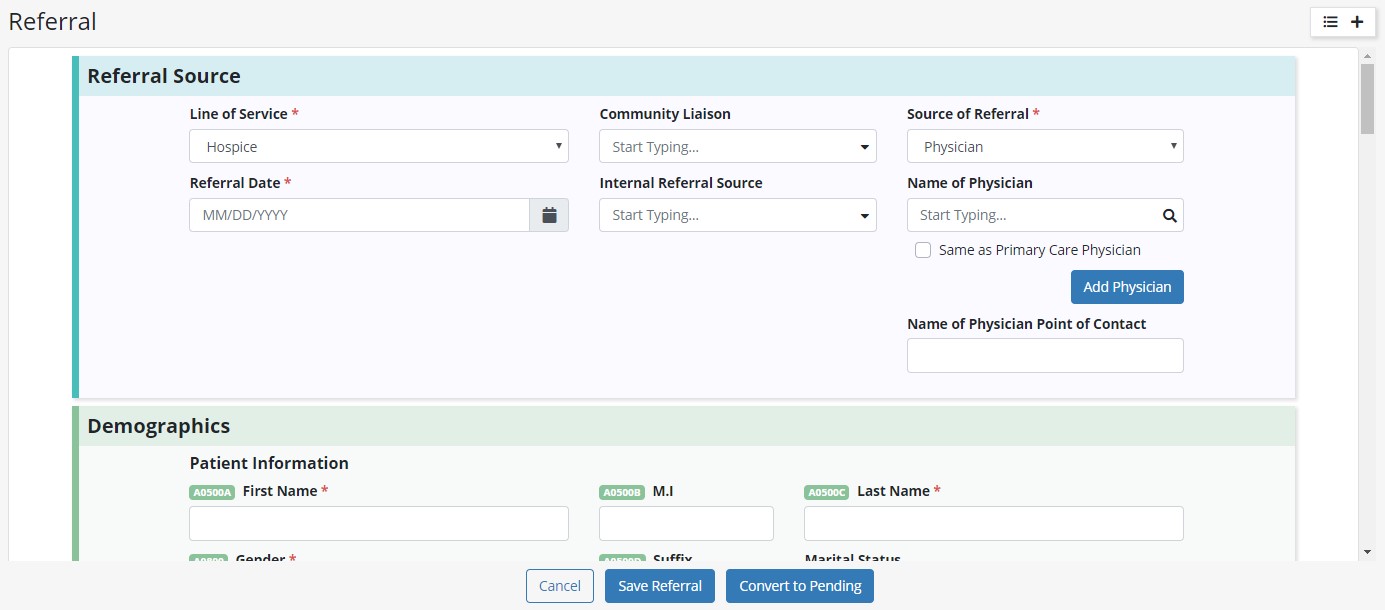
Information entered in the referral will flow to the Patient Profile. Hospice Item Set (HIS) demographic information appears in sage green with the HIS locator identifier to the left of the field name.

In the referral form, you can check the patient’s Medicare eligibility using the Medicare Eligibility Check feature in the Payer Information section. In this section, red x icons will display next to fields that have not been entered that are required to run an eligibility check.
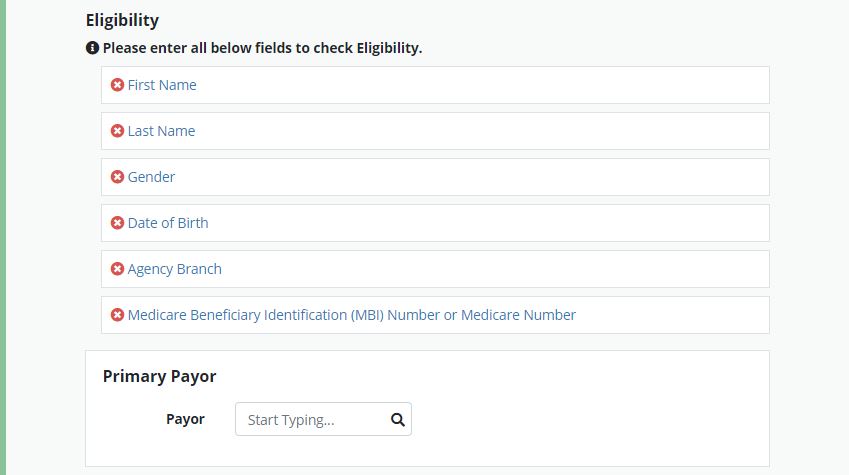
Once all the required fields are entered, a blue Check Eligibility button will appear.
Click the Check Eligibility button to generate a full Medicare eligibility report. Medicare eligibility can be checked once a day.

Once all appropriate fields in the referral form are completed, finish by clicking the blue Save Referral button at the bottom of the form.
Upon saving, you will be directed to the Referrals List.
At the top of the screen, a green pop-up box will confirm successful creation of the Referral.

All active referrals will display in the Referrals List. You can access this list by clicking the List menu that appears in the top right corner of all pages in Axxess Hospice and selecting Referrals from the drop-down menu.
Referrals can be edited, deleted or converted to pending in the Actions column of the Referrals List.
Once a decision has been made to admit a patient and an appointment is scheduled for admission, the patient’s referral should be converted to pending status.
Convert a referral to pending by selecting Convert to Pending in the Actions column of the Referrals List. The following fields are required to convert a referral to pending: Medical Record Number (MRN), Default Service Location, and Primary Payer.

You can also convert a referral to pending status immediately after entering/editing information in the referral, by clicking the blue Convert to Pending button at the bottom of the referral form.
![]()
When a referral is converted to pending status, a Patient Chart will generate. Information entered in the referral will flow to the Patient Chart.
View the Patient Chart by navigating to the Patients tab at the top of the screen and selecting Patient Charts from the drop-down menu.
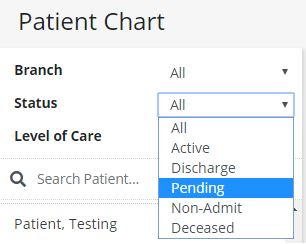
To locate a specific Patient Chart for a patient in pending status, select Pending in the Status filter drop-down menu. (The Status filter defaults to Active when the Patient Chart screen is opened, since most management of Patient Charts occurs for active patients.)
Once the Status filter is set to Pending or All, you can locate the Patient Chart using the Search feature. Click on the patient’s name to view the chart.
To add more information to the Patient Chart, select Edit Profile under the patient photo icon.
Information entered in the referral will auto-populate in the Patient Profile.
The Patient Profile is the source of information that flows to documents, Medication Profiles, Plans of Care and Physician Orders.

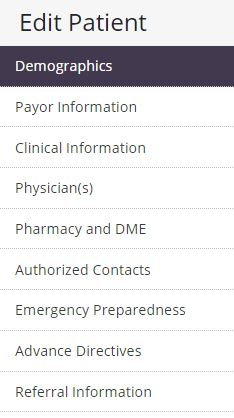
Navigate through the Patient Profile using the Next and Previous buttons at the bottom of the screen, or by selecting the desired tab on the left-side menu.
The Patient Profile includes the following tabs:
Several fields that are not required in the referral become required in the Patient Profile.
Fields that become required in the Patient Profile are listed below by section:
Demographics
Clinical Information
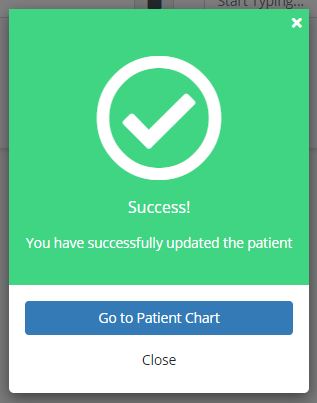
Once you’ve completed the required fields and entered any additional information in the Patient Profile, click Complete on the final screen.

A green pop-up notification will confirm that the Patient Profile was updated successfully. Click Go to Patient Chart to return to the chart.