As a part of the regulatory changes finalized in the CMS Final Rule for FY 2021, beginning October 1, hospice organizations must generate and deliver election statement addenda upon request of a hospice patient or their representative. To help organizations seamlessly comply with this ruling, Axxess Hospice now enables users to document notification of a patient’s or caregiver’s request for an addendum to the election statement.
This feature streamlines operations and facilitates compliance by enabling documentation updates and corrections that can be tracked and reviewed for auditing purposes.
To generate an election statement addendum, users must have permission to view and edit patient charts, visits and medication information.
To give a user permission to access the Non-Covered Items page in the addendum, navigate to the Permissions tab, and edit the user’s profile. In the Clinical section, select View and Edit next to the Patient Chart permission.
People tab ➜ People Center ➜ Edit ➜ Permissions tab ➜ Clinical section ➜ Patient Chart ➜ View/Edit

To give a user permission to document notification of the patient’s right to receive the Election Statement Addendum, navigate to the Permissions tab, and edit the user’s profile. In the Clinical section, select View and Edit next to the Visits permission.
People tab ➜ People Center ➜ Edit ➜ Permissions tab ➜ Clinical section ➜ Visits ➜ View/Edit

To give a user permission to document relatedness of items, services and medications, navigate to the Permissions tab, and edit the user’s profile. In the Clinical section, select View next to the Medication Profile permission.
People tab ➜ People Center ➜ Edit ➜ Permissions tab ➜ Clinical section ➜ Medication Profile ➜ View/Edit

Once the appropriate permissions are selected, click Save to finish granting the permissions to the user.
When completing an RN Initial Assessment or RN Initial/Comprehensive Assessment, users can now document review of the patient’s right to request notification of hospice non-covered items, services and drugs.
To document the review of these rights, navigate to the First Visit Interventions section in the assessment and select Hospice Coverage and Financial Responsibility. Select Reviewed Right to Request Patient Notification of Hospice Non-Covered Items, Services, and Drugs Addendum. Enter the information reviewed with the patient or caregiver.
Users can also document any additional interventions in this section, or organizations can add custom templates based on their policies and procedures.

Axxess Hospice enables users to document the relatedness of diagnoses, items, services and medications to the patient’s terminal diagnosis and related conditions.
Diagnoses are added in the patient chart on the Clinical Information tab. When a new diagnosis is added and a new terminal diagnosis is selected for the patient, select Yes or No from the Related drop-down menu to indicate if the diagnosis is related to the patient’s terminal diagnosis. If No is selected, document the rationale and any pertinent medical management information.

The relatedness status of a diagnosis can be updated at any time by selecting the edit icon next to the diagnosis. However, users still must have a physician order to add, resolve or update other details of a diagnosis.

DME is added in the patient chart on the Pharmacy and DME tab. When new DME is added, users can now select Yes or No from the Related drop-down menu to indicate if the DME is related to the patient’s terminal condition. If No is selected, document the rationale and any pertinent medical management information.

The relatedness status of DME can be updated at any time by selecting the edit icon next to the DME. However, users still must have a physician order to add, discontinue or update other details of DME.

Supplies are added in the patient chart on the Pharmacy and DME tab. When new supplies are added, users can now select Yes or No from the Related drop-down menu to indicate if the supplies are related to the patient’s terminal condition. If No is selected, document the rationale and any pertinent medical management information.

The relatedness status of supplies can be updated at any time by selecting the edit icon next to the supplies. However, users still must have a physician order to add, discontinue or update other details of supplies.

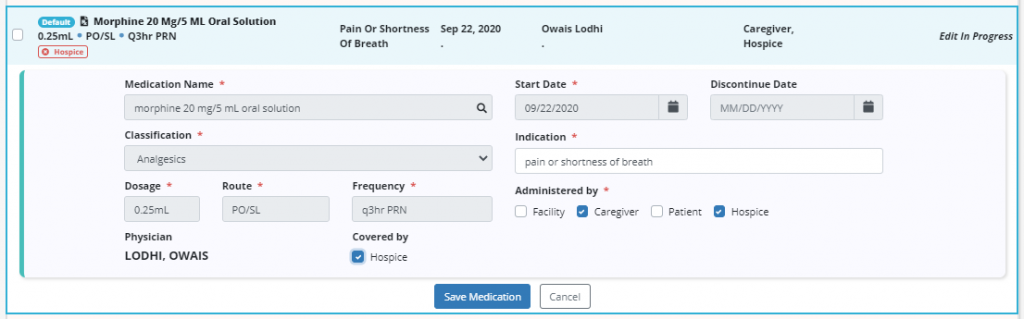
Medications are added in the Medication Profile. When new medications are added, users can now select whether a medication is covered by the organization or not in the Covered By section of the Add Medication form.
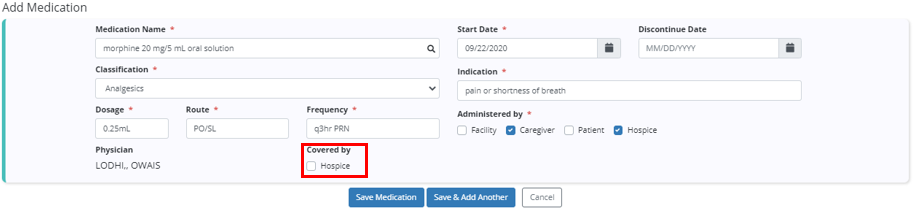
The Covered By status of a medication can be updated at any time by selecting Edit next to the desired medication. However, users still must have a physician order to add, discontinue or update other details of medications.
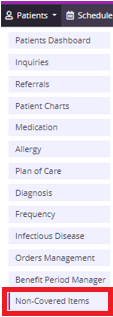
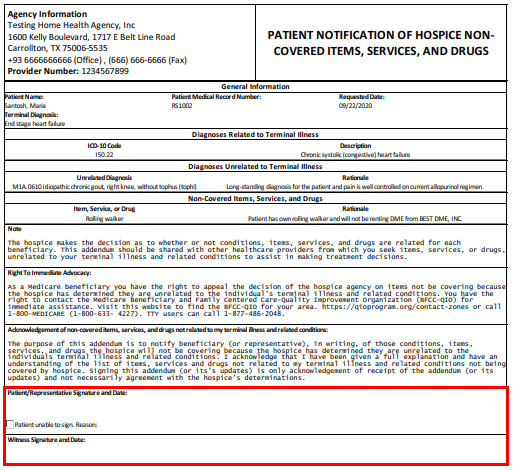
To generate a Patient Notification of Hospice Non-Covered Items, Services, and Drugs addendum, navigate to the Non-Covered Items page in the patient’s chart under Quick Links, or select Non-Covered Items under the Patients tab.

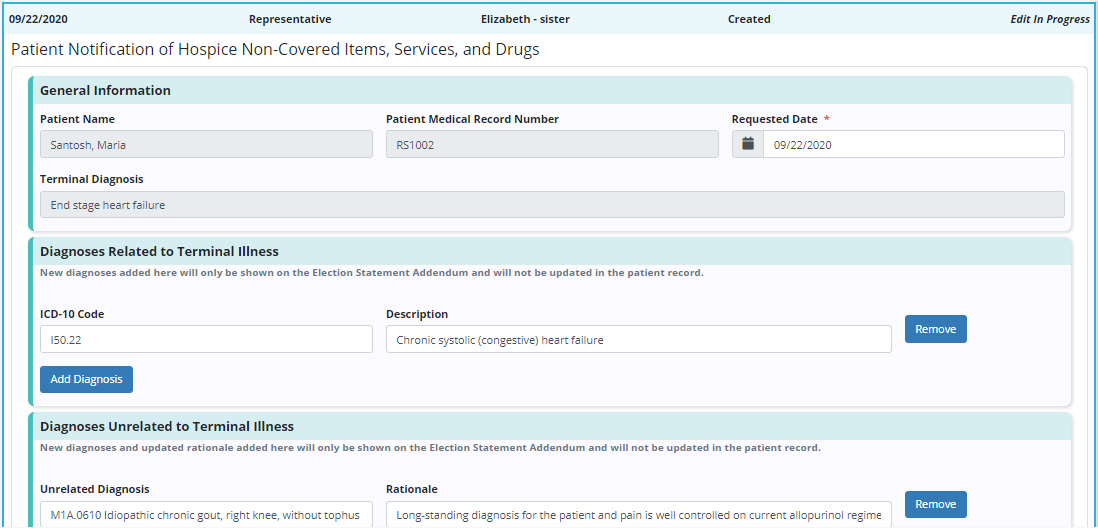
To add a new addendum, click Generate Addendum. Complete the Requested Date and Requested By fields, and enter the name of the requester in the Name field. If the patient is requesting the addendum, select Patient under Requested By. The patient’s name will automatically populate in the Name field. Once completed, click Generate Addendum to create the addendum.

Once created, the Patient Notification of Hospice Non-Covered Items, Services, and Drugs form will pre-populate with the following information:
| General Information | ||
| Diagnoses Related to the Terminal Illness | ||
| Diagnoses Unrelated to the Terminal Illness | ||
| Non-Covered Items, Services, and Drugs | ||
| Note | ||
| Right to Immediate Advocacy | ||
| Acknowledgement of non-covered items, services, and drugs not related to my terminal illness and related conditions |
To remove any changes made to the form, click Cancel. Click Save to save any changes, and click Complete to mark the form as ready to send to the patient/representative.
Once a form has been completed, it will appear in To Be Sent status. Select the print or download icon to print or save a copy of the form. Click the edit icon to make changes to the form, or click the delete icon to remove the form.
All forms generated for a patient will appear on the Non-Covered Items page.

When the form is printed or downloaded, a signature and date line will populate for the patient/representative and a witness, so that a signature can be collected at the time of the review.
Once the form has been printed and delivered to the requester, select Mark as Sent from the Actions column to update the status of the document to Delivered.
Updated on 9/22/2020
