The Physician Order document enables users to update Medications, Plan of Care Profiles, Discipline Visit Frequencies, Diet, Activity, Level of Care, Diagnoses, DME, and Supplies while updating the Comprehensive Plan of Care in one step. All Physician Order updates will automatically show on the IDG Summary/Comprehensive Assessment Update, so IDG members can review all Plan of Care updates during team meetings.
Physician Orders can be created in multiple ways:
1. Plan of Care Review
Select the Add Orders button in the Plan of Care Review section of any clinical document (except Hospice Aide and Volunteer documents).
Clinical document➜ Summary tab➜ Plan of Care Review section➜ Add Orders

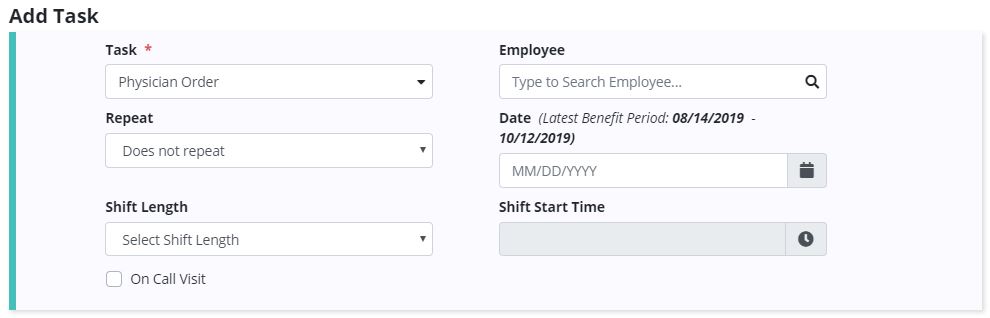
2. Patient/Employee Schedule
Physician Orders can also be scheduled from the Patient Schedule and Employee Schedule screens.
Schedule tab➜ Patient Schedule or Employee Schedule➜ Add Task➜ Physician Order in Task drop-down menu
3. Patient Profile, Plan of Care Profile, or Medication Profile
Physician Orders can be created in the Patient Profile, Plan of Care Profile and Medication Profile.
Plan of Care Profile➜ Update Plan of Care➜ New Physician Order➜ Create


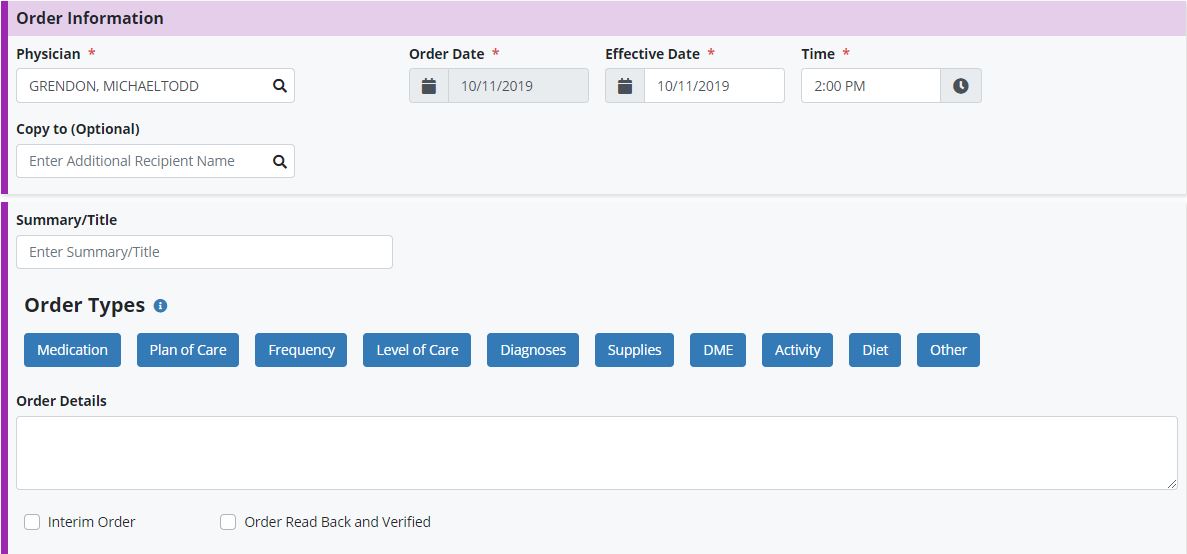
The following fields appear in the Order Information section of the Physician Order:
| Physician: The Attending Physician’s name automatically populates in this field, but can be changed to any physician on the Physicians list. |
| Copy to (Optional): If any other physicians need to receive the order, enter their names here. Any physician on the Physicians list can be added. |
Order Date: This field is not editable.
|
| Effective Date: The current date automatically populates in this field. If you want to order to start on another date, enter the desired date here. |
| Time: Enter the time the order was received. |
Under the Order Information section, users can enter a summary or title in the Summary/Title text box.
Accessing Order Types from the Physician Order:
In the Order Types section of the Physician Order, buttons direct the user to editable forms of each section in the Patient Profile and Chart.
The Plan of Care Profile is updated through the Physician Order. The editable format is accessed through a Physician Order that is either scheduled or created from the Add Orders button in a clinical document.Select the Add Orders button and select Plan of Care.
Add Orders button➜ Plan of Care button or Plan of Care Profile➜ Update Plan of Care button
Once you select Update Plan of Care, you will be prompted to add a new Physician Order or use a Physician Order that is already open for the patient.
To create a new Physician Order, select Create next to New Physician Order, and enter a date for the new Physician Order.
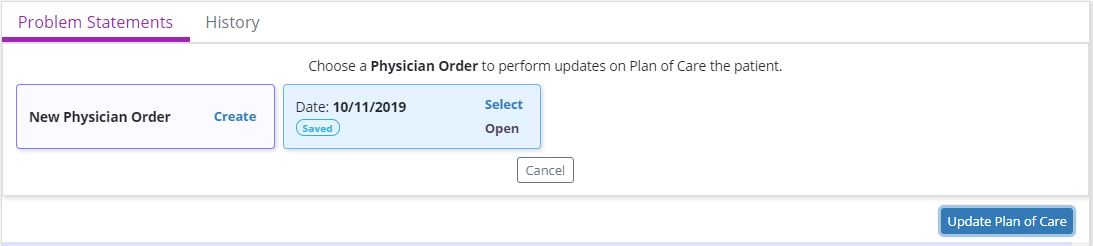
Once you have either created a new Physician Order or selected an existing Physician Order to link the Plan of Care Profile changes, a confirmation message will reflect the selected order.

Once the Plan of Care Profile is in the editable format, you will see the following buttons:
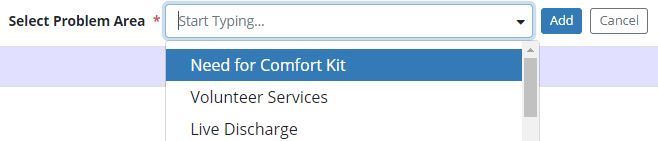
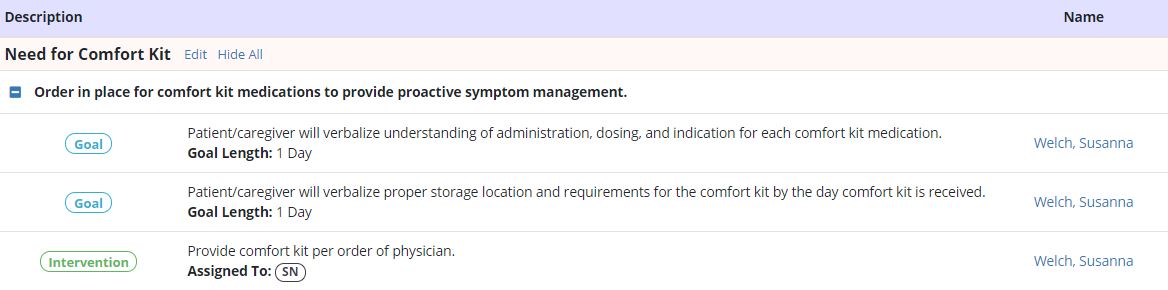
To add a problem area to the Plan of Care Profile, select Add Problem. Select a problem area from the Select Problem Area drop-down menu and click Add.
In the Plan of Care Orders screen that opens, select a problem statement and enter goals and interventions.
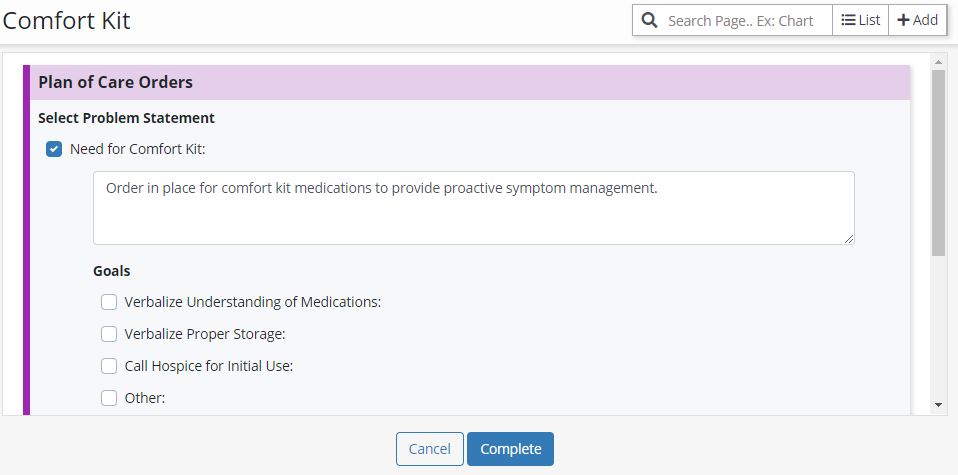
Text identified by **double asterisks** needs to be replaced by individualized patient information to customize the Plan of Care. All problem statements, goals, and interventions are editable, so you can make the Plan of Care Profile specific to individual patient and family needs.
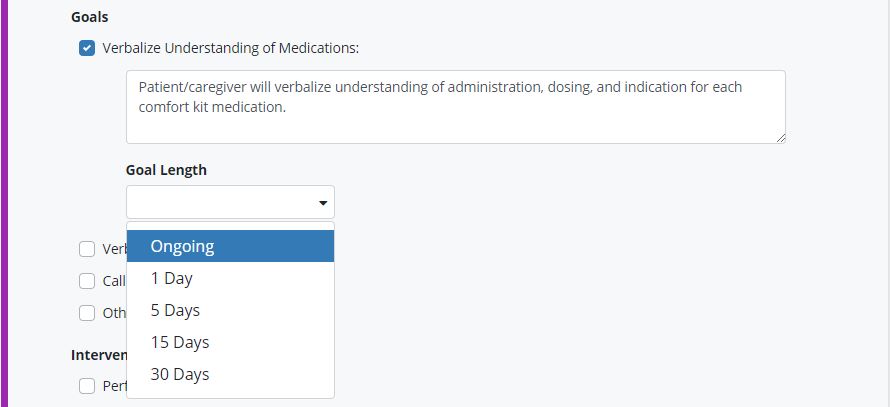
Under each selected goal, identify a length by selecting from the following options in the Goal Length drop-down menu:
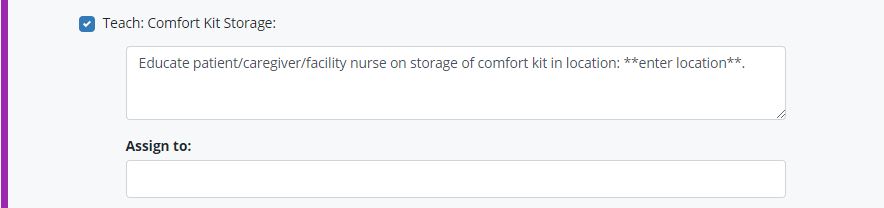
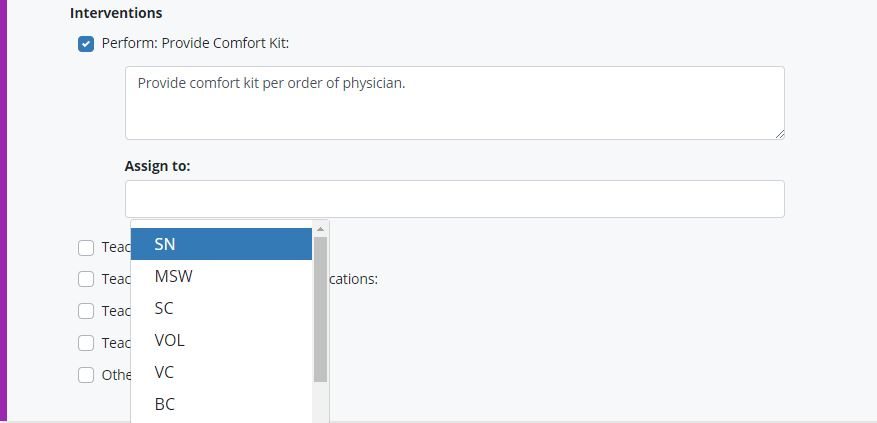
When entering interventions for the goal, identify which discipline is responsible for completing the intervention by selecting one of the following options from the Assign to: drop-down menu:
| SN: Skilled Nurse |
| MSW: Medical Social Worker |
| SC: Spiritual Counselor |
| VOL: Volunteer |
| VC: Volunteer Coordinator |
| BC: Bereavement Counselor |
| HA: Hospice Aide |
| Patient |
| Caregiver |
| Facility Staff |
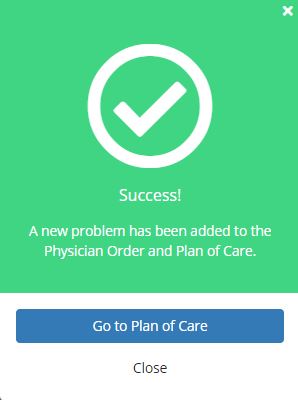
Once you have entered the problem statement, goals, and interventions for the problem area, click Complete at the bottom of the page. The problem statement, goals, and interventions will update in the Plan of Care Profile and flow to the Physician Order. A green success message will confirm that the problem was successfully added.
To discontinue interventions and resolve goals, select Update Problem Statements on the Plan of Care Profile screen.
Select an existing Physician Order or create a new Physician order to make changes to the patient’s Plan of Care.
The Plan of Care Profile will open to display problem statements, goals, and interventions.
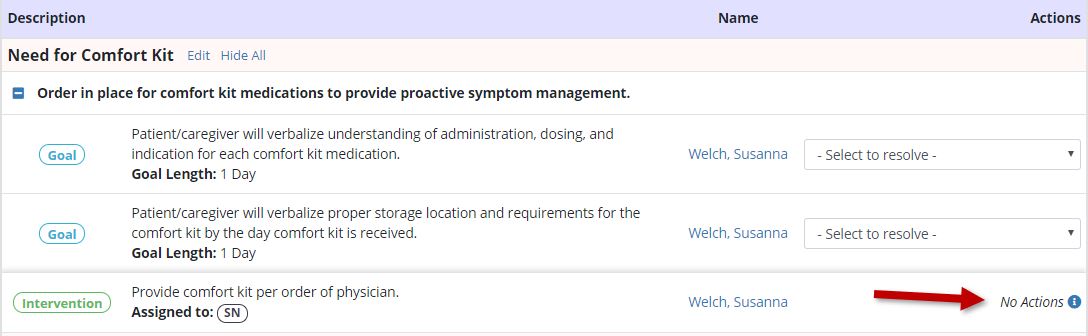
To resolve a goal, select one of the following options from the Select to resolve drop-down menu:
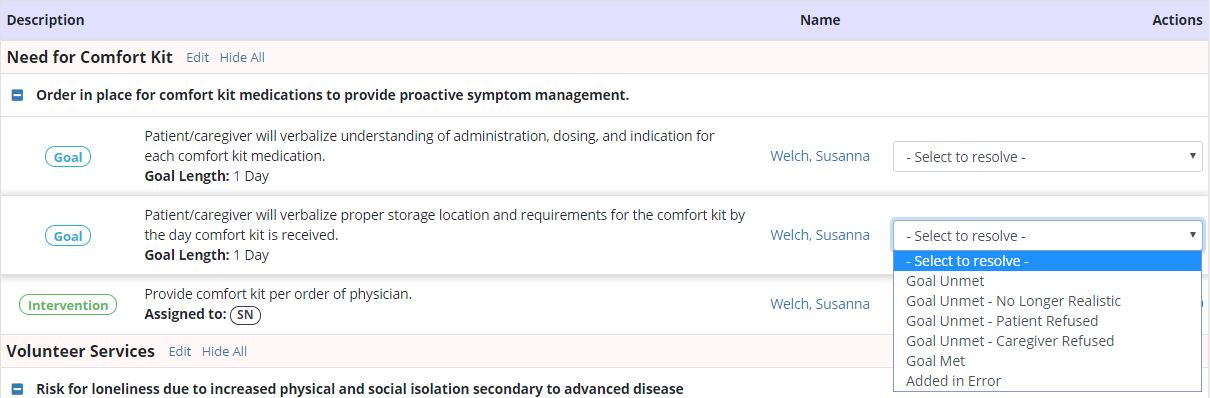
To discontinue an intervention, select Discontinue in the Actions column next to the intervention.
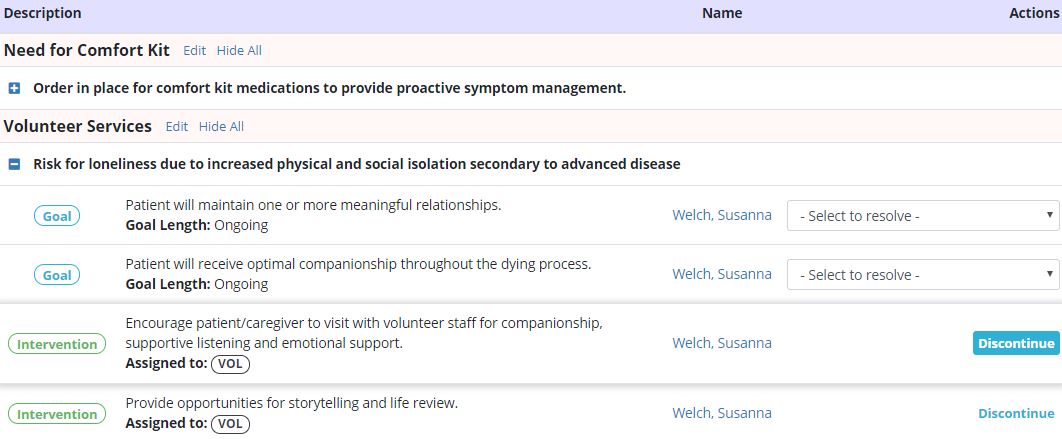
The intervention will be labeled as Marked to Discontinue. If you do not want the intervention discontinued, select Cancel.

If there is only one intervention associated with a goal, you will not have the option to discontinue the intervention, since all goals require at least one intervention. No Actions will appear in the Actions column.
If you resolve a problem statement’s only goal, the problem statement and all associated interventions will be marked as discontinued, since an intervention cannot exist without an associated goal.
Click Save in the top right corner once you have finished resolving the desired goals and making the necessary updates. The number of problem statements, goals, and interventions impacted by your changes will appear in the Save button. Select Cancel to cancel the actions.
Once you select Save, a green confirmation message will confirm that the changes have been applied. Updates to the problem statement, goals, and interventions will flow to the Plan of Care Profile and Physician Order.

Edit Existing Problems, Goals, and Interventions:
To add new goals and interventions to an existing problem area, select Edit next to the problem area description in the Plan of Care Profile.

Once the Physician Order is complete, changes made to the Plan of Care Profile will be visible in the Plan of Care Profile and the Comprehensive Plan of Care.
The level of care can only be updated from the Physician Order. To update the level of care, select the Level of Care button in the Physician Order and select the level of care you want to order for the patient.

Once the Physician Order is complete, the new level of care will appear in the Patient Chart header and replace the previous level of care on the Comprehensive Plan of Care.
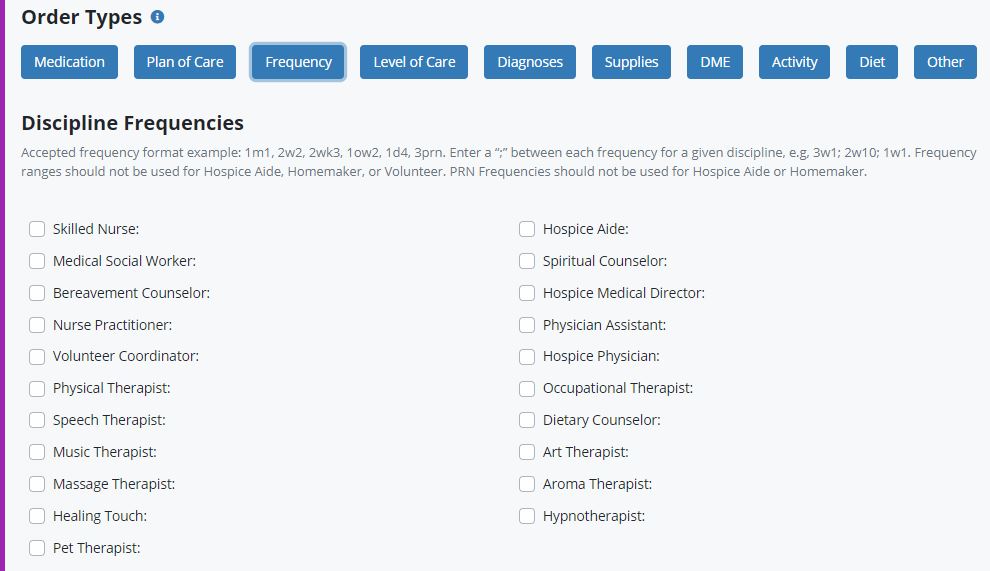
Visit frequencies are updated from the Physician Order to ensure that all discipline frequencies occur in a corresponding order. To update a visit frequency, select the Frequency button in the Physician Order.

The patient’s frequency profile will display the discipline, visit frequency, PRN status, start date, and end date for each of the patient’s active and discontinued frequencies.
To add a new frequency, click the Add Frequencies button and document the discipline, visit frequency, start date and PRN status. Select the discipline and enter a frequency using the format examples in the instructional text. Select a start date for the frequency order to begin and select Yes or No to identify whether the frequency is a PRN frequency. Selecting Yes under PRN will prompt you to enter a reason for ordering PRN visits.
Actions for existing frequencies include Discontinue, Discontinue and Copy, and Copy.
Selecting Discontinue will prompt you to enter a date for the frequency to discontinue. If you select Discontinue by mistake, click Cancel and the frequency will not be discontinued.

Selecting Discontinue and Copy will enable you to discontinue an old frequency and copy its details to apply to a new frequency. Once selected, you will be prompted to enter a date for the old frequency to discontinue. The frequency details will copy to the new frequency, and you can update any of the frequency details to create the new frequency.
The Copy action enables discontinued frequencies to be restarted. Select Copy and enter a start date for the frequency to restart. Visit details from the discontinued frequency will populate. Adjust the visit details as needed and click Save.
The Frequency Profile can also be accessed from the Patients tab at the top of the screen and from the Actions menu in the Patient Chart.
Patients tab➜ Patient Charts➜ Actions➜ Frequency Profile
Patients tab➜ Frequency Profile

To update a patient’s diagnoses, navigate to the Physician Order by selecting Add Orders in a clinical document. In the Physician Order, select the Diagnoses button.
Diagnoses can also be updated through the Patient Chart:
In the Patient Chart, select Edit Profile from the Actions menu. Navigate to the Clinical Information tab and click the Update Diagnoses button on the right side.
Patients tab ➜ Patient Charts ➜ Edit Profile ➜ Clinical Information tab ➜ Update Diagnoses
Select or create a Physician Order to link diagnoses updates. Once a Physician Order is selected, update the patient’s diagnoses as needed. Refer to the Diagnoses Documentation page for details on updating diagnoses.
Diagnoses updates will flow from the patient’s profile to the Comprehensive Plan of Care.
To update supplies, navigate to the Physician Order by selecting Add Orders in a clinical document. In the Physician Order, click the Supplies button under Order Types.

Supplies can also be updated through the Patient Chart:
In the Patient Chart, select Edit Profile from the Actions menu. Navigate to the Pharmacy and DME tab and click the Update Supplies button on the right side.
Patients tab ➜ Patient Charts ➜ Edit Profile ➜ Pharmacy and DME tab ➜ Update Supplies
Select or create a Physician Order to link supplies updates. Once a Physician Order is selected, update the patient’s supplies as needed.
To add a new supply, start typing in the Select Supply field and select the desired supply in the drop-down menu. Supplies in your agency’s Supply List will appear in this menu for selection. If the supply you’re looking for does not appear in this menu, contact an administrator to request that s/he add the supply to the Supply List.

Once a supply has been selected, enter the Start Date and click Save.
To discontinue a supply, click the edit icon under Actions in the patient’s profile. Enter an End Date and click Save.
Supplies updates completed in the patient’s profile will flow to the Comprehensive Plan of Care.
To update DME, navigate to the Physician Order by selecting Add Orders in a clinical document. In the Physician Order, select the DME button.
DME can also be updated through the Patient Chart:
In the Patient Chart, select Edit Profile from the Actions menu. Navigate to the Pharmacy and DME tab and click the Update DME button on the right side.
Patients tab ➜ Patient Charts ➜ Edit Profile ➜ Pharmacy and DME tab ➜ Update DME
Select or create a Physician Order to link DME updates. Once a Physician Order is selected, update the patient’s DME as needed.
To add a new DME, start typing in the Select DME field and select the desired DME in the drop-down menu. DME in your agency’s DME List will appear in this menu for selection. If the DME you’re looking for does not appear in this menu, contact an agency administrator to request that s/he add it to the DME List.
Once a DME has been selected, enter the Start Date and click Save.
To discontinue DME, click the edit icon under Actions in the patient’s profile. Enter an End Date and click Save.
DME updates completed in the patient’s profile will generate in the DME section of the Physician Order in read-only format, and flow to the Comprehensive Plan of Care.
Activity orders can only be updated directly through a Physician Order document. Access the Physician Order by clicking the Add Orders button in the Plan of Care Review section of a clinical document, or by scheduling a Physician Order in the Schedule Center. In the Physician Order, select the Activity button under Order Types.
Under Activity Order, select the desired activity.

Once the Physician Order is complete, the new activity order will replace the previous activity order on the Comprehensive Plan of Care.
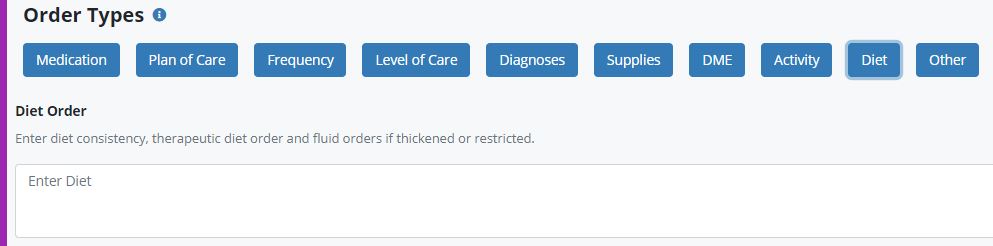
Diet orders can only be updated directly through a Physician Order document. Access the Physician Order by clicking the Add Orders button in the Plan of Care Review section of a clinical document, or by scheduling a Physician Order in the Schedule Center. In the Physician Order, select the Diet button under Order Types.
Enter details of the diet order in the text box under Diet Order.
Once the Physician Order is complete, the new diet order will replace the previous diet order on the Comprehensive Plan of Care.
To update orders that do not fall into any of the above categories, such as a discharge order for a live discharge patient, select the Other button under Order Types in the Physician Order.
Enter details of the order in the text box under Other Order.
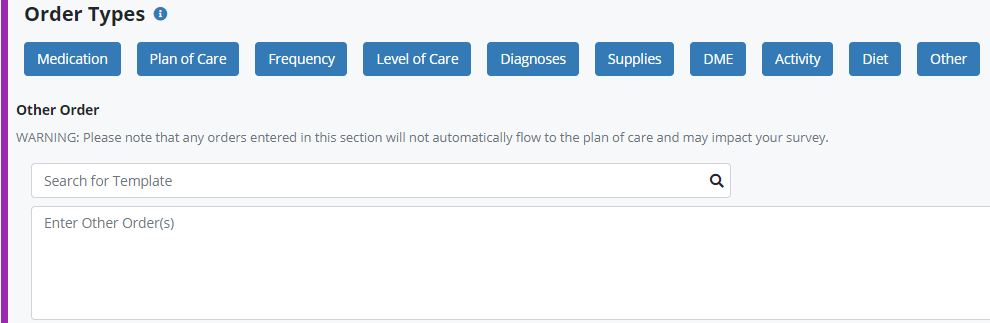
**Orders entered under the Other category will not flow the Comprehensive Plan of Care, and may increase your agency’s risk of survey deficiency. Most orders can be entered using one of the order types provided in the Physician Order document.
To complete the Physician Order, check the box next to Order Read Back and Verified.

Click Complete to finish entering orders. Click Save to save your work and return to later to finish entering orders. Click Cancel to erase any changes that were made prior to the last save.

