Axxess Hospice now enables users to manually update patient statuses. This functionality gives hospice agencies control and flexibility to manage patient information seamlessly and according to operational needs.
By maintaining current and accurate patient documentation, agencies can sustain a more seamless workflow and streamline processes for optimal patient care.
With these enhancements, Axxess Hospice users can make any of the following patient status updates:
| Referral to Non-Admitted Status | |
| Pending to Non-Admitted Status | |
| Active to Discharged Status | |
| Active to Deceased to Status | |
| Discharged to Referral Status |
To update a referral to a non-admit, navigate to the Referrals list under the lists menu or Patients tab. On the Referrals screen, select Non-Admit under Actions to update the patient’s status to Non-Admitted.

Enter the non-admit date and reason, and click Non-Admit to move the patient to Non-Admitted status. Click Cancel to discard the status update and keep the patient on the Referrals list.

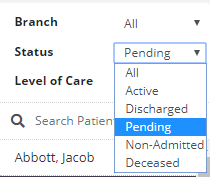
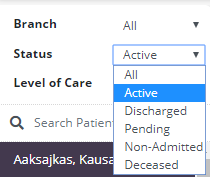
To view patients in Non-Admitted status, navigate to the Patient Charts under the Patients tab. In the Status filter, select Non-Admitted.
To access the Non-Admit by Reason report, navigate to the Report Center under the Reports tab. In the Patient Reports section, select Non-Admit by Reason.
To mark a pending patient as non-admitted, navigate to the Patient Charts under the Patients tab and select Pending from the Status filter.
Click the edit icon next to the patient’s status under the patient’s photo.
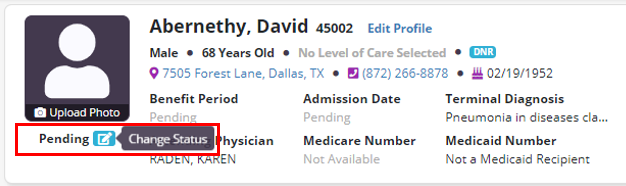
Select Non-Admitted and enter the non-admit date and reason.

To view patients in Non-Admitted status, navigate to the Patient Charts from the Patients tab and select Non-Admitted from the Status filter. To view the Non-Admit by Reason report, navigate to the Report Center under the Reports tab. In the Patient Reports section, select Non-Admit by Reason.
To mark an active patient as discharged, navigate to the Patient Charts from the Patients tab and select Active in the Status filter.

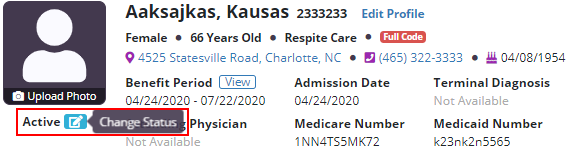
Click the edit icon next to the patient’s status under the patient’s photo.
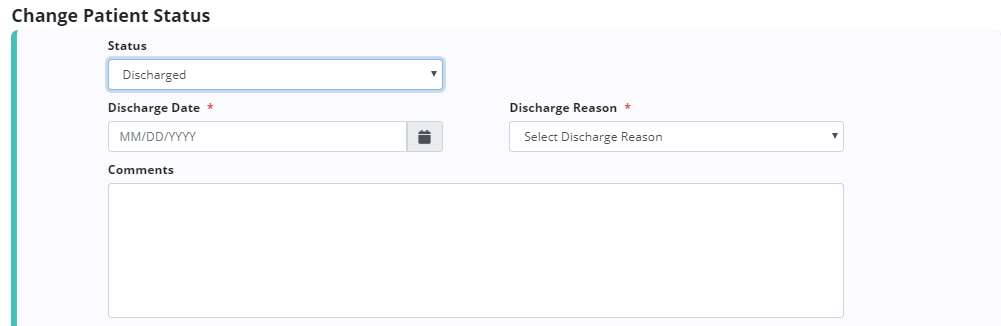
Select Discharged and document the discharge date and discharge reason. Enter any comments as needed.
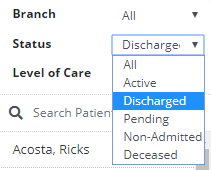
To view patients in Discharged status, navigate to the Patient Charts from the Patients menu and select Discharged from the Status filter. To view the Discharged Patients by Reason report, navigate to the Report Center under the Reports tab.
Note: When a Discharge Visit or Unattended Discharge Note is completed for a patient, the patient’s status will automatically be updated to Discharged.
To mark an active patient as deceased, navigate to the Patient Charts from the Patients tab and select Active from the Status filter.
Click the edit icon next to the patient’s status under the patient’s photo.

Select Deceased and document the date of death, time of death, and time of last breath.

Patients in Deceased status can be viewed by navigating to the Patient Charts from the Patients tab and selecting Deceased from the Status filter. The Deceased Patients report can also be found in the Report Center.
Note: When a Death Visit or Unattended Death Note is completed for a patient, the patient’s status will automatically be updated to Deceased.
Patients who have been discharged from an agency can now be readmitted. To readmit a discharged patient, navigate to the Patient Charts under the Patients tab and select Discharged from the Status filter.
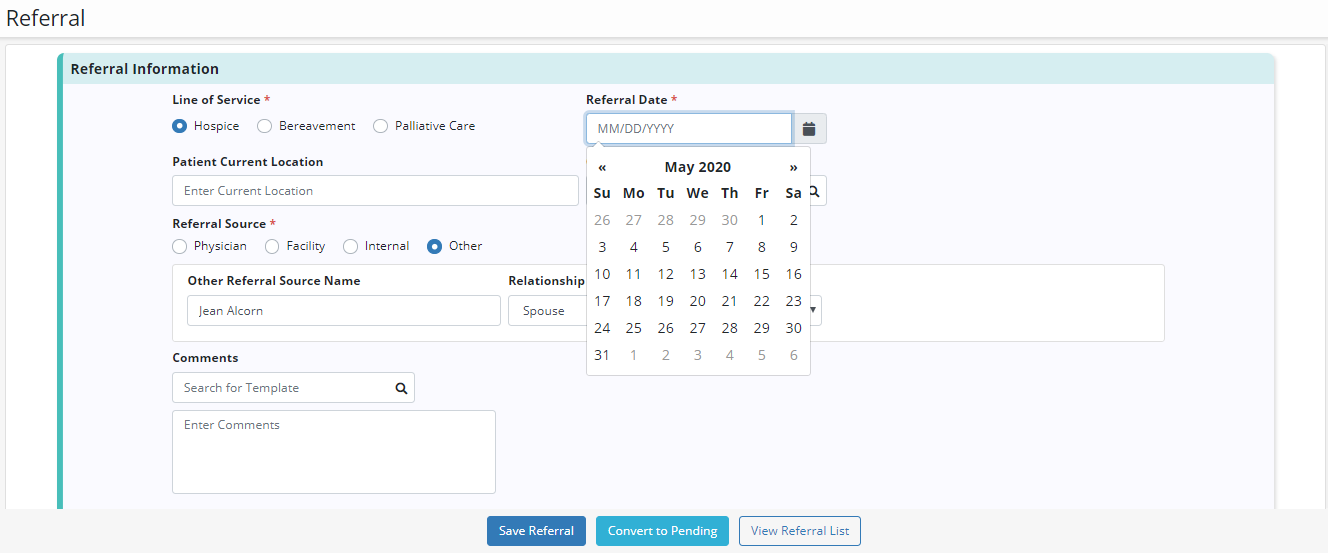
In the patient’s chart, click Add Referral to create a new referral for the patient.

The patient’s previously documented information will automatically populate in the Referral window. Verify the existing information for accuracy and enter the patient’s updated information. A new referral date and admission information are required.
Once all referral information is documented, click Save Referral to add the patient to the Referrals list. Select Convert to Pending to move the patient to Pending status and schedule an admission visit. Select Cancel to cancel the new referral and return to the Patient Charts screen.
Updated on 5/21/2020
