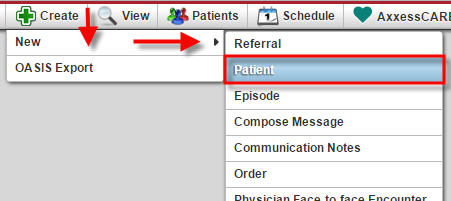
 One way to enter a new patient in Axxess Home Health is to fill out a New Patient Form. Locate the New Patient Form by navigating to the Create tab choosing New, and Patient.
You will be taken to the New Patient Form.
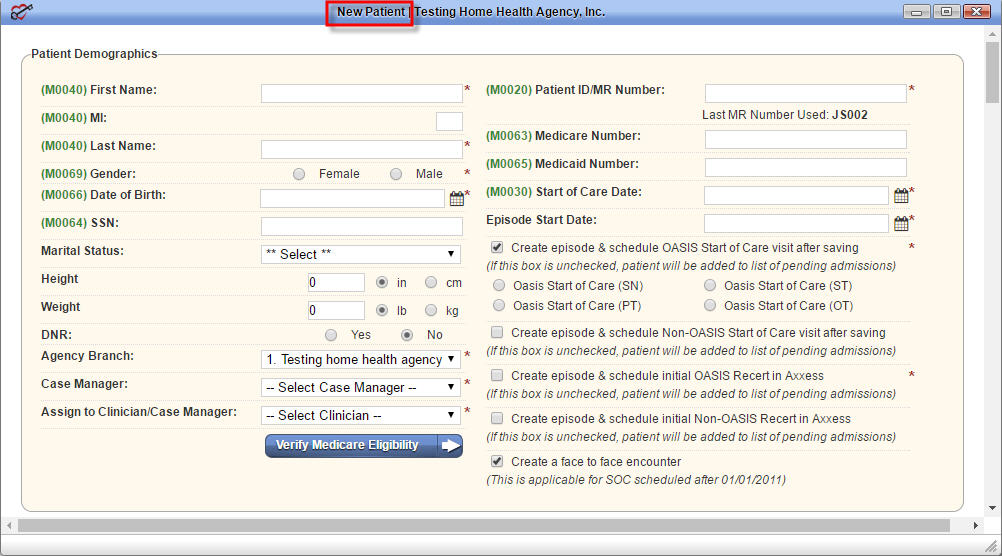
All fields that require completion to save a New Patient are indicated with a red asterisk. These will be the minimum of fields you need to complete.
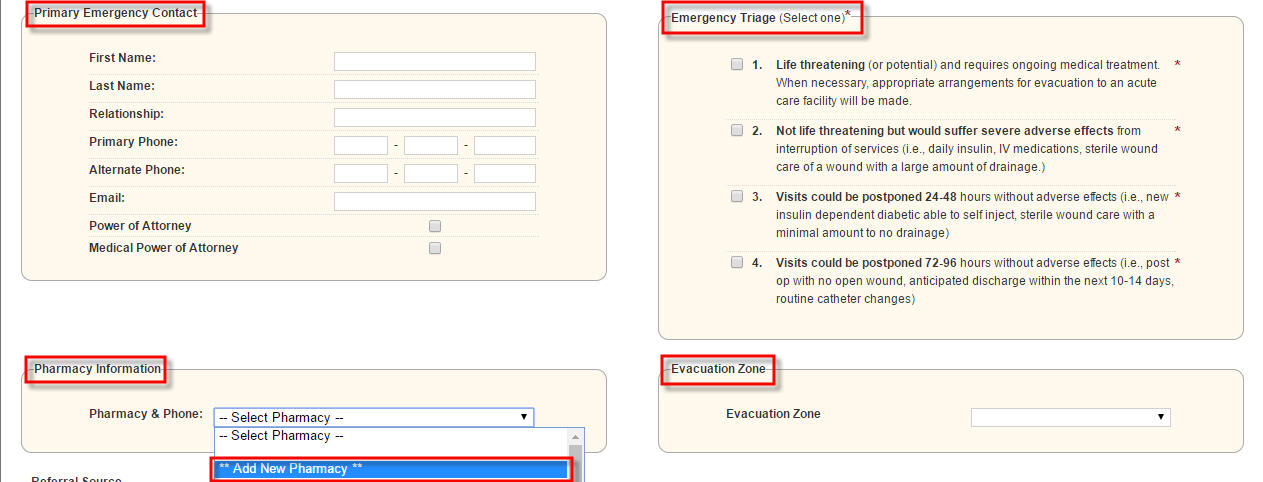
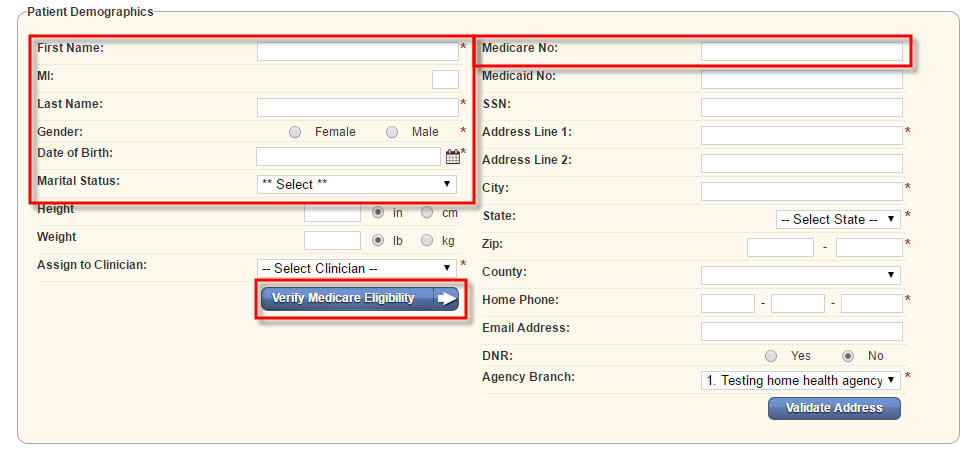
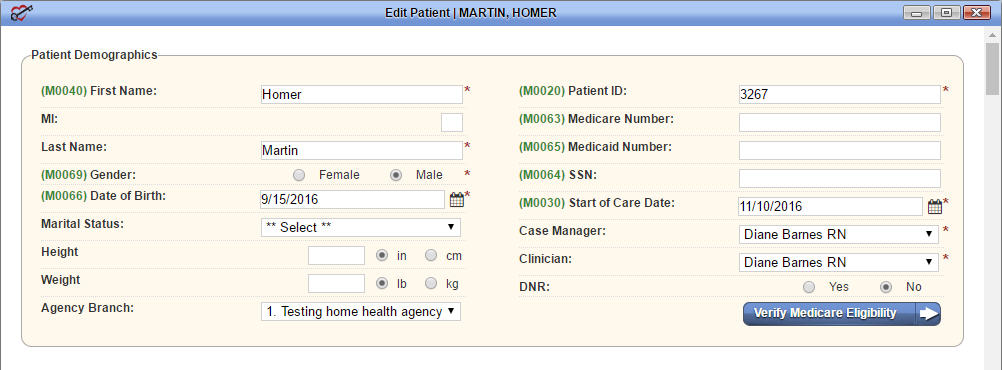
The first section of a New Patient file is Patient Demographics. The required fields within this section are:
Medicare Patients:
A patient’s Medicare number is not required to create a patient. If the patient has Medicare as a payor source, the Medicare number may be entered along with the patient’s first/last name, DOB, and gender. Medicare eligibility can then be instantly checked!
To check Medicare eligibility, you can click on the Verify Medicare Eligibility button. Once selected, a screen will pop up with the return eligibility information displayed. The screen will contain the effective dates of the patient’s part A and B coverage as well as any other agencies or insurances involved. If no other insurance or agency is involved, you will only see the Medicare part A and B information.
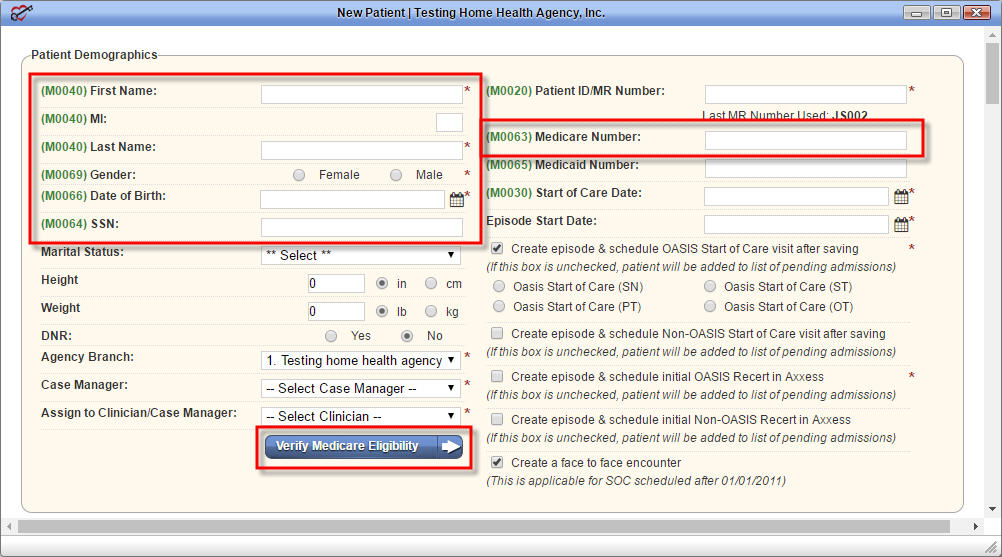
 The last area under Patient Demographics that we will highlight are the following two statements:
Both of these statements are defaulted with a check mark. You have the option to deselect the defaulted selections or select to Create Episode & Schedule Non-OASIS Start of Care Visit after saving.
The Create Episode and Schedule Start of Care Visit after saving option will automatically create a patient episode matching the Episode Start Date as well as create an SOC visit with the staff member indicated in the Assign to Clinician/Case Manager field. As noted below the statement, “(If this box is unchecked, patient will be added to list of pending admissions.)” The Home Health solution allows adjustment of the date if the SOC changes.
The Create face to face encounter will create an order task to send to the physician for signature. It is recommended to keep this statement checked for your Medicare and other patients with a payor source requiring a face to face encounter. You can deselect this statement when payors do not require face to face documentation.
Scrolling down the screen, the next three sections are:


Continuing through the form, you have:

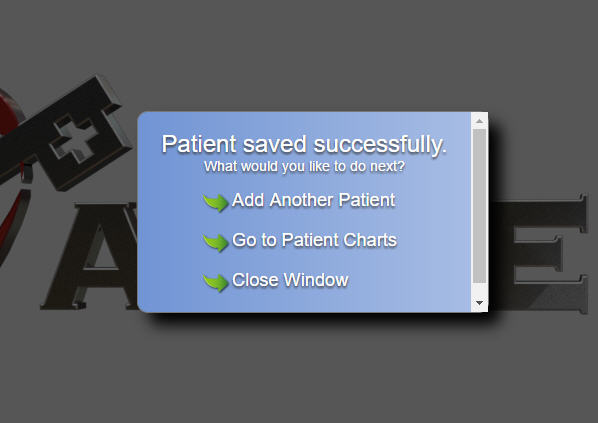
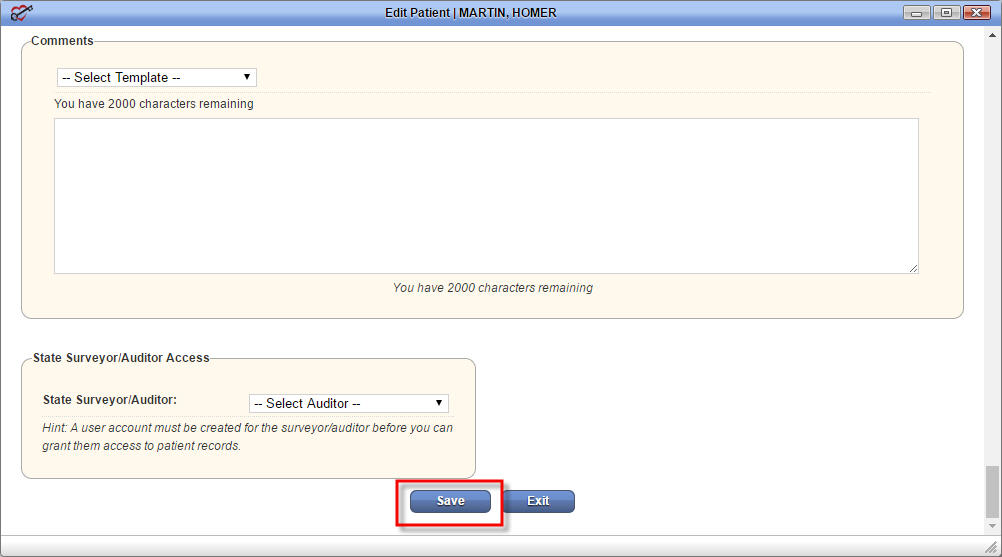
After all required information is entered into the New Patient form you have three selection options: Save the Patient Information, Admit or Cancel.
 When selecting the Save option, the patient moves to a Pending Admission status. The Start of Care visit and Episode are not created.
The Pending Admission will now be located under the Patients tab and Pending Admissions. This feature can be utilized to track upcoming pending admissions, and used to easily admit a patient when ready to schedule the Start of Care.
 When a user selects to Admit Patient from the new patient form, the Home Health solution will schedule the Start of Care visit on the indicated Start of Care Date. The clinician assigned to the Start of Care visit will have the patient on his/her My Scheduled Task.
Once you admit the patient, you will see a notification that the patient was saved successfully! The patient is now located under the Active patient list, and the OASIS has been assigned to the clinician’s scheduled task.
 The last option is to Cancel. Selecting this option will close the screen without saving the information.
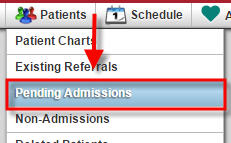 When you are ready to Admit a saved patient, you can do so from the Pending Admissions list. Go to the Patients tab and choose Pending Admissions.
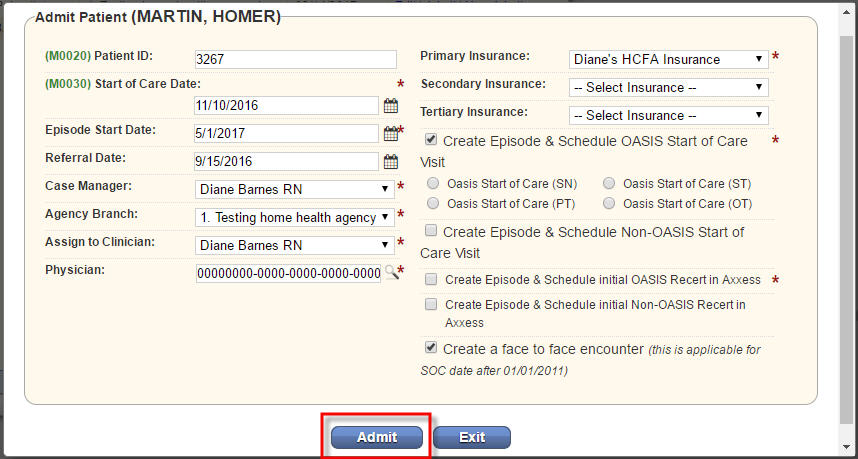
Select, Admit for the patient you wish to admit. Verify the information, update the Start of Care Date, and then select Admit.

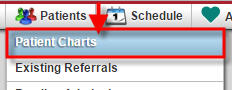
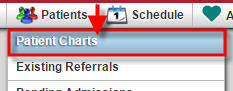 To locate an admitted patient, navigate to the Patients tab and choose Patient Charts.
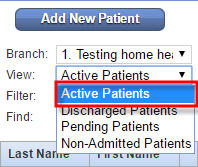
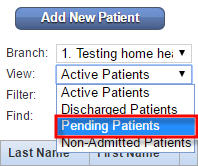
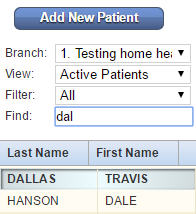 On the left side of the Patient Charts, find the search filters. You can filter by: Branch or by patient name. If an agency has multiple branches, filtering by Branch can be useful to select the branch of the patient you are looking for. You can also view various patient status’ (Active, Discharged, Pending, and Non-admitted patients). Filter by payor if you know the insurance your patient uses or simply search by first or last name. As soon as you start typing the letters of the name, the software will begin auto-populating a list of names. Select the patient’s name from the list to view his/her chart.
You have two options to add a patient into the Home Health solution. The path you choose will depend on information you receive at time of referral as well as by the processes your agency follows.
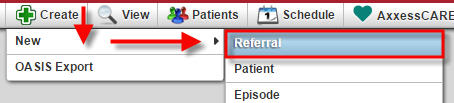 To add a new patient in as a Referral, start by choosing the Create tab, choose New, and Referral.

Throughout the Home Health solution, field items that require completion to save the document to the database are indicated by a red asterisk to the right of the field.
Required fields in the Referral Source and Demographics section include:
If your agency tracks referral sources and it happens to be a physician that referred the patient, the intake staff may add the physician to the referral form.
If the physician is not found, you have the ability to add a New Physician right from the new referral screen. See Physician Information for further instruction on adding a new physician into the software
Medicare Patients:
You will notice that the Medicare number is not required when entering a new referral. This is due to the fact that not all patients will have Medicare as a payer source. However, if Medicare is the payer source, the Home Health solution allows for entry of the Medicare number at this point and the ability to instantly check patient eligibility.
Medicare Eligibility:
To check Medicare eligibility, enter the patient’s first name, last name, DOB, gender, and the Medicare number. Now click on the Verify Medicare Eligibility button. Once selected a pop up box with the return eligibility information will display. This box will contain the effective dates of the patient’s part A and B coverage as well as any other agencies or insurances involved.
The lower half of the referral information page allows you to indicate services requested by the referring doctor; any DME equipment needed; Primary Physician information (this is the doctor that will sign the 485), which may or may not be different than the referring physician. An example of differing referral and primary physicians occurs in many instances when a patient is discharged from a hospital. The initial verbal order for start of care order and other comments may be entered in the comments section.
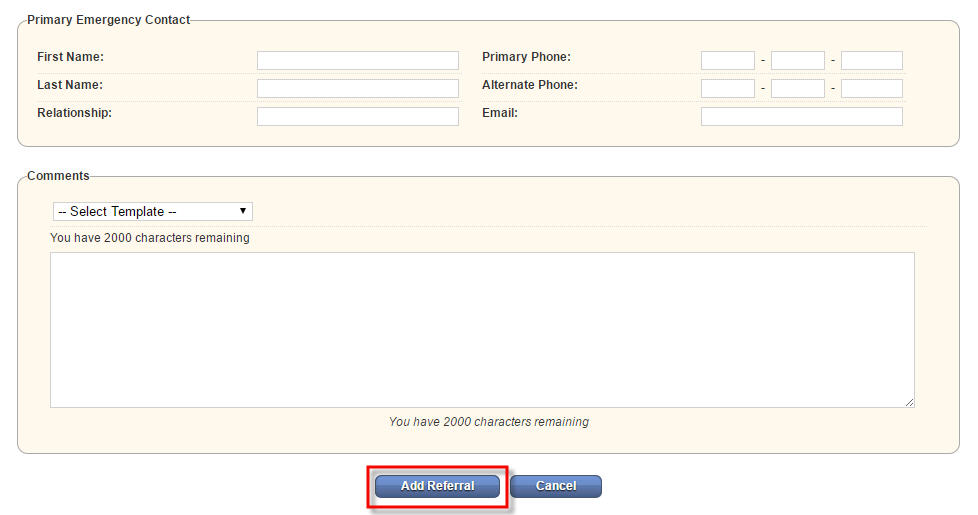
Once all the required fields and any additional information is entered the user selects Add Referral and the referral is saved. All of the information entered on the Referral form will transfer onto the New Patient form, after selecting the patient to admit under the existing referrals section.
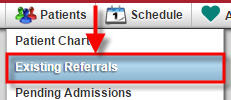 Your referral will now be located under the Patient tab and Existing Referrals.
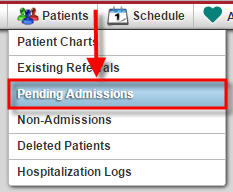
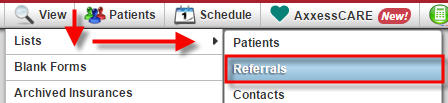 The Home Health solution has provided several places where a patient’s status may be updated to Non-admission. The first place to make a patient a non-admit is while the patient is still in either Referral or Pending Admission status. To see this patient, go to the View tab and choose List, and Referrals.
or go to the Patients tab and choose Existing Referrals.
 or go to Patients and choose Pending Admissions.
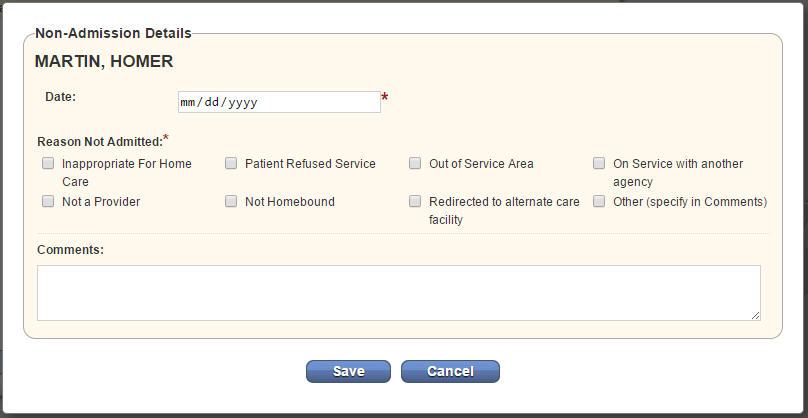
On any of these screens, select Non-Admit on the far right column of the table under Actions.
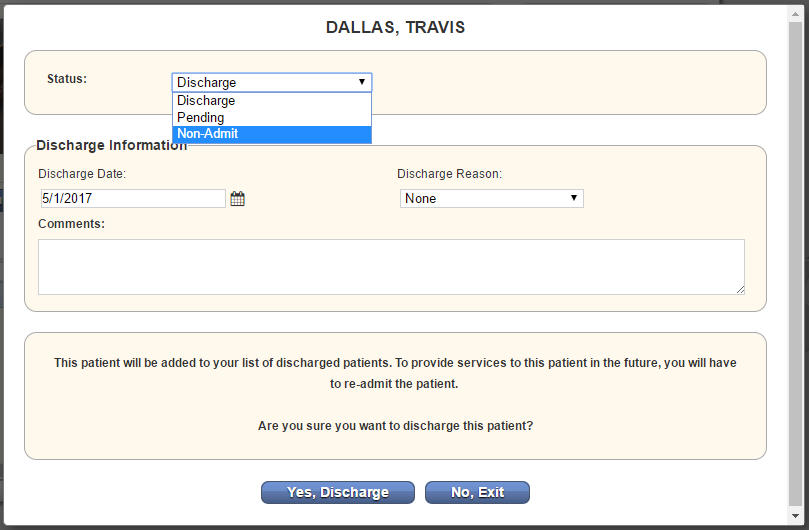
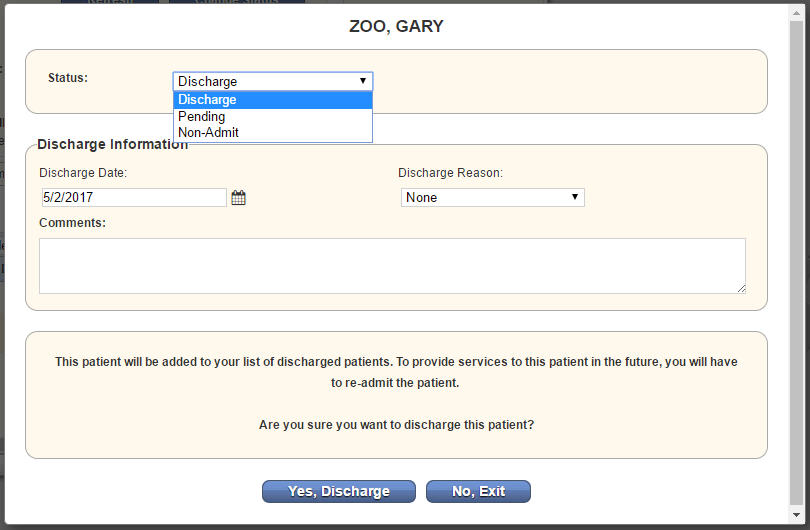
Enter the Non-Admission details and Save.
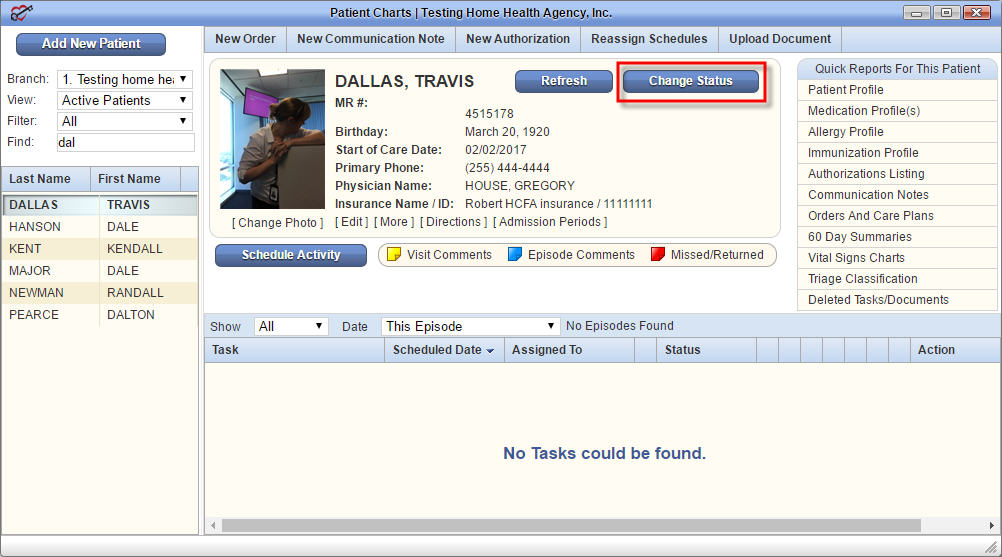
 You can also change an active patient to Non-Admit from the patient’s chart. Navigate to the Patients tab and choose Patient Chart. Then, choose the patient you wish to non-admit.
Select the Change Status button on the Patient Chart.
Then select Non-Admit from the Status drop-down menu.
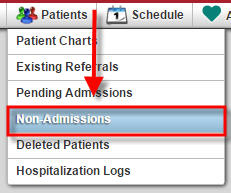 To locate Non-Admitted patients go to the Patients tab and choose Non-Admissions.
Patient details that you can see from the Non-Admitted Patient list include the MRN (medical record number), the patient name, insurance, policy number, patient address, date of birth, phone number, gender, non-admit reason and the non-admit date.
Under the Action column on the far right, if you have permissions, you can Admit the patient. This feature allows you to simply choose to admit the patient and complete the admission steps instead of re-entering all the information once again. To print a list of non-admitted patients, simply Export to Excel.
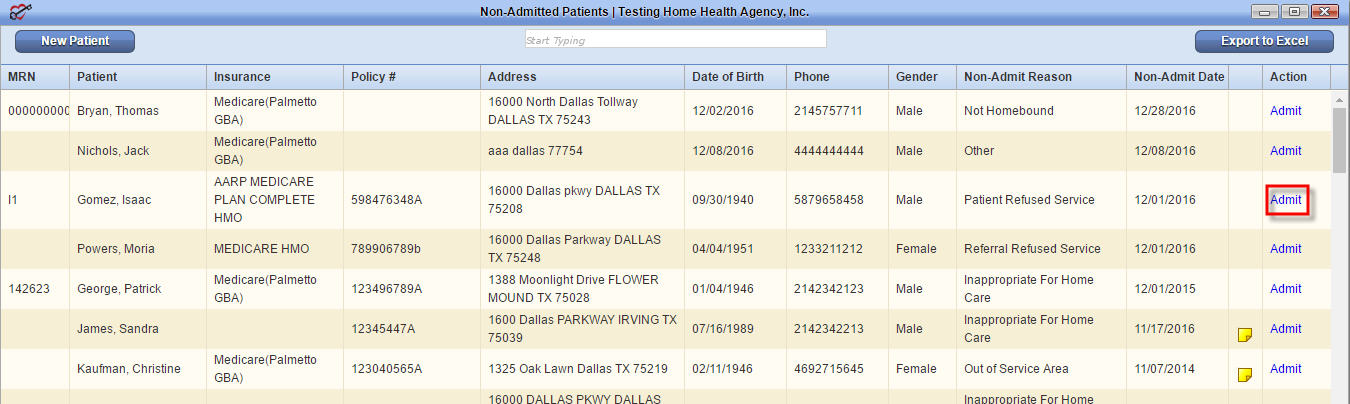
There are times when you have identified that a patient will not be coming on service, marked the patient as a Non-Admit only to have circumstances change and the patient comes on service. With Axxess Home Health, you don’t have to re-enter all of the patient information. Instead, you simply go to the Non-Admissions Patient List by toggling to the Patients tab and choosing Non-Admissions.
In the Non-Admitted Patients list, locate the patient you wish to be admitted and select Admit on the right.
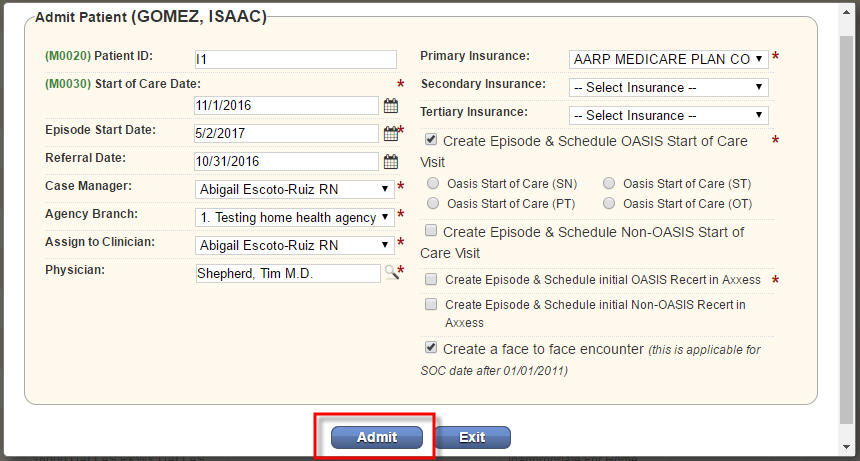
Once the Admit link is selected the admit screen will display for you to update key information. All mandatory fields are indicated with a red asterisk. Once complete, select Admit or Exit.
A patient will have one continuous chart with admissions and discharge periods. The readmission process is simple with Axxess’ Home Health solution. To begin the readmission process start by opening the Patient Chart located under the Patients tab. When a patient is readmitted the chart will return to the Active patient list.
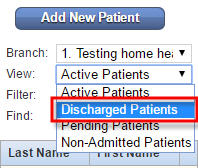 Select Discharged Patients from the drop down filter on the left, then select your patients name from the list.
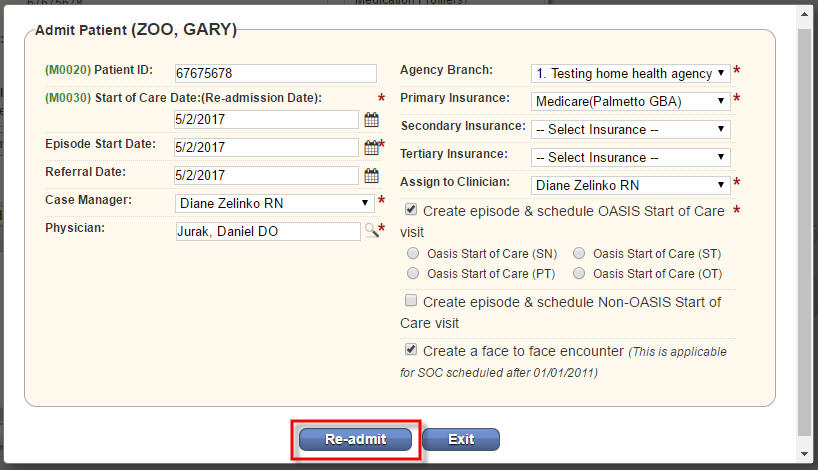
Now you can select Re-Admit on the right side of the chart.
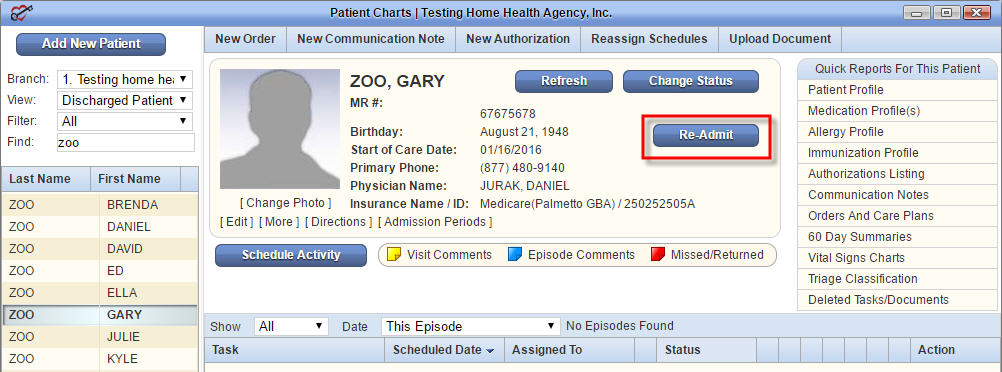
The Admit Patient screen prompts you to verify the patient information, and allows you to make any changes from the previous admission period. After verifying the information select Re-admit.
 After selecting Re-Admit the patient will be moved to the Active Patients list. You can navigate to the Active Patients list on the left of the screen.
The OASIS Start of Care and Face to Face have been scheduled and saved automatically.
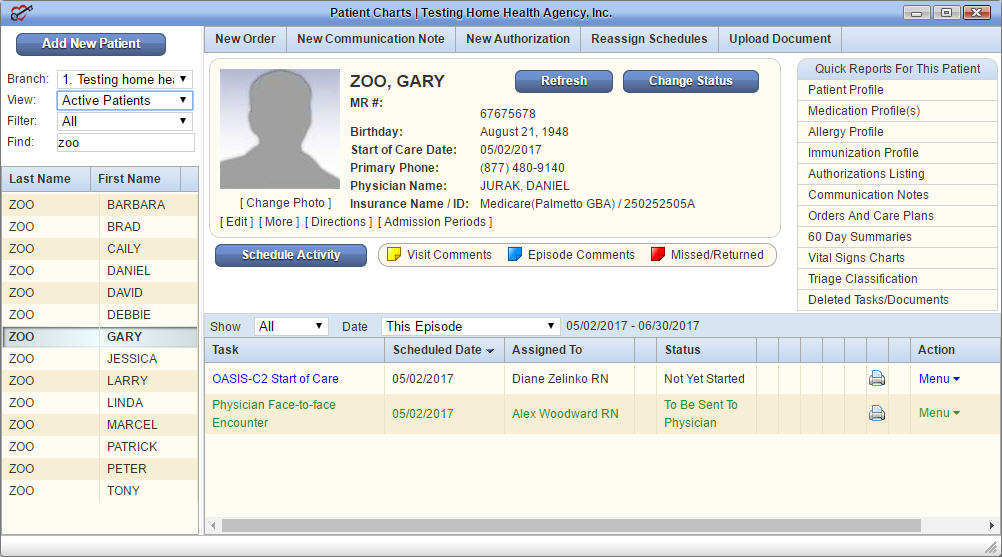
Hint: to view a patient’s admission periods select Admission Periods on the front of the chart page below the demographics.
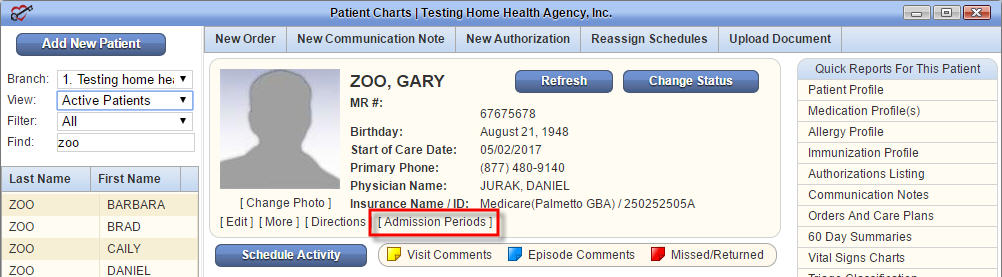
This will show the patient’s different admission periods and any associated episodes.

A patient’s status can be changed at any time simply by selecting Change Status in the Patient Chart. This option allows you to move a patient to the correct status in case they were inadvertently changed. Change Status is located next to Refresh on the patient’s chart.
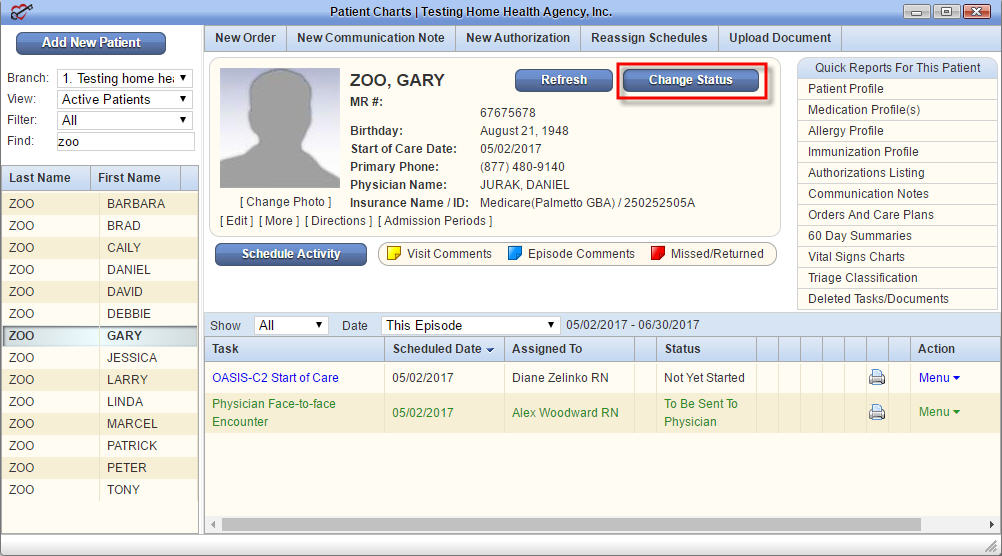
Select which status you want to move the patient to; and add comments if needed. Then Save.
 Pending Admissions are patients that have either been entered into the system either as a New Patient or an Existing Referral that were admitted and then opted to save the information instead of admitting at that time. The Pending Patient Admission list is a great tool for monitoring patients currently waiting for admission to your agency. You can access this list by toggling over the Patients tab and choosing Pending Admissions.

First, let’s take a look at the Patient List.
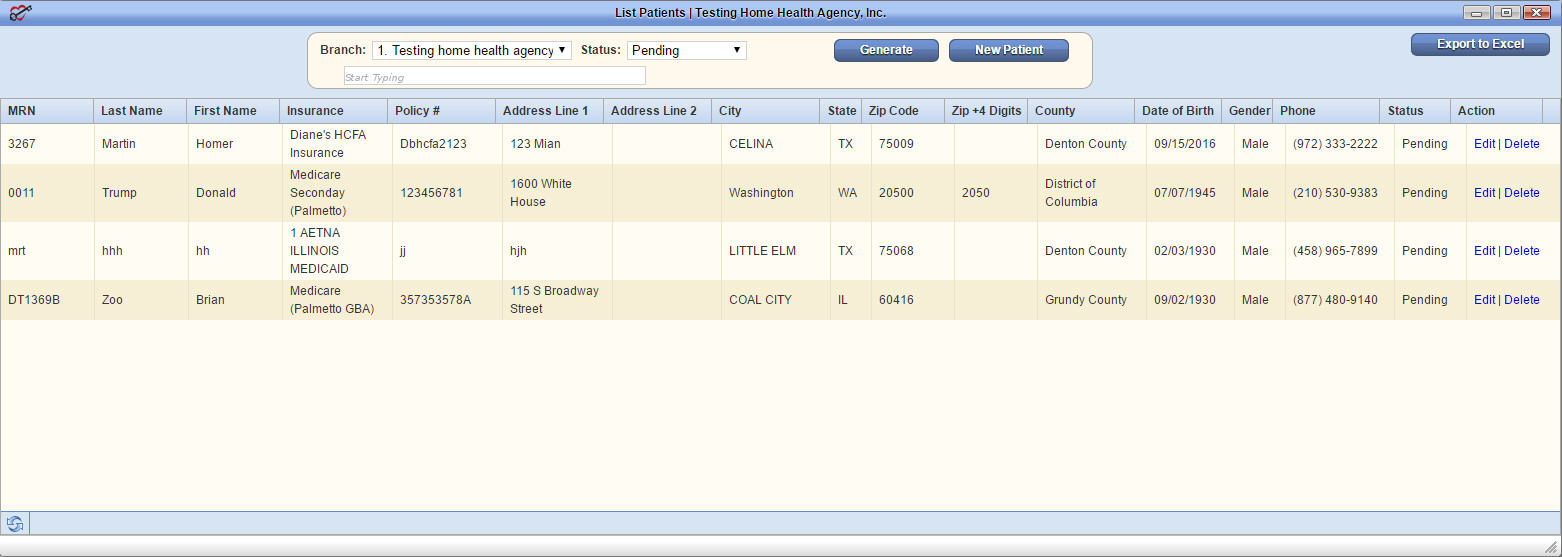
Patient specific Actions available within the Patient List screen are Edit and Delete.
Selecting Edit will open the patient information screen and allow the user to add/change information then, Save or cancel the updates by selecting Exit.
In the Home Health solution, you can upload documents to a Pending Patient. To do so, locate the patient in the Patient Chart by toggling over the Patients tab and selecting Patient Charts.
 On the left, you will want to change the status to Pending from the drop-down list. Now select the patient for which you would like to upload documents.
On the navigation in the Patient Chart, select Upload Document and choose New Document to upload patient files to the chart.

To view the uploaded documents select View Documents on the patient’s chart under Upload Document in the navigation on the Patient Chart.

