Axxess Home Health now enables users to add and assign patient tags to categorize patients that fall into certain groups. This functionality enables organizations to easily track and monitor various items at the patient level.
To add tags to the system, navigate to the Admin tab, hover over New and select Tag. Enter a name and description for the tag and click Save.
Admin tab ➜ New ➜ Tag ➜ Save
New tags can also be added from the Tags screen, which lists all existing tags. To view existing tags, navigate to the View or Admin tab, hover over Lists and select Tags. To add a new tag from this screen, click Add Tag. Enter a name and description for the tag and click Save.
Admin or View tab ➜ Lists ➜ Tags ➜ Add Tag ➜ Save

Tags can be added into the system for patient characteristics, specialty conditions and training, QAPI projects, teams and financial.
Axxess will continue to add tags throughout the system to make reporting, scheduling and patient management easier.
To edit an existing tag, select the edit icon (  ) next to the desired tag on the Tags screen. Make the necessary edits and click Save.
Admin or View tab ➜ Lists ➜ Tags ➜ Actions ➜  ➜ Save

When the name of a tag is updated, the system will automatically update the patient’s chart with the new tag name.

To delete an existing tag, select the delete icon ( ![]() ) next to the desired tag on the Tags screen.
) next to the desired tag on the Tags screen.
Admin or View tab ➜ Lists ➜ Tags ➜ Actions ➜ ![]()

Once a tag is deleted, it will move to the Inactive list and will no longer appear in the patient charts.
To view deleted tags, select Inactive from the Status filter at the top of the Tags screen. To reactivate a tag, click the green restore icon ( ![]() ).
).
Admin or View tab ➜ Lists ➜ Tags ➜ Inactive ➜ Actions ➜ ![]()

Once a tag is restored, it will move to the Active list and reappear in the patient charts.
To view all modifications to a tag, select the activity log icon ( ![]() ).
).

The activity log provides an itemized view of tags that are added, edited or deleted in the system. It also gives insight into the date, user and actions taken.

Tags can be assigned to patients at intake when adding a new patient to the system and through the patient’s chart at any point throughout the episode.
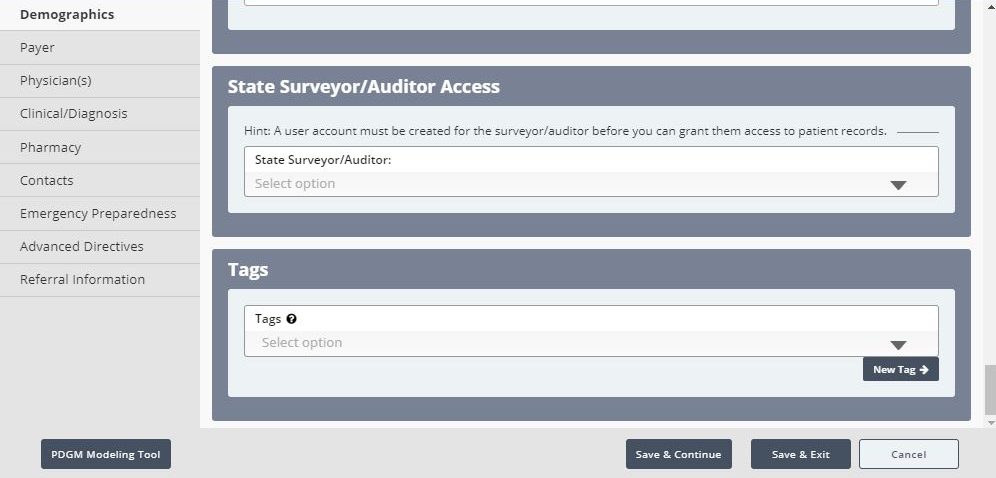
To assign tags to an existing patient, navigate to the patient’s chart and select Edit Patient. Scroll to the bottom of the Demographics tab and select the appropriate tags from the Tags section. Click Save & Exit to finish assigning the tags to the patient.
Patients tab ➜ Patient Charts ➜ Edit Patient ➜ Demographics tab ➜ Tags ➜ Save & Exit

Patients can be filtered by tags anywhere that a Tags filter is available in the system.
|
View tab ➜ Lists ➜ Patients |
|
|
View tab ➜ Lists ➜ Referrals |
|
|
Patients tab ➜ Referrals |
|
|
Admin tab ➜ View ➜ Lists ➜ Patients |
|
|
Admin tab ➜ View ➜ Lists ➜ Referrals |
|
|
Home tab ➜ Quality Assurance (QA) Center |
Updated on 08/04/2021