The Wound Manager is now available on the Axxess Home Health mobile application. This comprehensive wound management system enables users to document and track wound care across multiple episodes and admission periods in an easy-to-use, central location.
As users document wounds, the Wound Manager automatically validates documentation for consistency and quality assurance.
Users can perform the following actions in the Wound Manager:
|
Enter Wound Orders |
|
|
Add New Wounds |
|
|
Document Existing Wounds |
|
|
Indicate Care Not Performed |
|
|
Change Wound Care Orders |
|
|
Restage Wounds |
|
|
Deactivate Wounds |
|
|
View Wound Care Flowsheet |
|
|
View Wound History |
|
|
Load Previous Documentation |
|
|
Save, Validate and Complete |
Users can access the Wound Manager from the Integumentary Status tab in OASIS/non-OASIS assessments and through the Integumentary section in clinical notes.
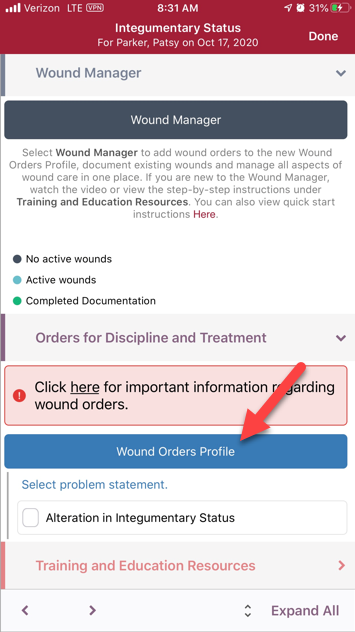
The Wound Manager button changes from dark blue to teal to alert users when wound care must be documented. Click the Wound Manager button to open the Wound Manager.
Once all wound documentation has been completed and validated, the Wound Manager button will turn green. When there are no active wounds, the Wound Manager button stays dark blue to indicate that wound care documentation is not applicable.

The following sections appear across the bottom of the Wound Manager:
|
Wounds |
|
|
Document |
|
|
History |
|
|
Resources |
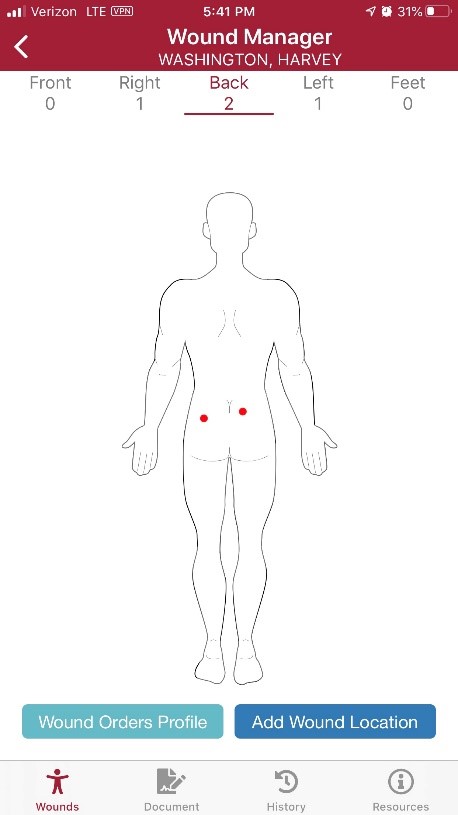
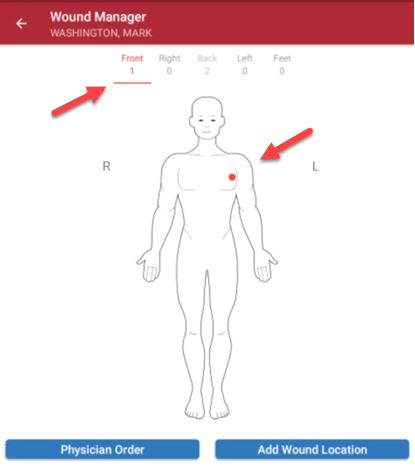
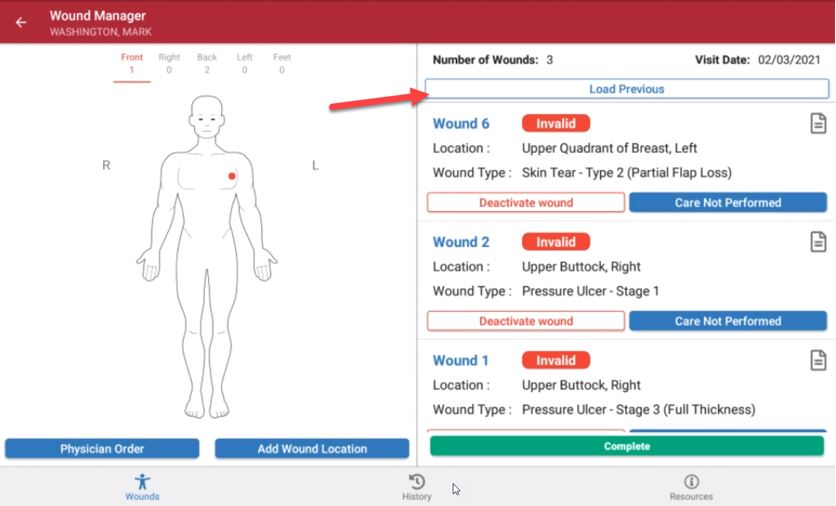
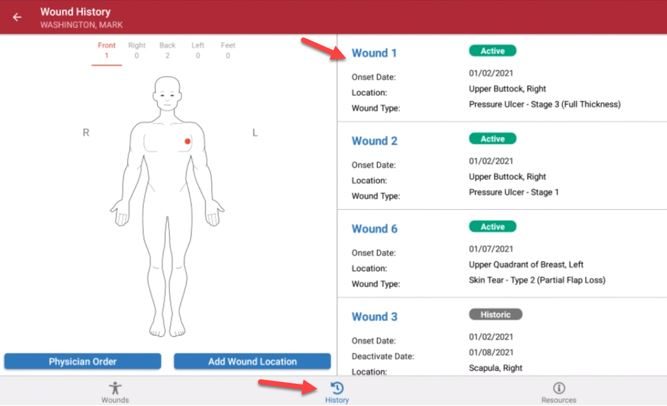
On the Wounds page, the anatomical figure displays where the wounds are located on the patient’s body. When active wounds are present, the number of wounds will appear under the body positions (front, right, back, left or feet). Users can swipe left or right to change views.
On the anatomical figure, red dots indicate active wounds, purple dots indicate multiple wounds in the same location, green dots indicate healed wounds, and black dots indicate historical wounds.
Below the anatomical figure, users can select Add Wound Location to add a new wound or Wound Orders Profile to open the Wound Orders Profile.
If you are in an OASIS or non-OASIS comprehensive assessment, you will always see the Wound Orders Profile button. If you are in a visit note, you will see the Physician Order button in the same location as the Wound Orders Profile button. Physician orders must be present in the Wound Orders Profile before adding new wounds or changing orders.
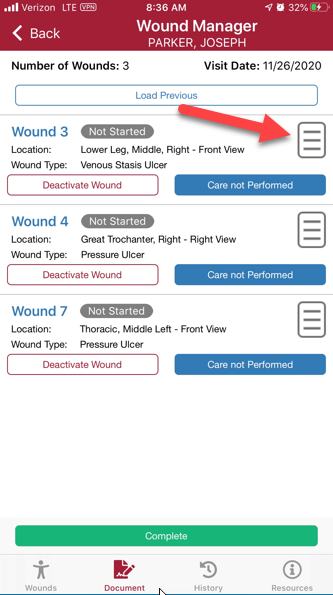
Navigate to the Document page to view a list of active wounds. Click on a wound to access the wound documentation page. Click on the paper icon to view the flowsheet for a wound.
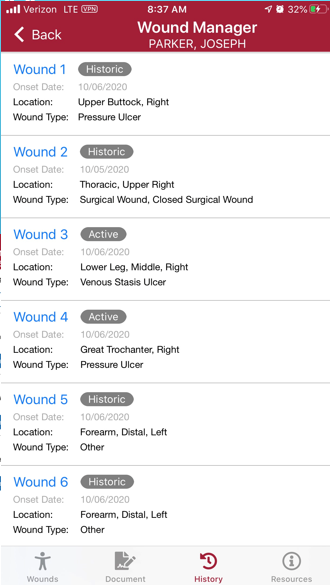
Navigate to the History page to view a list of all active and inactive wounds.
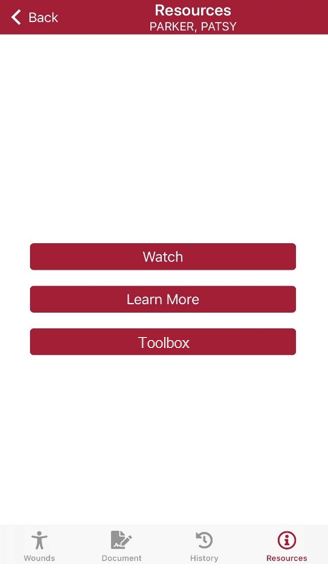
Navigate to the Resources page to access training resources and video tutorials on the mobile Wound Manager.
Click Watch to watch video tutorials on using the mobile Wound Manager. Click Learn More to read training content on the mobile Wound Manager. Click Toolbox to access our library of wound training resources to increase assessment skills, including wound vac training.
Wound orders must be entered in the system before new wounds can be added. Enter wound orders through:
|
The Wound Orders Profile button, |
|
|
The Physician Order button in a clinical note on a subsequent visit, or |
|
|
A physician order created through the Create tab or New tab in the patient charts. |
Adding a Wound Order Through the Wound Orders Profile Button:
When entering the Wound Manager through an OASIS or non-OASIS assessment, the teal Wound Orders Profile button appears in the Orders for Discipline and Treatment section and on the Wounds page in the mobile Wound Manager.
Select the Wound Orders Profile button to open the Wound Orders Profile and enter wound care interventions. Once a wound order is entered and associated to a wound, the wound order will flow to the Plan of Care.
Wound goals are added to the Plan of Care Profile through the Orders for Discipline and Treatment section.
Adding a Wound Order Through a Clinical Note on a Subsequent Visit:
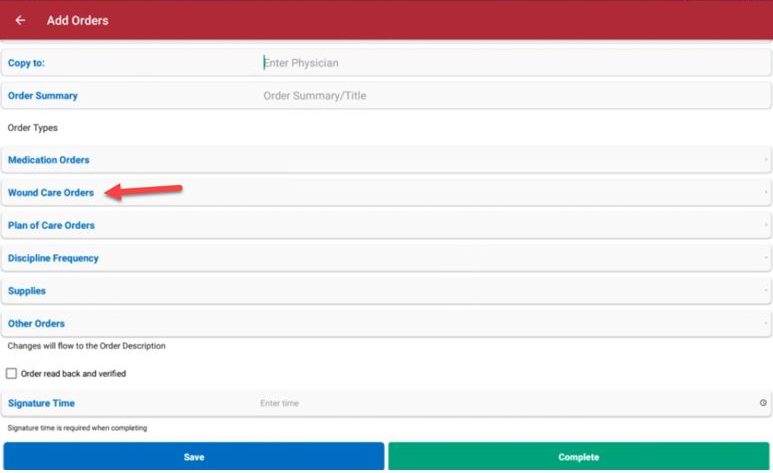
To add wound orders on a subsequent visit, open the Wound Manager and select the blue Physician Order button above the anatomical figure.
In the physician order, select the Wound Care Orders button to open the Wound Orders Profile.
The Physician Order button is also accessible from visit notes. For coordination of care, it is important to sign the order as soon as it is entered into the system. Orders that are not signed will stay on the Pending Orders page and cannot be associated to wounds until signed.
To add new wounds, open the Wound Manager and select Add Wound Location.
1. Add Wound Location
Click the wound location on the anatomical figure and select the location from the list.

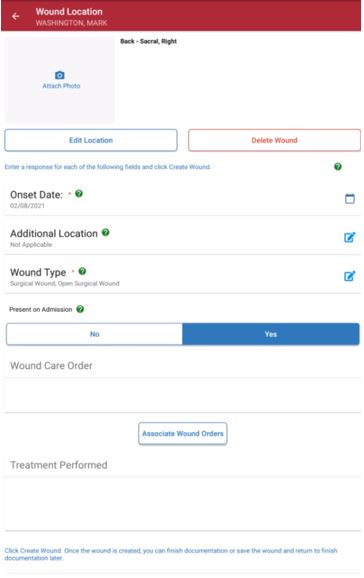
2. Enter Details
Select the camera icon to capture or upload a photo of the wound directly into the patient’s note. The wound photo will flow to the following locations:
Wound Care Flowsheet
Wound History
Wound Picture Gallery on Web Application
Click the Delete Wound button to delete the wound location and start over. Select the Edit Wound button to return to the anatomical figure and change the location of the wound. The back arrow will take the user back to the previous list of anatomical locations.
Throughout the Wound Manager, helpful tips are available to guide users through the process of accurately documenting wounds. Click the question mark bubble icons ( ![]() ) throughout the Wound Manager to access applicable guidance.
) throughout the Wound Manager to access applicable guidance.
Enter details for the following required fields: Additional Location, Onset Date, Present on Admission, Wound Type and Tissue Injury Level.
| Section | Description | ||
|---|---|---|---|
|
Additional Location Description |
Select additional descriptors to indicate the wound’s precise location. This functionality is particularly useful when more than one wound is present in the same anatomical location (e.g., venous stasis ulcer to left lower leg distal and venous stasis ulcer to left lower leg proximal). If there are no additional descriptors, select Not Applicable. |
||
|
Onset Date |
Based on organizational policies, the onset date can be the reported date of the wound’s origin or the date of the visit when the wound was discovered. The onset date is important to identify when and where the wound may have originated. This field defaults to the visit date. |
||
|
Present on Admission |
If the patient had the wound during the start of care visit, select Yes to indicate the wound’s presence on admission. If the wound was discovered on a subsequent visit after the start of care, select No. This information is important for tracking wounds and QAPI. The selected option will flow to the wound care flowsheet, wound history and wound reports. |
||
|
Wound Type/ Tissue Injury Level |
Wound types are consistent with ICD-10 coding rules. Although the face-to-face documentation must indicate the presence of wounds, including pressure ulcers, clinicians are permitted to stage wounds based on current WOCN guidelines. Skin tears are identified by a classification system. Medicare does not include all types of skin tears in skilled care. Refer to your organization’s policies to identify lacerations versus skin tears and the CMS-required documentation for skilled services coverage. Refer to your organization’s policies to identify trauma wounds according to ICD-10 coding guidelines. Closed surgical incisions heal by primary intention (e.g., staples, glue, stitches). If the wound opens, document a tissue type change through the system prompt on subsequent visits. Open surgical wounds heal by secondary intention and refer to the healing of an open wound by laying down new tissue from the base upward. Surgical wounds that are secondary to infected devices must be reported to the CDC and documented in your records. Complete an infection control report to fulfill this requirement. |
3. Select Wound Order
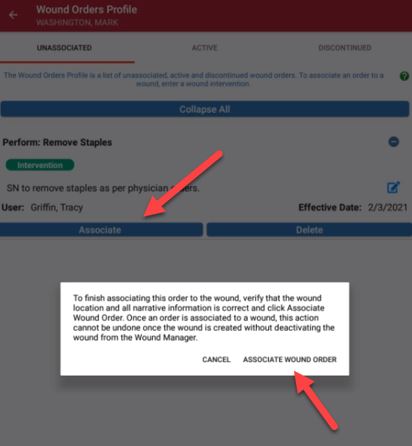
Once wound orders are added through the Wound Orders Profile, they can be associated to wounds. Users can add orders through the Wound Orders Profile button at any time, but orders can only be associated to wounds by selecting the Associate Wound Order button.
Once a wound order is associated to a wound, it will flow to the Wound Orders section of the note in read-only status. Wound orders will populate in all subsequent notes and cannot be edited once the wound is created without documenting a change order on a subsequent visit. To change or correct the wound order before creating the wound, simply click on the Associate Wound Order button again.
Make sure that wound orders are correct before associating them to wounds, as this data will flow to the multidisciplinary Plan of Care.
It is critical to enter all wounds and orders before the next scheduled visit to ensure continuity of care, even when the visit is not completed at the point of care. When orders are entered on the day of service, they will flow to the next visit automatically.
Orders cannot be entered once the next visit has started. See the Late Documentation section below for additional information on visit management.
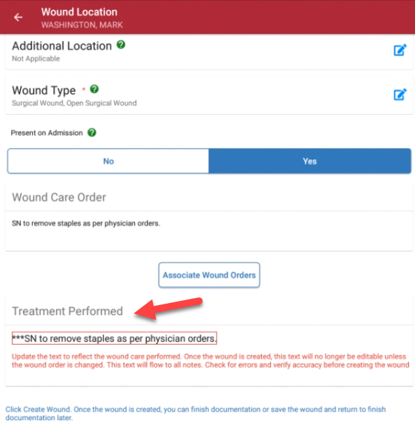
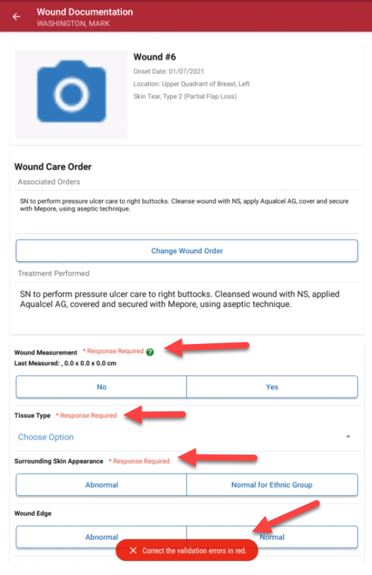
4. Treatment Performed
Once the wound order is associated, the order will flow to the Treatment Performed section in edit mode. Clear the asterisks and change the text to reflect the treatment that was performed. Verify that all text is correct, as it will flow to ALL visit notes for consistency. Treatment performed text can be edited at any time but will only flow automatically to the next visit note when the physician order is updated.
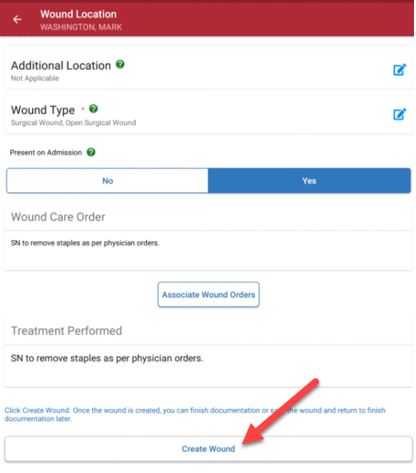
5. Create Wound
Once the required details, wound orders and treatment performed sections are complete, select Create Wound.
To ensure seamless care coordination, wounds should be created on the day of the visit (even if all other documentation for the visit is late). Once the next visit has started, wounds cannot be added to late documentation through the Wound Manager. Carefully review all information before selecting Create Wound.
Once the wound is created, the total number of wounds will appear on the anatomical figure. Red dots will mark the location of each wound. Purple dots will indicate areas where multiple wounds are in the same location. A description of each wound location will appear in the wound list under the document icon, if the user is on a mobile phone. If the user is on a tablet, the wound list will appear on the home page.
The system will automatically assign a number to each wound to facilitate seamless wound tracking across multiple episodes and admission periods. Each wound’s assigned wound number will be attached to the wound for the entire life of the wound in the system. Wound numbers are never reused.
Once wounds are created, users are taken to the documentation page to enter the wound assessment.
Users can document the wound assessment or select Save & Continue or Validate. When Save & Continue is selected, the user will return to the Document home page. When Validate is selected, the system will run a check to ensure a response for all the documentation prompts have been entered. Once the validations clear, the user will return to the Document home page.
On the Document page, the user can select Complete or go back.
When the clinician selects Complete to exit the Wound Manager, the system will automatically QA the wound notes to ensure all assessment questions have been answered. This functionality streamlines operations by eliminating the need to audit every wound note. When the validations identify wounds that require additional documentation, a red Invalid tag will appear in the list of wounds on the Document page.

When all the wounds have passed documentation validation, the user will be taken back to the Integumentary section of the assessment or visit note.
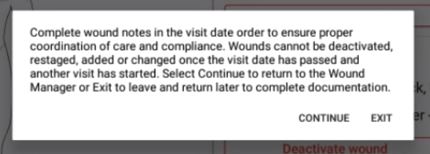
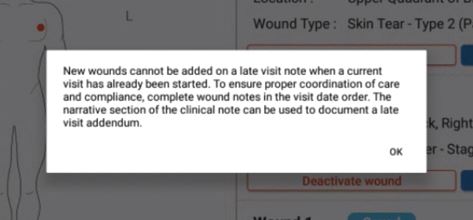
When the back function is selected, the user will receive the following message regarding late documentation. Select Continue to continue wound documentation or Exit to save the documentation and exit the Wound Manager.
Clinicians can complete documentation in the Wound Manager separately from visit notes. However, wound documentation will automatically flow to visit notes to encourage real-time completion of wound documentation for continuity of care and appropriate visit management.
Select the Load Previous button on the Wound List page (located under the Document icon) to load completed documentation for all wounds from the most recent visit into the current visit. When selected, all documentation will flow to the current visit except wound score data. If documentation for the previous visit has not been completed, it cannot be loaded into the current visit.
To begin the visit, there is an option to choose a picture from the library or to take a wound picture. This picture will flow to the wound history and wound flowsheet for comparison and further analytics.
Weekly wound measurements are required to initiate calculation of the wound score for each week to determine if the wound is healing, delayed or stagnant, or declining. Measurements can be performed and documented more frequently than weekly, based on clinical judgement and organizational policies.
Additional details on wound scores, including data points used to calculate the score are provided below.
Once a wound is created, clinicians can document the following information on subsequent visits:
| Wound Measured (Select Yes to calculate a wound score.) | |
| Tissue Type | |
| Tissue Amount | |
| Skin Surrounding Wound | |
| Wound Edge | |
| Wound Drainage | |
| Wound Odor | |
| Undermining | |
| Tunneling | |
| Wound Pain | |
| Signs and Symptoms of Infection | |
| Comments | |
| Response to Treatment |
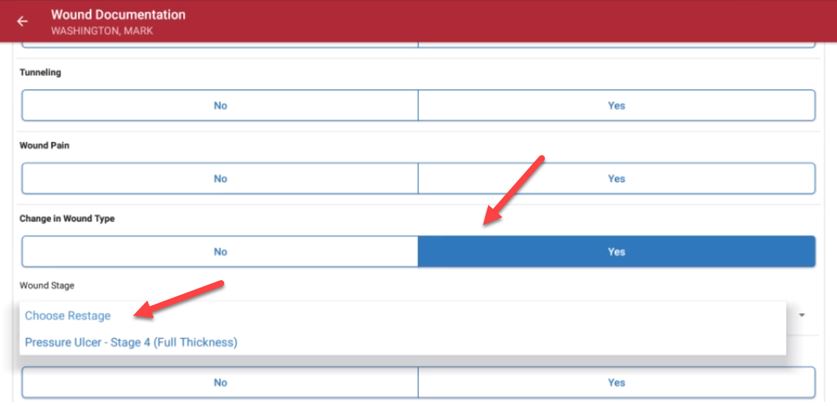
The Change in Wound Type section enables the clinician to document when the tissue type has changed. Since pressure ulcers cannot be back-staged, the system will only present tissue types for worsening wound conditions. A wound tissue type cannot be changed when documentation is late.
When documenting wound care, real-time validations ensure that clinicians completely document the characteristics of the patient’s wounds. These validations provide QA assistance and promote complete and accurate clinical documentation of wounds.
Once all wounds are validated, wound documentation will flow to the wound care flowsheet, wound history and wound reports, and can be reviewed by clinical office staff.
A wound score is calculated for each wound based on wound measurement and five key areas of documentation that identify healing or worsening of the wound.
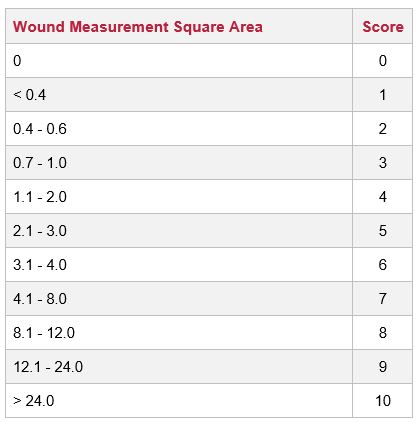
When completing wound documentation in the Wound Manager, select Yes under Wound Measurement to initiate the wound score. The surface area of the wound (length x width) generates the first calculation. Wounds should be measured at least weekly, but can be measured more frequently based on clinical judgement and organization policies.
The following five areas of wound documentation are included in the total wound score calculation:
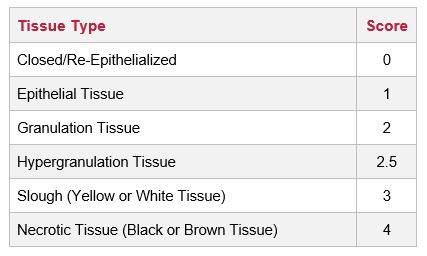
| 1. Tissue Type | |
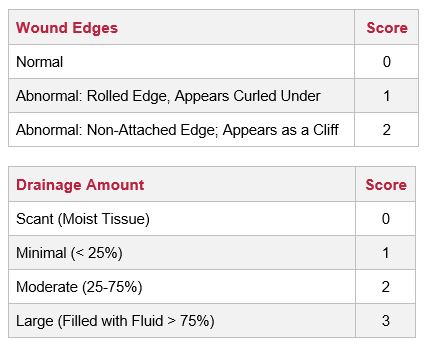
| 2. Wound Edges | |
| 3. Drainage Amount | |
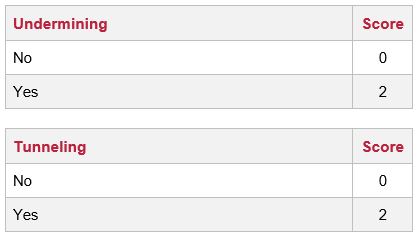
| 4. Undermining | |
| 5. Tunneling |
The total possible score is 23. A score that is decreasing numerically is considered healing. A score that is increasing numerically is considered worsening. A wound score that remains the same for two weeks or longer indicates delayed healing and a need to adjust treatment and/or schedule a physician visit.
The wound score will flow to the wound history and wound care flowsheet. The information in the wound calculator cannot be copied from previous notes. These sections will remain empty on each subsequent visit to activate the wound calculator.
When the clinician selects No under Wound Measurement in the Wound Manager, a wound score will not be calculated, and N/A appear in the measurement and wound score sections of the wound flowsheet.
Wound scores are calculated based on the following data:
To deactivate a wound, navigate to the Document page. Click Deactivate Wound and select the reason for deactivation. Once a wound is deactivated, it will move from the Document page to the Wound History page. To reactivate a wound, navigate to the Wound History page by clicking the History icon.
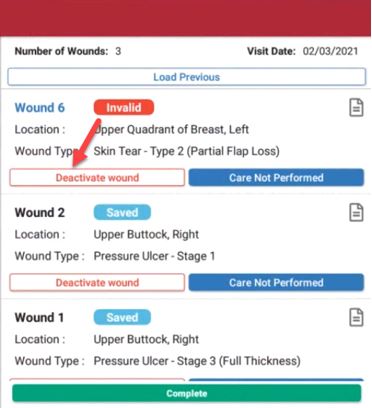
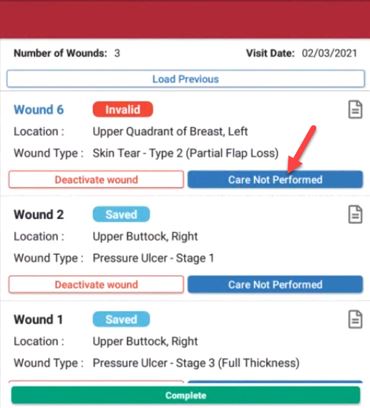
When wound care is not due for an active wound, users can select Care Not Performed on the Document page and identify a reason from the drop-down menu. Selecting Care Not Performed clears validations, so users can complete documentation in the Wound Manager without performing wound care.
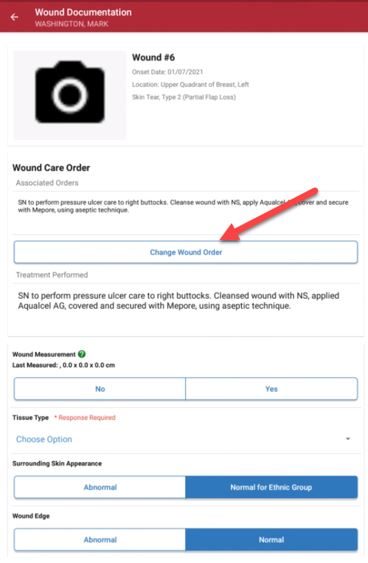
To change a wound order, select Change Wound Order on the Document page and associate a new order to the wound. Make sure the wound order has been entered through a physician order before changing the wound order. Selecting Change Wound Order will open the Wound Orders Profile. Select an order to associate to the wound, edit the Treatment Performed text and click Save.
Since the Wound Manager is an automated system, visit management is extremely important to maintain data integrity. Late documentation disrupts coordination of patient care and data in subsequent visits. Once a subsequent visit for a patient has started, the clinician can document the assessment questions. However, the following actions cannot be performed in late documentation:
| Adding New Wounds | |
| Adding New Wound Orders | |
| Changing Wound Orders | |
| Deactivating Wounds | |
| Change to Tissue Type (Restaging) | |
| Reactivating Wounds |
Clinicians are encouraged to complete timely documentation in the order of patient visits. The Wound Manager is signed separately from visit notes to ensure coordination of care in the event a clinician needs to delay completion of visit notes (i.e., to document a physician follow-up).
When the clinician selects the back button or Complete in the Wound Manager, the user will receive a warning message regarding the inability to change wounds on subsequent visits once another visit has started.
As a reminder, wound documentation can be completed/signed by the user before completing the clinical note or comprehensive assessments (i.e., OASIS).
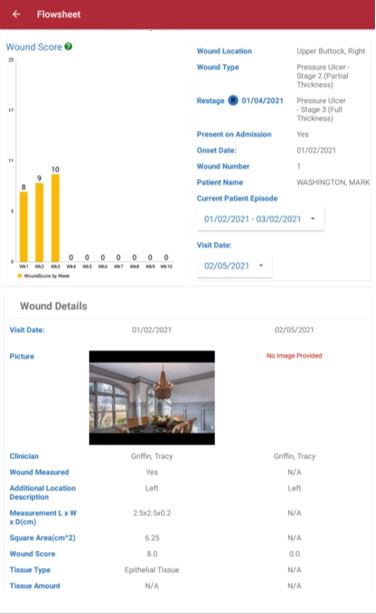
The wound flowsheet is a record of each individual wound for every visit. To access the wound flowsheet, click the flowsheet icon on the Document page in the Wound Manager or navigate to the History page, click the wound number and select the wound flowsheet button.
The wound photo captured during the visit appears at the top of the wound flowsheet.
The wound location, type, additional location description, present on admission and onset date appear next. If a pressure ulcer is restaged or a non-pressure ulcer has a change in the tissue type, an indication for a change will appear on the dashboard.
The flowsheet will default to the current episode and last visit date. Click the Episode Date button to review documentation from previous episodes. Click on the Visit Date button to review documentation for a specific date. To review comparative data, click Show First Visit to see the assessment of the wound when it was first entered.
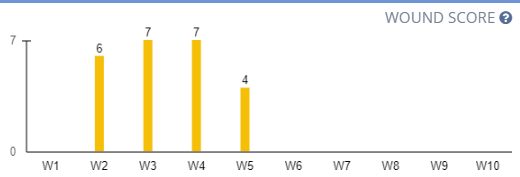
The Wound Score graph shows the wound status timeline of one to ten weeks, giving users the ability to view the wound’s healing status and progress at a glance.
Click the question mark icon in the top-right corner of the Wound Score graph to view additional information about wound scores.
A wound score that has decreased since the last measurement indicates healing. A wound score that has remained the same for two or more weeks indicates delayed healing or stagnation. A wound score that has decreased since the last measurement indicates declining. N/A indicates a wound score that has been the same for two weeks or less.
The name of the clinician who completed the visit appears under the Wound Score graph.
In addition to the assessment questions in this grid view, the following details regarding wound score components appear on the wound flowsheet:
| Wound Measured | |
| Measurement (lxwxd) | |
| Square Area | |
| Wound Status | |
| Tissue Type | |
| Tissue Amount | |
| Surrounding Skin | |
| Wound Edge | |
| Drainage Present | |
| Drainage Type | |
| Drainage Amount | |
| Odor | |
| Undermining | |
| Tunneling | |
| Pain | |
| Change in Tissue Injury Level | |
| Signs and Symptoms of Infection | |
| Wound Order | |
| Treatment Performed | |
| Response to Treatment | |
| Comments |
The wound history is a list of all active and inactive wounds for the patient’s current admission period. Relevant wound data elements for the last completed visit appear in the wound history.
To access the wound history, select the History icon.
On the Wound History screen, each wound is identified by wound number, and flags indicate each wound’s status. Wounds labeled Active are current wounds. Wounds labeled Inactive have been deactivated but can be reactivated. Wounds labeled Historical can no longer be reactivated.
Updated on 02/11/2021
