The Medicare/Medicare HMO (PPS) menu enables users to bill and manage Medicare and other episodic payers. The following menu items are included in the Medicare/Medicare HMO (PPS) section:
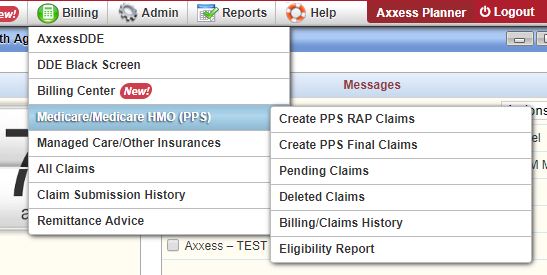
With billing permissions, you may access the create RAP claims menu via the Billing tab, hover over Medicare/Medicare HMO and select Create RAP Claims or from the More RAPs tab on the Outstanding Claims dashboard panel.
 Either path takes you into the RAPs menu where all unbilled RAPs are listed. The default parameters are set to your agency’s name and Insurance type of Medicare. You may use the drop-down list to view and process RAPs for any Medicare HMO payors you may have. Use the refresh button to pull the outstanding RAP claims for the new selection criteria. The patient list may be printed or exported to excel for additional analysis.
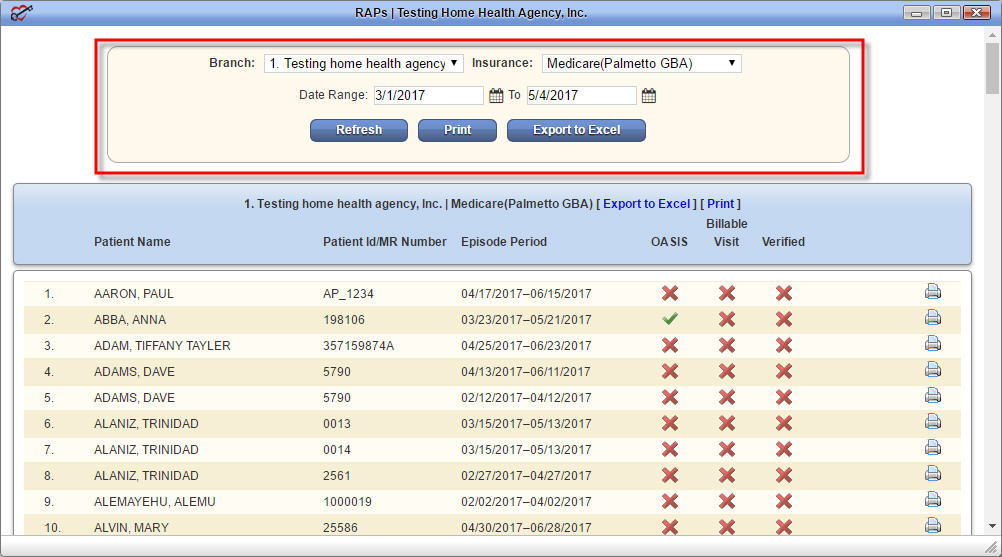
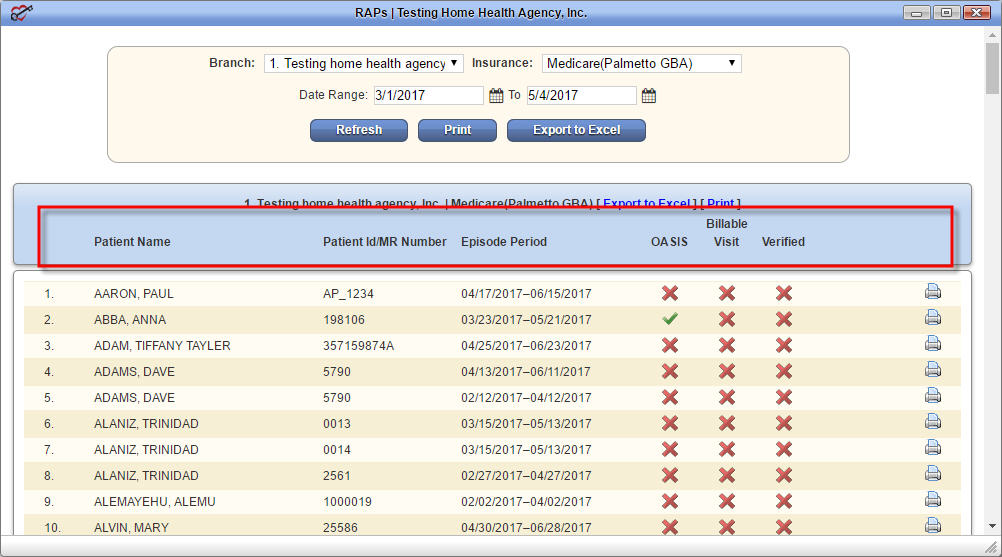
The lower half of the screen contains a list of all patients for the selected payor who have unbilled RAPs. The first three columns of the list include patient name, patient id/medical record number and the episode period associated to the unbilled RAP. The patient list is presented in alphabetical order by last name as a default. You do have the ability to sort by Patient ID/MR number or Episode period by clicking on the associated column name.
Satisfying the requirements of the next three columns (OASIS, Billable Visit and Verified) is what allows you to ultimately bill the RAP. The columns start off in a red X status. Once a requirement is met the X will update to a green check mark.
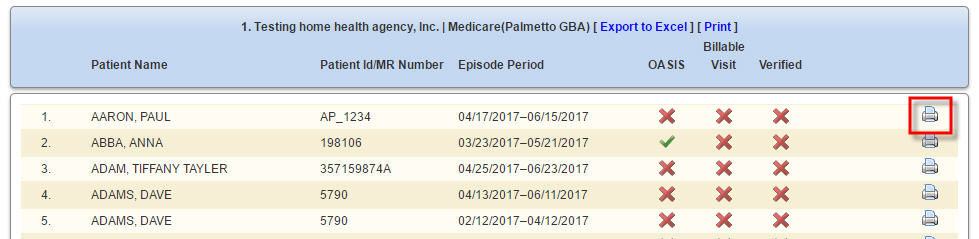
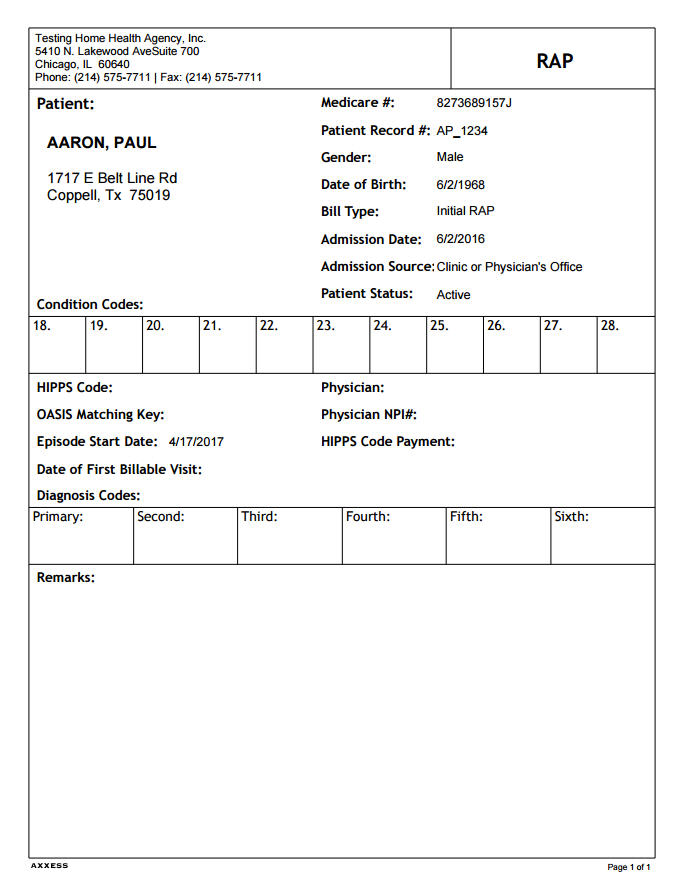
The printer icon located on the far right displays and allows printing of the RAP summary information.
Let’s discuss the OASIS, Billable Visit and Verified columns.
The OASIS and Billable Visit columns update automatically when the requirement is met within the Home Health solution.

Once the OASIS and Billable Visit requirements are met the system updates the patient’s name to a hyperlink (clickable link in blue).

At this point you can access the verification screen by clicking on the patient’s name.
The verification screen is separated into two sections: Patient and Episode. Each should be reviewed for accuracy prior to completing the verification.
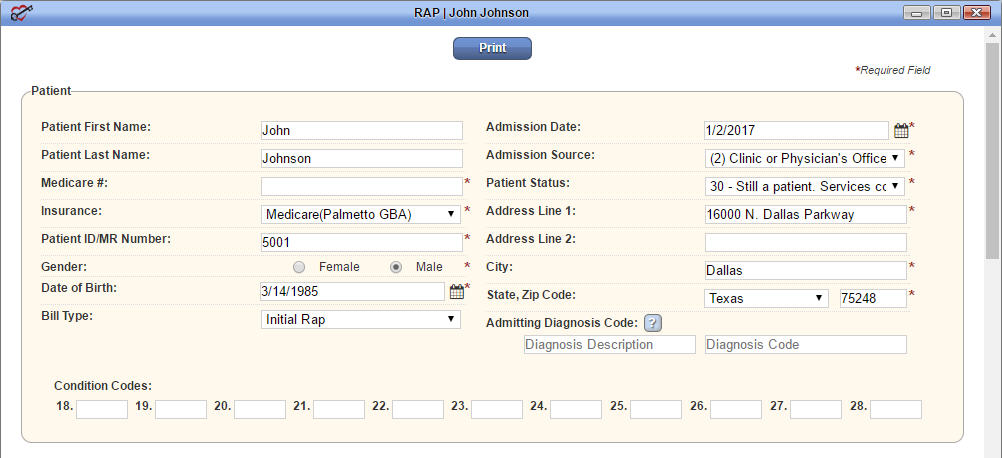
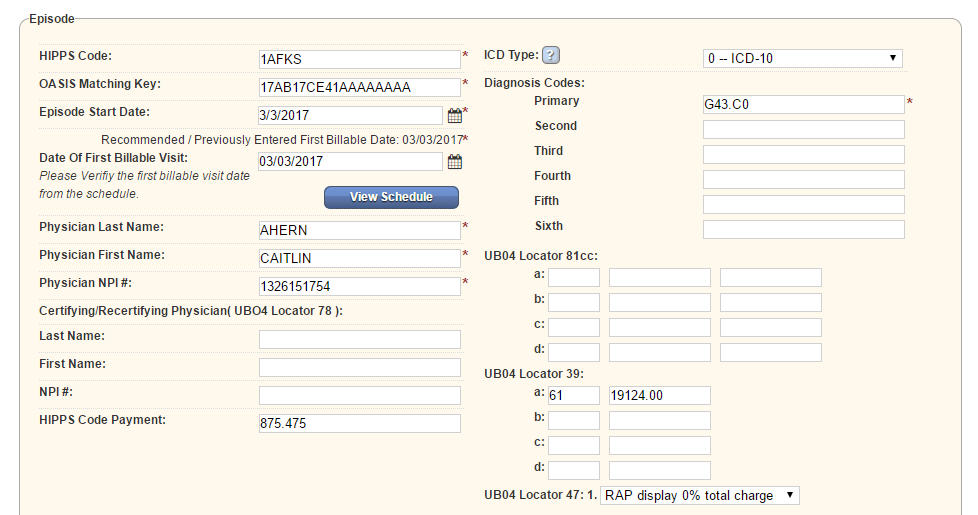
At the bottom of the Episode section you have the ability to add remarks for the claim. This includes documentation for open liability / auto claim. Once all information is reviewed you can choose to Verify or Print the information. You can close the window if you wish not to verify the RAP.

Once you verify the RAP, you are brought back to the RAP screen where the Verified column is now updated with a green check mark. Plus, a select box will now be present prior to the patient name.

![]() Located at the bottom of the RAPs table are two options: Generate Selected and Generate All Completed. You have the ability to individually select the patients you wish to bill RAP invoices on, then select Generate Selected. Selecting Generate All Completed pulls all patients who have the selection box available for billing. These are the patients who have green check marks across the OASIS, Billable Visit and Verified columns.
Located at the bottom of the RAPs table are two options: Generate Selected and Generate All Completed. You have the ability to individually select the patients you wish to bill RAP invoices on, then select Generate Selected. Selecting Generate All Completed pulls all patients who have the selection box available for billing. These are the patients who have green check marks across the OASIS, Billable Visit and Verified columns.
Choosing either Generate button takes you to the RAP Claim Summary page which gives you the ability to review all patients that will be processed with that particular claim submission. The summary page displays the patient name with medical record number, Medicare number, episode date the RAP is associated to and the claim amount. The claim amount is the RAP percentage, not the full payment amount.

Once a final review is completed the user has one of two submission options available: Download Claim(s) or Submit Electronically.
![]() Download Claim(s): is present for Medicare until the intermediary processes your agency’s EDI paperwork. It is present for Medicare HMO payors if the agency opts not to use electronic billing. You simply select the Download Claim(s) button, save to your computer, and then upload to Medicare through your portal of choice. Once the download and subsequent upload is completed select to Mark Claim(s) as Submitted. Marking the claims as submitted removes the RAP claim from the Create RAP Claim screen.
Download Claim(s): is present for Medicare until the intermediary processes your agency’s EDI paperwork. It is present for Medicare HMO payors if the agency opts not to use electronic billing. You simply select the Download Claim(s) button, save to your computer, and then upload to Medicare through your portal of choice. Once the download and subsequent upload is completed select to Mark Claim(s) as Submitted. Marking the claims as submitted removes the RAP claim from the Create RAP Claim screen.
Once you are set up with electronic billing, choose Submit Electronically and your claims will be sent to Medicare. This updates the claim status to submitted and pulls the claim off the create RAP claim menu.
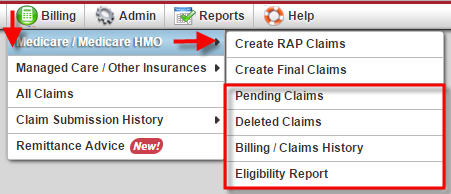
Once the claim is submitted from the Claim Summary screen the file moves to the Pending Claims list. Pending Claims can be found in two places.
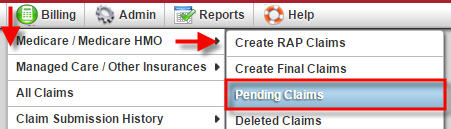 1. Toggle over the Billing tab, choose Medicare / Medicare HMO and then select Pending Claims.
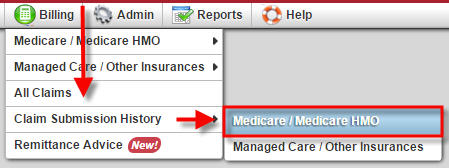 2. Toggle over the Billing tab, choose Claim Submission History and select Medicare / Medicare HMO.
Both of these menu items are described in detail in the Medicare/Medicare HMO Claim Follow-Up tutorial.
This concludes the process for creating and submitting RAP claims from the Home Health solution. Please view the Create Final Claims and Medicare/Medicare HMO Claim Follow-Up for additional information and instruction on the process of billing finals and managing collection of payment within the Home Health solution.
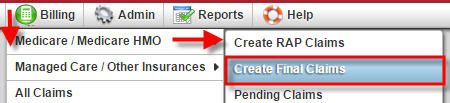 With billing permissions, you may access the Create Final Claims menu via the Billing tab, hover over Medicare / Medicare HMO and select Create Final Claims.
Or from the more Finals tab on the Outstanding Claims dashboard panel.
Selecting Create Final Claims takes you into the Finals menu where all completed episodes with unbilled Finals are listed. The default parameters are set to your agency’s name and Insurance type of Medicare. You can use the drop-down list to view and process Finals for any managed Medicare payors you may have as well. If selecting a managed Medicare payor you will need to select the Refresh button to pull the new information to the screen. The list may be printed or exported to excel for additional analysis.
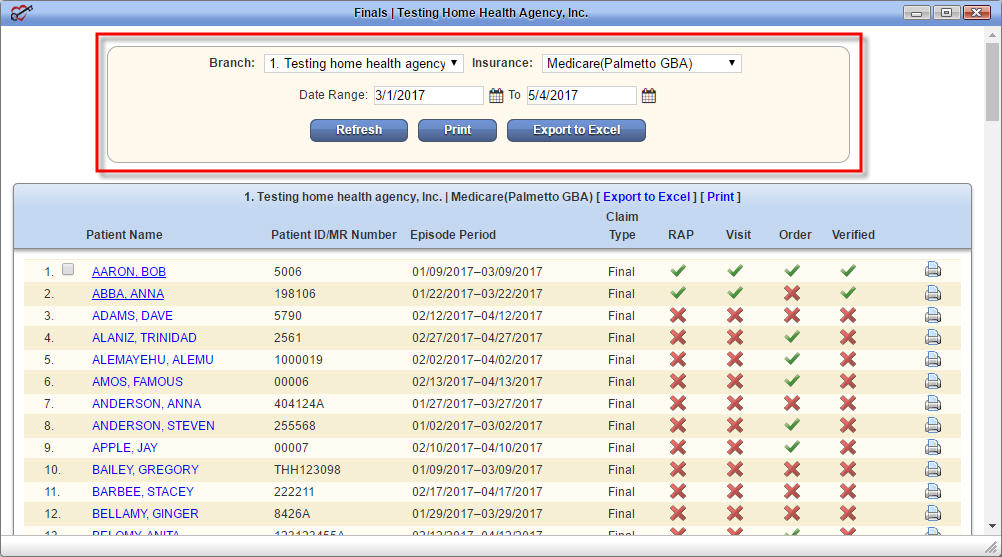
The lower half of the screen contains a list of all patients for the payor who have an unbilled Final where the episode has ended (patient discharged or recertified).
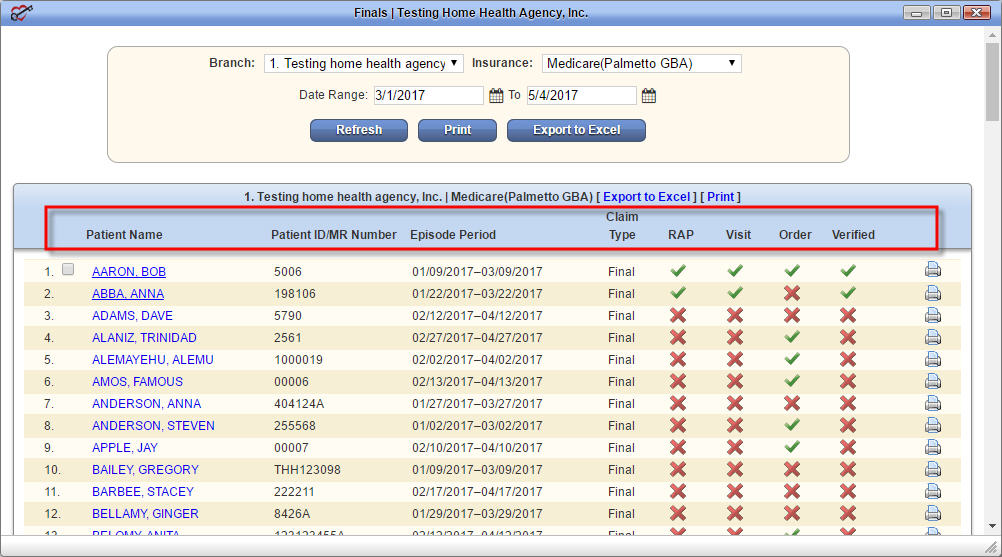
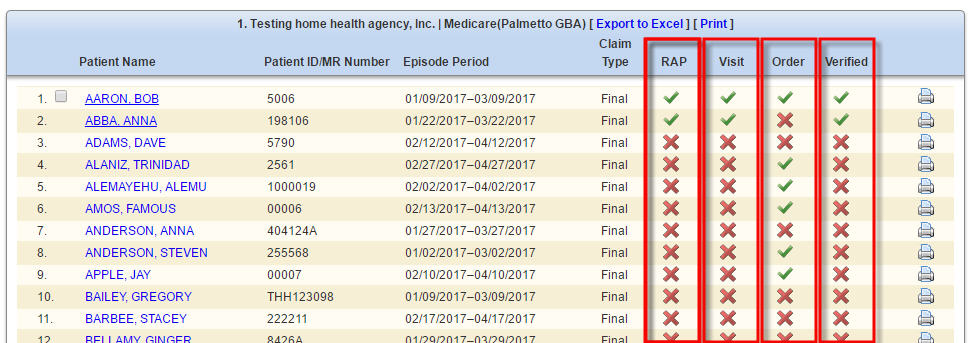
The first three columns consist of the patient name, patient id/medical record number and the episode period associated to the unbilled Final. Satisfying the requirements of the next four columns (RAP, Visit, Order and Verified) is what allows you to ultimately bill the Final Claim. The columns start off in a red X status. Once the requirements are met for each of the items the X will update to a green check mark.
The RAP, Visit and Orders columns update automatically when the requirement is met within the system.

The final column, Verified, requires your action to update the status. The verified column cannot be accessed until the RAP column is satisfied. Once the RAP column is satisfied the patient name updates to a hyperlink which allows the user to advance through a four step verification process.
Clicking on the patient name hyperlink activates the verification process. The four steps of the verification process include: Demographics, Verify Visits, Verify Supplies and Summary. Once all steps have been verified the Verified column will update to a green check mark.

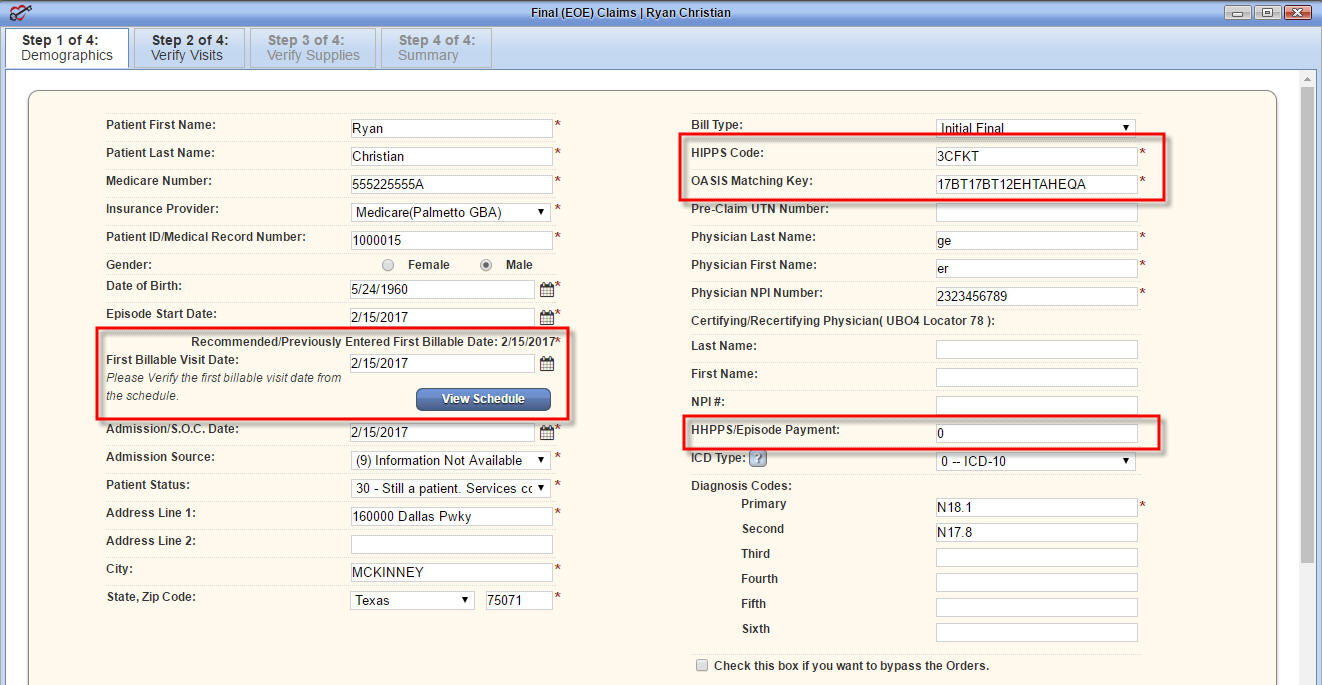
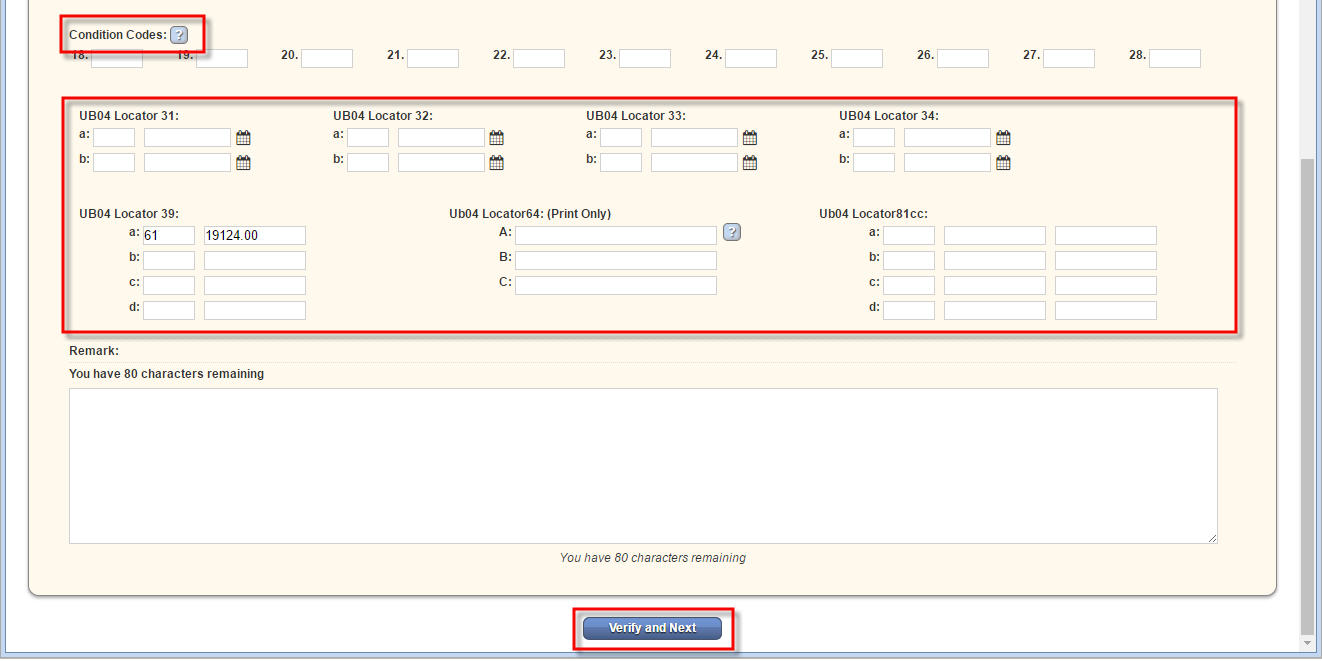
The Demographics step provides you an opportunity to validate fields and coding that will appear on the UB04 invoice to the payor. Fields that require completion are highlighted with a red asterisk. There are a couple fields I would like to point out in particular:
Once all the information is verified and updates made as needed select the Verify and Next button. This will take you to step two of the process.
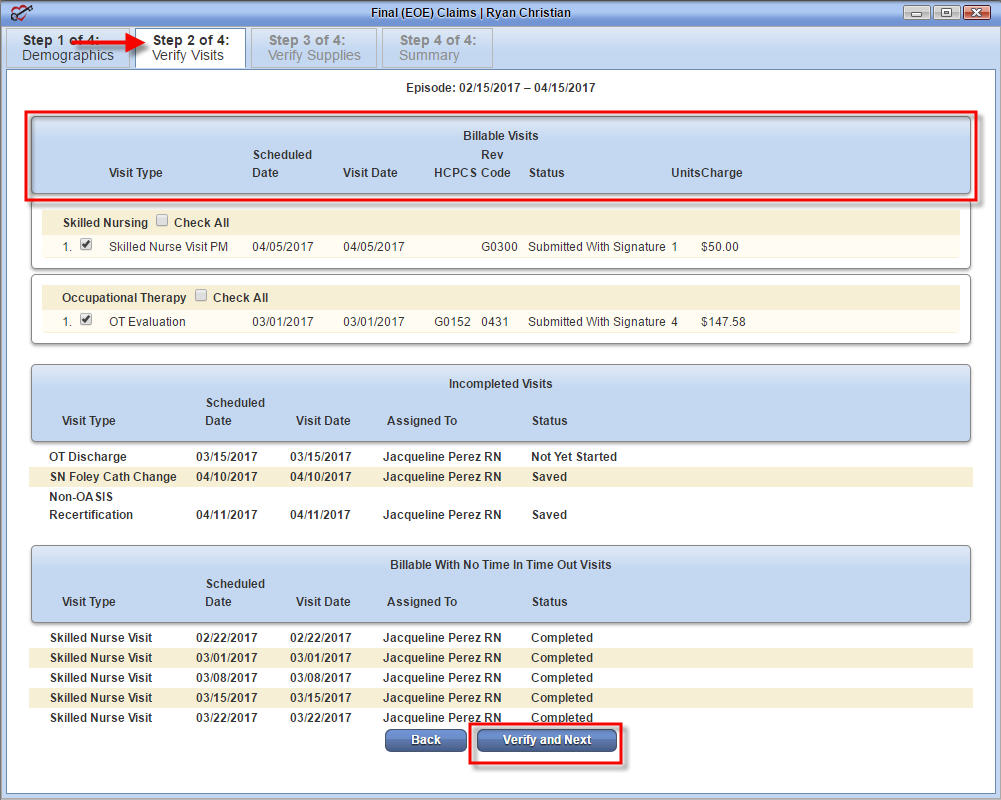
Step 2 is to Verify Visits: all visits in a completed status will pull to the verify visits page of the claim verification process. The page is separated into two sections: Billable Visits and Non Billable Visits. The columns include the Visit Type, Scheduled Date as well as Visit Date (actual), the HCPCS code, Visit Status, Units (# of 15 min) and Charge. Verify the information and make any needed adjustments through either the schedule center or patient chart. Accessing the scheduler will also allow you to determine if there are any non-completed visits. You will uncheck any visits that are determined not appropriate for billing. Once the review is complete click Verify and Next to go to Step 3 or Back to revisit Step 1.
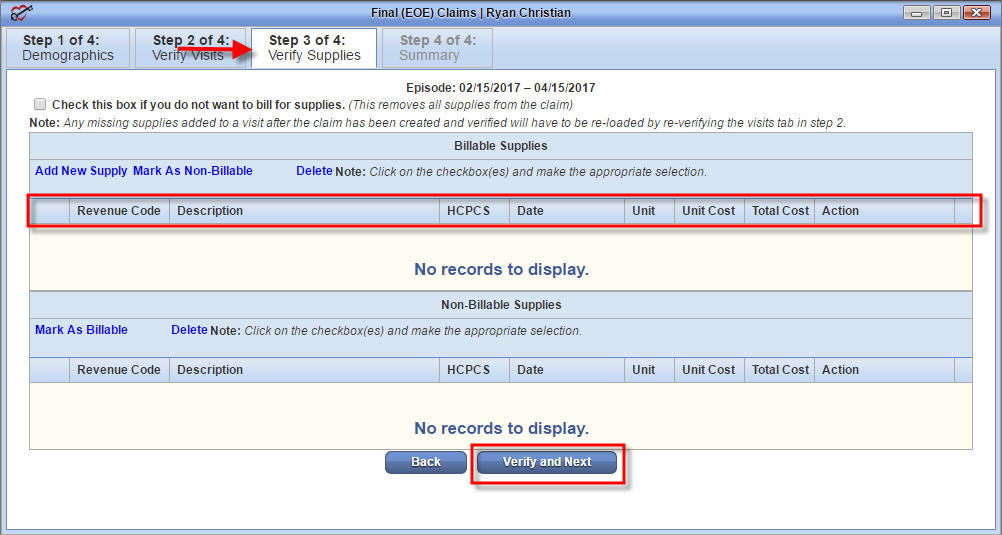
Step three in the process is to Verify Supplies. Supplies added to visit notes will populate line items on this page. You can add, edit or delete supplies during the supply verification process.
The supply list is separated into two sections: billable and non-billable. A supply in the billable section may be marked as non-billable by selecting the supply and choosing the Mark as Non-Billable action button. The reverse is available in the Non Billable supply section. If you wish to exclude all supplies from the claim select the “Check this box if you do not want to bill for supplies” statement.
The supply list contains several columns. From left to right you have the Revenue Code, Description, HCPCS code, Date the supply was added, number of Units, Unit Cost, Total Cost and Action. Maintain the supply information through the supply list contained within the Home Health solution. Please refer to the Supply Maintenance tutorial for detail instruction on adding, editing and maintaining supplies for your agency.
Once supplies are verified you again have the option to choose Verify and Next to move to Step four of the process or Back to review step two.
The final step of the verification process is the Summary screen. This provides a review of the information as it will appear on the claim. If you identify any needed changes go back to the appropriate step to update. The first two sections of the Summary page contain the demographic information found in Step 1.
The third section lists the RAP line item, supply cost if applicable and all of the billable visits for the episode.
The bottom section contains the total charges for the episode as well as the option to go Back, Print the information or Complete the process.
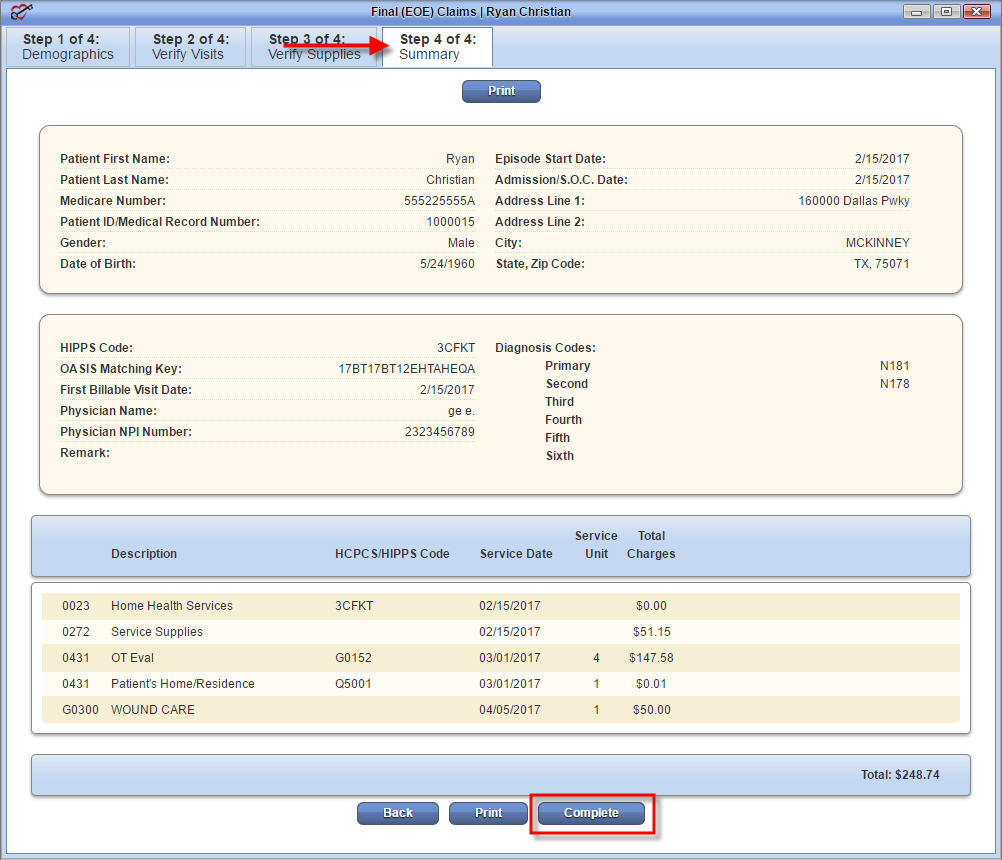
Choosing Complete brings you back to the Final screen where the Verified column is now updated with a green check mark. If all columns requirements are met the patient’s name will have a selection box in front of the name and all columns will have a green check mark.

![]() Located at the bottom of the page are two options: Generate Selected and Generate All Completed.
Located at the bottom of the page are two options: Generate Selected and Generate All Completed.
You are able to individually select the patients you wish to bill Final invoices on, then select Generate Selected. While selecting Generate All Completed pulls all patients who have the selection box available for billing. These are the patients who have green check marks across the RAP, Visit, Order and Verified columns.
Choosing either Generate button takes you to the Final Claim Summary page which give you the ability to review all patients that will be processed with that particular claim submission. The summary page displays the patient name with medical record number; Medicare number, episode date the Final is associated to and the claim amount.

Once a final review is completed you have one of two submission options available: Download Claim(s) or Submit Electronically.
![]() Download Claim(s): is present for Medicare until the intermediary processes your agency’s EDI paperwork. It is present for Medicare HMO payors if your agency opts not to use electronic submission. Select the Download Claim(s) button, save to your computer, and then upload to Medicare through your portal of choice. Once the download and subsequent upload is completed the select Mark Claim(s) as Submitted. Marking the claims as submitted removes the Final claim from the Create Final Claim screen.
Download Claim(s): is present for Medicare until the intermediary processes your agency’s EDI paperwork. It is present for Medicare HMO payors if your agency opts not to use electronic submission. Select the Download Claim(s) button, save to your computer, and then upload to Medicare through your portal of choice. Once the download and subsequent upload is completed the select Mark Claim(s) as Submitted. Marking the claims as submitted removes the Final claim from the Create Final Claim screen.
Once you are set up with electronic billing, choose Submit Electronically and your claims will be sent to Medicare. This updates the claim status to submitted and pulls the claim off the create RAP claim menu.

Once the claim is submitted from the Claim Summary screen the file moves to the Pending Claims list. Pending Claims can be found in two places.
1. Toggle over the Billing tab, choose Medicare / Medicare HMO and then select Pending Claims.
2. Toggle over the Billing tab, choose Claim Submission History and select Medicare / Medicare HMO.
 The Submit Electronically option is available for Medicare once the EDI paperwork has been processed by your agency’s intermediary. It is available for Medicare HMO payors if your agency wishes to bill electronically through the Home Health solution. In this instance Axxess will create an account for your agency. Once set up, choose the check box for the electronically submit claims in the EDI Information section when creating the insurance payor.

![]()
 The billing process does not end with the submission of either the RAP or Final Claim. You must track and follow-up on claims to ensure payment and collection of revenue.
The sub-menu selected under the Medicare/Medicare HMO will be determined by the type of follow-up being performed.
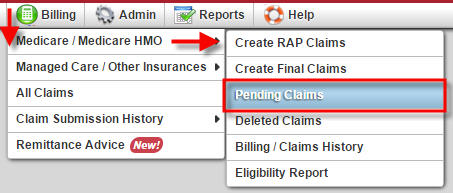 The Pending Claims menu allows you to view and track patient claim information for all RAP and Final claims submitted for payment.
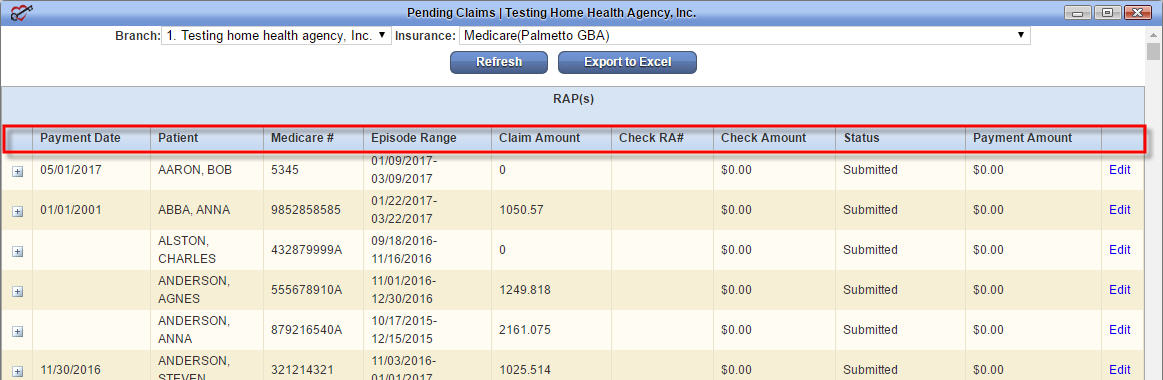
The default parameters in the Pending Claims are set to Branch: your primary agency and Insurance: Medicare. You can change the parameters as needed. The screen is split into two sections…RAPs and Finals. This allows you to focus follow-up action by claim type.
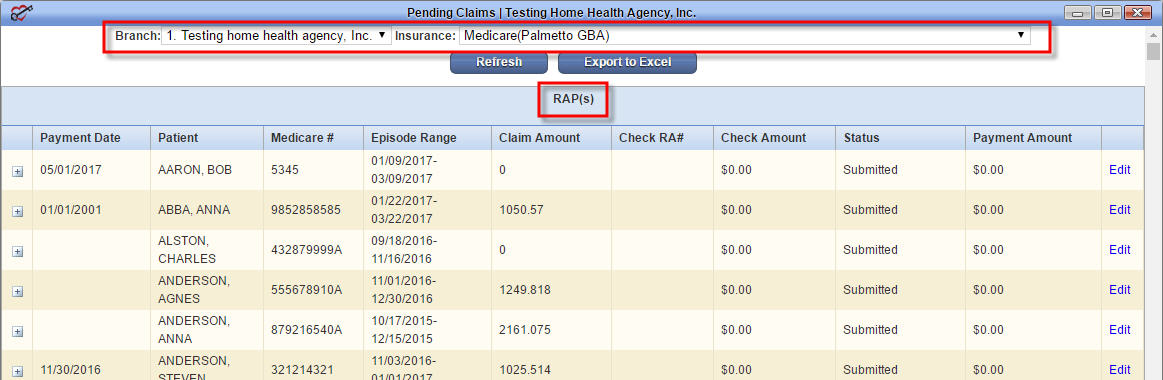
The columns of the Pending Claims menu include: Payment Date, Patient, Medicare #, Episode Range, Claim Amount, Status and Payment Amount. The last column does not have a title however it is the Action column. Clicking on a column header will order the displayed information by the column selected.
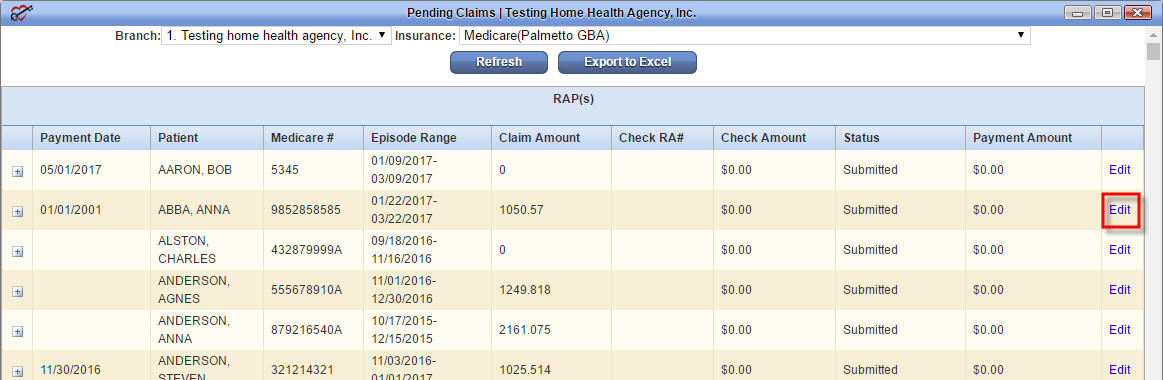
The Edit feature located under the Action column allows you to update payment status as the claim is tracked with the payor.
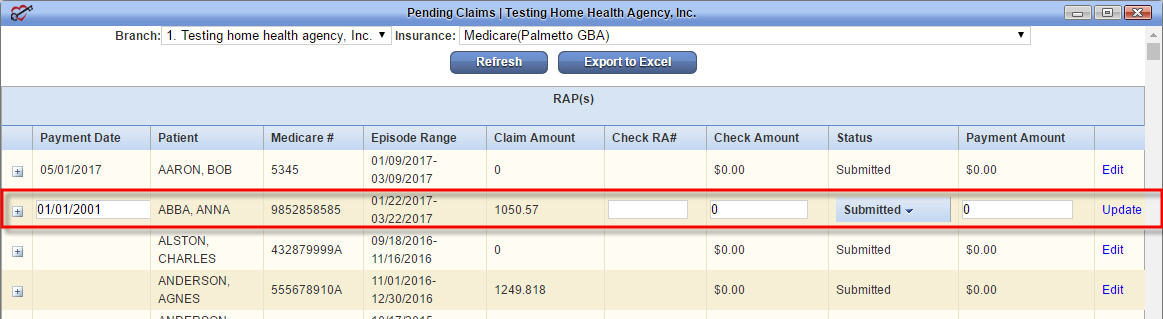
Selecting the Edit button opens the Payment Amount, Status and Payment Date fields for the claim. One or more fields may be updated as needed. The Status field is a drop-down list. Once updated select to either Update or Cancel the information. A sample of the values in the drop-down menu include: Processed as Primary, Processed as Secondary, Reversal of Previous Payment, Accepted/Processing, Payment Pending and Rejected.
Once the claim has been updated to a paid status the line item will drop off the Pending Claims list. Payment details can be reviewed from the Billing Claims History.
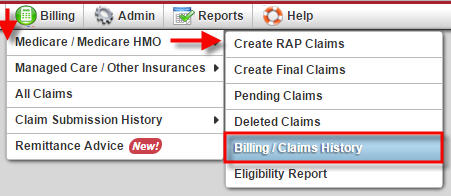 The Billing Claims History contains all Medicare/Medicare HMO billing by patient for the agency. To access the Billing Claims History page hover over the Billing tab, choose Medicare / Medicare HMO and choose Billing/Claims History.
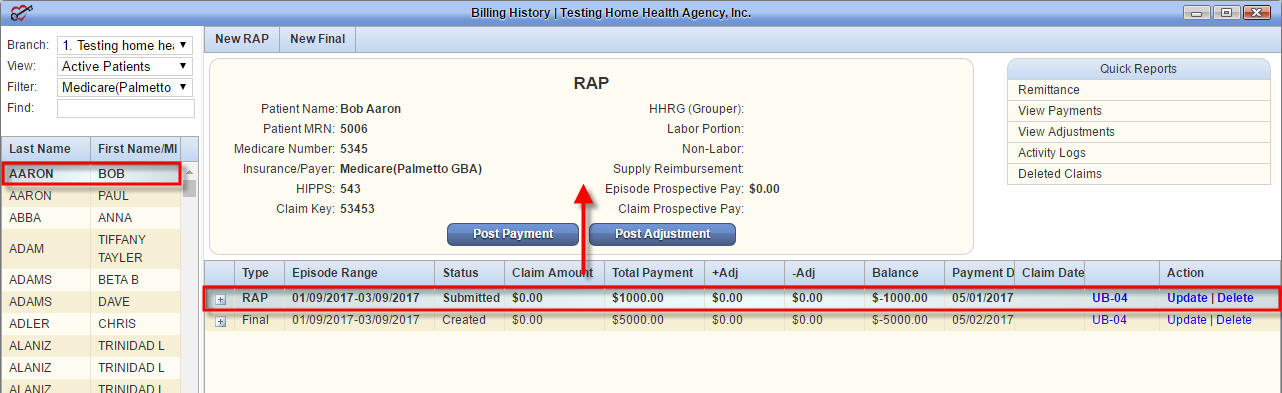
Find and select the patient from the patient list on the left-hand side. The list defaults to Active Medicare patients, but filtering criteria may be adjusted as needed.
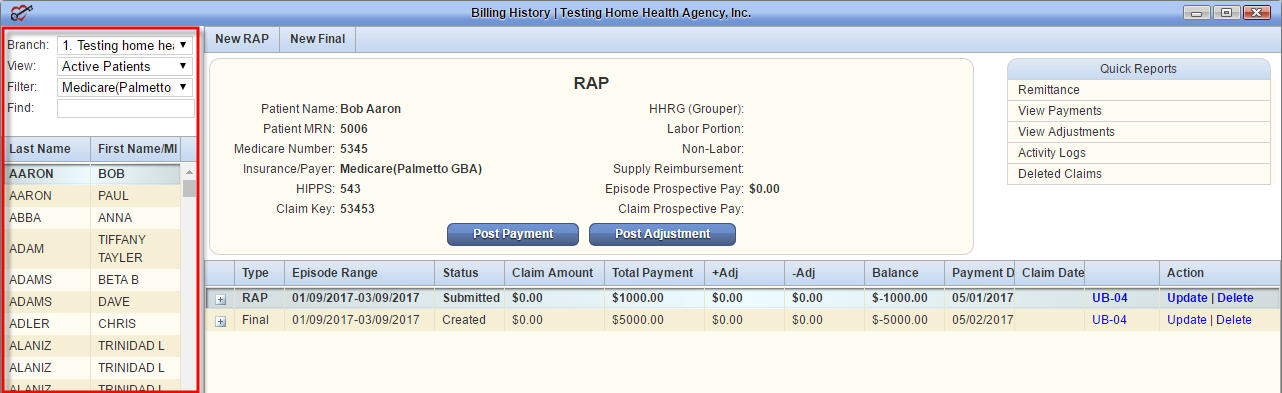
Once the patient is selected his/her information will show up on the right-hand side of the screen. Basic information for the first claim is displayed above the claim list. In this example, the first claim listed is a RAP. The claim listing columns include Type, Episode Range, Status, Claim Amount, Payment Amount, Payment Date and Action. The basic information presented when a claim is selected includes the claim type, patient name, medical record number (MRN), Medicare Number and Insurance/Payer.
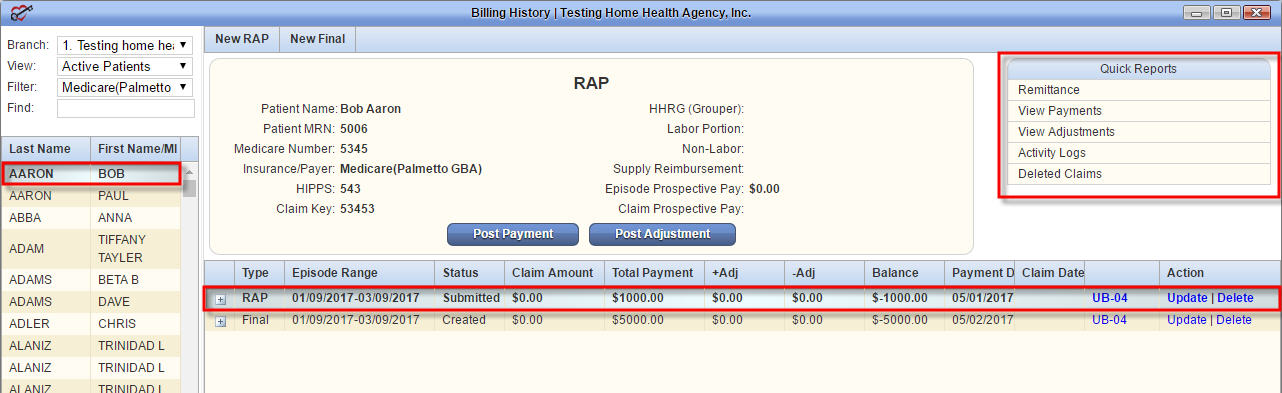
To the right of the basic information are Quick Reports associated to that particular claim. The quick reports for this example include Remittance and Activity Logs. The Remittance report will provide the remittance advice details for the claim if one exists. The Activity Logs show when changes were made to a claim and who made the change/update.
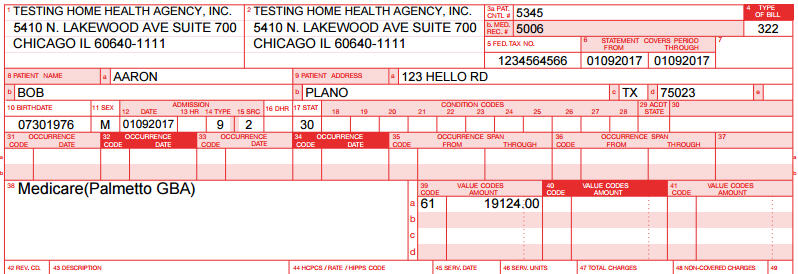
Axxess Home Health provides the ability to view the claim in its UB04 format by selecting the UB-04 hyperlink displayed in the claim information line.
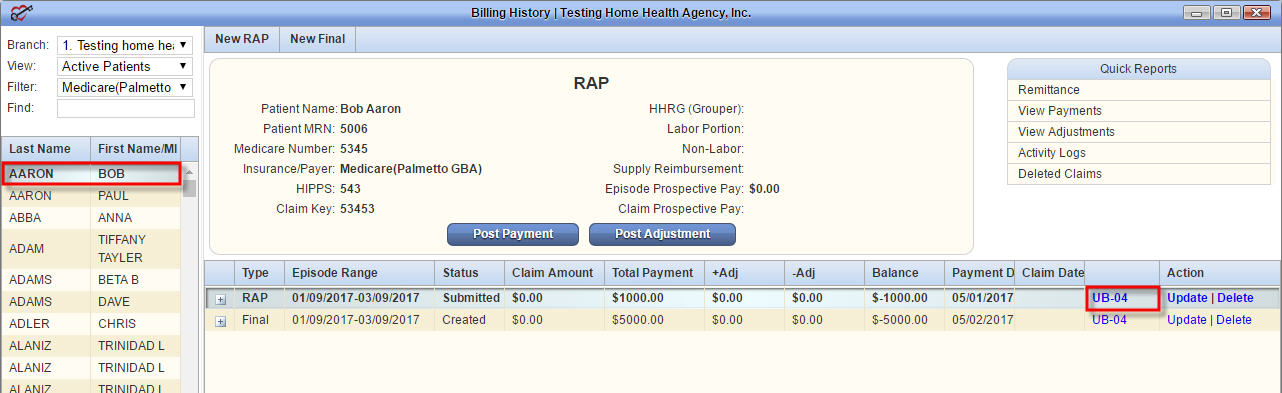
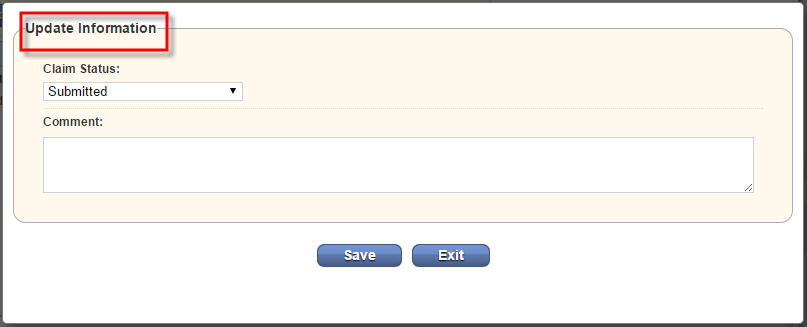
With permissions, you may also Update or Delete a claim.

The update action item allows you to update the claim status, payment amount and payment date. You can also attach comments, if desired. Once information is entered select Save to update the information or Exit to cancel the update.
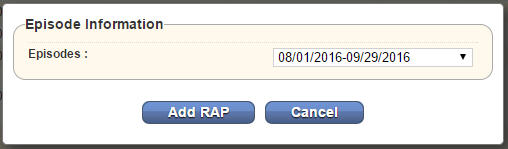
The last item within the Billing History for a patient is the ability to create a New RAP or New Final if needed. While the system automatically creates RAP and Final claims, there may be exceptions when you need to create a new RAP or Final for a patient.
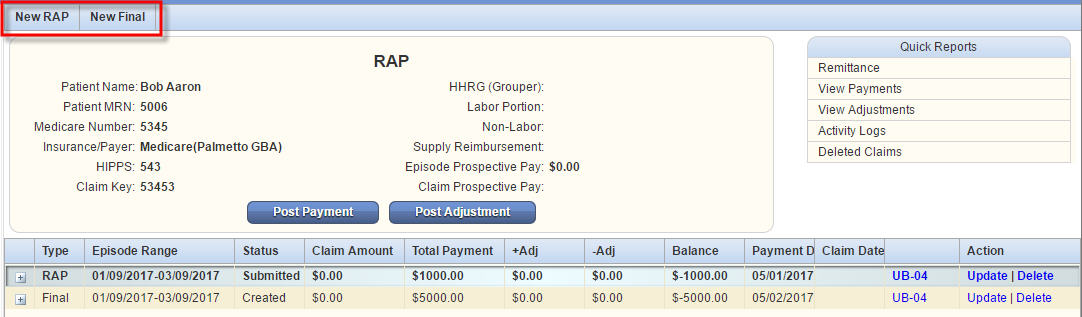
Selecting either New RAP or New Final creates a pop up window that contains a drop-down list of episodes that exist for the patient. You can select the episode you wish to generate the new RAP or new Final for, and then select the appropriate Add button. Cancel will not create a new claim.

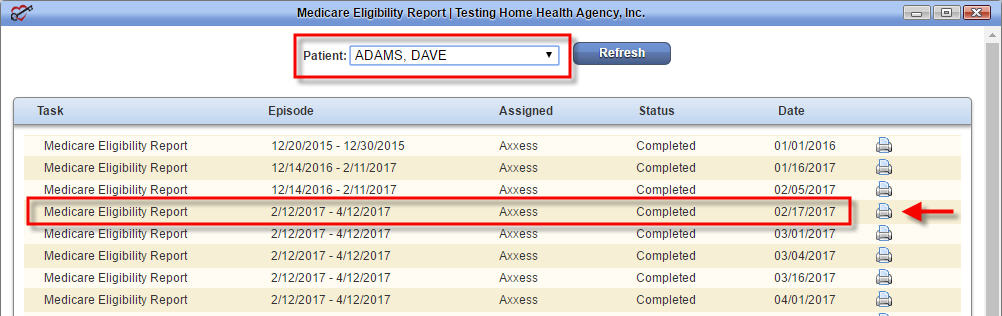
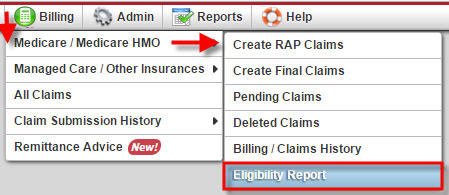 The last item under the Billing tab for Medicare/Medicare HMO is the Eligibility Report
The Eligibility Report provides a view of all the Eligibility Reports completed for a patient. Simply select the patient from the drop-down list, then select the refresh button. Typing part of the patient name will filter the list.

Once the patient is selected, the Home Health solution will display all the eligibility reports in list format for the patient. The Home Health solution runs bi-weekly eligibility reports for all patients with an active status for your agency. The eligibility report list contains 5 columns:
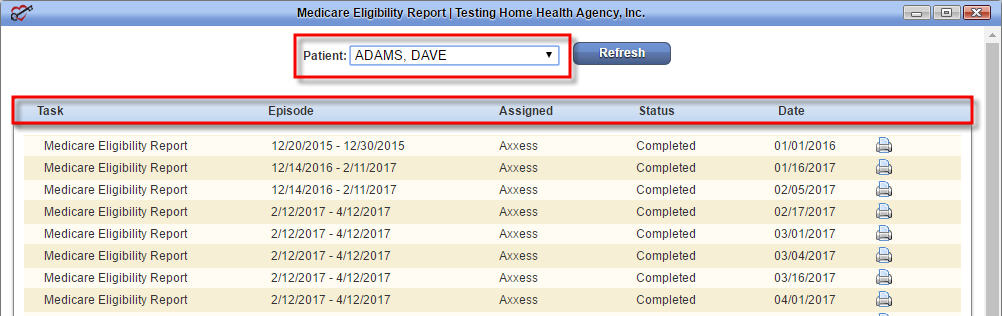
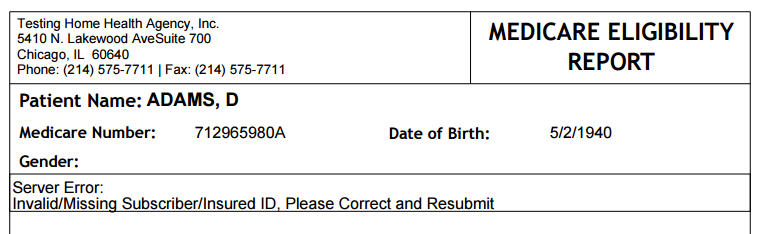
To view the details of an eligibility report select the printer icon associated with the line item.