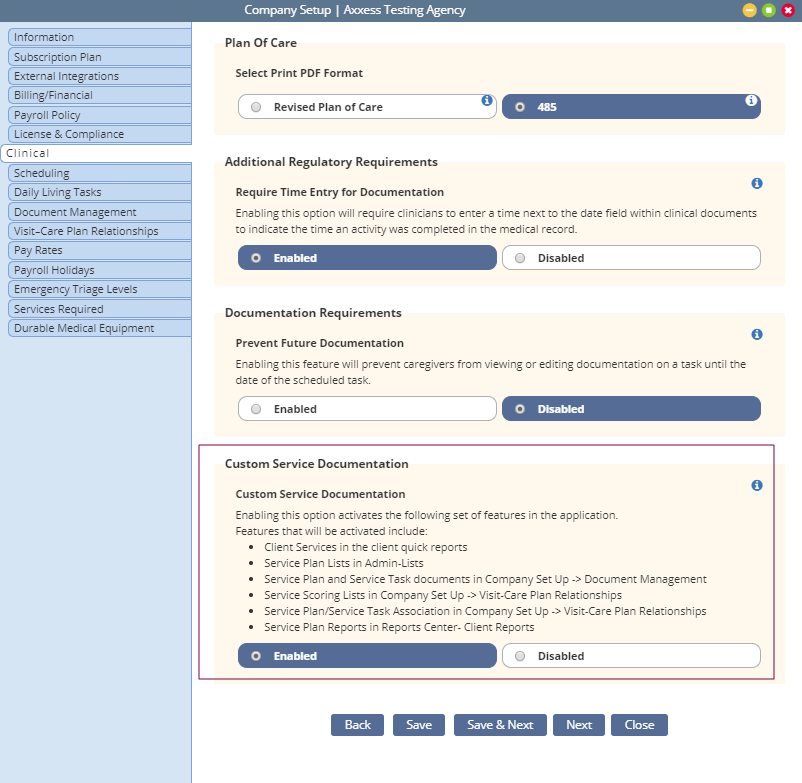
Custom service documentation is a multifaceted feature ideally suited for agencies providing paraprofessional services that fall outside traditional personal care with ADL support.
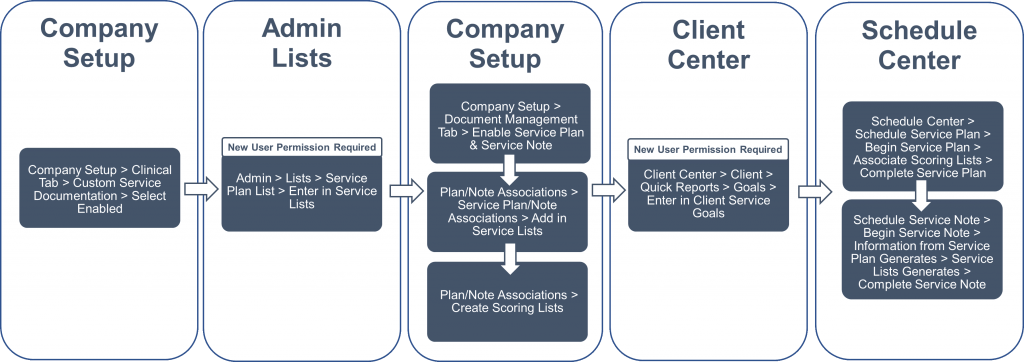
To enable Custom Service Documentation, select Company Setup under the Admin tab. Navigate to the Clinical tab and select Enable under Custom Service Documentation. Click Save to complete the process.
Admin tab ➜ Company Setup ➜ Clinical tab ➜ Custom Service Documentation ➜ Enable ➜ Save
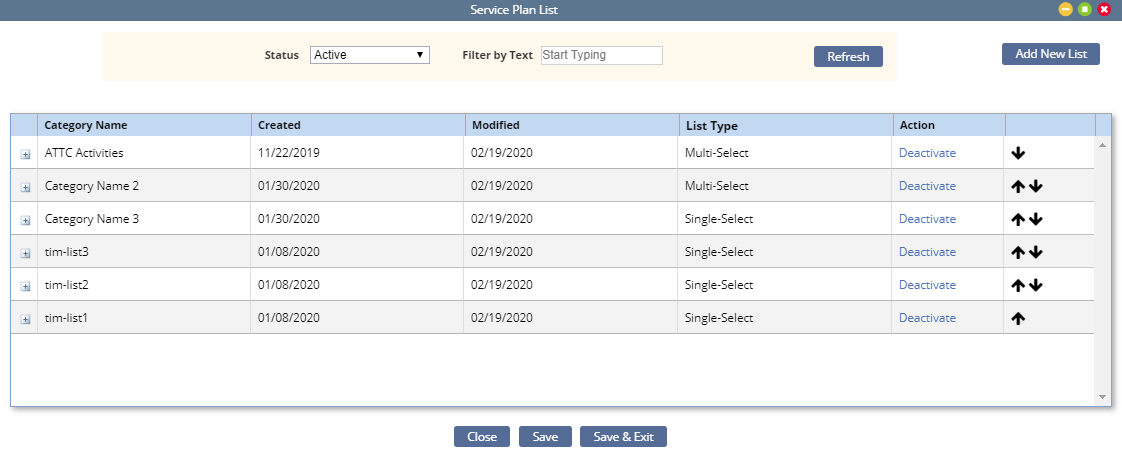
The first step after enabling the feature is creating service plan lists that will appear in your agency’s service notes. To create service plan lists, navigate to the Admin tab, hover over Lists, and select Service Plans from the drop-down menu. The ability to access service plans is permission-based.
Admin tab ➜ Lists ➜ Service Plans (permission-based)
The service plan list enables agencies to create single-select or multi-select lists for caregivers to use during service note documentation. Active lists can be linked to service plans/notes in the Visit-Care Plan Relationships tab of Company Setup.
The service plan list default view shows all active lists. Users can reorder lists using the up/down arrows on the right side of the table. Users with permissions to deactivate lists will see the Deactivate button in the Action column.
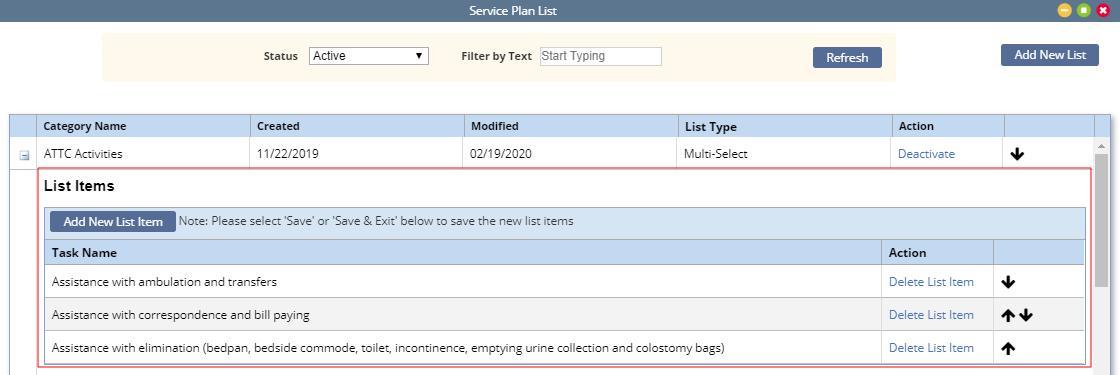
Click the plus sign to the left of a category name to view all values in the list. Select Add New List Item to add an item to the list. Select Delete List Item in the Action column to delete an item. Reorder the list using the arrows on the far-right side.
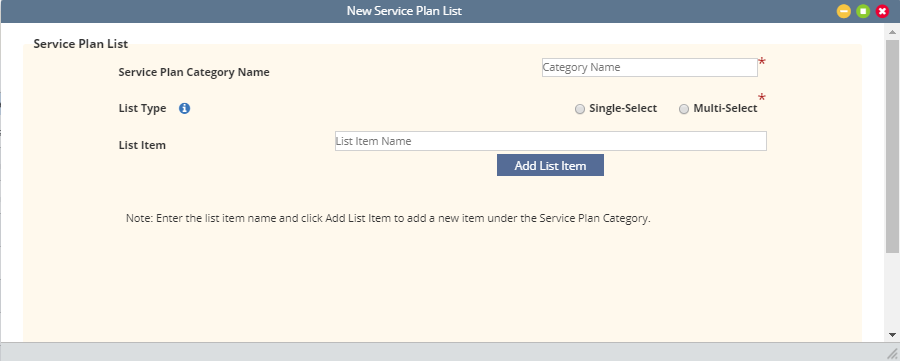
To add a new list, select Add New List in the top right corner of the Service Plan List window.
Enter a name in the Service Plan Category Name field.
Select a list type. Single-select lists limit caregivers to one item when completing service notes. Multi-select lists enable an unlimited number of items in the list to be selected.
Add list items. To add a list item to the service plan category, enter a name in the List Item field and click Add List Item.
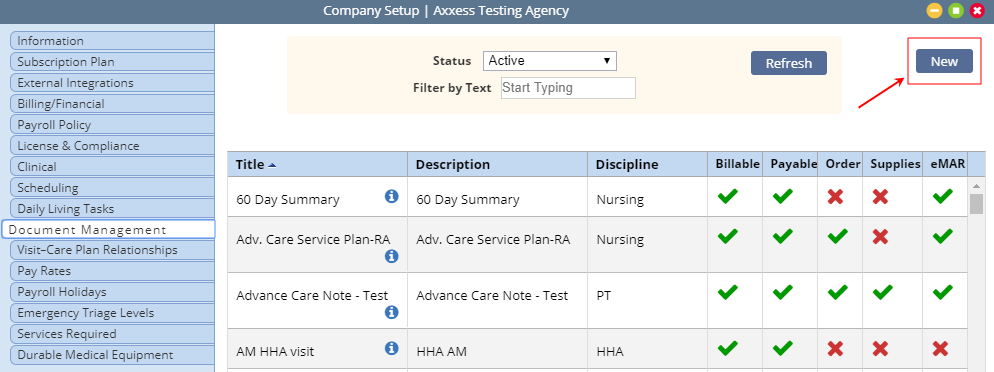
To activate documents, select Company Setup under the Admin tab and navigate to the Document Management tab. Select New in the top right corner of the screen.
Admin tab ➜ Company Setup ➜ Document Management tab ➜ New
Add a service plan and service note for each type of service your agency provides.
Repeat these steps for each service document you want to create.
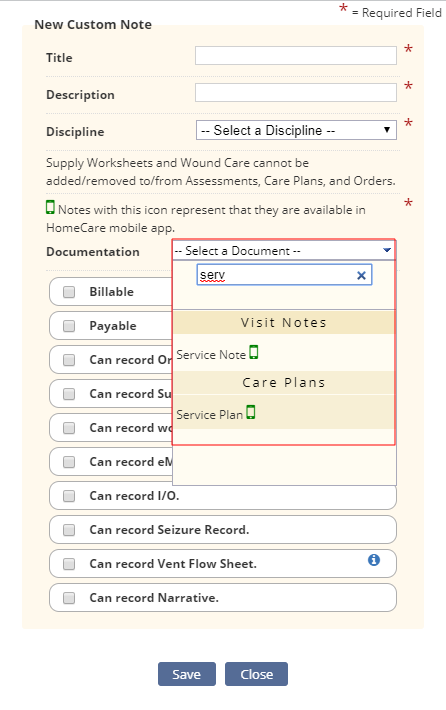
After entering the title, description and discipline, users can search in the Documentation field to narrow down and select from the list of documents.
The Service Note document is under the Visit Notes category. The Service Plan document is under the Care Plans category.
After selecting the documentation note, indicate if the note is billable and/or payable and select any additional addendums to include in the note.
Once service plan lists have been created, enter client goal scoring and set up service plan and service notes in the Document Management tab of Company Setup before associating service plans to notes.
Admin tab ➜ Company Setup ➜ Document Management tab
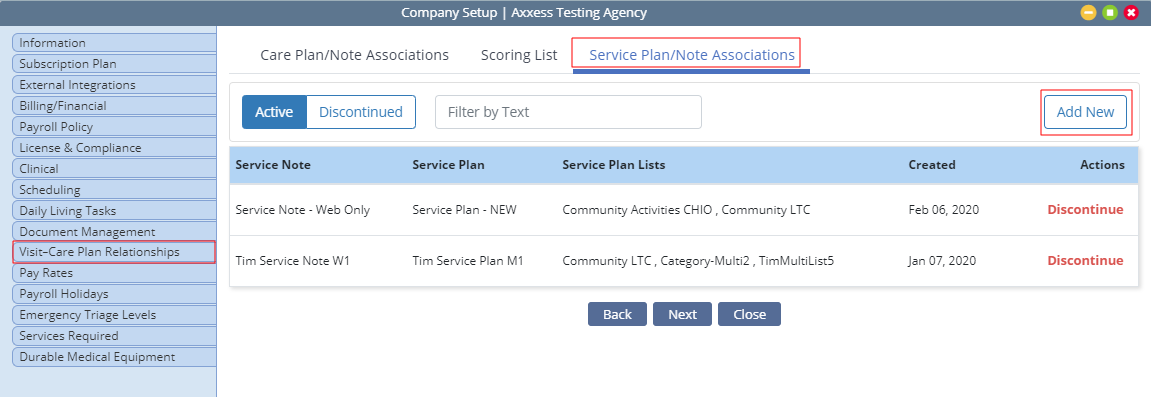
To associate service plans to notes, navigate to the Visit-Care Plan Relationships tab of Company Setup, and click Service Plan/Note Associations at the top of the screen.
Admin tab ➜ Company Setup ➜ Visit-Care Plan Relationships tab ➜ Service Plan/Note Associations
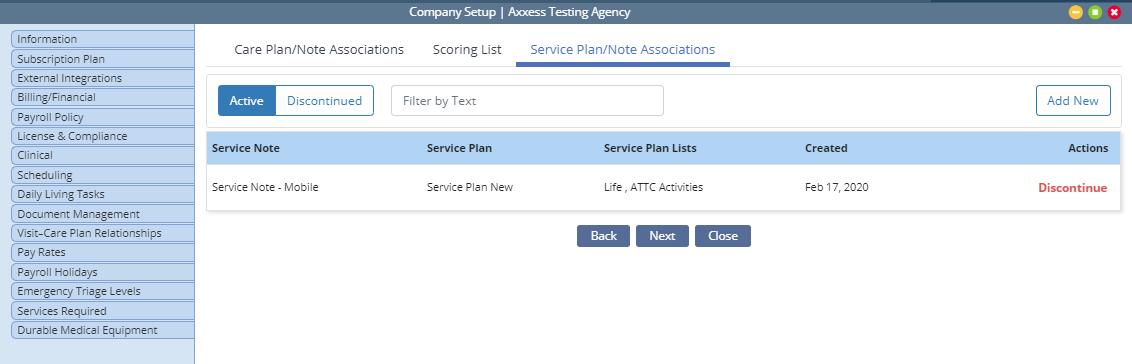
A list of all active associations will display on the Service Plan/Note Associations screen. To view associations that have been discontinued, click Discontinued in the top left of the screen.
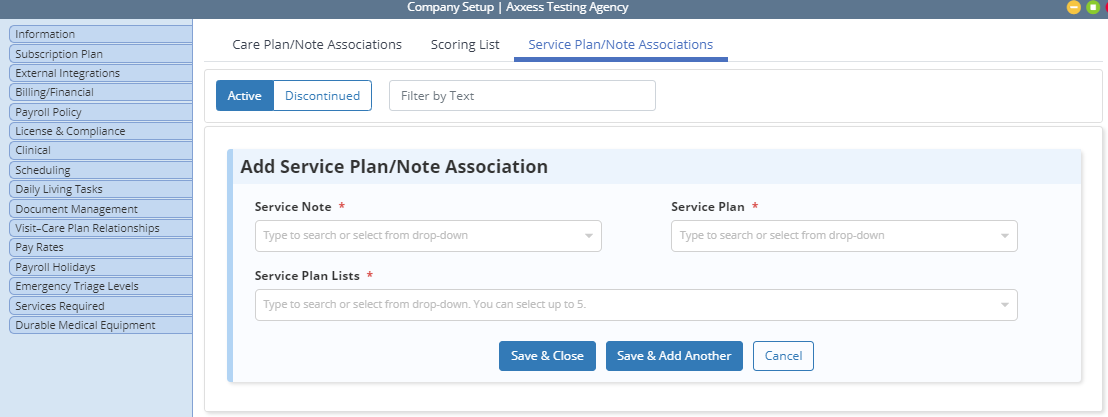
To add a new association, click Add New.
In the Add Service Plan/Note Association window, use the Service Note and Service Plan drop-down menus to select which note and plan to link. In the Service Plan Lists menu, select up to five categories to include in the service note.
Click Save & Close to finish adding the association, or click Save & Add Another to finish saving the association and immediately add another service plan/note association. Select Cancel if you decide not to add the association.
Existing service plan/note associations appear in the association table. Select Discontinue under Actions to deactivate an association.
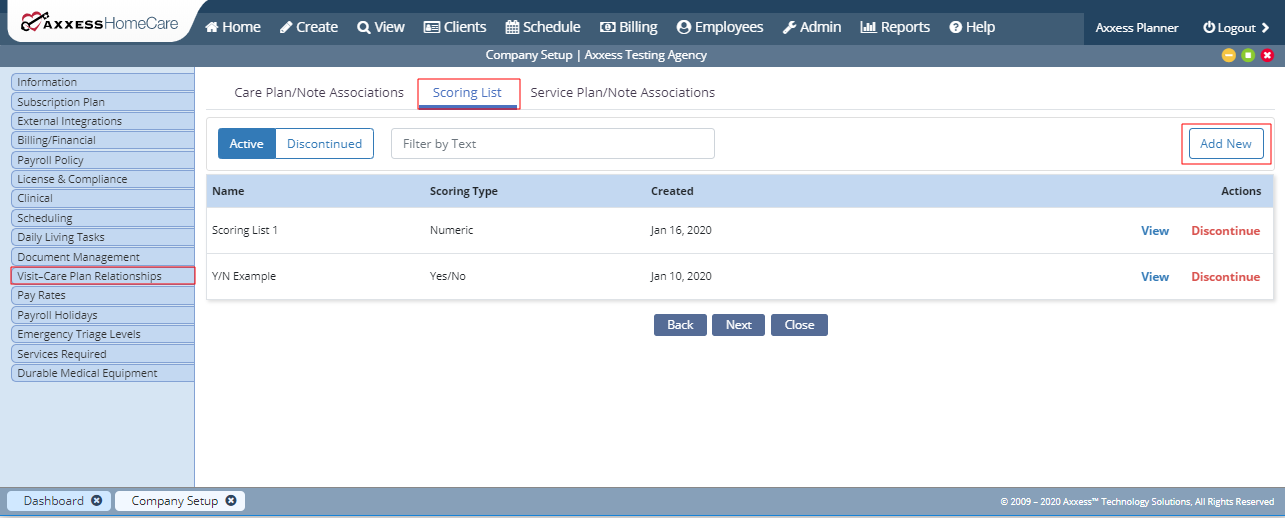
The scoring list feature enables agencies to enforce score entry when a caregiver indicates completion of a client’s goal.
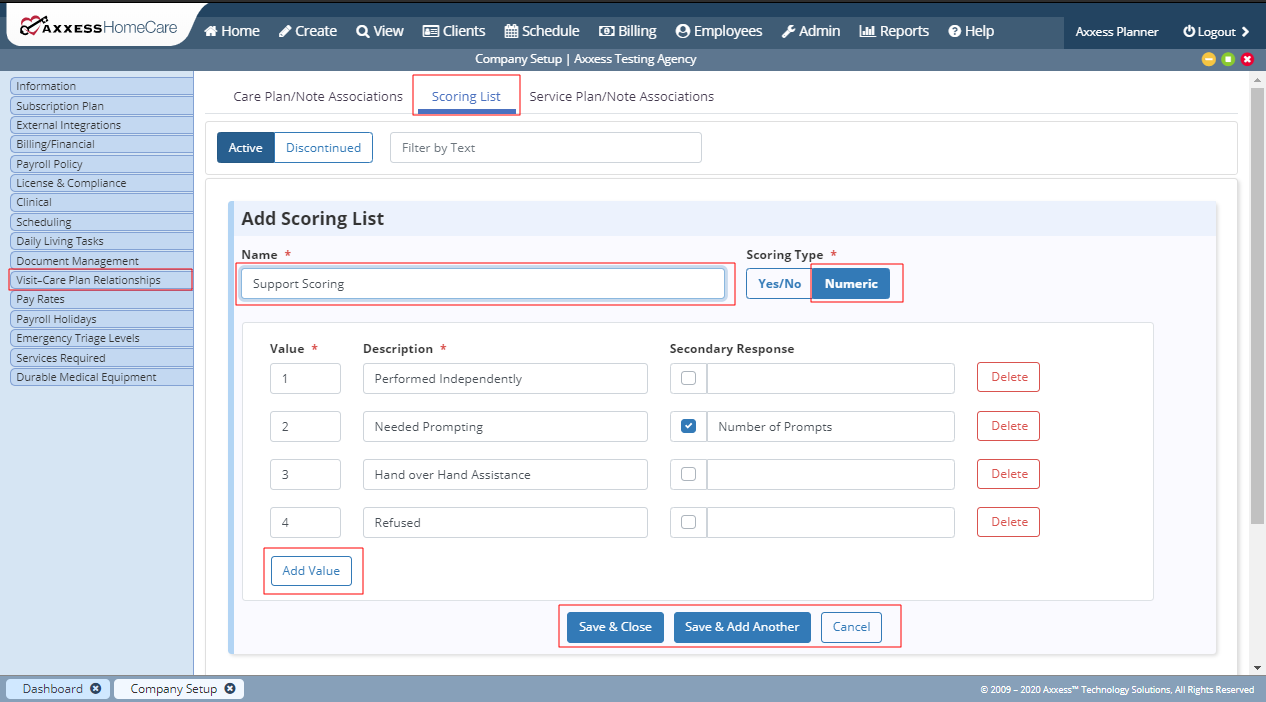
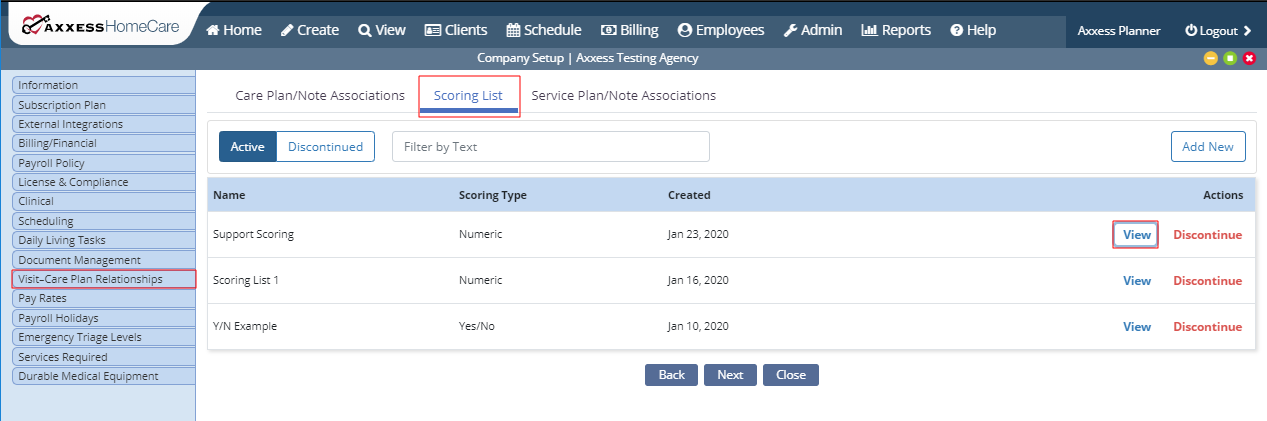
To set up scoring lists, navigate to the Visit-Care Plan Relationships tab of Company Setup. Select the Scoring List tab at the top of the screen and click Add New.
Admin tab ➜ Company Setup ➜ Visit-Care Plan Relationships tabs ➜ Scoring List ➜ Add New
On the Add Scoring List window, name the list and select a scoring type. The scoring type defaults to Yes/No.
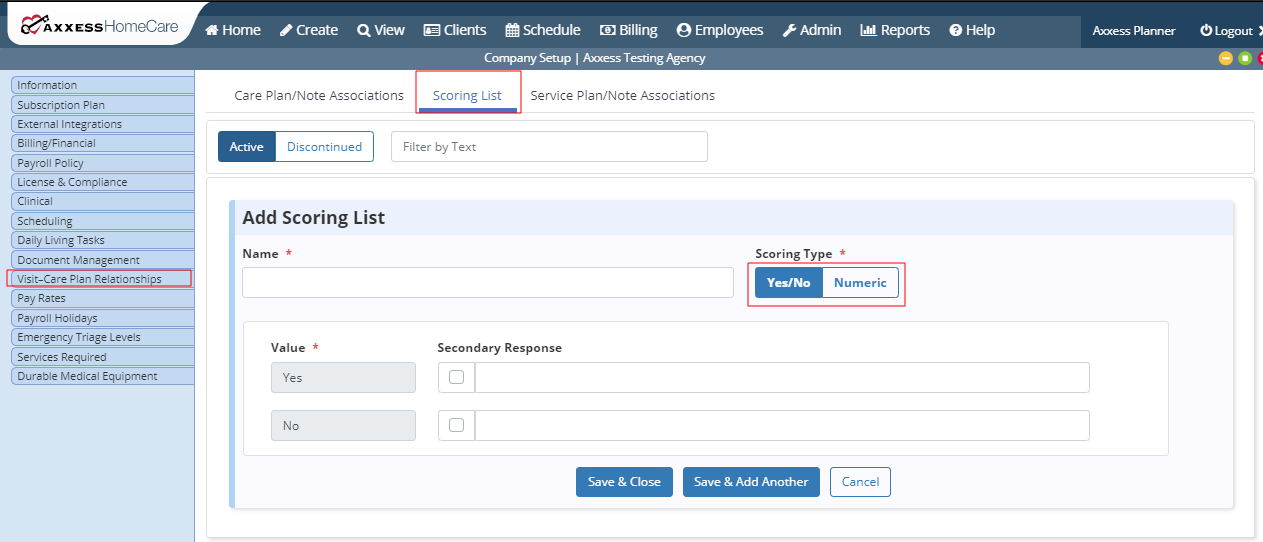
Select Numeric to create a numbered scoring list.
For each value, choose whether or not to require secondary responses. Check the box next to Secondary Response to require additional information from a caregiver when the respective response is selected.
Click Save & Close or Save & Add Another.
Once a scoring list is created, caregivers will be required to enter a score when documenting completion of a client goal. The scoring lists will be available to link to client goals in service plans.
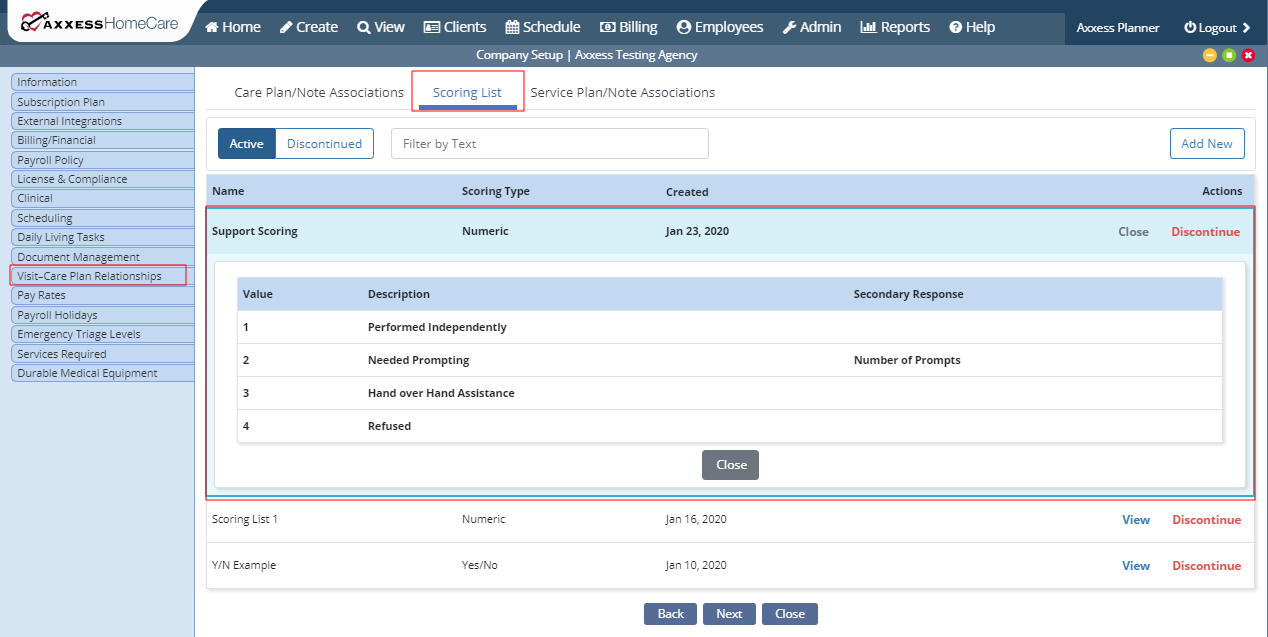
Select View in the Actions column to review existing values for a particular scoring list.
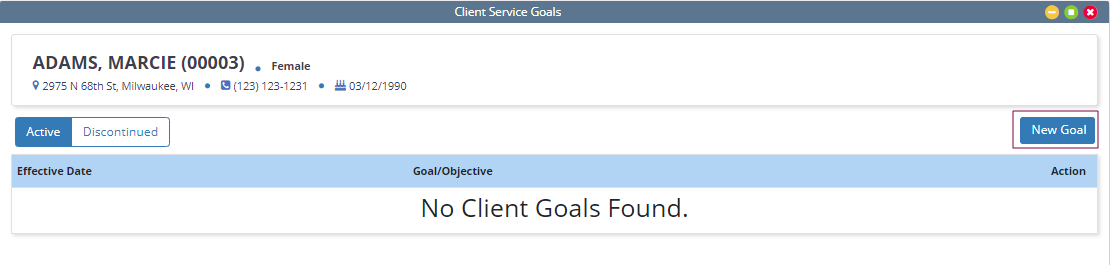
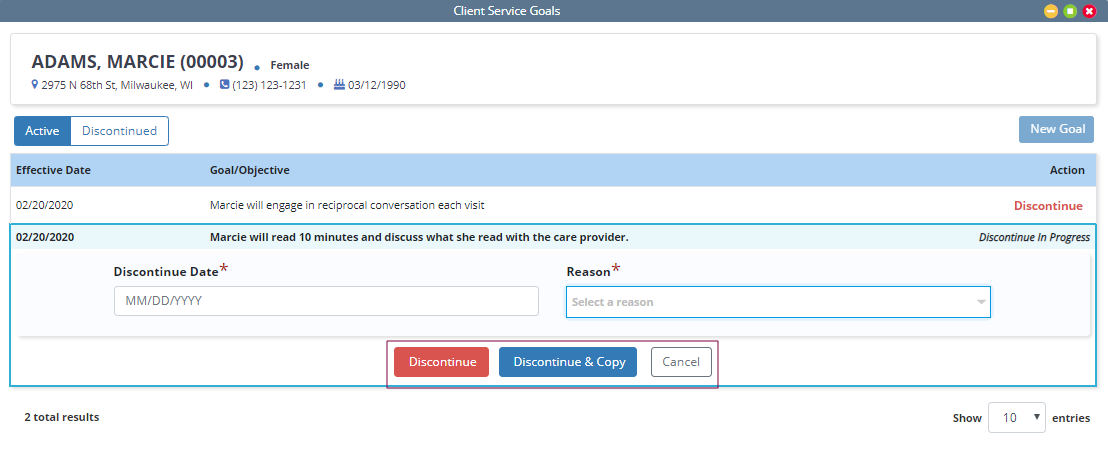
Users who have permission to view client service goals will see a new menu item labeled Client Service Goals in the Quick Reports menu of Client Charts.
Clients tab ➜ Client Center ➜ Quick Reports menu ➜ Client Service Goals (permission-based)
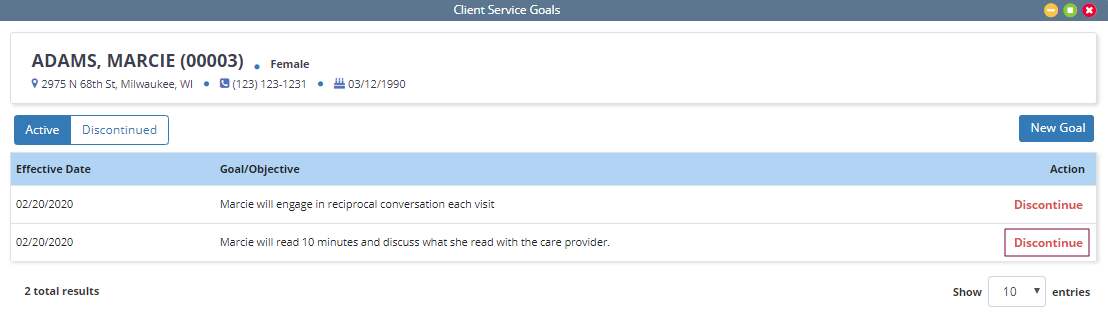
By default, active client service goals appear on the Client Service Goals screen. To view discontinued goals, click Discontinued in the top left.
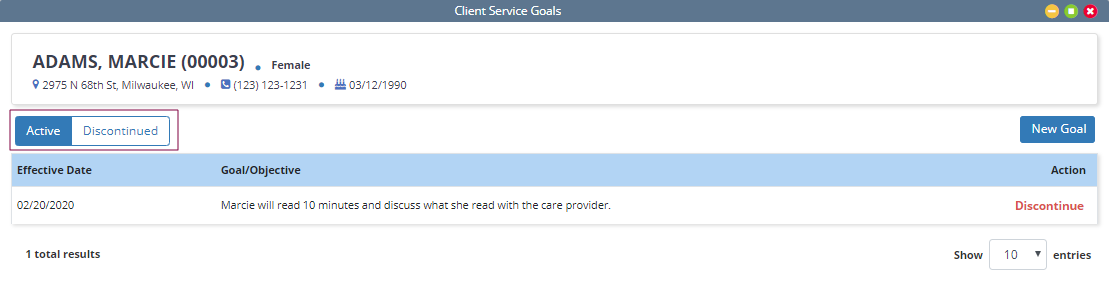
To add a service goal for the client, click New Goal in the top right corner of the screen.
Enter the effective date and goal/objective for the client. Click Save to add the goal to the client’s goal list.
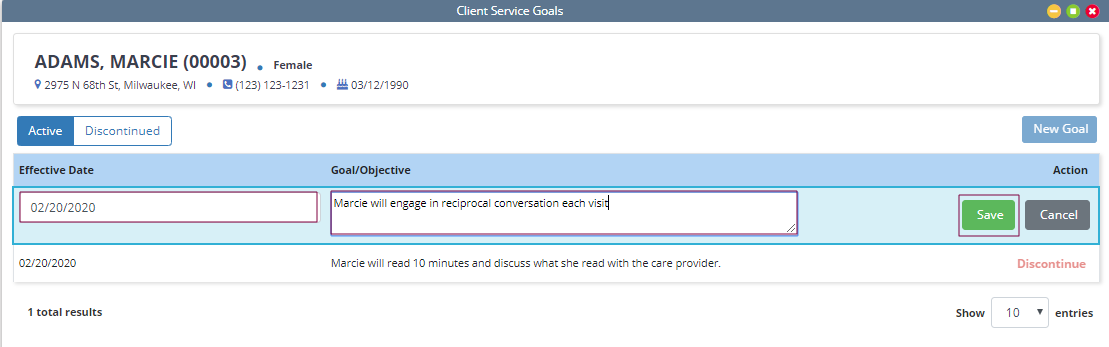
Select Discontinue to end a goal.
Enter the discontinue date and select a reason for the discontinuation.
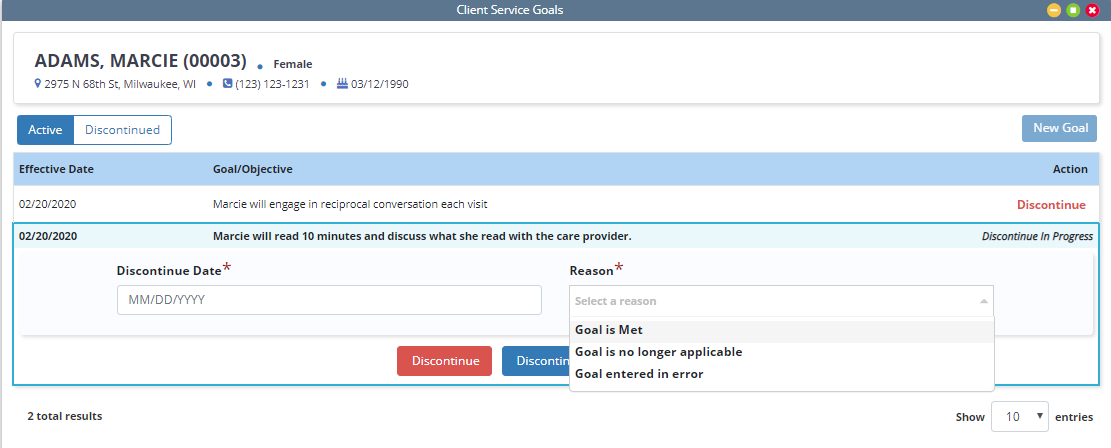
Discontinue moves the goal to the discontinued list. Discontinue & Copy discontinues the goal but copies the goal text into a new goal for editing. Cancel stops the discontinue action.
To schedule a service plan or note, navigate to the Schedule Center under the Schedule tab. In the client’s schedule, hover over the New tab and select Client Task.
Schedule tab ➜ Schedule Center ➜ New tab ➜ Client Task
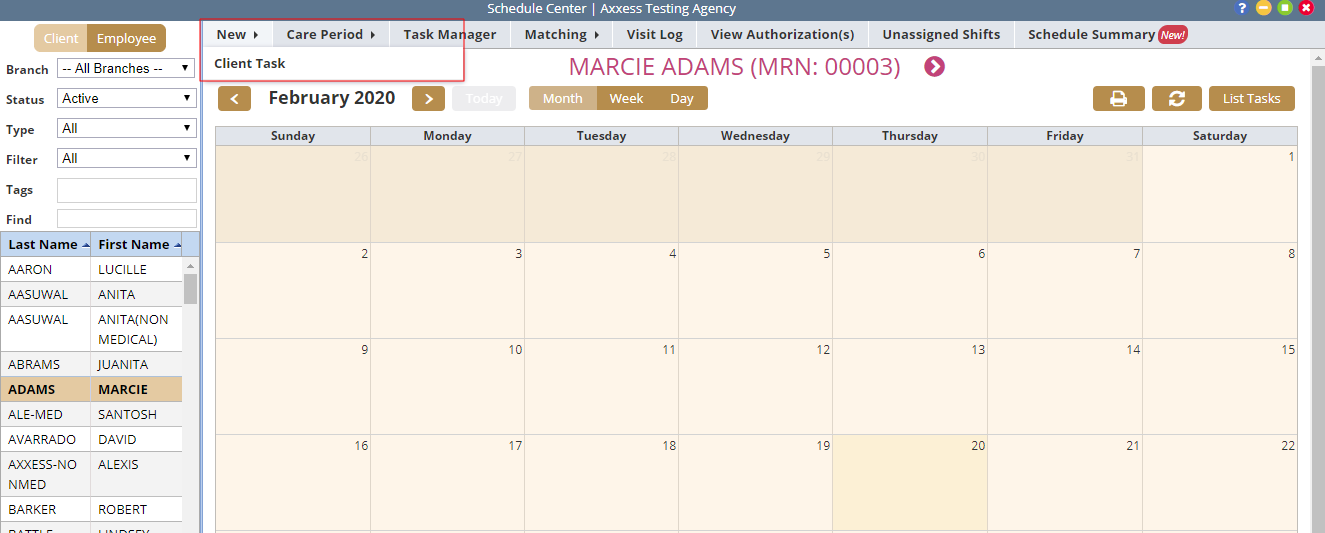
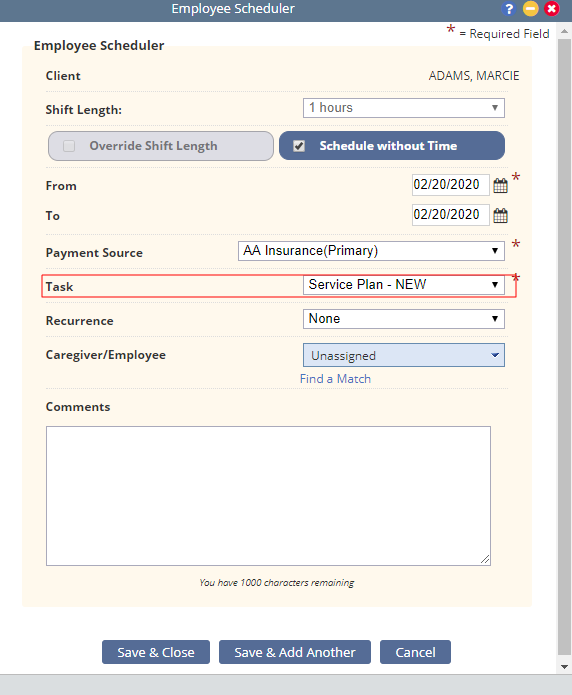
Complete the fields in the Employee Scheduler window. To schedule a service plan, select the Service Plan in the Task drop-down menu. To schedule a service note, select the Service Note option in the Task drop-down menu.
Complete the remaining fields and select Save & Close or Save & Add Another.
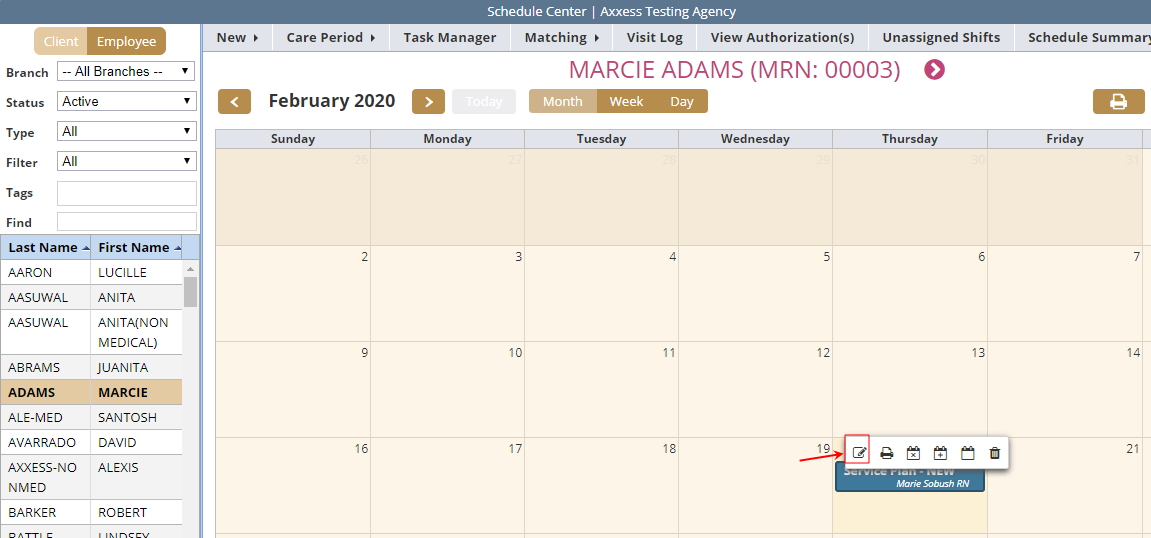
Once scheduled, the assigned staff member can complete the task.
In the Service Plan document, use the Yes/No options to indicate if each section should appear on the linked service note. Selecting Yes will expand the section to display options from a corresponding list or information that will pull from the client’s chart.

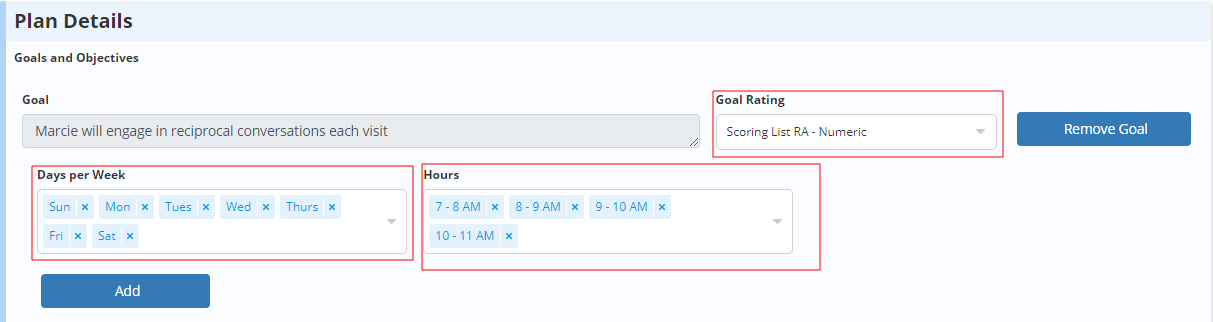
Client service goals are located at the bottom of the plan under Plan Details. Enter scoring if applicable in the Goal Rating drop-down menu.
Select days under Days per Week and hours under Hours to identify the times that goals should appear in the note. Linked service notes that are scheduled on a selected day and time will display the respective goals. Multiple day/time entries can be added for each goal.
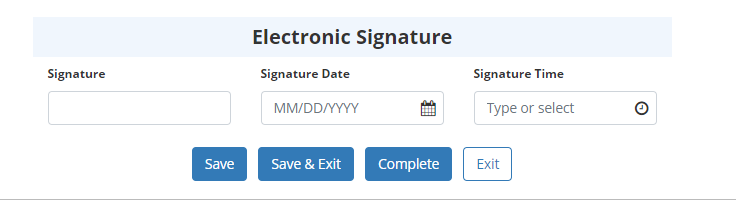
Once all sections are complete, sign and date the document in the Electronic Signature section and click Complete to complete the Service Plan.
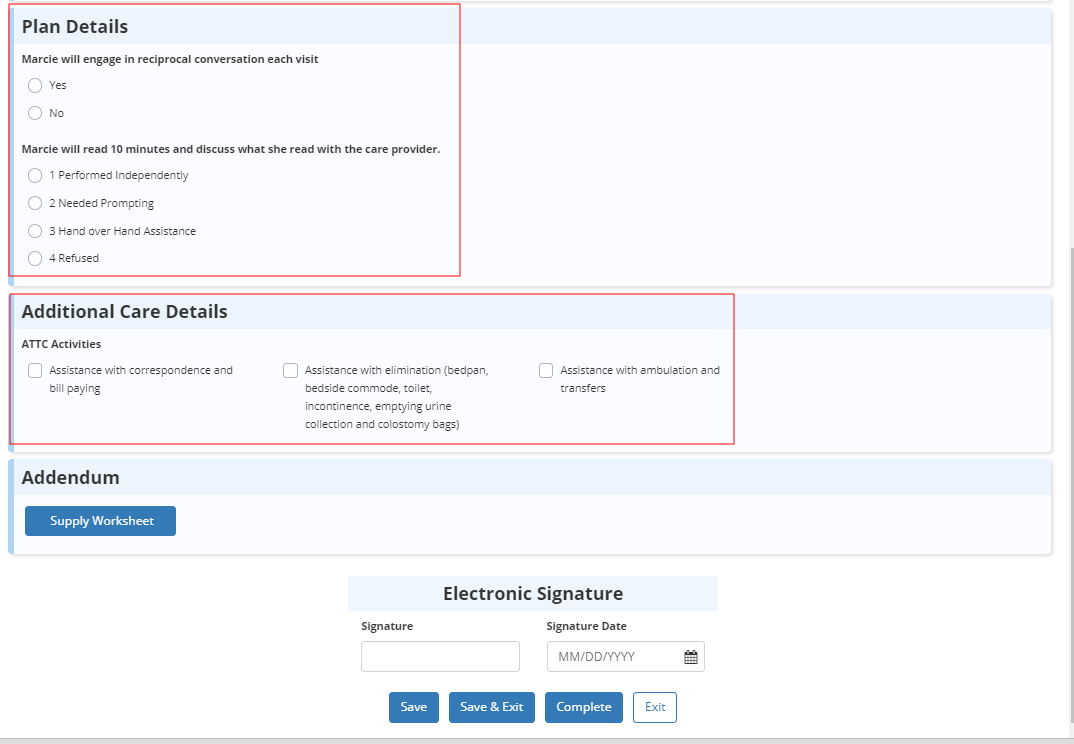
Sections of the Service Plan where Yes was selected will display as read-only text in the Service Note.
The Plan Details section displays a list of client goals based on the days/times selected in the Service Plan. If scoring was associated to a goal, it will appear below the goal for completion.
The Associated Care Details section shows all lists associated with the plan/note, so users can identify additional activities that were completed during the visit.
Once all sections are complete, sign and date the document in the Electronic Signature section and click Complete to complete the Service Note.
Updated on 3/11/2020
