Located along the top of the Axxess Home Care screen is the Menu Bar. Prior to discussing each menu title let’s go over basic functionality. Hovering over a menu bar tab will present a drop-down list of the menu items contained within that menu category. Some menu items contain a sub-menu which will appear as an arrow next to the item. An example of this is My Account under the Home tab. Clicking on a menu item will take you into that particular area of Axxess Home Care. More in-depth training on the menu items are provided in their specific training areas.
As we go through specific menus, you will notice several of the same items that we covered on the dashboard. This allows you to get to these pages from a number of places within Axxess Home Care.
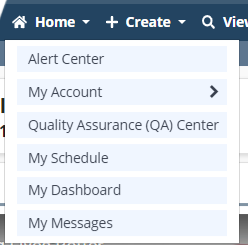
Home
Working from left to right, the first menu is the Home tab. Under this tab, you will find:
Alert Center: Opens up the Alert Center to allow you to see EVV notifications, License expiry, and paystubs; per your permissions.
My Account: Allows you to perform password and electronic signature resets as well as updating your address and phone number.
Quality Assurance (QA) Center: Where clinical documentation is processed by the QA staff. Your QA staff has the ability to view, edit, approve and return documents from within the QA Center. Documentation that passes through the QA Center is configurable. The default page view shows active client tasks that are ready for processing with an event date within the last seven days.
My Schedule/Tasks: Gives you an alternative path to access your working ‘to do’ list.
My Dashboard: Enables you to access the dashboard from the menu bar.
My Messages: Opens the Axxess Home Care messaging center, which is an easy-to-use, HIPAA compliant messaging feature within the system.
Create
With permissions, the Create tab allows you initiate many of the functional tasks your agency needs to perform to run a successful operation.
Client
Medical
Non-Medical
Referral
Medical
Non-Medical
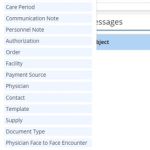
Care Period
Message
Communication Notes
Authorizations
Orders
Facilities
Payment Source
Physician
Contact
Incident Accident Report
Infection Report
Physician Face-to-Face
Pharmacy
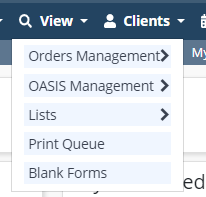
View
The View tab provides access to existing items in Axxess Home Care. Based on your permissions, you may have access to all or a portion of the list.
Orders Management: Allows you to co-sign orders and to manage the sending and receiving of all orders in the system. Full explanation of the orders management and sub-menus are covered in the Orders Management tutorial.
Lists: Gives you the ability to view existing:
Clients
Referrals
Contacts
Templates
Supplies
Facilities
Payment Sources
Physicians
Users
Incident Logs
Infection Logs
Communication Notes
Missed Visits
Personnel Notes
Pharmacies
Treatments
Print Queue: Allows viewing and printing of visit and task items. Tasks may be grouped by client, date, task or clinician.
Blank Forms: Allows you to view blank document forms that you can assign via Document Management in Company Set up as permissions allow.
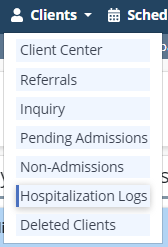
Clients
This menu provides efficient access to a variety of client related information. As in the other menu tabs discussed, depending on permissions granted, you may have partial to full access to the following items.
Client Center: This is the client’s electronic medical record.
Referrals: When a referral client is entered through the Create tab,the information pulls to the Existing Referral list to manage the admit process.
Inquiry: This allows you to see a list of inquiries entered.
Pending Admissions: Clients that were either entered through the Create tab, existing referrals that were upgraded to an Admit status or discharged clients that are pending re-admission.
Non-Admissions: Existing referrals or pending admissions that did not qualify for admission will be available here.
Deleted Clients: You would only select to delete clients if your agency does not want them on any report, including the non-admit.
Hospitalization Logs: Clients with a completed transfer to inpatient facility will move to the hospitalization log. This allows the agency to quickly identify and manage their hospital list.
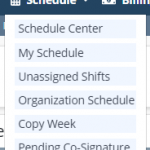
The Schedule tab contains:
Access to the Schedule Center, where all tasks are assigned for clients/employees.
A shortcut to My Schedule/Tasks, which is the dashboard panel discussed earlier.
Unassigned Shifts provides a view of all unassigned (open) shifts for the time period selected and may be viewed in calendar or list format. Based on the user permissions, tasks may be reassigned or deleted from this page. The email option sends an open shift notification to a client’s oriented staff.
The Organization Schedule provides a view of all the scheduled events for a given day or week. The schedule may be viewed by client or employee.
The Copy Week functionality allows users to expedite scheduling events for clients that have a stable/set schedule.
Pending Co-Signature This page contains all tasks that are set up to require co-signature. The co-signature requirement is set at the employee/task category from within the employee permission section.
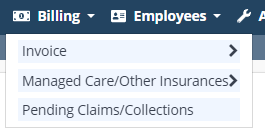
Next in line is the Billing Menu. Users with billing permissions manage their agency billing and collections activities from this menu.
Invoice covers all payment sources that bill out on an Invoice. From this Menu Item Billers may create invoices, review and send invoices that have been created and view client billing history (apply payments/adjustments).
Managed Care/Other Insurances covers all payment sources that bill electronically or UB04 / HCFA 1500 paper claims. It also provides the ability to create claims, review and process existing claims as well as view client billing history (apply payments/adjustments)
Pending Claims/Collections: Allows you to manage all pending claims and outstanding collections.
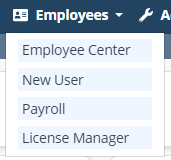
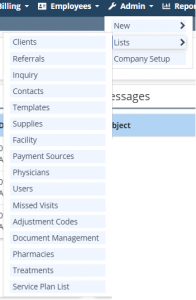
Following the Billing Menu is the Employees menu tab.
Employee Center is similar in look and feel to the Client Center. It is where the employee chart may be accessed once the user is created in the system.
New User: Allows you to add a new user.
Payroll provides the ability to review and manage tasks for payroll purposes.
License Manager: Provides a secondary option to enter employee compliance information into the system.
Moving to the right, users with Administrator permissions will see the Admin menu tab. Options available below will be dependent on the exact permissions granted.
While most of the options under the sub-menu New replicate the items under the Create Menu, five additional items may be created from the submenu:
User: This is the path to add a new user into the system.
Template: Templates are available for selection in clinical documentation.
The Adjustment Code provides the ability to set up billing adjustment reason codes. For example: copay, bad debt and contractual.
Upload Types refers to a category of documents that an agency may upload into the client chart. For example: admission documentation, lab draws results, hospital discharge orders.
Just as the sub-menu Admin->New contains most of the features as Create, Admin->Lists looks similar to View->Lists. The additional features available under Admin->Lists are Adjustment Codes and Upload Types.
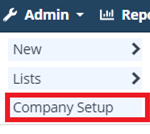
The last item under the Admin Menu is Company Setup. This menu sets up the agency documents, payroll and other customizations. It is vital that agency administration reviews and sets up per their agency. The manage Company Information Guide will walk through the agency set up in greater detail.
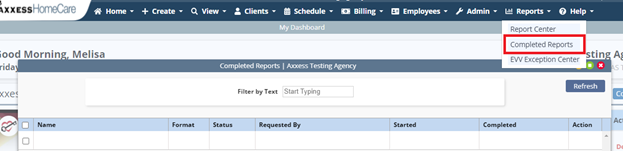
Next is the Reports tab. There are two categories under the Reports menu. The report center and completed reports.
The Report Center hosts a wide variety of reports organized under categories. All reports are designed to assist agencies in operating their business in an efficient manner.
A majority of reports in the Report Center generate without wait time. These reports will directly display on the screen. From here, the user has the option to export the report to Microsoft Excel, if he or she wishes to further manipulate the data.
Reports that extract data from a variety of sources and thus take time to build will present a message that the user will be notified via Messages when the report has been created. Once generated, the report is found in the Completed Reports menu.
At Axxess, one of our core features is our focus on you, our customer. The right hand side of the menu bar, contains the Help tab. Under this tab are many ways to obtain assistance to questions you may have in negotiating the many functions and features of Axxess Home Care.
Our online Training Manual provides answers to common questions you may have.
Under the Support sub-menu, you will find ways to obtain assistance.
Recent Software Updates provides information on updates made to the system.
We offer the ability to Like us on Facebook or Follow us on LinkedIn. Join the community of Axxess users around the country.
 This menu provides efficient access to a variety of client related information. As in the other menu tabs discussed, depending on permissions granted, you may have partial to full access to the following items.