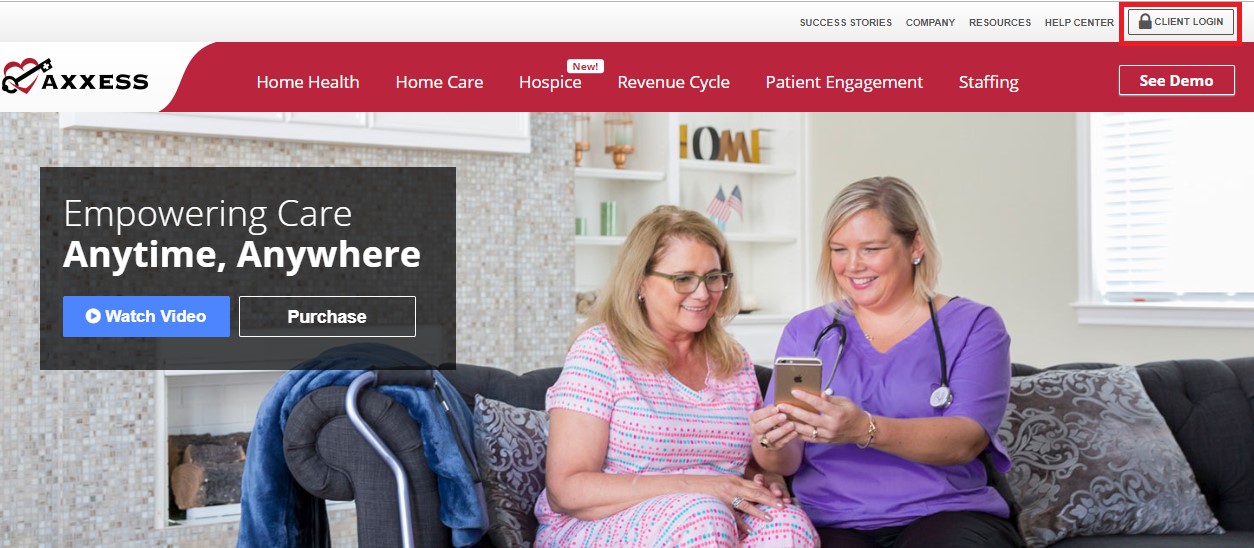
Go to www.axxess.com, and select on "Client Login", located in the upper, right-hand corner.
Enter in your username and password.
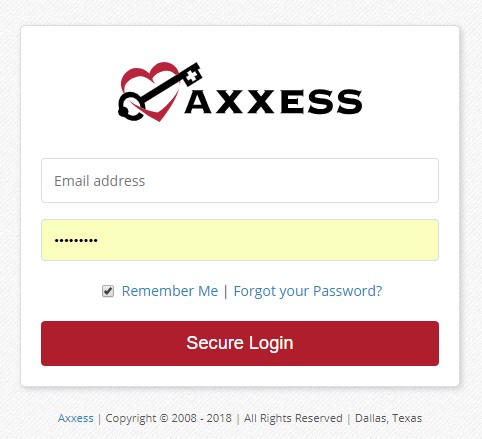
Your Username is the email address assigned to your account when it was created.
Your Password was created by you, from a link that was sent to this email address. This password will also be your electronic signature.
If you forget your password, select on Forgot your Password, and a link will be sent to this email address. Here you will be able to reset your password, however, your electronic signature will remain the same. (Resetting Signature will be covered later).
After you have entered the correct username and password you will see the following message:
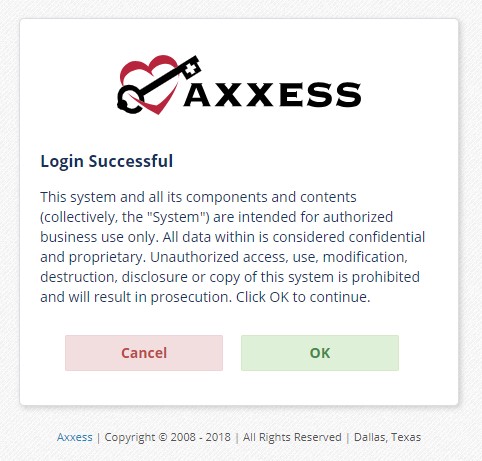
Select "OK" and you will see the Clinician Planner.
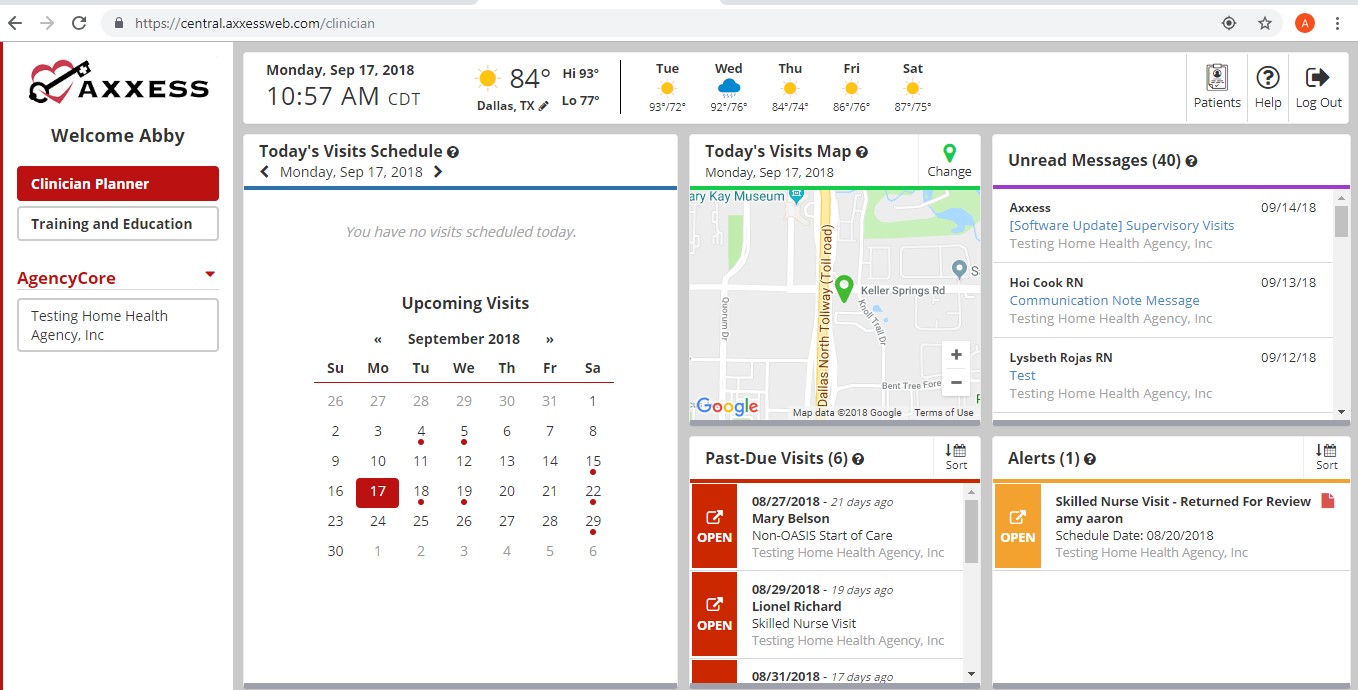
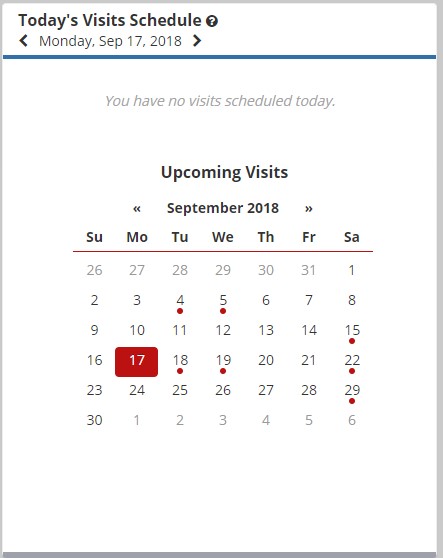
Date/Time/Weather - Today's date, time and 5-day weather forecast for your specific area
Today's Visit Schedule - Calendar that show's your visit schedule (red dots on the dates you have visits)
Selecting on the day will bring up the tasks schedule. Selecting the Task will show the status of the visit. Then you can select the Patient chart to go directly to the patient's Chart.

Today's Visits Map - Allows you to view directions for your daily visits or plan out your route.
Green - Current Location
Red - Visit Location
Blue - Selected Visit
Select on the marker to view the details of the visit.
You can select on "Get Directions" and this will take you to Google Maps, giving you a step by step list of directions and the visual map.
Unread Messages - A list of your unread messages from your Internal Messaging Center. Selecting on a message takes you directly to your messaging center.
Past-Due Visits - A list of visits from the last 21 days that have not been completed and signed.
Selecting the red "Open" tab on the left-hand side of the visit will take you to the note and allow you to view the chart. The visits list from oldest to newest, you can "sort" to reverse the order from newest to oldest.
Alerts - A list of all visits/tasks that have been returned to you from the QA Center.
Hover over the red sticky note to view comments from QA.
Select the orange "Open" tab to chart on the note/visit.
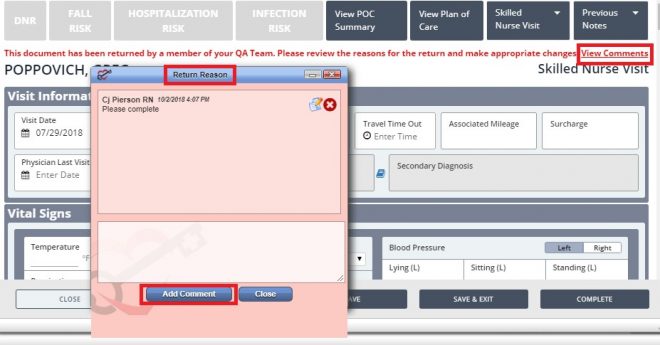
When you go into the note, it will display a message in red font that the document has been returned by QA. Select "View Comments" to read the message and send back any response.
On the left-hand side of the screen, is a list of agencies you are a user for, as well as multiple products your agency subscribes to.
Opens every time you log in. 5 tiles will appear, but 4 more may appear based on permission settings for your roles/duties in the agency (see Admin Overview). Below are the 5 tiles for all clinicians:
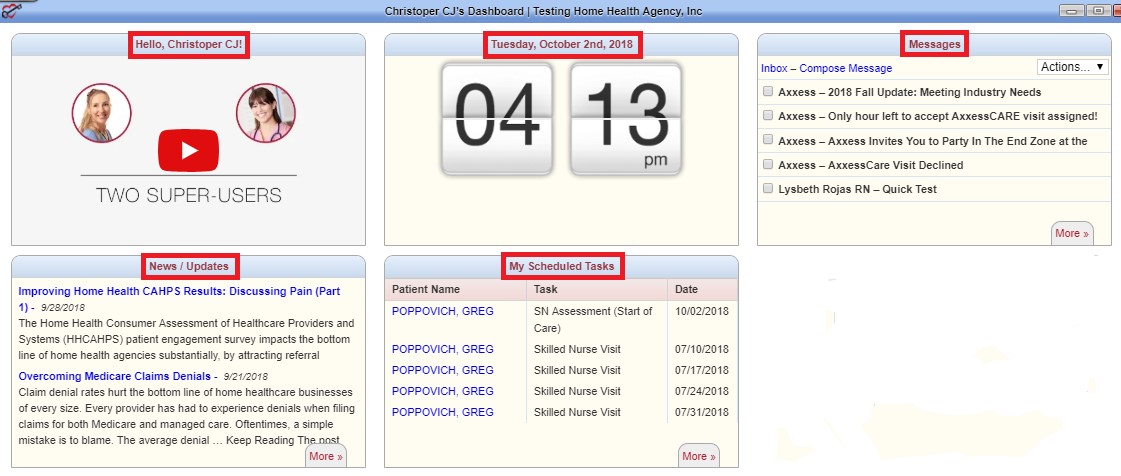
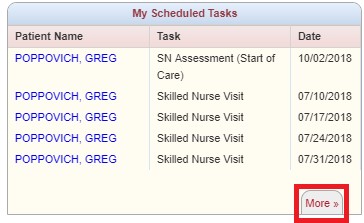
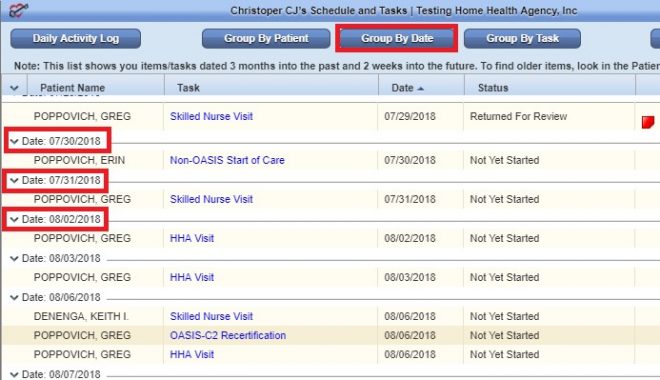
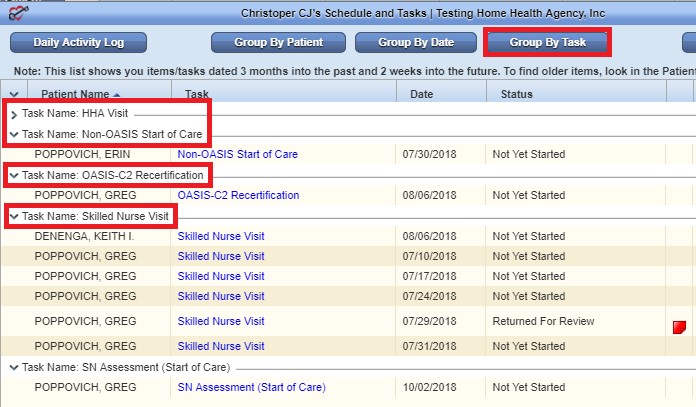
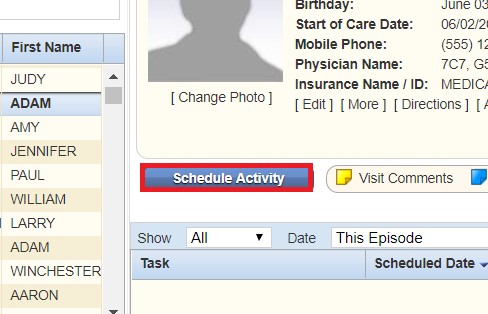
If you are wanting to view your entire list of scheduled tasks, select the "More" hyperlink, on the bottom right-hand corner of the tile.
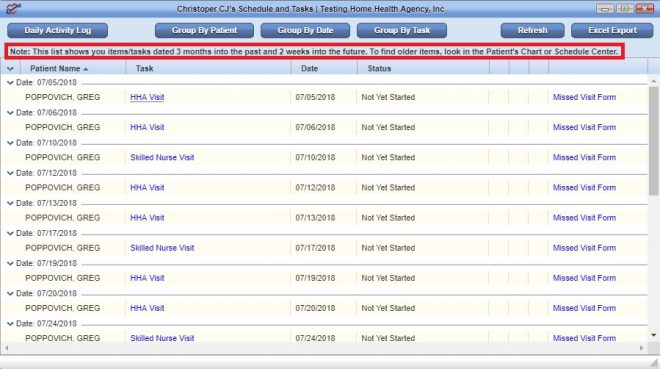
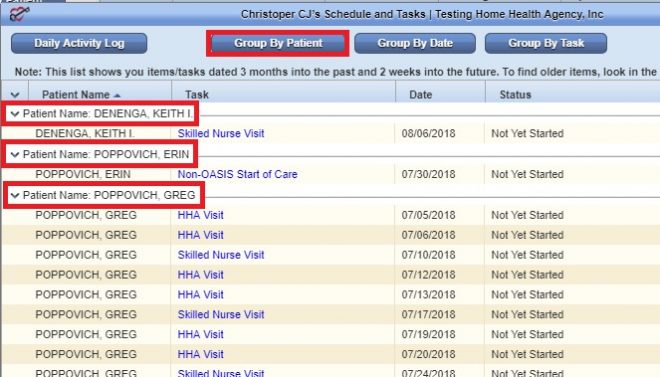
3 ways to group data: Patient, Date and Task.
![]() Red - Return Reason from either QA Center or another clinician
Red - Return Reason from either QA Center or another clinician
![]() Yellow - A note pertaining specifically to this visit, that communicates to other users
Yellow - A note pertaining specifically to this visit, that communicates to other users
![]() Blue - A note that has information for every visit in an episode (ex. A gate code or where to park). This information will appear in a sticky note on every visit in that episode.
Blue - A note that has information for every visit in an episode (ex. A gate code or where to park). This information will appear in a sticky note on every visit in that episode.
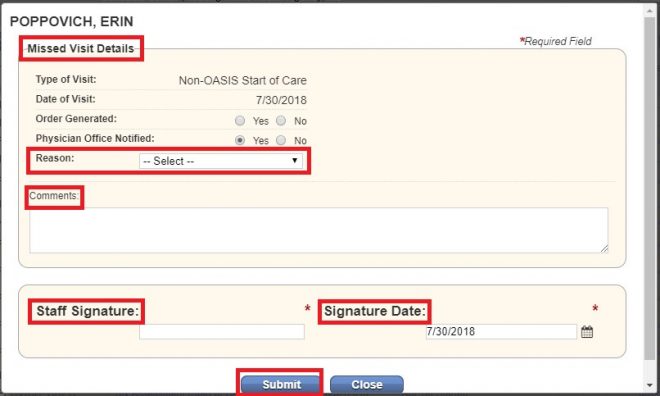
Missed Visit Form – When a visit was missed for any reason, you will select the blue, "Missed Visit Form" hyperlink. A window will pop up, asking you to fill in the reason, comments, and your signature and date. Once the form is complete, the visit will fall off your scheduled tasks, and the status will be Completed (Missed Visit).
Home/My Account/Edit Profile
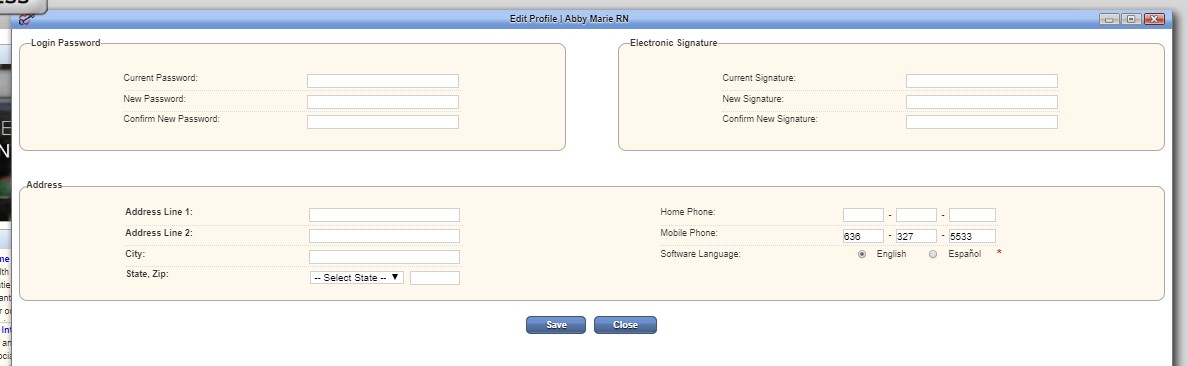
If you know your current password and/or signature you can come into this screen and update with new information.
If you do not remember your current signature, you will have to reset your signature.
Home/My Account/Reset Signature
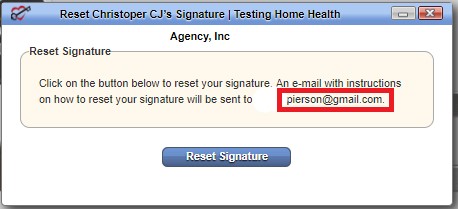
When you select "Reset Signature," a link will be sent to your email address in the message, allowing you to create a new signature.
Home/My Monthly Calendar
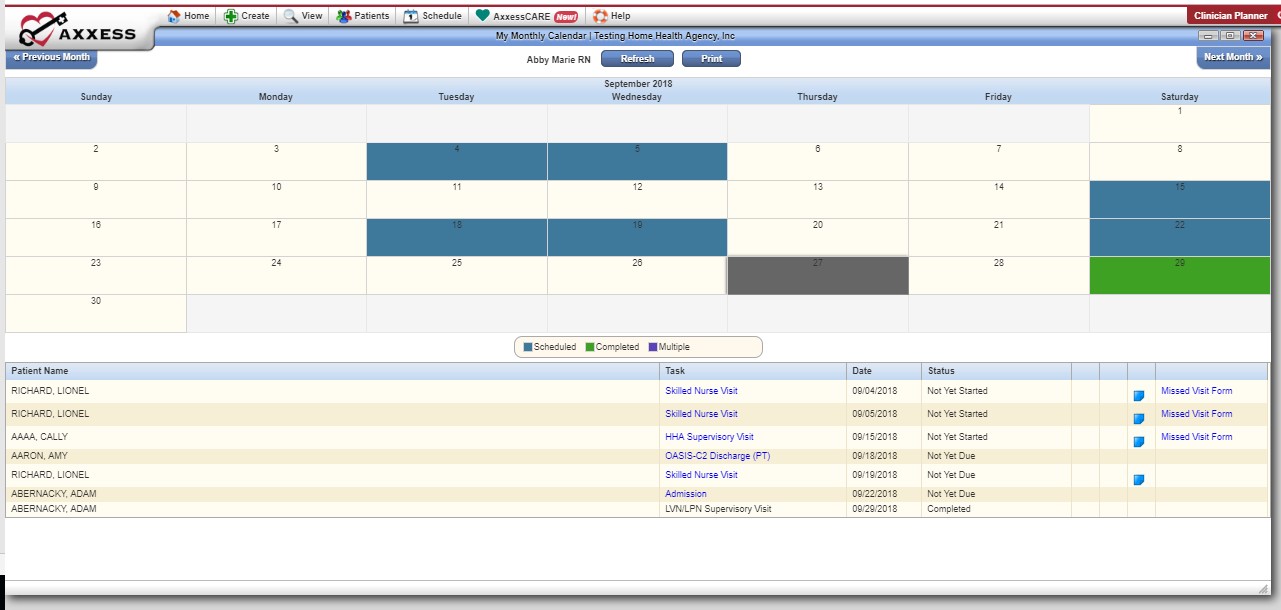
Another view of all your visits/tasks.
Ability to select a task that is not yet complete (blue text) and chart.
Missed Visit Forms are also available to complete here.
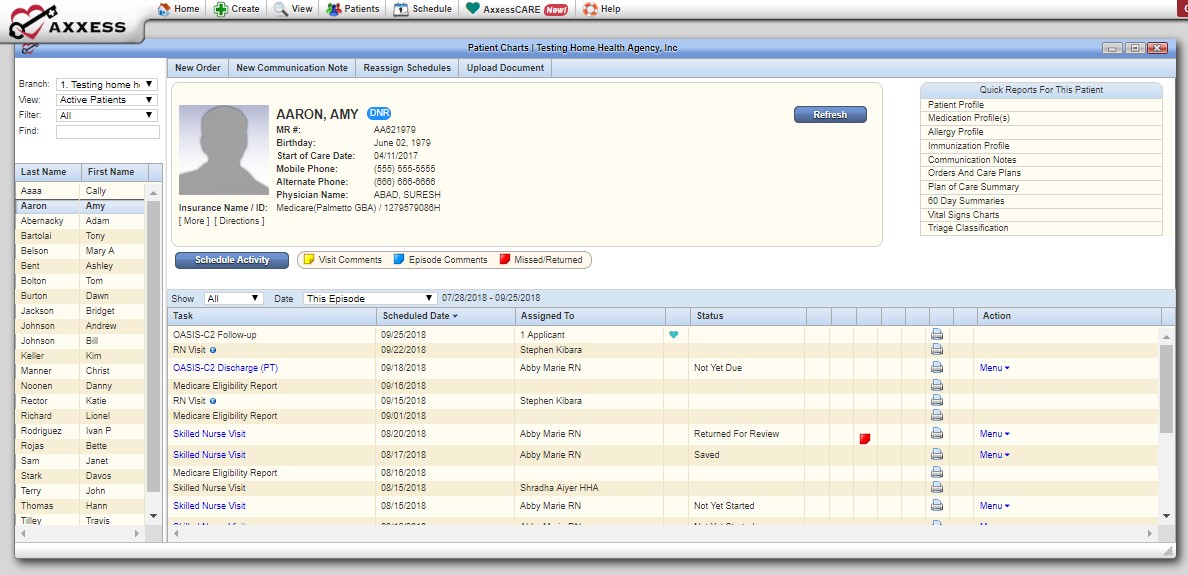
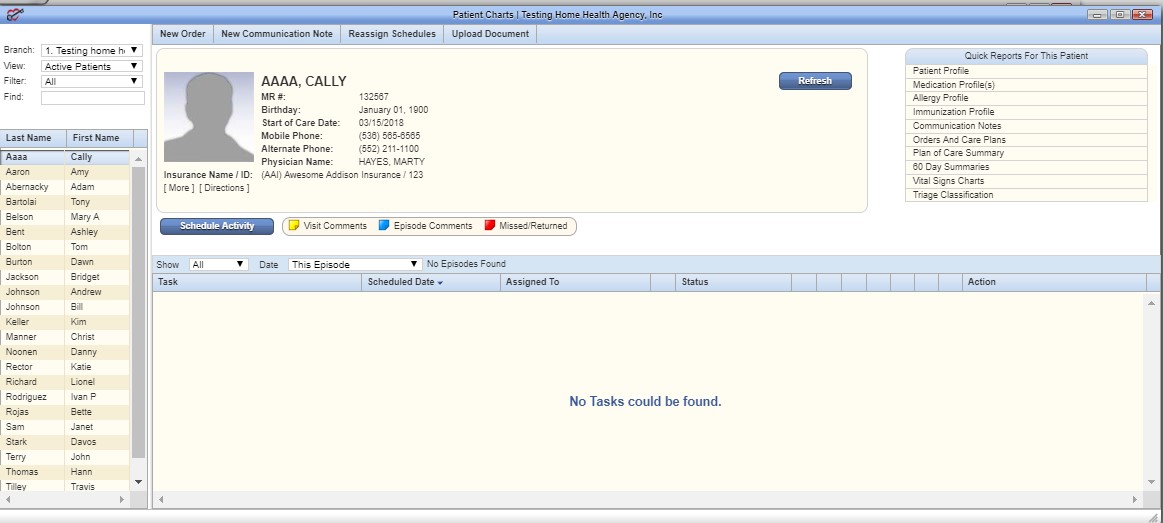
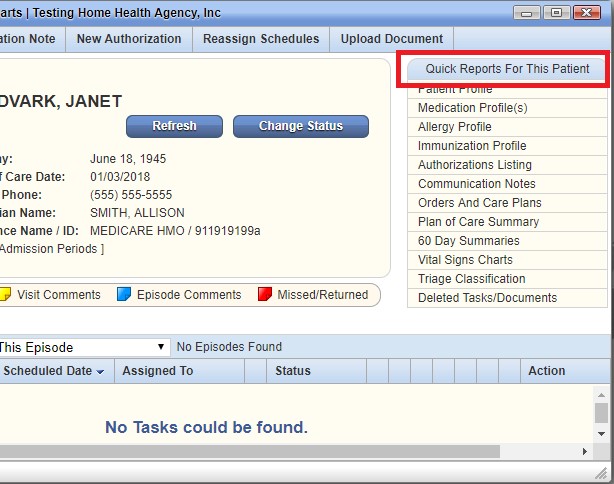
Patient/Patient Charts
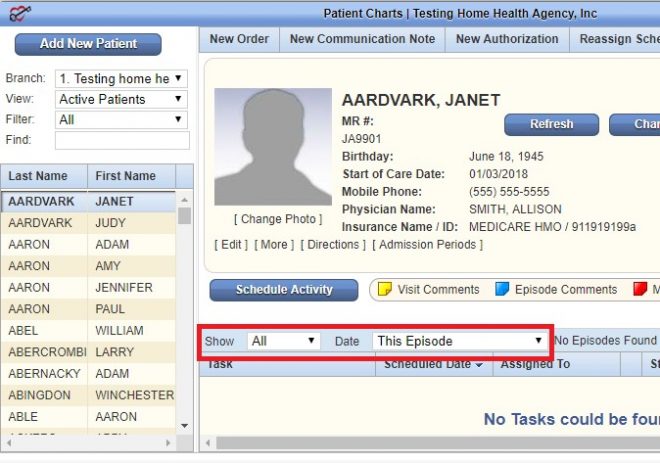
Filter by:
Branch: Choose the branch you are looking in (if more than one branch in agency)
View: Status of the patient (Active, Discharged, Pending, Non-Admit)
Filter: Payer Source
Find: Free text to type part of a patient's name
Patient's snapshot at the top of the screen gives a quick view of the patient's demographics.
A list of visits in the current episode will display at the bottom of the screen. You can filter the "Show" and "Date" drop-down menus to change viewing parameters.
You are able to select the visit/note, as long as they are not complete. If they are still in blue, you can select and start charting.
Selecting Menu (under the actions column) will allow you to view the visit details:
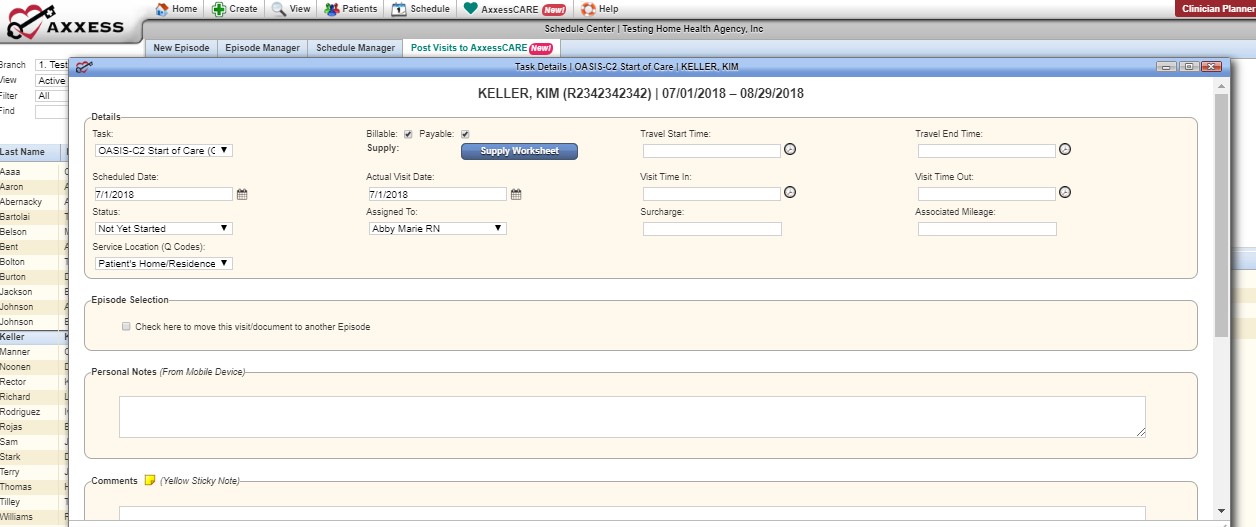
VISIT DETAILS:
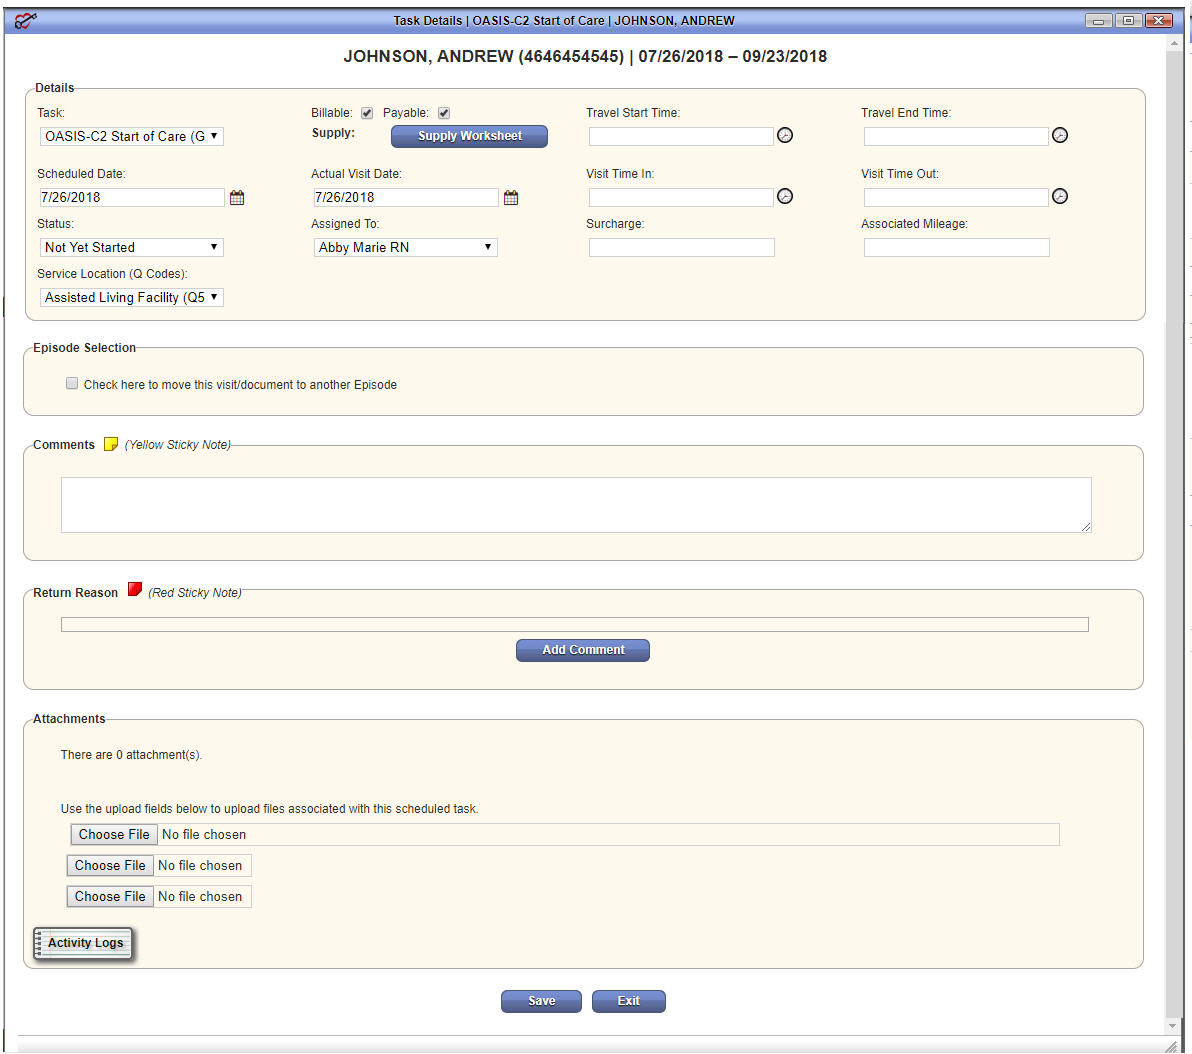
Scheduled Date: The date the visit was scheduled on the calendar.
Actual Date: The date the visit was completed. This is pulling from the note completed by the clinician.
Assigned To: The clinician that is currently assigned to this visit.
Service Location: This is the Q Code that pulls to the claim.
Personal Notes: Anything documented by the clinician on the mobile device.
Comments (Yellow Sticky Note): Any notes that pertain this specific visit and are needed to communicate with other agency users.
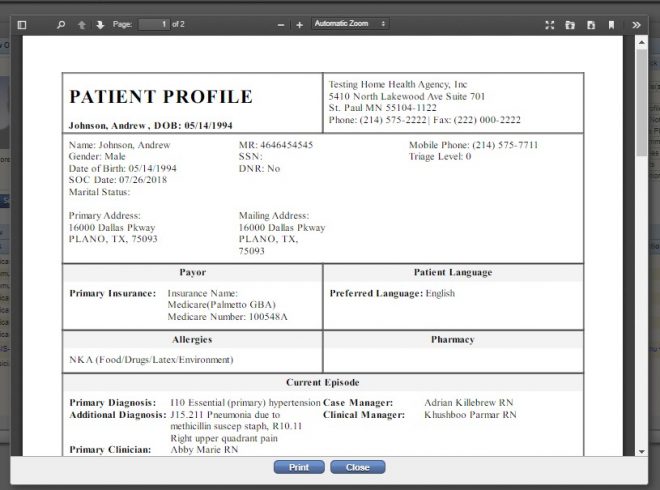
PDF print out of the patient information taken at admission.
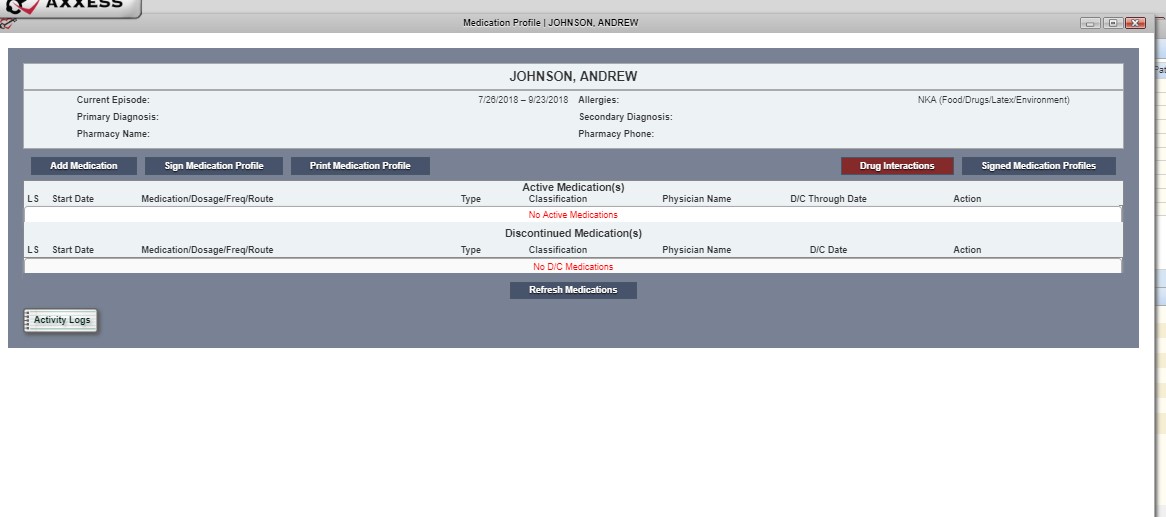
Add Medication:
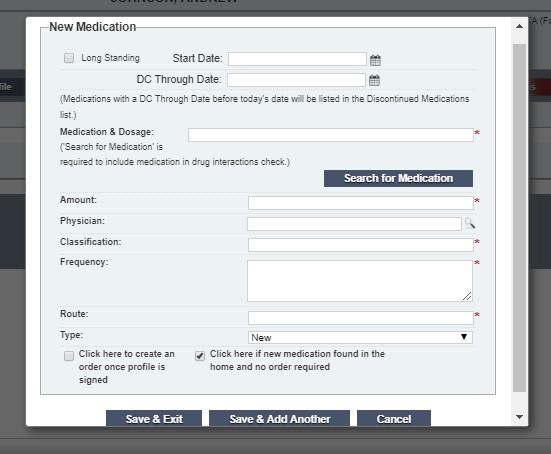
Start Date: Enter or select the calendar icon to choose a date.
DC Through Date: Enter or select the calendar icon to choose a date.
Medication & Dosage: Begin typing the description of the medication, then select on the search for Medication. A drop-down box will appear with all the medications we have listed in the software.
Medications not listed can be added. However, only medications selected from the drop-down box will be checked for drug interactions.
Amount: ex. 1 tab, 1 puff, 1 pump
Physician: Start typing name of physician and dropdown box will appear with related physicians
Classification: If a medication from the database is entered this area with give you suggested classifications
Frequency: Can be written out fully or with medical shorthand
Route: Free text
Type: Whether New, Changed or Unchanged
You can then decide whether you want the new medication to create an order to be added to the medication profile without an order by checking either box. If there are more medications to enter, select the "Save & Add Another," if not, "Save & Exit" button at the bottom.
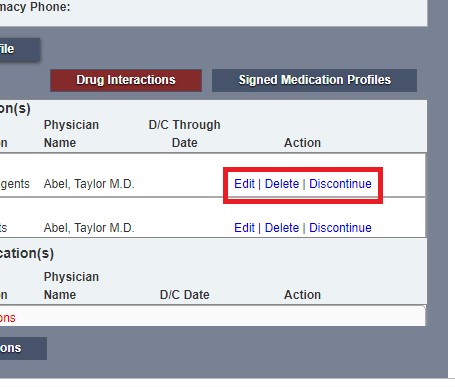
Once you add medication it will appear on the active Medications. You are able to Edit/Delete/Discontinue this medication by selecting the hyperlink on the right-hand side of the medication.
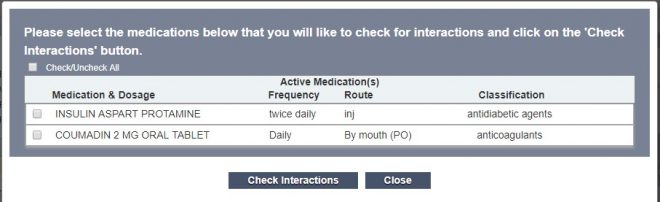
Check for Drug Interactions:
Select the "Drug Interaction" button at the top of the screen.
Select the box next to the medication, on the left-hand side, that you are wanting to check the interaction. Select "Check Interactions" a PDF will populate called Drug-Drug Interactions.
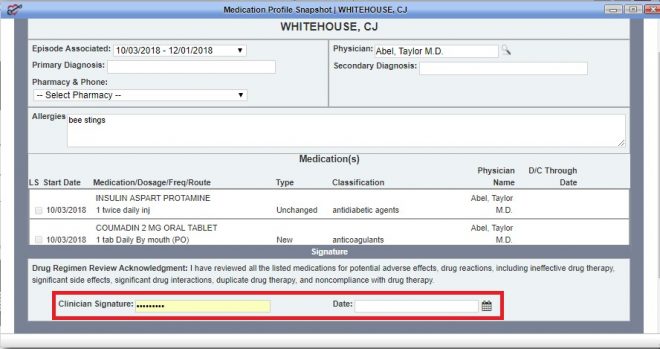
Once you make any updates to the Medication Profile you will need to sign the profile. Select "Sign Medication Profile" in the upper left. A window pops up with the Medication Profile, allowing you to enter your signature and date.
To view any prior signed Medication Profiles, select "Signed Medication Profiles" and a window will pop up with a list of previously signed profiles:

Select on the printer icon to view and/or print the signed Medication Profile.
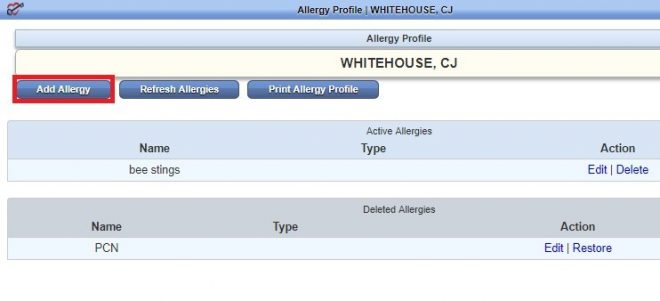
This pulls a list of all added allergies for the patient. To add an allergy, select "Add Allergy"
Type in the name of the Allergy and the Type of allergy. Once you select "Save & Exit", the allergy will be added to the report. If there are additional allergies, select the "Save & Add Another" button.
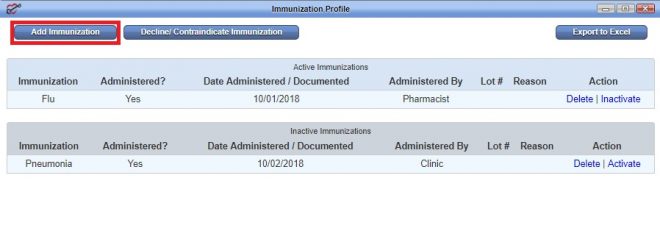
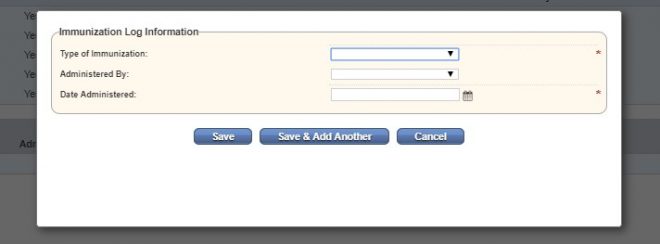
There is a list of inactivated immunizations in the bottom part of the window. To reactivate, select the "Activate" button. If you need to add an Immunization, select the button in the top left, "Add Immunization." Choose the Type of Immunization and who it was Administered By from their respective drop-down menus. Then write it or select the calendar day it was given. Once completed, select the "Save" button. Select "Save & Add Another" if you are entering more than one.
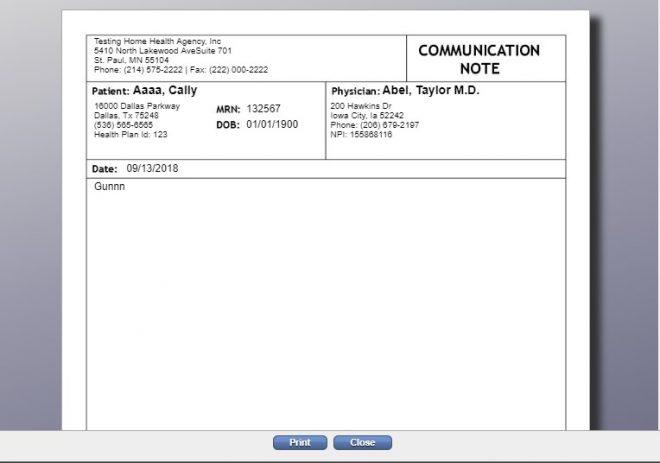
This report will give a list of all the Communication Notes created for this patient. The report will allow you to see who created the note, the date and also provide a PDF to view and/or print.

If you select on the printer icon, a PDF document will generate with the ability to print:
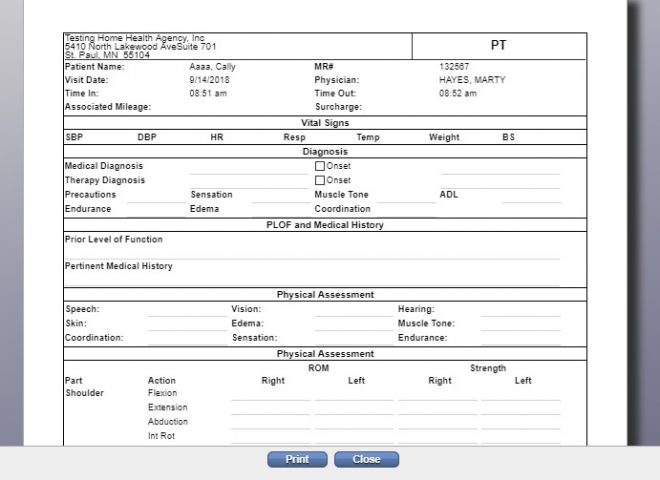
This report will list out all the Orders And Care Plans for this patient. This list is a quick way to view these orders when trying to locate a specific one. The list provides the basic details of the orders with the ability to view and/or print the document:
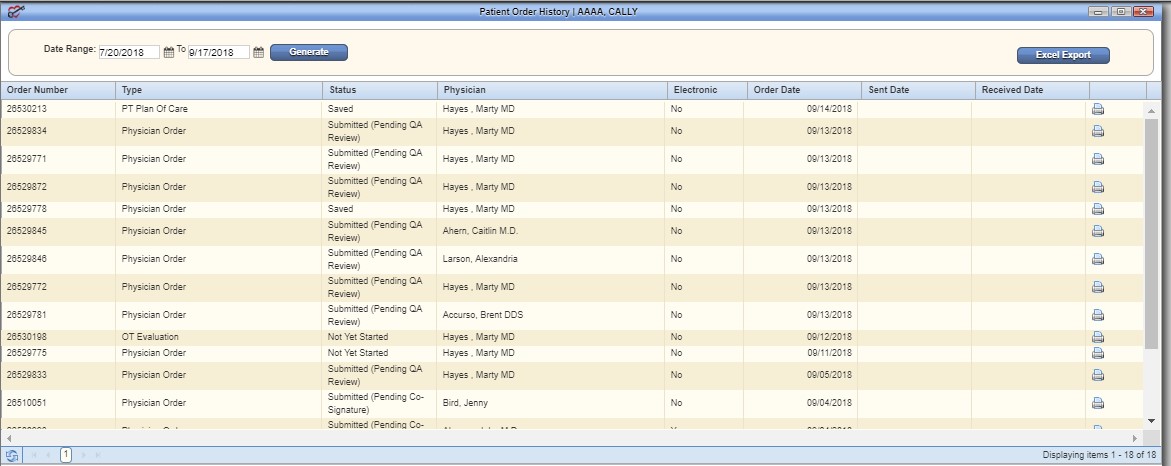
When you select on the printer icon, a PDF document will appear with the ability to print:
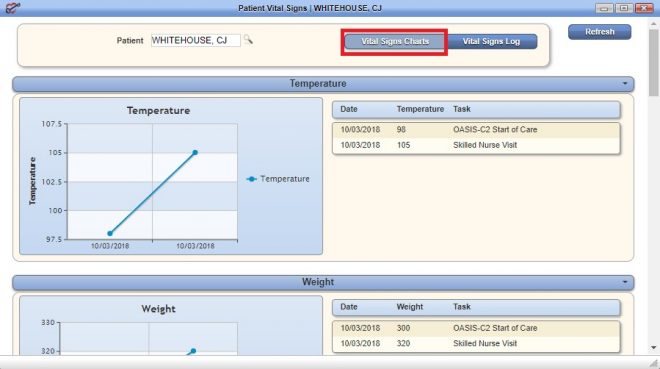
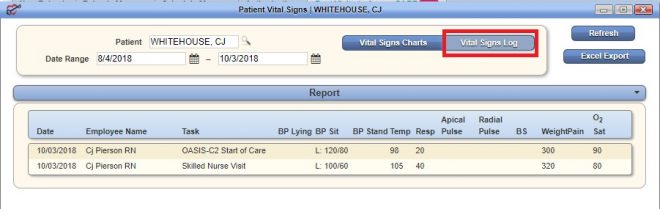
This report pulls a chart of all the prior vital signs documented on visits and a graphic view of their trends. You also have the option to choose the Vital Signs Log, in order to view a summary list of all the vitals:
NOTE: The following 4 Quick Reports are permissions based
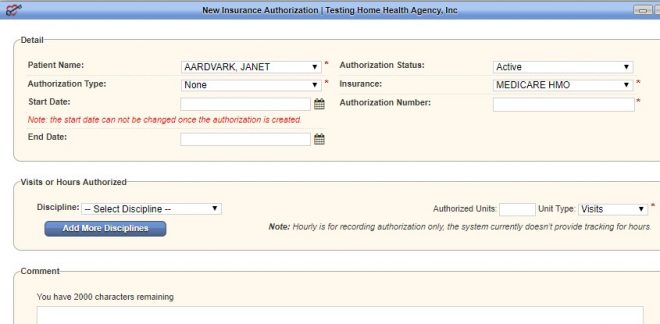
This report shows all current authorizations listed for the patient. The number of items on the page can be altered by changing the drop-down at the very bottom of the window. The refresh icon is in the bottom left part of the window.

To add a new authorization, select the "Add Authorization" button in the top left. Choose the Authorization Type and Status from their respective drop-down menus. The Patient Name and Insurance will be auto-selected for you. Enter the Start and End Date or select from the calendar icon. Also, enter the Authorization Number given from the insurance.
Then select which disciplines were authorized by the insurance in the Visits or Hours Authorized category. Indicate how many Authorized Units were granted and whether they were for Visits or Hours. Located below is a free text section for comments. The bottom of the form is where Attachments can be added by selecting the Choose File button (finding the file on your computer) then selecting the Attach Document button. When complete, select the "Save" button.
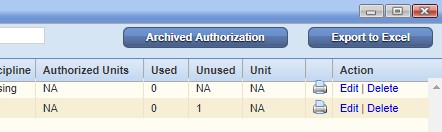
You can view all previous episodes by selecting the "Archived Authorization" in the top right from the Authorization List. You can also print a PDF, (printer icon) Edit the previous entries and Delete erroneous entries by selecting the hyperlink on the far right of each entry. The whole list can also be turned into an excel spreadsheet by selecting the "Export to Excel" button
This report will list at 60 Day Summaries that have been entered. If you are trying to limit the results you can starting typing the employee who performed the Visit, Signature and Episode dates or the Physician Name. The Summary can also be printed as a PDF by selecting the printer icon on the far right.

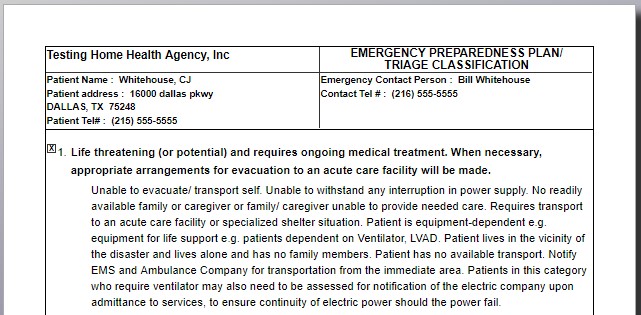
This quick report will pull up a PDF version of the patient's Emergency Preparedness Plan/Triage Classification based on what was answered during the assessment. Select the "Print" button at the bottom to get a copy of the form.
See Deleting a Visit below
NEW ORDERS:
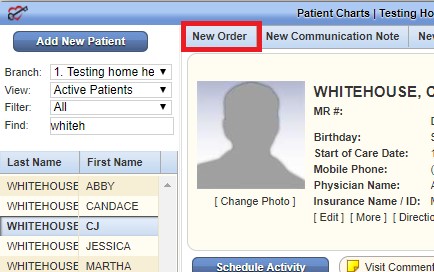
To add a new order to a patient's chart, select the "New Order" tab at the top of the patient's chart and the window below will appear:
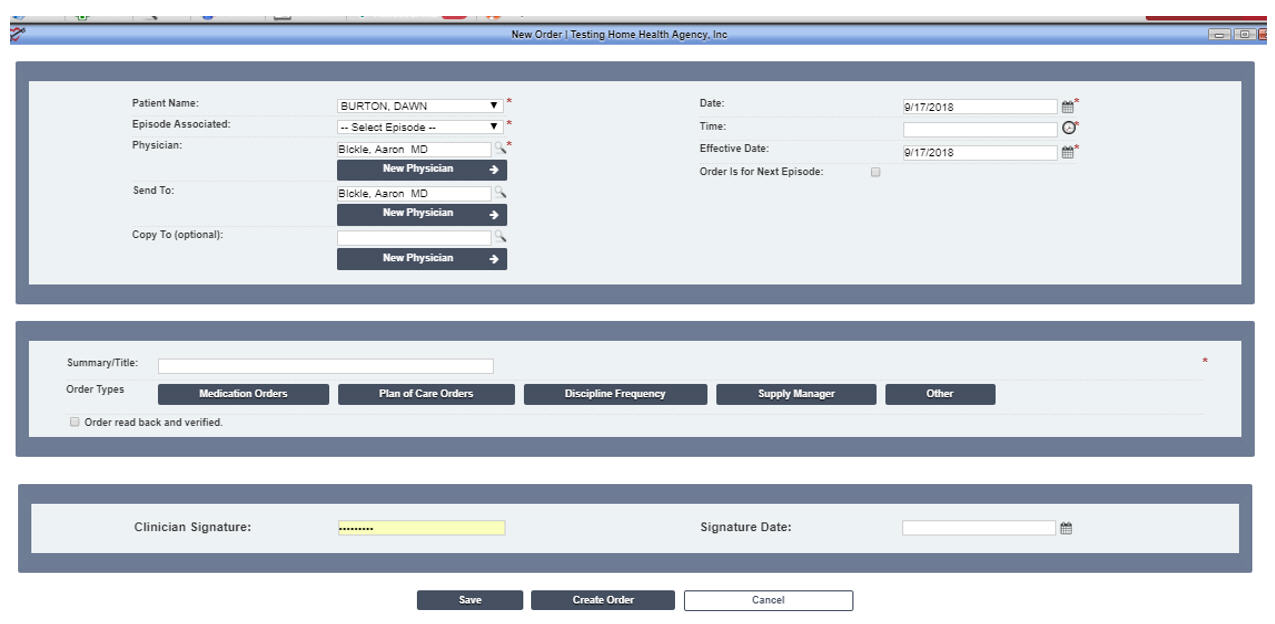
Patient's name and physician will autofill in the designated fields.
Select the episode this order goes with.
Date: The date will default to today's date, but you can change if necessary.
Time: Fill in the time
Effective Date: This date will default to today's date, but you can change if necessary.
Order is for Next Episode: Check this box if the order will go to the next episode.
Summary/Title: Give this order a title
Order Types:
Medication Orders: The Medication Profile will populate allowing you to add a new medication.
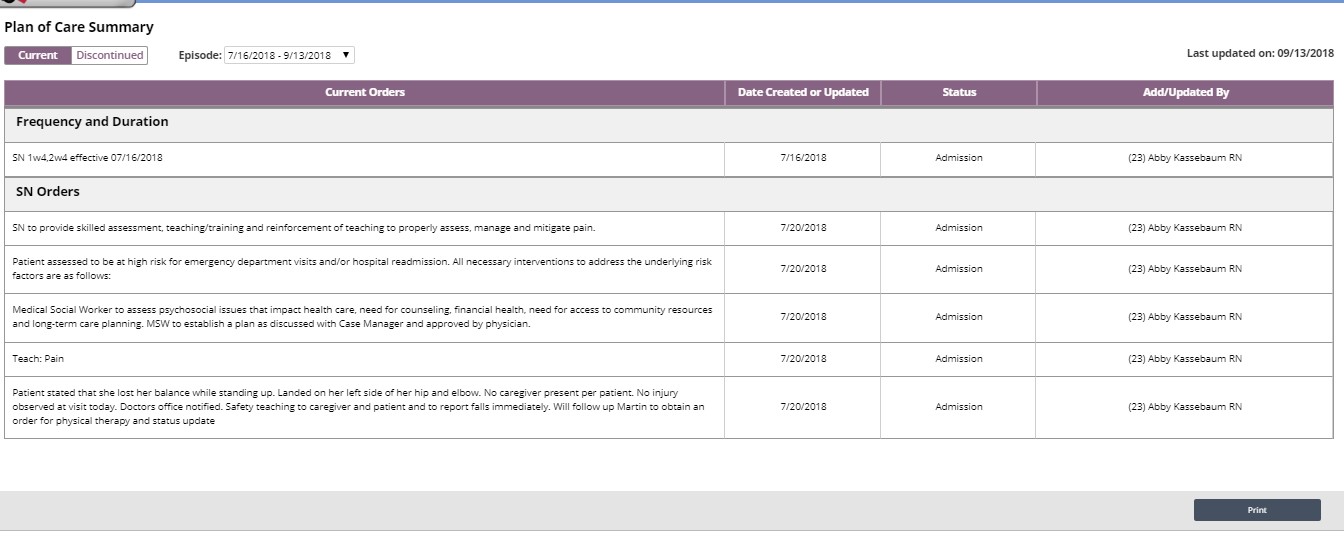
Plan of Care Orders: The POC Summary will populate allowing you to update the Plan of Care.
Discipline Frequency: Discipline Frequency fields will appear at the bottom of screen to fill in. , Remember to check the "if this Is an interim order" box if the new frequency will override the original frequencies
Supply Manager: The Supply Manager box will appear, allowing you to fill in the supplies.
Other: Anything that does not fit in the four types listed will fall in this field. Anything entered in this type will not flow to the POC Summary.
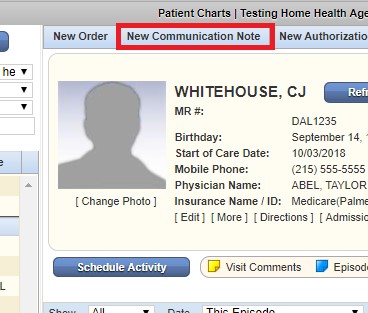
To create a new Communication Note, select the "New Communication Note" tab. The window below opens:
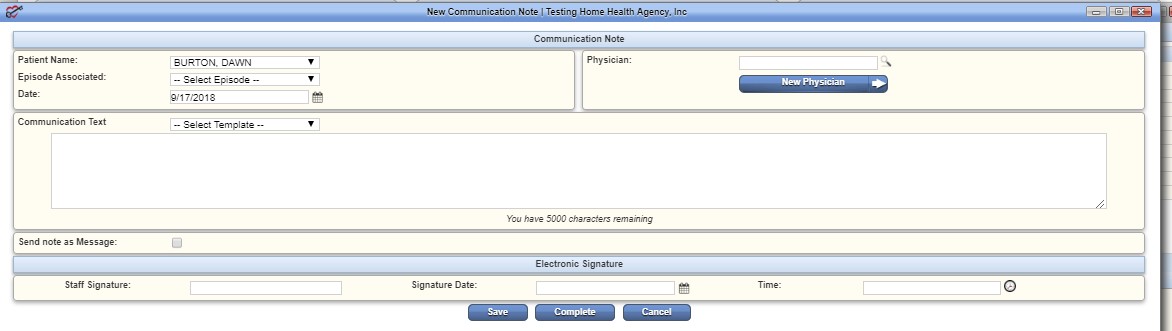
Patient's Name: Auto Filled
Episode Associated: Select on the drop-down menu to select the episode assigned to.
Date: Default to today's date but can change.
Physician: Start typing in physician's name and a drop-down box appears. If the physician is not currently in Axxess, you can select on "New Physician" to enter the name.
Communication Text: This is the area where your Communication Note is created. You can either free text or select one of your agency's templates.
Send Note as Message: Check this box if you want this note to send as a message to other users in your agency.
Signature: Sign with your Signature
Date: Make sure the correct date is filled in.
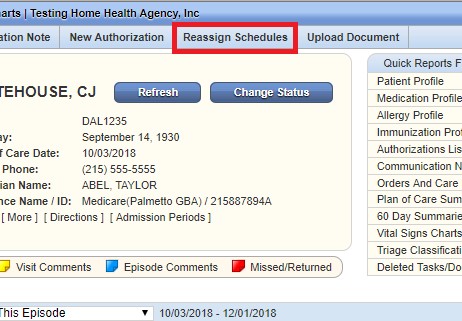
To reassign a work schedule from one employee to another, select the "Reassign Schedules" tab, and the following window appears:
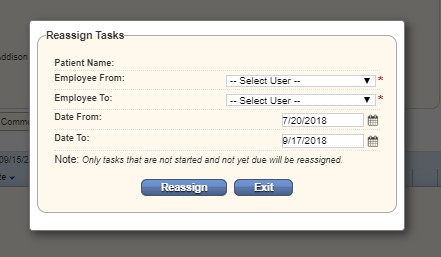
Select the drop-down menu for the employee you are assigning From and To. Double check the date range you are pulling visits from is correct. Then you will select "Reassign." The visits in the patient's chart will pull the new employee.
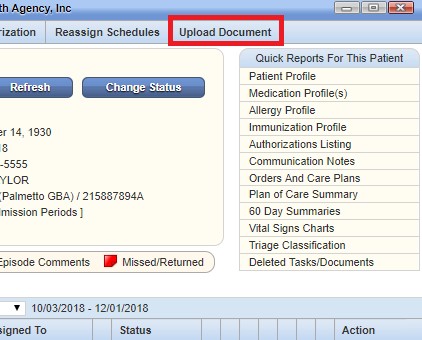
If you are wanting to add any documents/attachments to your patient's chart, you will select the "Upload Document" tab. You will see an option for New Document or View Documents.
For a new document:
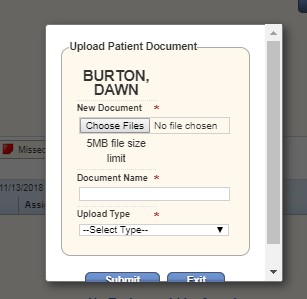
Choose Files from your computer, give the document a name that will appear in the patient's chart, and select the Upload Type.
For View Documents:

The documents that are attached will all display with the ability to edit or delete them.
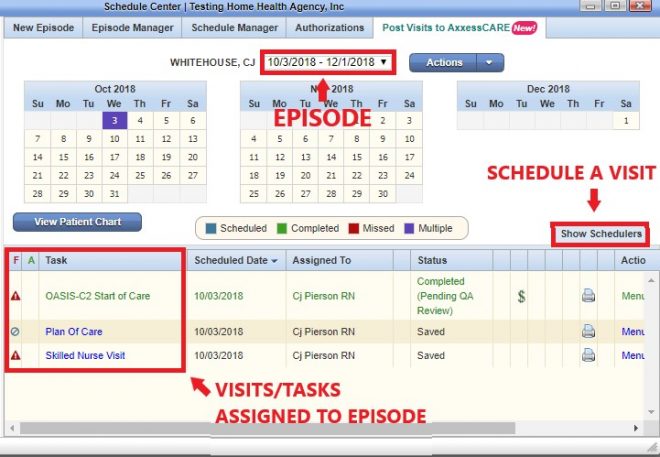
Current episode defaults at the top of the screen.
All visits/tasks assigned to this episode are listed at the bottom of the screen.
Color-coded visits appear on the calendar and are the print color of the task.
![]()
Select a date on the calendar and tab will expand under the calendar allowing you to schedule the visit. The section will also expand by selecting the "Show Scheduler" tab.
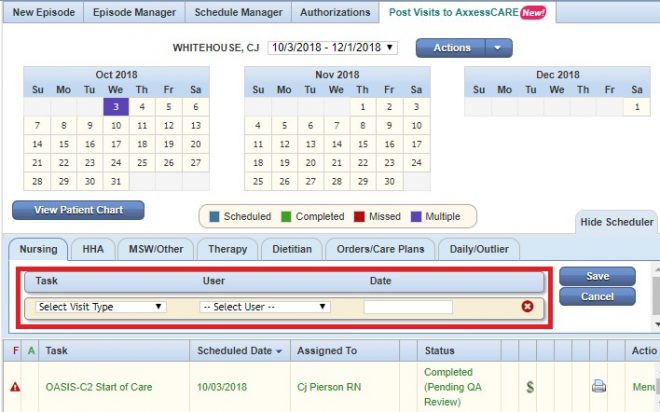
Select the correct discipline's tab, in order to find the specific visit you are looking for. Once you select the "Task, User and Date, select "Save" and visit will appear within the list of other tasks/visits below.
If you are needing to schedule multiple visits (same type) for the same user, Select on the blue "Schedule Manager" tab at the top of the screen:
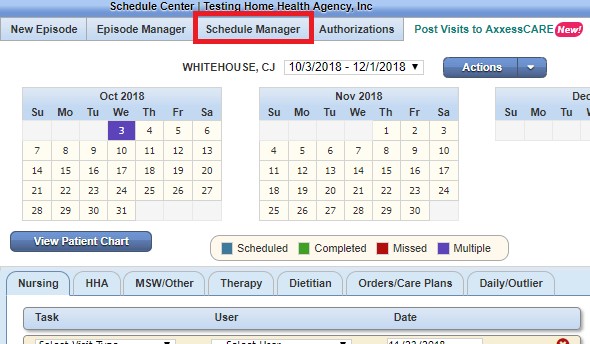
Select on Schedule Employee, and the box below appears:

Select the "User/Employee" and the "Visit Type" you are wanting to schedule. Then select each box in the calendar you want to assign. If you accidently select a box, just select the box again and this will unselect the day. Once you select "Save", the visits will display on the patient's schedule.
Visit Details:
On the right-hand side of the screen (under the Action column) will be a Menu drop-down for all visits.
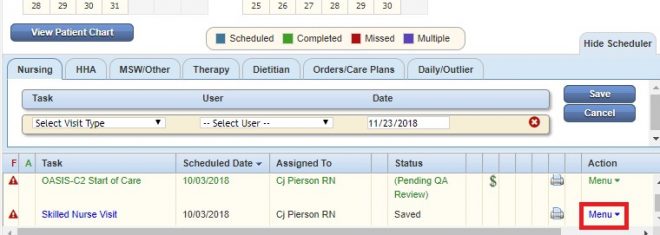
When you select Menu, you will see a "Details" option. The window will open, displaying the details of the visit.
To delete a visit, go to the Menu drop-down. Select "Delete" and the window below will appear:
(Permission Based)
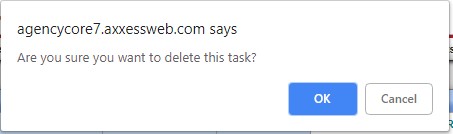
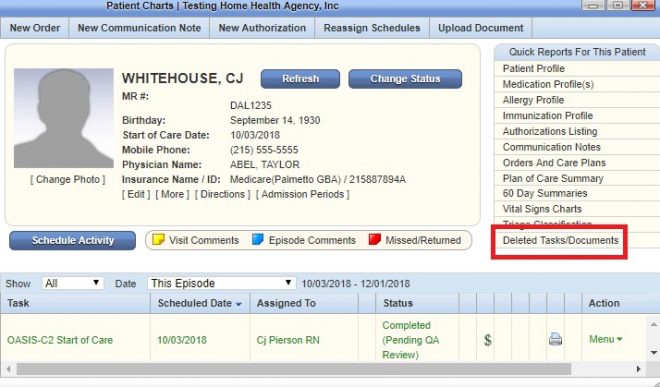
Once you select "OK", the visit will be deleted, but still stored in your "Deleted Tasks/Documents" in the Patients Chart in case you need to restore.
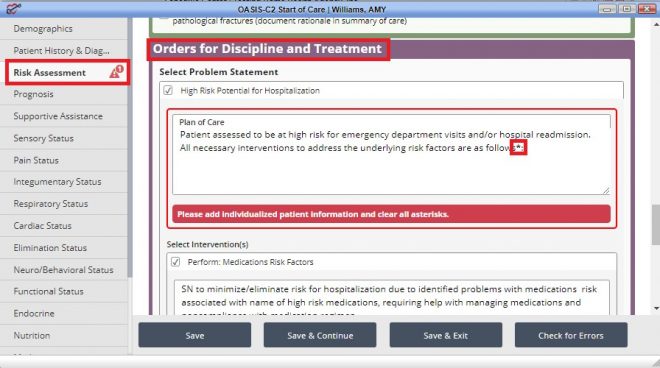
When charting your information in the SOC visit, some information has already pulled in from the patient's profile. You need to make sure all required questions get filled in the rest of the visit. This will be indicated by red asterisks.
Green Boxes - Information in the Green boxes are the M questions that will be exported to CMS. At the end of the OASIS, you will select on "Check for Errors" and the system will make sure all OASIS questions are answered and not conflicting.
Purple Boxes - These questions generate Plan of Care Pathways.
Grey Boxes - These questions will pull to the Plan of Care (sent to physician for signature).
Blue Boxes - Physical Assessment questions.
Orders:
You have the ability to enter orders at bottom of each tab in the SOC. You will have the opportunity to enter the order, interventions, goals, homebound status, and medical necessity based on previous assessment answers.
You will notice that several boxes will display **. When you see this mark, the system wants to fill in customized information, based on this patient's visit.
When all information is complete, select on the "Check for Errors" button. A window will open letting you know if there are any warnings or errors.

Warnings will have a yellow triangle ![]() icon. This message is the software letting you know of things you may want to look at before submitting the OASIS, not a hard stop.
icon. This message is the software letting you know of things you may want to look at before submitting the OASIS, not a hard stop.
An error will be a red stop ![]() icon. This message is the system letting you this question either needed to be answered or answered differently. You will not be allowed to finish this OASIS if you have red error messages.
icon. This message is the system letting you this question either needed to be answered or answered differently. You will not be allowed to finish this OASIS if you have red error messages.
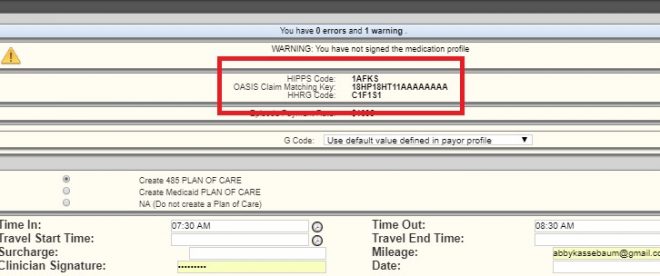
You also want to make sure your HIPPS Code, OASIS Claim Matching Key, and HHRG scores all have a code. These codes are going to affect your billing, so you do not want this to be blank.
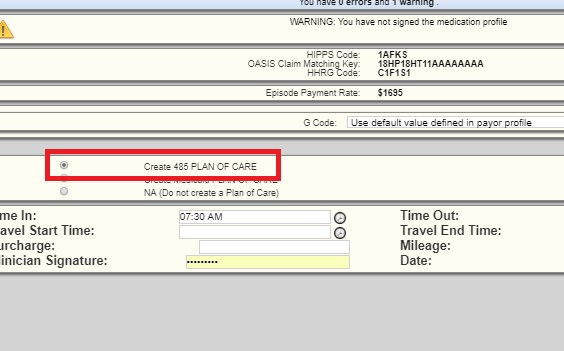
Once you finish the OASIS the system will automatically create a 485 Plan of Care if you select the "Create 485 PLAN OF CARE" radio button.
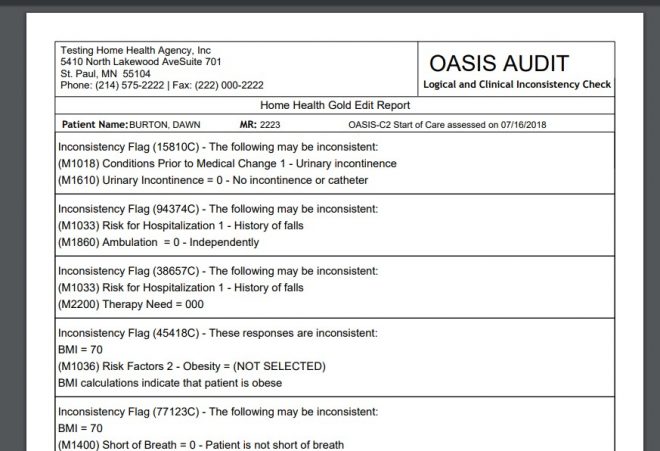
Before you finish the OASIS, you can run the OASIS scrubber. There is a button that says "OASIS Scrubber" in the bottom left.
This will look for any inconsistencies or flags that your agency may want to address. These audits are not necessarily wrong, the scrubber is looking for inconsistencies.
After all, audits have been addressed, make sure you fill out the Time In and Time Out.
NOTE: If your agency keeps track of travel time, surcharges, and mileage must also be entered.
Then put in your signature, date, and select "Finish."
After you have finished the OASIS, it will be sent to the QA Center for approval. The Plan of Care will generate in the patient's schedule.
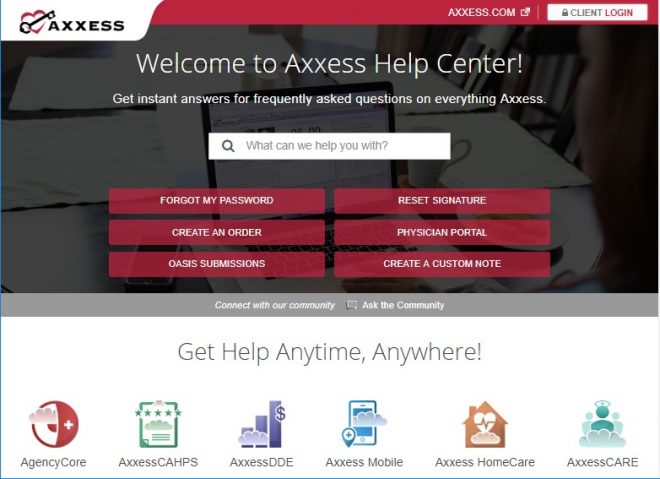
A great resource that is available 24/7 is our Help Center. A place to get answers to frequently asked questions or watch videos of all Axxess products. It can be accessed by going to:
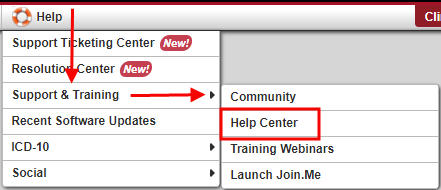
Or also available at https://www.axxess.com/help/