x
Join our new Axxess User Community to connect, share, learn and grow together.Learn More
Claims “RAP and Final” are created automatically when the patient is admitted in the system.
NOTE: If the patient is entered with another Primary Payer and then changed, the RAP and Final will need to be created manually in Claims History.
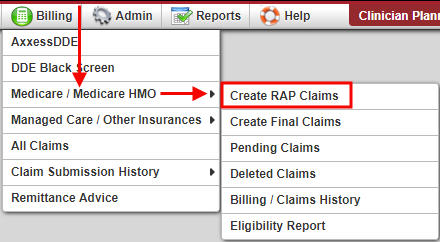
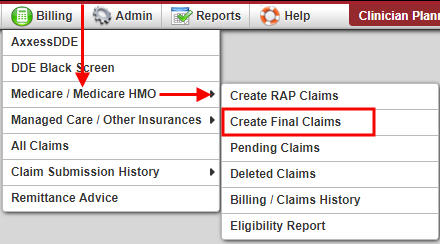
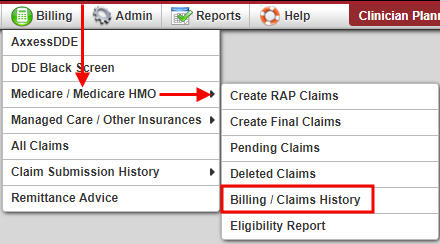
Billing/Medicare_Medicare HMO/Create RAP Claims
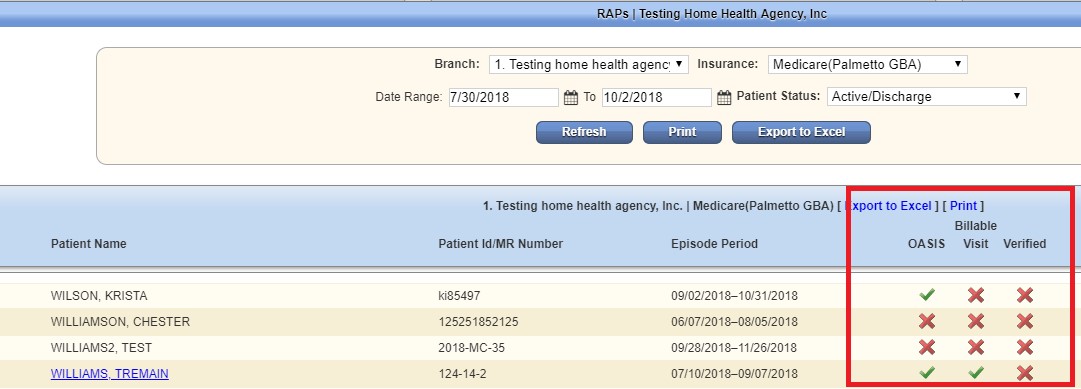
A window will open with a list of Patient’s Names, Patient ID/MR Number, Episode Period, OASIS, Visit and Verified. Sort by:
Once parameters have been entered, select the “Refresh” button.

Only patient names that fall within that selection will be on the list. To Print the list of patients, select the “Print” button. To make an excel spreadsheet out of this list, select “Export to Excel.”
To the right of the patient’s name and episode date there will be OASIS, Billable Visit and Verified. All these sections need to have a green check mark to bill the RAP. The green check marks are obtained by meeting the following criteria:
After reviewing all the details of the RAP, select “Verify.” This will show a green checkmark ![]() under the Verified column.
under the Verified column.
Once the RAP has been verified there will be a check box to the left of the patient’s name. This shows the RAP is ready to be generated for billing submission. Select the check box next to the patient’s name and scroll to the bottom of the page. Select the “Generate Selected” button.

Once “Generate Selected” has been selected, the user will be taken to a screen that shows 2-3 options:
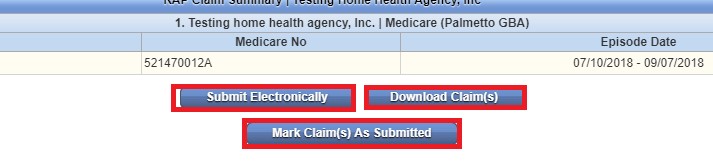
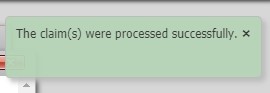
Once the claim has been submitted, an alert will appear on the top right corner stating, “The claim(s) were processed successfully.” Then the RAP will be removed from the list automatically and will show in the Billing/Claims History section.

To submit all claims that have the three checkmarks without selecting each patient, select “Generate All Completed” and the user will be taken to a screen that shows three options:
Billing/Medicare_Medicare HMO/Billing_Claims History

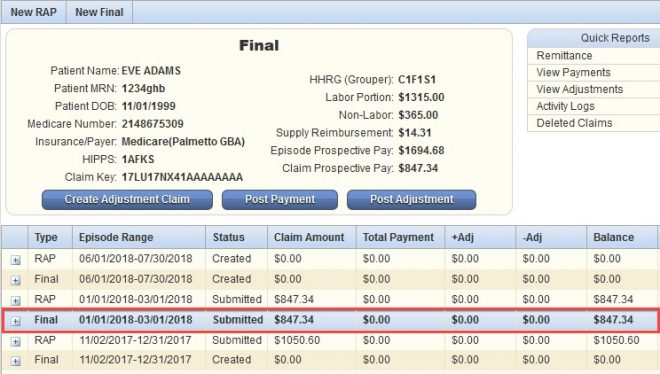
After Submitting Electronically or Marking Claim as Submitted it will appear in the “Claims History” with the Status of Submitted.
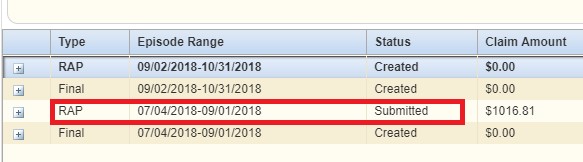
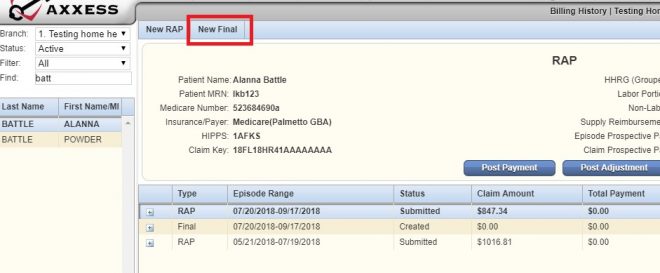
This is the section where users can create a RAP if it was not created due to a Payer change after the patient was admitted in the system. Search by:
Select the patient name on the left side (patient’s name box will turn light blue). Then on the upper left under the “Home” tab there will be an option for “New RAP.”
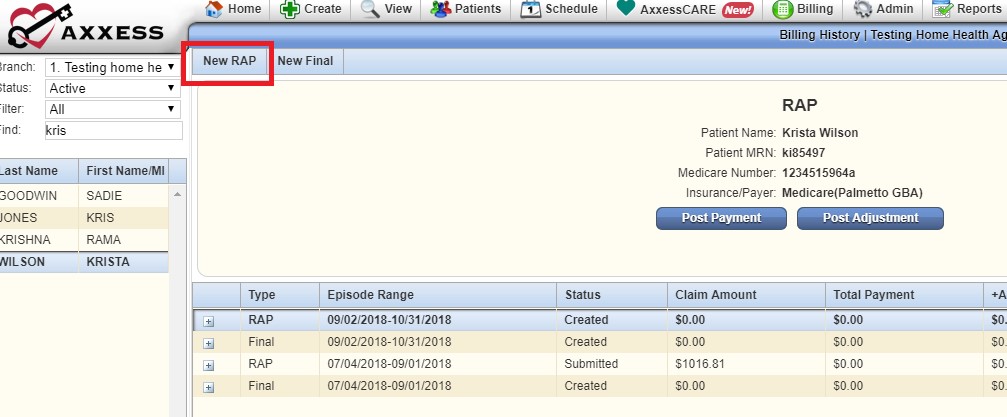
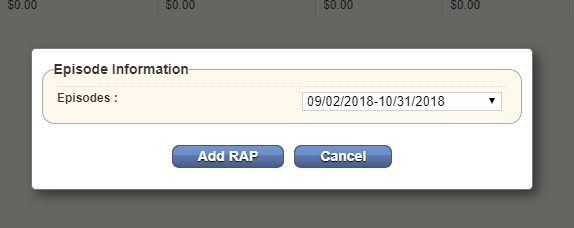
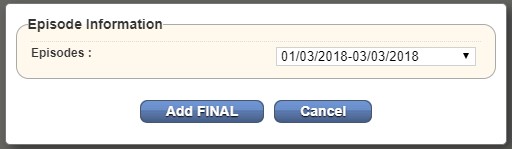
Once the “New RAP” is selected, an Episode Information window will open. Choose the correct episode from the drop-down and then select the “Add RAP” button and the RAP will be created.
Billing/Medicare_Medicare HMO/Create Final Claims
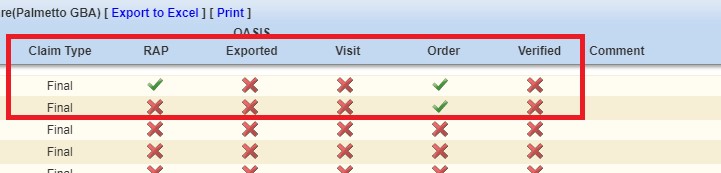
A window will open with a list of Patient’s names, Patient ID/MR Number, Episode Period, Claim Type, RAP, OASIS Exported, Visit, Order, Verified and any Comments. Here there is the option to sort by Insurance and Date Range. Search by:

Only patient names that fall within that selection will be on the list. To Print the list of patients, select the “Print” button. To make an excel spreadsheet out of this list, select “Export to Excel.”
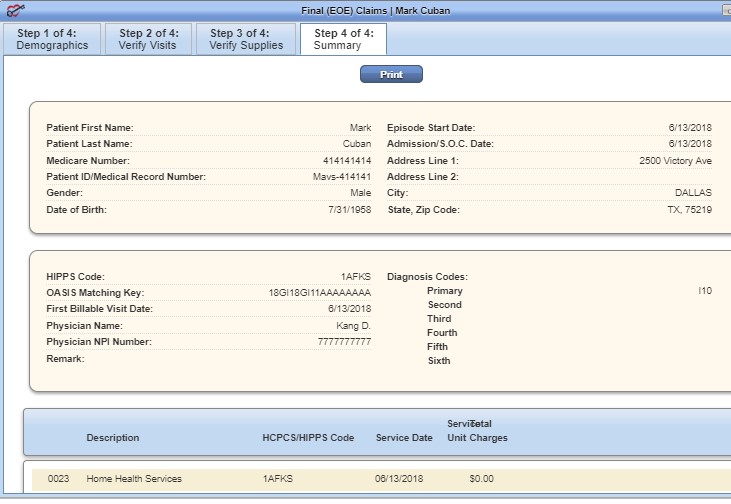
To the right of the patient’s name and episode date will be the Claim Type (Final), RAP, OASIS Exported, Visit, Order and Verified all these sections need to have a green check mark ![]() to bill the Final. This green checkmark is obtained by selecting the Patient’s Name and verifying the Final. RAP must be submitted, OASIS must be exported and all the visits are completed in that episode. All orders should also be returned with physicians’ signature and then there will be a hyperlink on the patient name for verifying Final Claim.
to bill the Final. This green checkmark is obtained by selecting the Patient’s Name and verifying the Final. RAP must be submitted, OASIS must be exported and all the visits are completed in that episode. All orders should also be returned with physicians’ signature and then there will be a hyperlink on the patient name for verifying Final Claim.
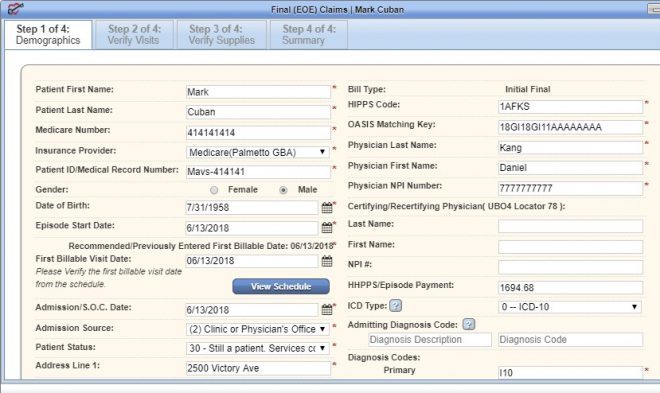
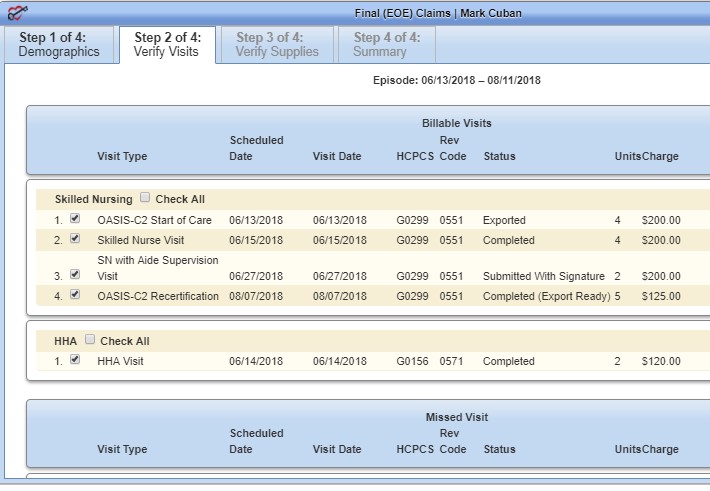
There are four steps to verifying a Final:
3. Verify Supplies – – Is the section where users verify the supplies that were used for the patient within the episode date range. If users do not want to bill for supplies check the box in the upper left-hand corner. Check the box to the left of the supply and select the hyperlinks “Mark As Non-Billable” or “Delete” if applicable. If a supply is marked as non-billable, it will fall to the lower section of the page. Select the “Edit” hyperlink on the right to make updates.

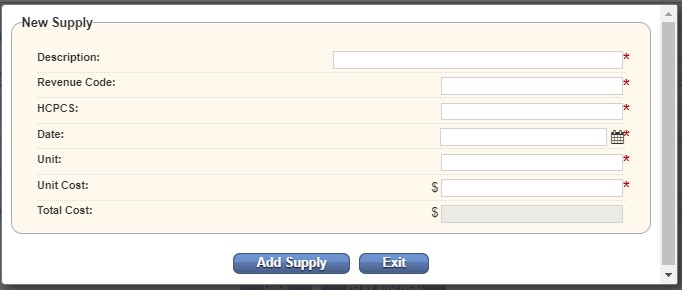
To add a supply that is missing, check the box to the left of the supply then select the “Add New Supply” hyperlink. A new window will open where users must enter the supply Description. Start typing and options will appear below. If applicable, select one of the descriptions. Axxess is pulling from a database that has the corresponding HCPCS codes listed. Enter the Revenue Code, select or write in the Date. Enter the Unit and Unit Cost. Then select the “Add Supply” button.
Back at Step 3, on the bottom of the page, you will see the “Back” button or the “Verify and Next” to go to Step 4.
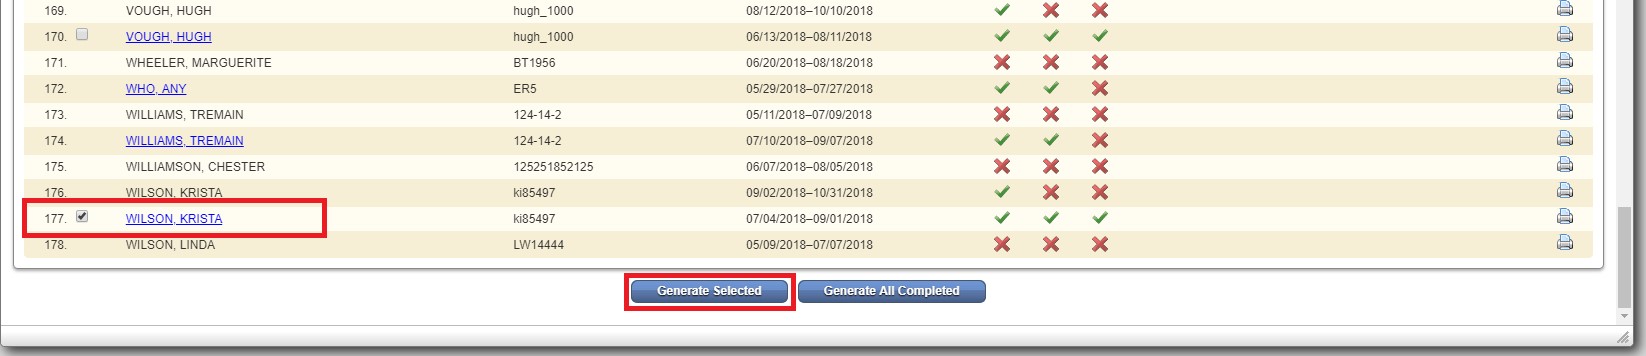
Once the Final has been verified there will be a checkbox next to the patient’s name. This shows the Final is ready to be generated for billing submission. Select the box next to the patient’s name. Scroll to the bottom of the page. Select the “Generate Selected” button.
Once “Generate Selected” is selected, users will be taken to a screen that shows 2-3 options:
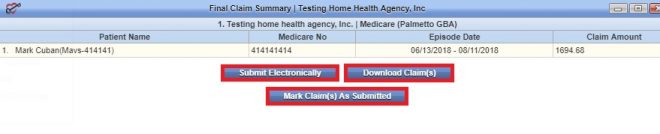
Once the claim has been submitted, an alert will appear on the top right-hand side corner stating, “The claim(s) were processed successfully.” Then the Final will be removed from the list automatically and will show in the Claims History section.
Billing/Medicare_Medicare HMO/Billing_Claims History.
After submitting Final or marking it as Completed Submitted it will appear in the Claims History with the status of Submitted.
This is the section where users would be able to create RAP if it was not created due to a Payer change after the patient was admitted in the system. Search by:

Select the patient name on the left side (patient’s name box will turn light blue). Then on the upper left under the “Home” tab there is an option for “New Final.”
Once you have selected the “New Final” option you will have an Episode Information window open. Choose the correct episode from the dropdown and then you will then select the “Add Final” button and your Final will be created.
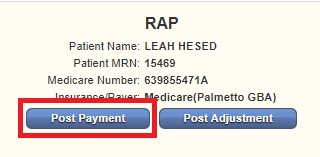
Once payment is received on the claim, post the payment amount by selecting “Post Payment.”
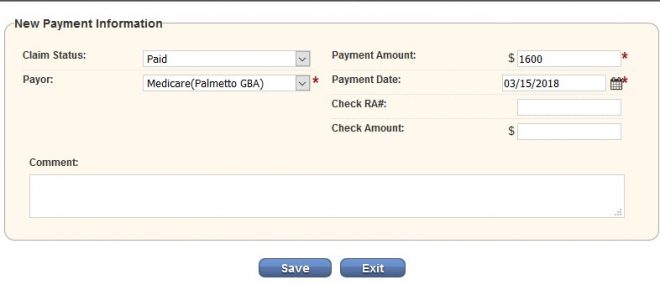
Change the Claim status from the drop-down menu to Paid. Enter the Payment Amount, Payment Date and select “Save.”
If there is a Balance amount on the claim, adjustments can be made by selecting “Post Adjustment.”

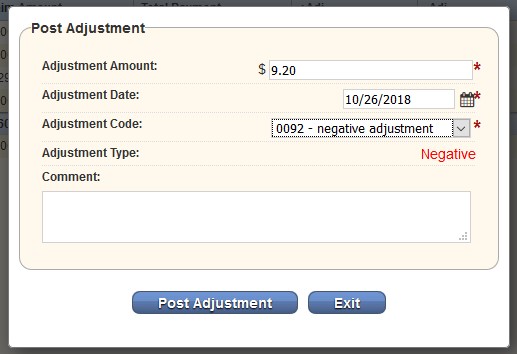
If there is a positive balance, make an Adjustment selecting a negative Adjustment Code and vice versa. Enter the Adjustment Amount, Date, any comments and select “Post Adjustment.” Go to Admin/Lists/Adjustment Codes/New Adjustment Code to make custom Adjustment Codes.
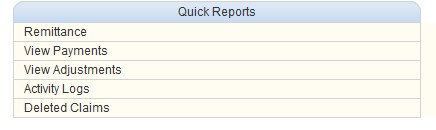
On the right-hand side are the following Quick Reports:
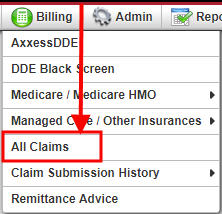
Billing/All Claims
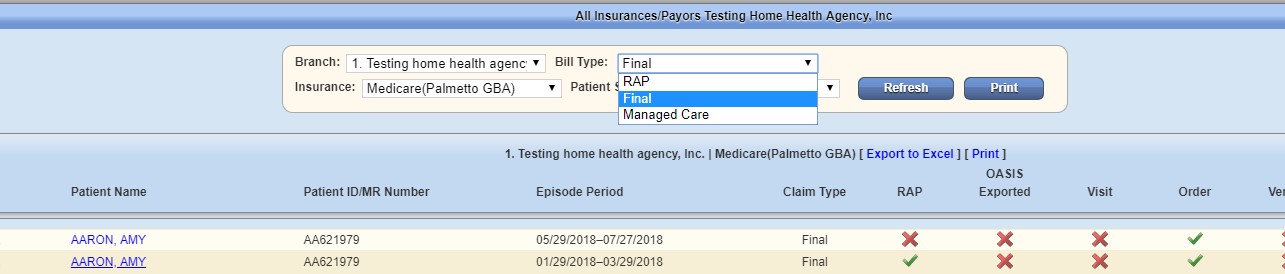
A new window will open with the option to verify all type of claims. To find a claim, select from the following search parameters:
Then select the “Refresh” button to finish the search.

This section works the same as the Medicare/Medicare HMO and Managed Care/Other Insurance. It allows for all claims in one window and change options in the top section depending on the Bill Type users are wanting to verify. It is the Same process of having all green check marks before being able to bill claims.
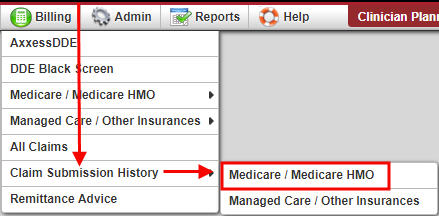
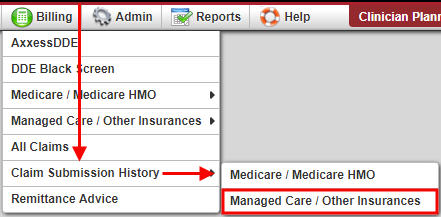
Billing/Claim Submission History/Medicare_Medicare HMO
This section provides the response for the claims that were submitted electronically for both Medicare/Medicare HMO and Managed Care/Other Insurance. Filter through claims by choosing the Claim Type and writing/selecting a date range. Once parameters have been chosen, select the “Generate” button.
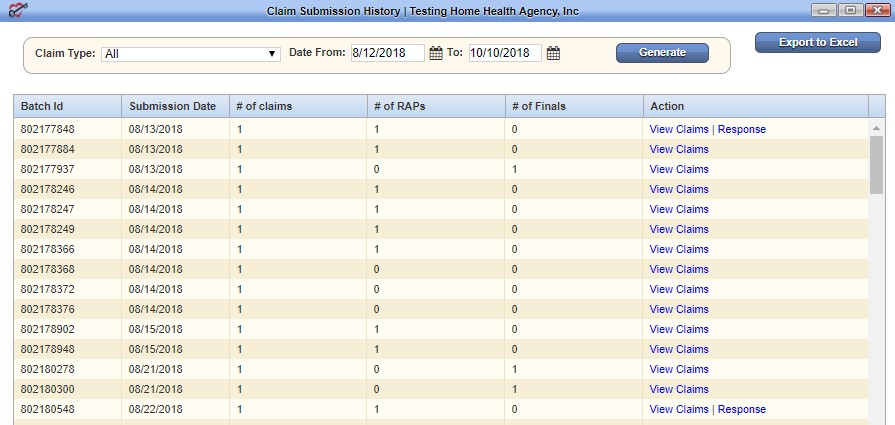
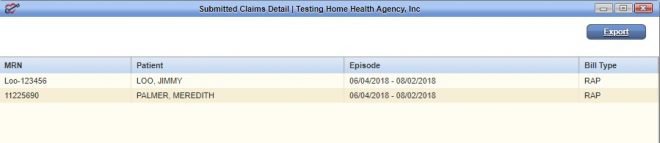
The window shows the Batch ID, Submission Date, # of claims, RAPs and Finals. To send the whole list to an excel spreadsheet select the “Export to Excel” button in the top right. To look at which claims were in each batch, select the “View Claims” hyperlink to the far right. The Submitted Claims Detail window will show every claim that was in the batch and the option to “Export” them by selecting the button in the top right.
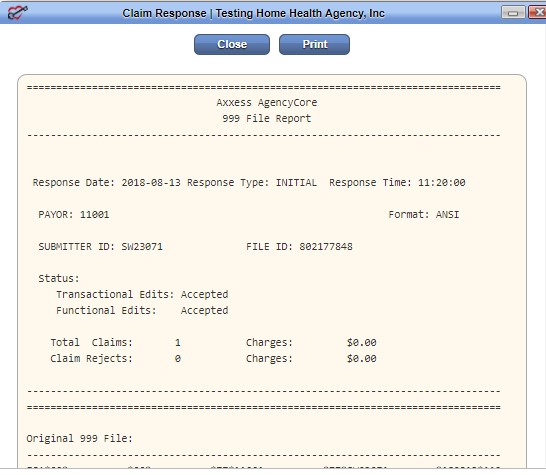
Back at the Claim Submission History window, select the “Response” (under Action) hyperlink to see the electronic response.
Billing/Claim Submission History/Managed Care_Other Insurances
The following window houses the submission history of all other claims besides Medicare and Medicare HMO claims. To find a specific claim, start typing in the Search By text space by either Batch ID #, Payer Name, Submission Date, Submitted By or the # of Claims. Select the “Export to Excel” button in the top right to create an excel spreadsheet of the list showing based off search parameters.
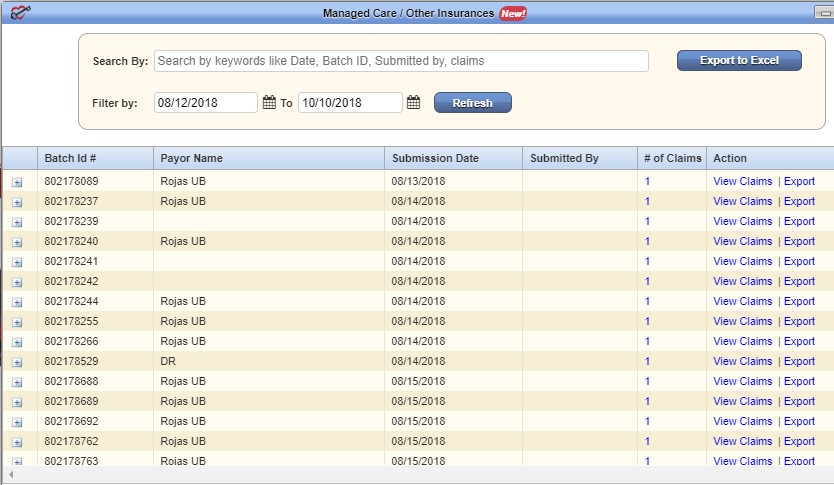
Claims can be viewed three ways:
Selecting any of the previous three options will expand the claim. The expanded claim will list the MRN, Patient, Type, Episode, Date Created and Claim Amount. To view the submitted form, select the “UB-04” hyperlink to the far right of the claim which will download a PDF copy. The “Export” hyperlink will create an Excel spreadsheet of just that batch.

Billing/Remittance Advice
Remittance Advice is uploaded from Medicare. The agency must be linked to Axxess to receive Remittance Advice through our system. If this is the case, when the window is opened there will be a list with the Remittance ID, Remittance Date, Payer, Payment Date, Last Posted Date, Provider Payment, Claim Count, Action and Posted Status. Write/select the date range for Remittance Date, choose the Insurance from the drop-down, then select the “Generate” button. Select the “Print” button to print the list showing based on parameters. The Action column contains two actions: View Details and Delete. The “Delete” action item will delete the remittance advice from the list. Select “View Details” to review the claims details and Post Payment.

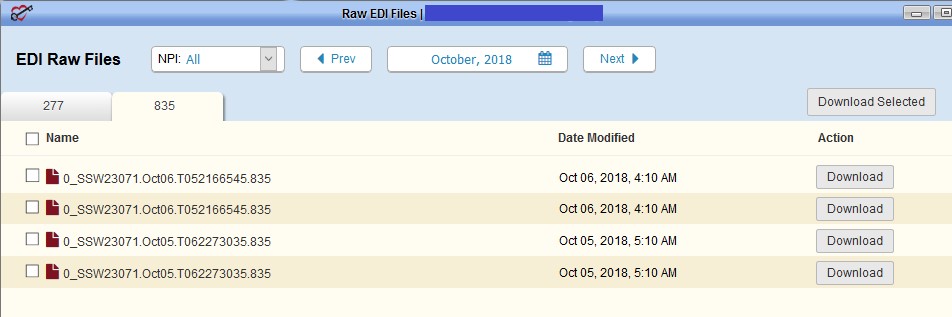
To see the raw EDI Files, select the “EDI Files” button to the far right. The following window will open. To limit the number of raw files seen, select an NPI from the drop-down or choose a date by selecting the calendar icon or selecting the “< Prev” and/or “Next >” buttons. Download each individual raw file by selecting the “Download” button to the right of the file. Select the check boxes to the left of each file and select the “Download Selected” button in the top right to download multiple at the same time. There are also two types of raw files split up by tabs. There is the “277” tab and the “835” tab.
Right below that section is another way to sort through Remittance Advice. Write/select the date range for Received Date, check the box whether it is Not Posted then select the “Generate” button to the far right. If there is a Remittance File to upload, select the “Browse” button (retrieve the file on computer), then select the “Upload” button.

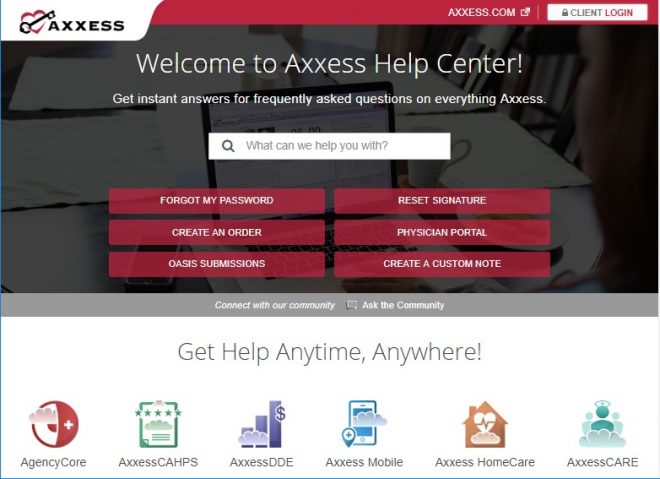
Help/Support & Training/Help Center
A great resource that is available 24/7 is our Help Center. A place to get answers to frequently asked questions or watch videos of all Axxess products. It can be accessed by going to:
Or also available at https://www.axxess.com/help/