x
Join our new Axxess User Community to connect, share, learn and grow together.Learn More
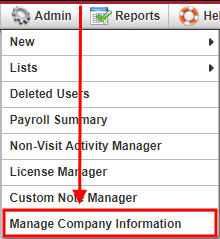
Admin/Manage Company Information
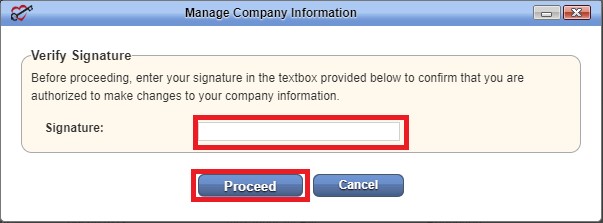
The following window opens and requires the signature of someone with the Administrator role in their user profile. After entering a signature, select the “Proceed” button.
NOTE: For updating Signature. See Office Overview
Manage Company Information is split up into 7 tabs found on the left side of the window
NOTE: Anything with a red asterisk (*) means the information is required to save the page.

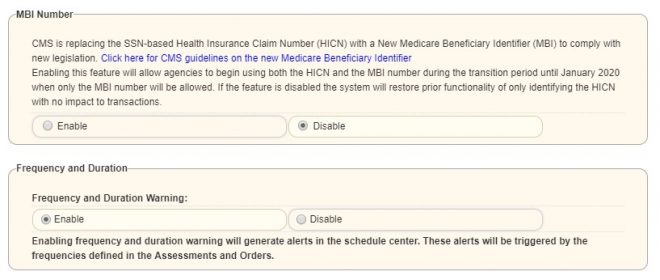
AgencyCore will accept MBI Numbers. This is a setting that must be enabled to use. The default is “Disable.” Alerts can be enabled in the Schedule Center based on frequency and duration according to previously entered orders and assessment answers. The default is “Disable.”
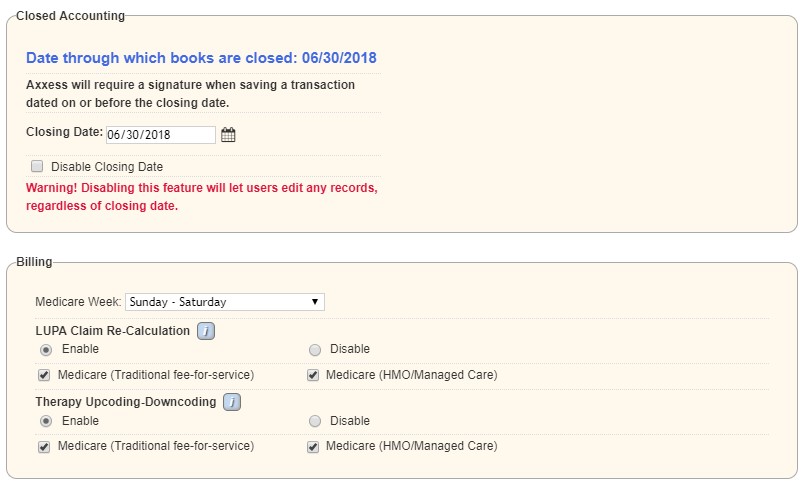
The agency must decide the date that books are closed by selecting a date on the calendar. A signature will be required for saving transactions dates on or before the closing date.
NOTE: If the “Disable Closing Date” check box is selected, users will be able to edit any records (permission-based) regardless of closing date.
Choose the Medicare Week from the drop-down. The default is Sunday-Saturday. Then users must decide if they would like “LUPA Claim Re-Calculation” and “Therapy Upcoding-Downcoding” to be enabled for traditional Medicare and/or HMO/Managed Care Medicare.
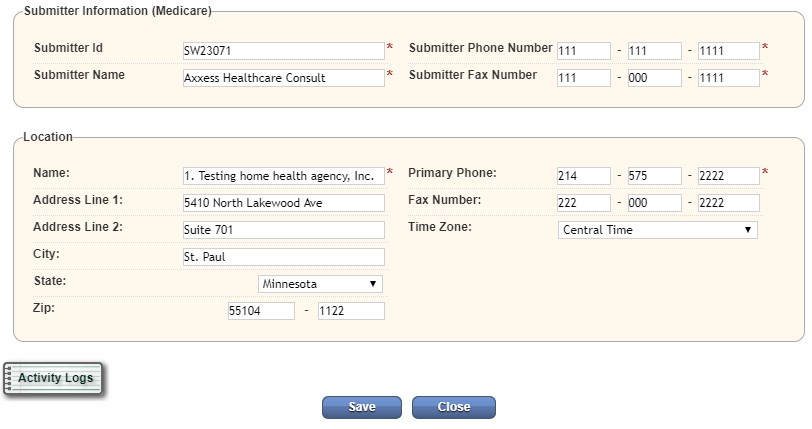
Once Submitter Information has been received from Medicare it should be entered (if claims are being downloaded) along with the address of the location tied to the Submitter Information. Selecting the “Activity Logs” button will open a new window showing which users have changed data in the Company Information tab, and when the change was made. Any changes made should be followed by selecting the “Save” button.
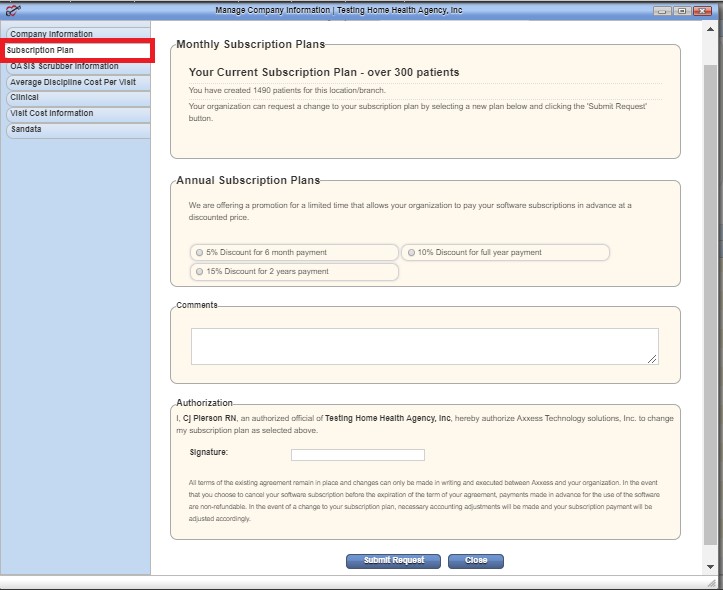
2. Subscription Plan – In this section, the current monthly subscription plan is shown. This plan is based on the number of users. Active Census can be adjusted by writing in a request in the Comments section, entering the users electronic signature and selecting the “Submit Request” button. Upgrading the Plan can only be done through the request from here. If users want to downgrade their plan, they must enter a ticket in the Support Ticketing Center.
3. OASIS Scrubber Information – The agency has the option to check and uncheck specific Audit Types that the Axxess scrubber can look for when verifying OASIS visits. There is also an option to check the box to have this information validated in real time, rather than manually selecting the button to “Check For Errors.”
NOTE: Hovering over the ![]() icon will give more insight to what each specific audit type is searching for.
icon will give more insight to what each specific audit type is searching for.

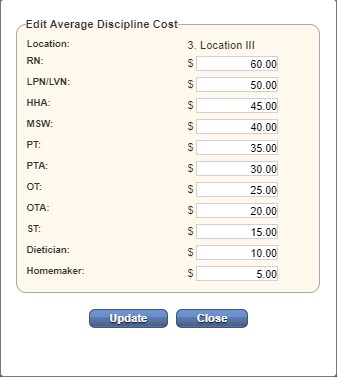
4. Average Discipline Cost Per Visit – This window allows users to enter an average the agency pays their workers per visit. Based on the location and discipline, the agency can decide the average cost per visit and its effective date.
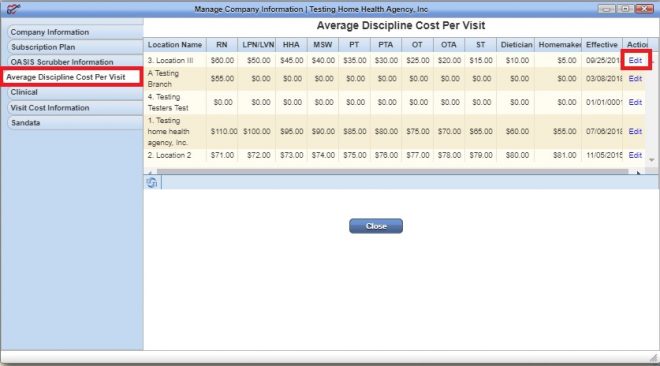
This can be edited by selecting the hyperlink “Edit” on the far right under the Actions column. Once all updates have been made, select the “Update” button to save.
6. Visit Cost Information – This allows agencies to enter the average costs of visits to their agency.
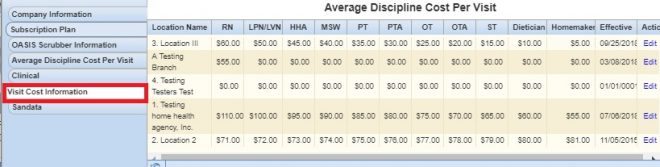
NOTE: Even though the formatting is the same as the Average Discipline tab, that tab is for workers while this tab is for agency costs.
Admin/New/User
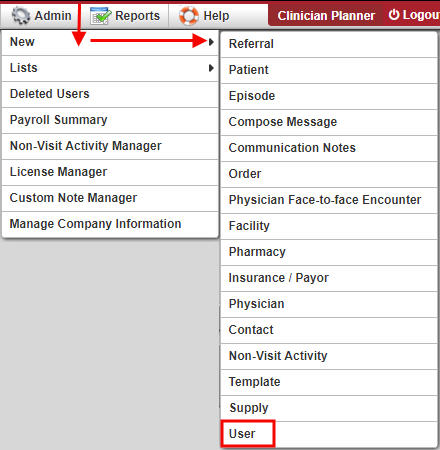
A window will open and the user’s information must be entered. All asterisked items are required. The Roles, Permissions and Restrictions can be copied from a previously entered user using the “Duplicate from” drop-down menu. For example, if the agency is entering a new RN, a current on-staff RN can be selected that will have the same software access.
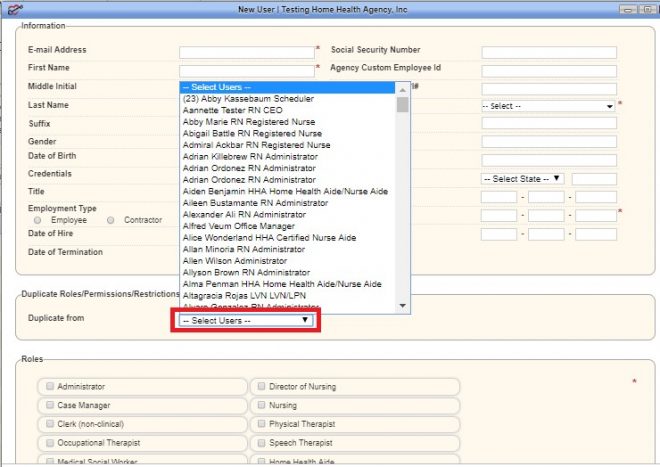
Roles are important in the software because they determine what a user can or cannot see, select, delete or undo.
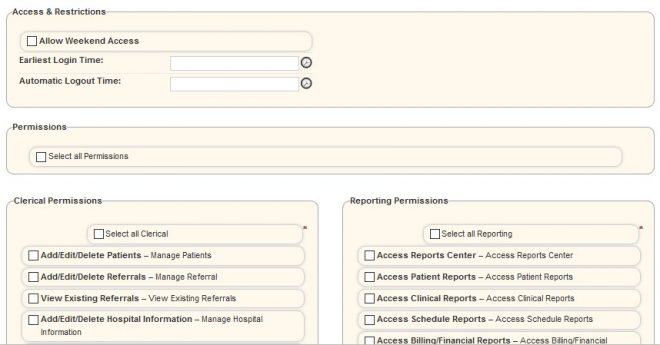
There is also a restriction function that will allow agencies to limit the times that users can be using the software. For example, if the “Allow Weekend Access” box is not checked and a user attempts to login on a Saturday, it will not allow entry.
Times can also be adjusted for the earliest time a user can log in and/or when they are automatically logged out of AgencyCore.
Permissions will allow agencies to manually select which Clerical, Reporting, QA, Clinical, Billing, OASIS, Administration, Schedule Management and State Surveyor permissions they wish their users to have.
To save time, there is also a “Select all Permissions” checkbox that will check every single permission box below.
NOTE: Under Clinical Permissions – Agencies can only choose either Ability or Require check box for both Notes and Orders. If both are checked the user will not be able to do either.
At the bottom of the window, there is a free text space for any Comments related to the user. Once finished, select the “Add User” button to complete.
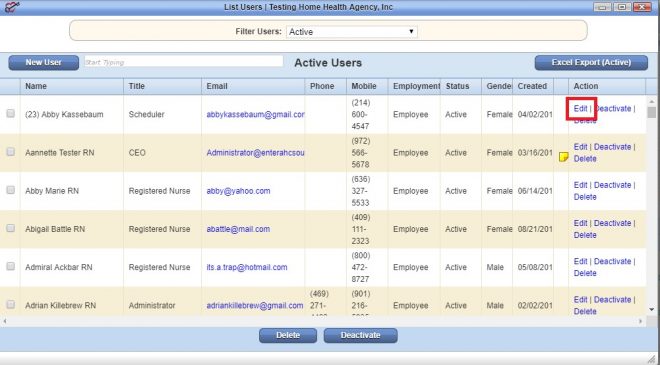
Admin/Lists/Users
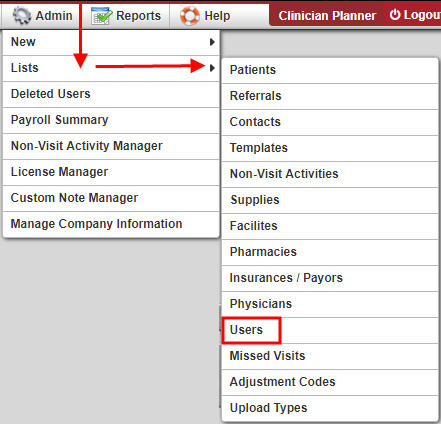
A window will open which will show a list of all current users. A new user can also be added from here selecting the “New User” button in the top left. Agencies can export the list of all users to an Excel spreadsheet by selecting the “Excel Export (Active)” button in the top right. The agency can “Deactivate” or “Delete” users individually by selecting on the hyperlinks to the far right under the Action column. The agency can also check the box(es) to the left of each employee name and “Delete” or “Deactivate” (buttons at the bottom) to remove multiple users at once. To edit a user, select the “Edit” hyperlink under the action column.
The Edit User window is split up into five tabs:
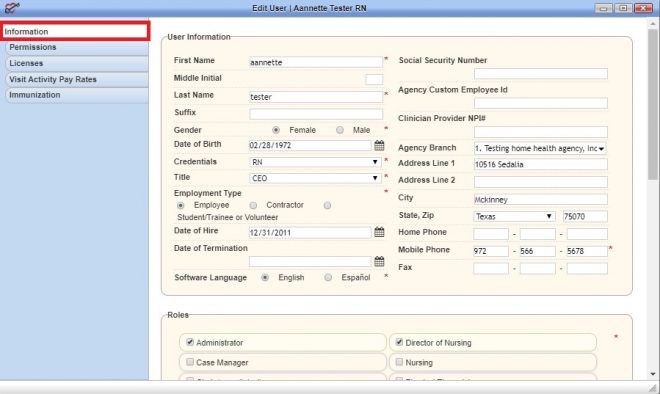
2. Permissions – See adding a new user.
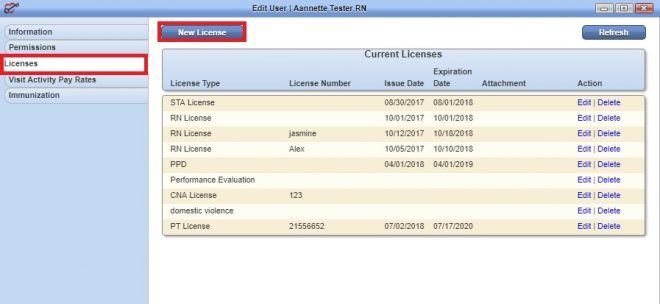
3. Licenses – Users licenses are maintained here, by either adding a new, editing a previous or deleting license information.
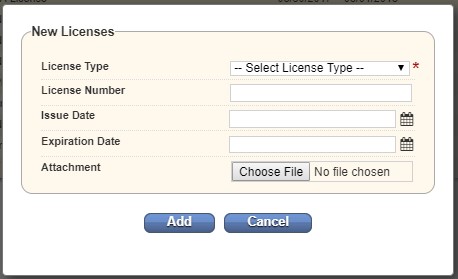
A window will open and license information is entered. Choose the “License Type” from the drop-down menu. Write in the License Number. Select from the calendar or write in the Issue and Expiration Dates. The agency can also add a scanned copy of any license by adding it as an attachment.
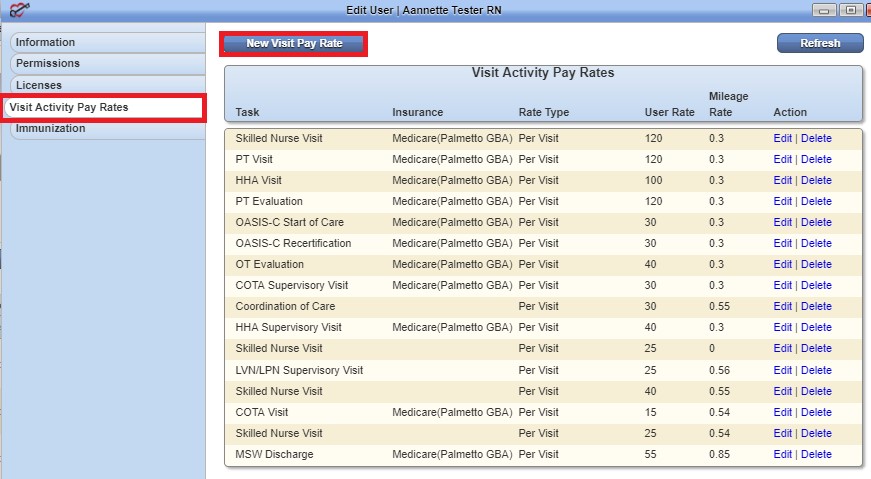
A new window will open, and the “Insurance, Task, Rate Type” must be chosen from their corresponding drop-down menus. A “User Rate” must then be added along with an optional “Mileage Rate.” Then select the “Add” button to save.
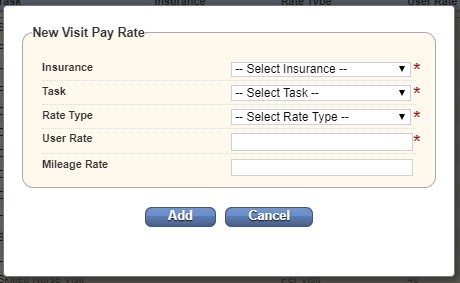
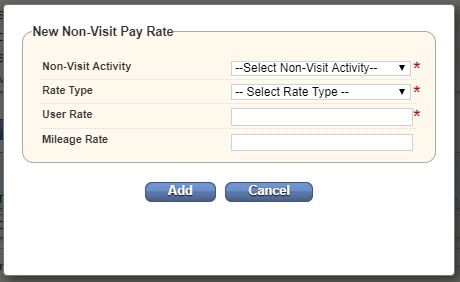
NOTE: Non-Visit Activities tasks needs to be created/added first. Go to Admin/List/Non-Visit Activity and create the activity types/task.
At the bottom of the tab, there is an option to “Import Pay Rates” which will let agencies copy pay rates set up for other users by simply selecting the “Duplicate Pay Rates from” drop-down menu. Then select the “Apply” button to the right.
At the bottom of the tab, there is an option to “Import Pay Rates” which will let you copy pay rates set up for other users by simply selecting on the “Duplicate Pay Rates from” drop-down menu. Then select the “Apply” button to the right.

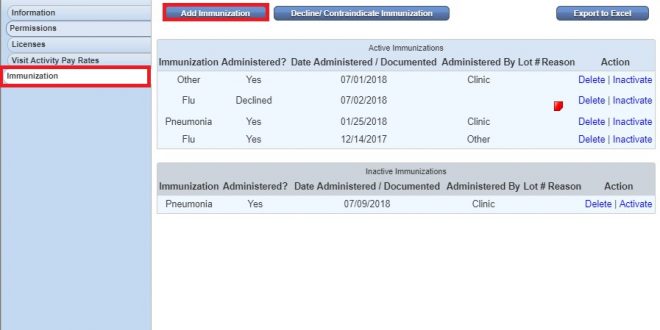
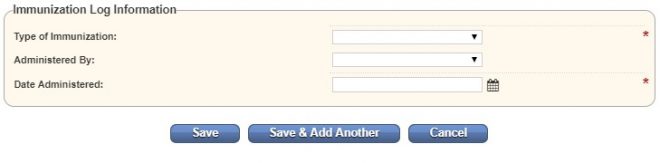
A new window will open in which agencies must choose the “Type of Immunization” and who it was “Administered By” from their corresponding drop-down menus. Then select the “Date Administered” by writing in or selecting the date in the calendar. Agencies can “Save” this, or if there is more than one immunization to add, select the “Save & Add Another” to continue with another blank “Immunization Log Information” window.
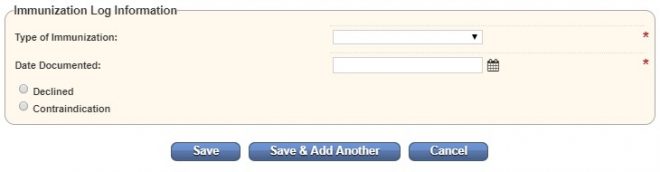
It will then show up under the “Active Immunizations” section. If a user declines an immunization, it can also be added by selecting the “Decline/Contraindicate Immunization” button at the top of the page. It will open another log information window where the “Type of Immunization” must be chosen again. Either write in or select the date from the calendar. Then mark whether the immunization was “Declined” or “Contraindication.” Agencies can “Save” this, or if there are more than one declined immunization to add, select the “Save & Add Another” to continue with another blank “Immunization Log Information” window.
Also, there is an option to “Delete” or “Inactivate” an immunization by selecting the hyperlinks in the far right under “Action.” Once an immunization is inactivated, it falls under the “Inactive Immunizations” section where it then can also be deleted or reactivated.
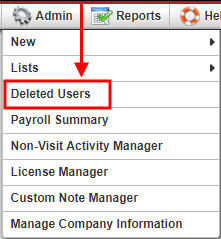
Admin/Deleted Users
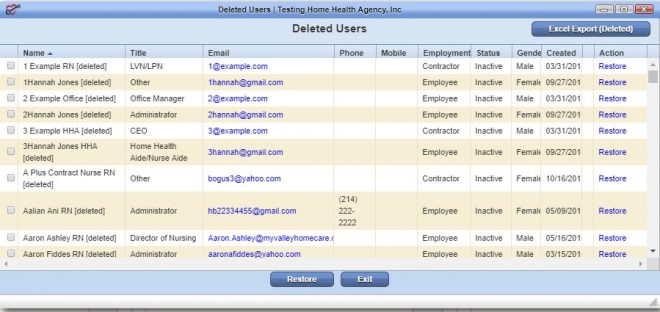
In the new window, individual users can be restored back to active status by selecting the “Restore” hyperlink on the far right under the Action column. Check one or more boxes to the left of user Names, then select the “Restore” button at the bottom of the window to restore multiple users. Select the “Excel Export (Deleted)” button in the top right to create an excel spreadsheet with all deleted users listed.
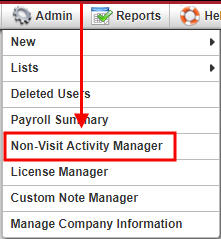
Admin/Non-Visit Activity Manager
NOTE: Non-Visit Activities tasks needs to be created/added first. Go to Admin/List/Non-Visit Activity and create the activity types/task.
A window will open in which all currently assigned non-visit activity is shown. Select the “Export to Excel” button in the top right to create an excel spreadsheet with all non-visit activity listed.
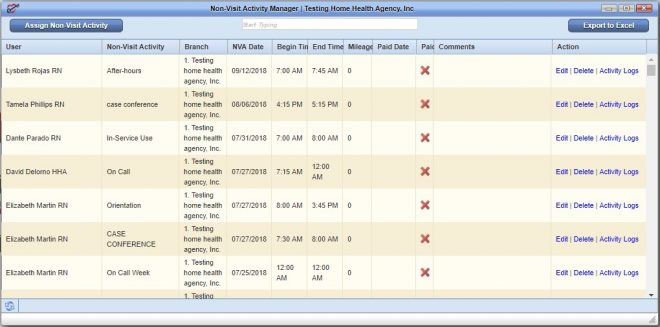
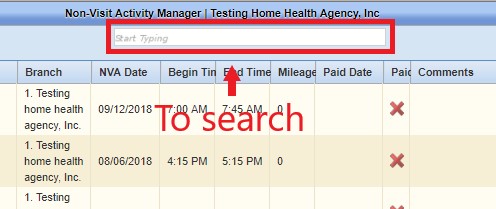
To search through the list, start typing in the text space at the top of the page. Search by Users, Non-Visit Activity, Branch, NVA Date, Begin and End Time, Mileage, Paid Date and Comments.
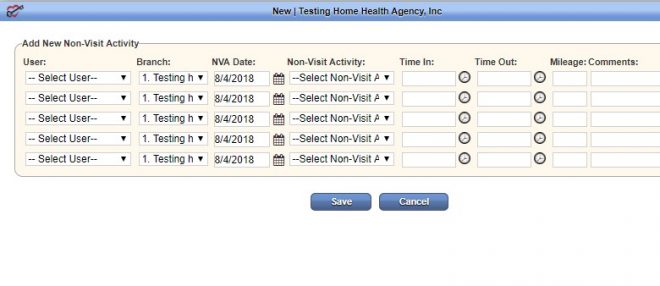
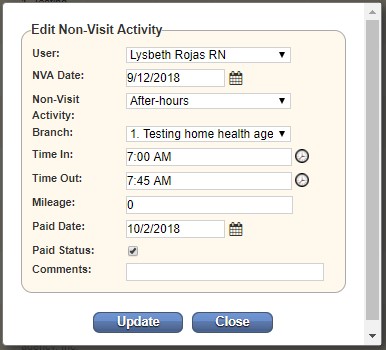
To “Assign Non-Visit Activity,” select the button in the top left. A window opens in which new non-visit activity can be added. Select the User from the drop-down menu, then choose the branch (if more than one). Write in or select NVA Date from the calendar, then select the specific Non-Visit Activity from the drop-down menu. Enter the Time In and Out by writing in or by selecting from the clock. Then enter Mileage and any Comments related to the activity. Five non-visit activity entries can be added at once. Once completed, select the “Save” button at the bottom of the window. If more than five entries need to be added, “Save” and select the “Assign Non-Visit Activity” button again.
To edit the non-visit activity, select the “Edit” hyperlink on the far right under the Action column. Unlike the previous seen activity entry, here a Paid Date (write in or calendar select) can be entered and verify the activity’s Paid Status (checkbox). Checking the Paid Status box will change the icon seen on first Non-Visit Activity window from a red “X” to a green check mark.
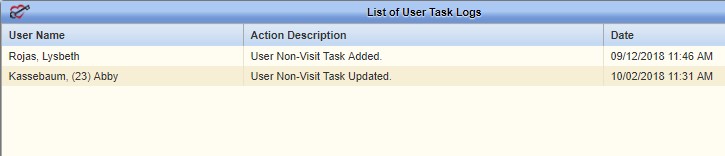
Selecting the “Activity Logs” hyperlink under the Action column will show which users have edited the activity entry and when. Choosing the “Delete” hyperlink under the same column will allow agencies to remove each entry individually.
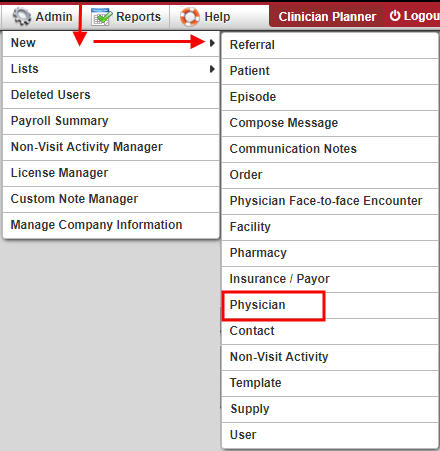
Admin/Lists/Physicians/New Physician, Admin/New/Physician or Create/New/Physician.
A new window will open. The quickest way to enter a physician is by entering their “NPI number.” As the number is typed, physicians and their corresponding NPI numbers will appear below for selection. After selecting the physician and pressing the tab key, the Physician Information and Address will auto-fill based on the information that is in the NPI registry. This can still be edited. Everything with a red asterisk is required.
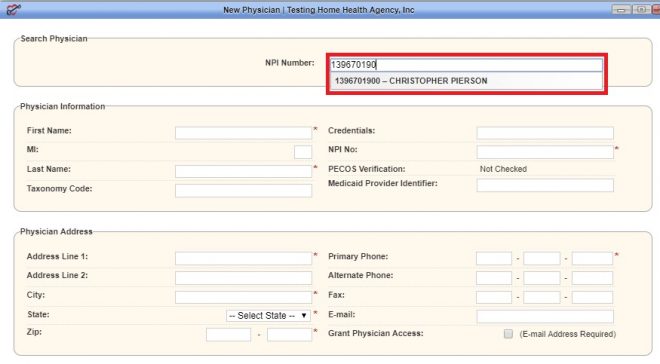
NOTE: If the NPI number is unknown, use the following website: https://npiregistry.cms.hhs.gov/registry/
If the physician is already listed in the NPI registry, the system will automatically do a “PECOS Verification.” A green check mark indicates they are PECOS-verified, a red “X” indicates they are not.
![]()
Once completed, select the “Save” button at the bottom.
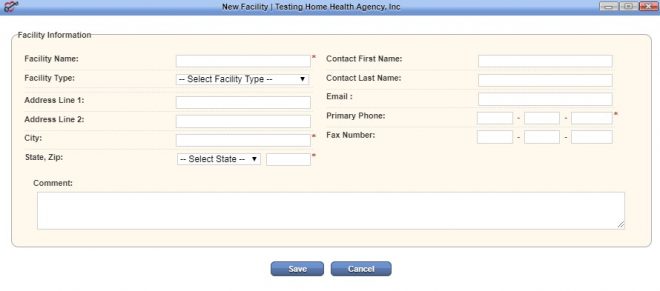
Admin/New/Facility, Admin/Lists/Facilities/New Facility or Create/New/Facility
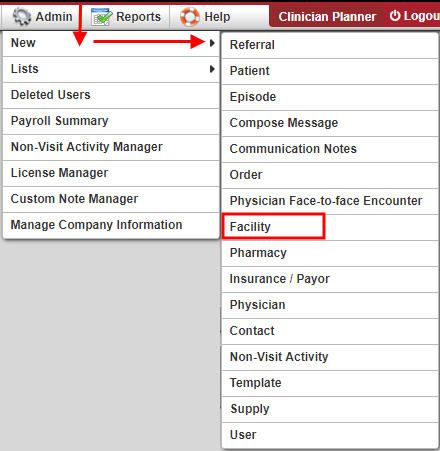
A new window will open. Enter the Facility Name, Address, Primary Phone, and as much information as possible. When finished, select the “Save” button at the bottom.
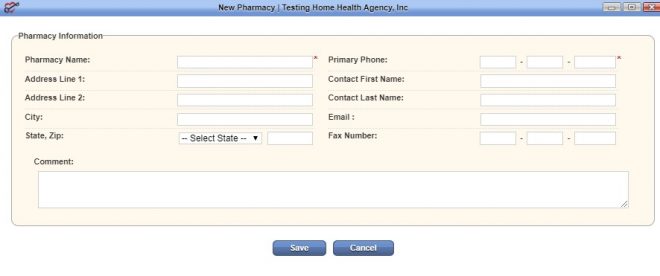
Admin/New/Pharmacy, Admin/Lists/Pharmacies/New Pharmacy or Create/New/Pharmacy.
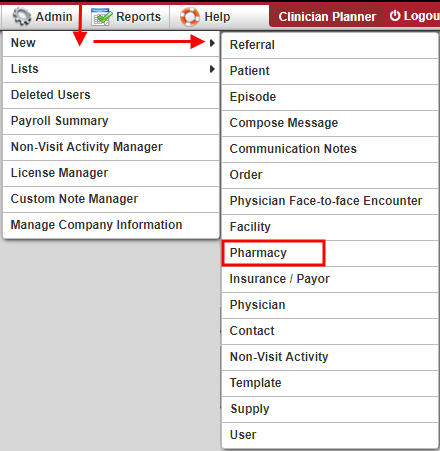
A new window will open. Input the Pharmacy Name and Primary Phone and all other information available. When finished, select the “Save” button at the bottom.
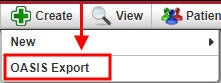
Create/OASIS Export
A new window will open. Filter for OASIS by choosing the Branch and Payment Source from the drop-down menus and selecting the desired Assessment Date Range. Then select “Generate.” The patient OASIS visits that meet the criteria will appear below.
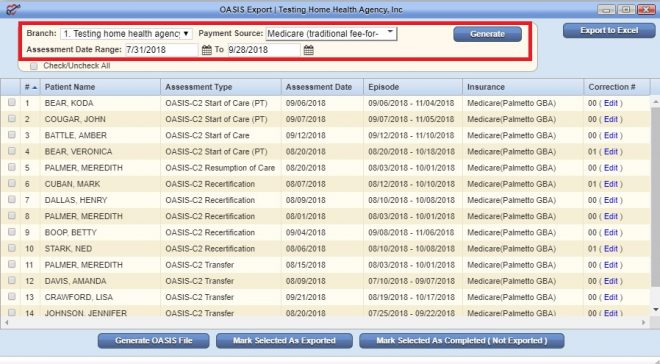
There are check boxes to the left of every patient name listed. Select one or multiple, then choose one of the buttons below. If “Generate OASIS File,” is chosen, the system will download the raw OASIS file on the computer to be uploaded to the Center for Medicare Services (CMS). There is a “Check/Uncheck All” checkbox inside the search criteria that will either check all boxes listed or clear them.
NOTE: Create a folder on the computer where OASIS files can be stored for easy access.
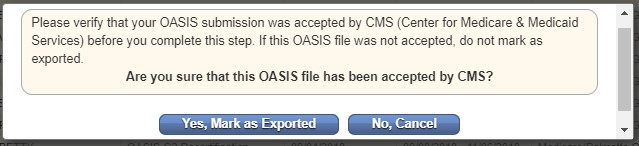
Once OASIS file(s) have been sent to CMS, go back inside the window, check the boxes of the OASIS that were submitted again (far left), then select the “Mark Selected As Exported” button at the bottom. A new window will open confirming that the OASIS file(s) have been accepted by CMS. To confirm, select the “Yes, Mark as Exported” button.
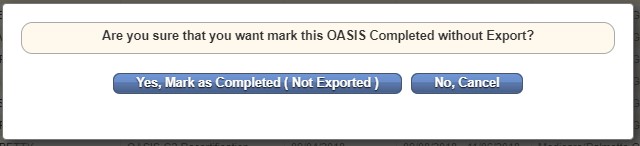
Similarly, if an OASIS needs to be marked as completed, but was not exported, check the box next to the Patient Name and then select the “Mark Selected As Completed (Not Exported)” button at the bottom of the page. A new window will open, and then select the “Yes, Mark as Completed (Not Exported)” button.
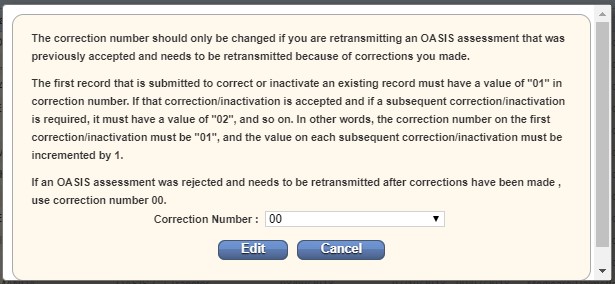
The list of OASIS can be exported to an Excel Spreadsheet by selecting the “Export to Excel” in the top right of the OASIS Export window. If submissions have been rejected and a corrected OASIS is being resubmitted, users can change the “Correction #” by selecting the “Edit” hyperlink on the far right of each OASIS line. A new window will open, and a warning will appear. Change the “Correction Number” by selecting on the drop-down then selecting the “Edit” button.
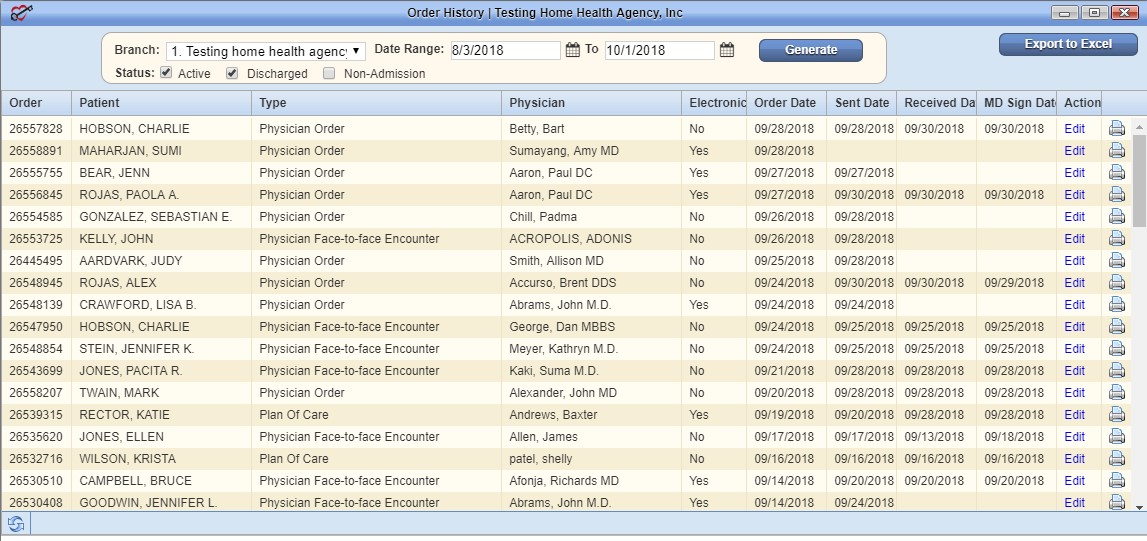
View/Orders Management.
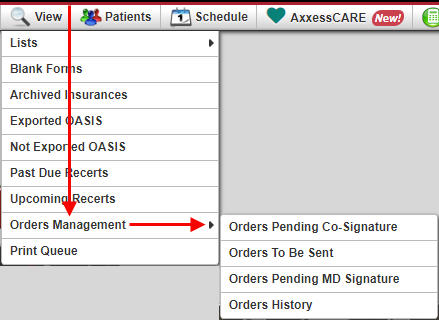
It is split up into four sections:
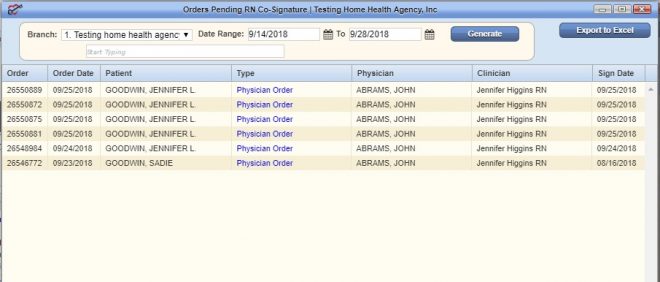
To co-sign an order, select the hyperlink under the column “Type.” A new window will open showing the printed version of the order. The three options with the order are the either, “Co-Sign,” “Print” or “Close.”

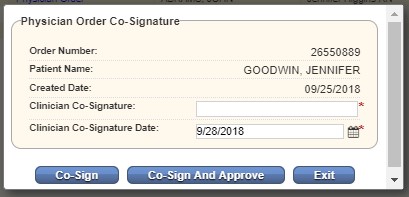
The co-signature window will open as shown below. After entering the co-signature, the user can either choose to “Co-Sign” the order or “Co-Sign And Approve.” After co-signing, the order will disappear from the Orders Pending RN Co-Signature window.

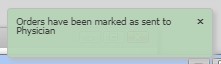
To print an order, select the printer icon ![]() on the far right of the order. Once printed, check the boxes to the left of the order and select the “Send Manually” button (in the top right). They will be marked as sent to the physician with a green notification.
on the far right of the order. Once printed, check the boxes to the left of the order and select the “Send Manually” button (in the top right). They will be marked as sent to the physician with a green notification.
![]()
If the agency’s physicians have access to the Physician Portal, orders should be sent electronically. This can be done by checking the boxes to the left of the orders and selecting the “Send Electronically” button in the top right.
![]()
To export the list of orders that meet the search parameters, select the “Export to Excel” button in the top right.
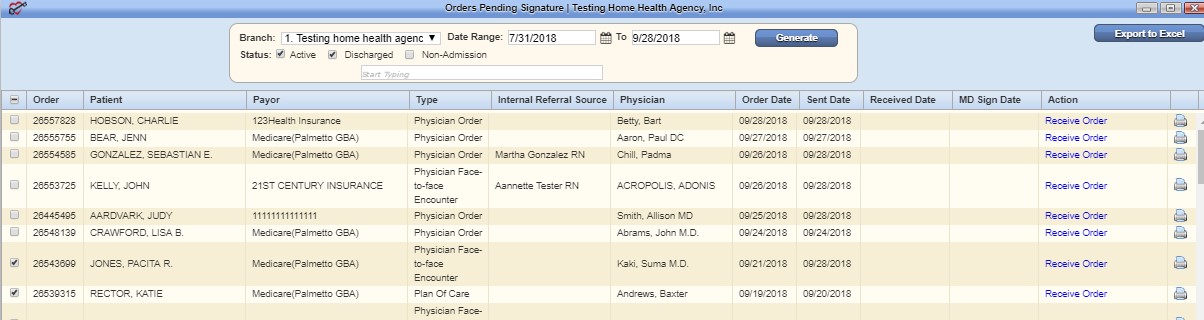
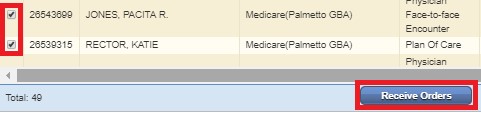
When the physician is ready to sign orders, check the box to the left of the order then select the “Receive Orders” button at the bottom of the page.
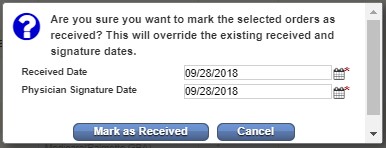
A new window will open where the doctor will confirm the Received and Physician Signature Date then select the “Mark as Received” button. The date auto populates with today’s date. Once marked as signed they will disappear from the Orders Pending Signature window and be in the Orders History section.
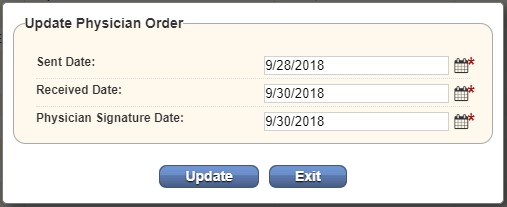
Select the “Edit” hyperlink to update an order’s Sent, Received or Physician Signature Date. A new window will open. Type in the date or select the calendar icon on the right. Select “Update” to save.
Select the refresh icon ![]() in the bottom left for the Orders History window to reflect the most recent status of all orders. Select the printer icon on the far right to re-print any orders that need to be sent/re-sent for signature. Select the “Export to Excel” button in the top right to create an Excel spreadsheet of all orders in the window (based off search parameters).
in the bottom left for the Orders History window to reflect the most recent status of all orders. Select the printer icon on the far right to re-print any orders that need to be sent/re-sent for signature. Select the “Export to Excel” button in the top right to create an Excel spreadsheet of all orders in the window (based off search parameters).
Admin/New/Insurance_Payor, Admin/Lists/Insurances_Payors/New Insurance or View/Lists/Insurances_Payors/New Insurance.
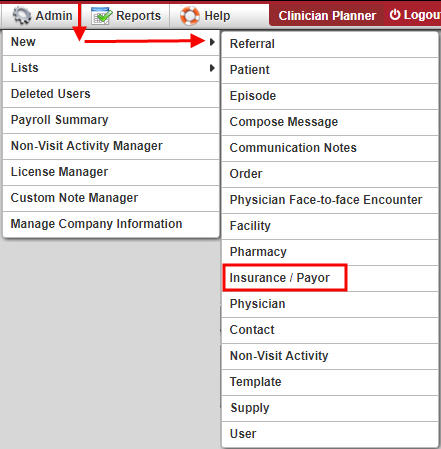
A new window will appear. The new payor window is split up into 4 different steps/tabs:

NOTE: The question mark icon ![]() is a reference. Hover over the icon for more insight about that question or section.
is a reference. Hover over the icon for more insight about that question or section.
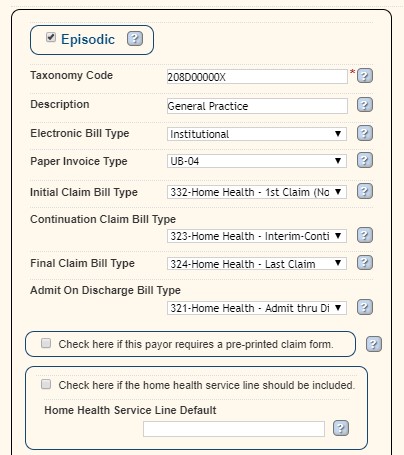
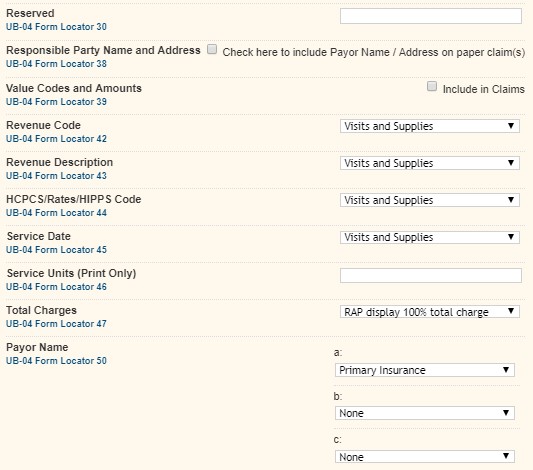
The next section is for payor details. Below are the selections that auto-populate when adding a new payor. It is required to enter an Insurance/Payor Name, Type, ID and Source of Payment. If Claims are submitted electronically through Axxess Select Availity as the clearinghouse, enter Submitter ID “00000.”
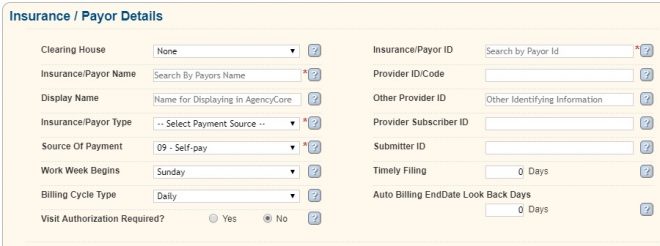
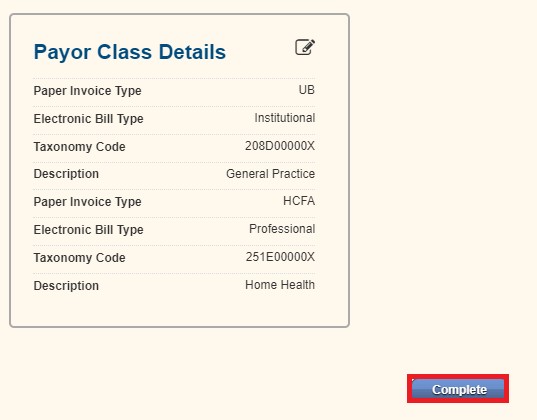
Select whether the payor pays Episodic, Per Visit or both by checking the corresponding boxes. The Episodic and Per Visit columns both ask the same questions seen below. Taxonomy code should be for Home Health, and if it is Episodic, the Initial Claim Bill type should be 322, Continuation 323, Final 329 and Admit thru Discharge must be 321. If it is a Per Visit Claim, make sure the agency is billing HCFA-1500 or UB-04. If it is a HCF-1500, it has to be Professional and UB-04 is an Institutional Claim. For Per Visit Claims, Initial Claim Bill type should be 322, Continuation 323, Final 324 and Admit thru Discharge must be 321.
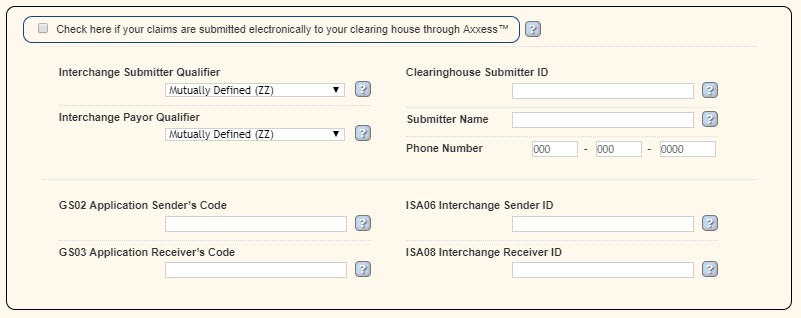
The next section will be entering the clearinghouse information. If Axxess is used for the clearinghouse, check the box at the top of the section and it will collapse.
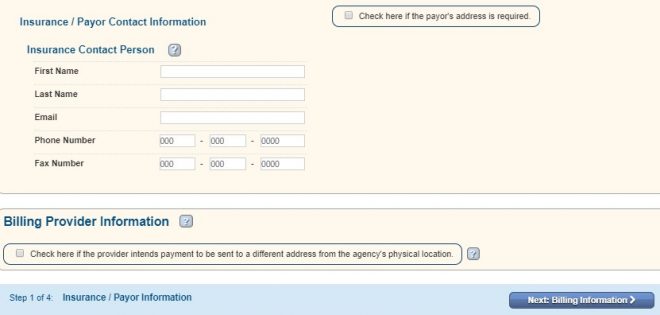
In the next section, enter the contact information of the person whom the agency communicates with at the insurance company. If the payor’s address is required, check the box to the right and enter that address. If the insurance wants their payments to be sent to a different address from their physical location, check the box at the very bottom of the page. Once completed with all the information in this page/tab, select the “Next: Billing Information >” button in the bottom right. There will be a green notification stating the new Insurance/Payor has been added successfully.
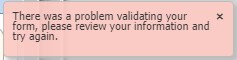
NOTE: If all required information is not entered, the following notification will appear:
The required sections that are missing information will be highlighted in red:
![]()

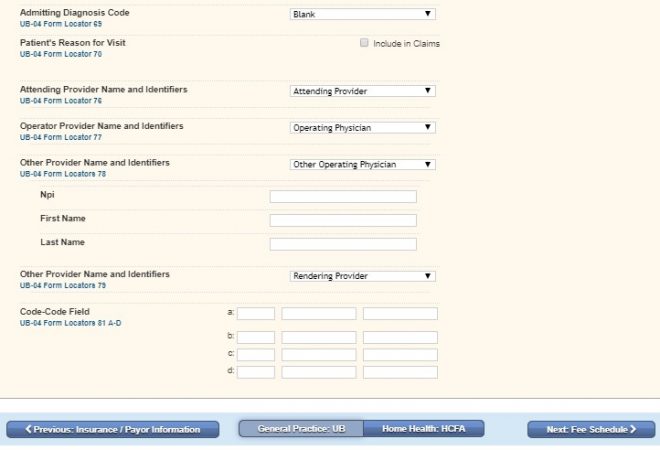
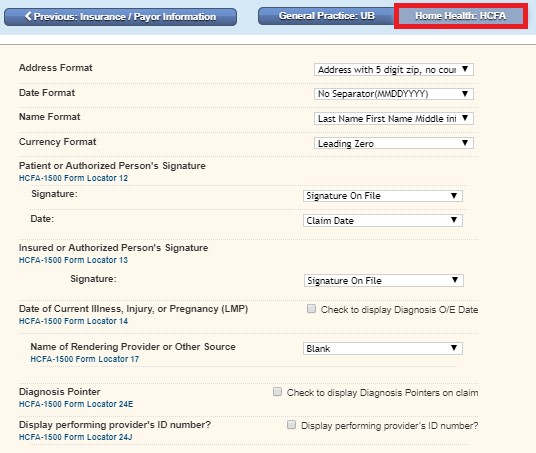
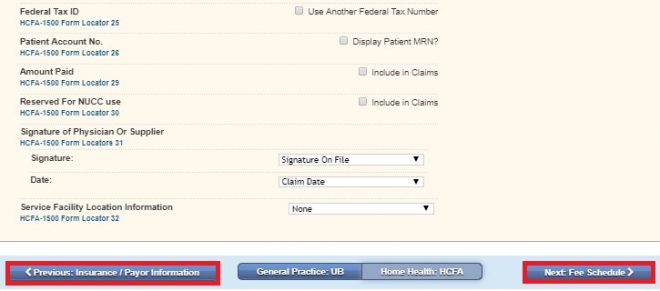
The following are the questions related to filling out the HCFA–1500 and the Locators of that form.
Toggle in between tabs/steps by selecting the “< Previous: Insurance/Payor Information” and “Next: Fee Schedule >” buttons at the bottom of the page. A green notification will appear stating the Billing Information has been updated successfully.
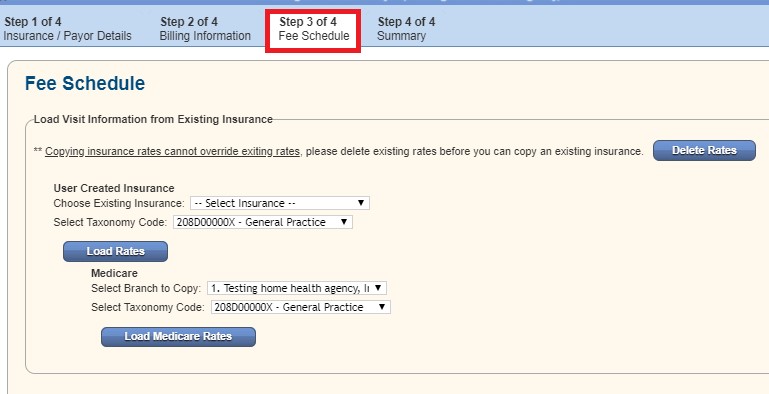
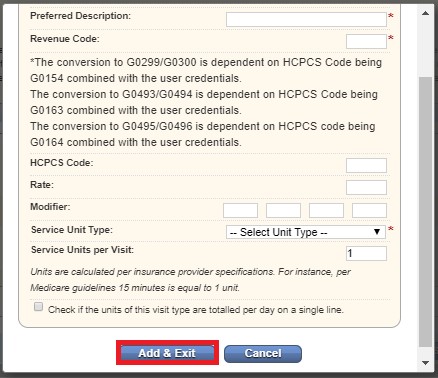
If visit information is being added per visit, select the “Add Visit Information” button. A New Visit Information window will open. Confirm the Taxonomy Code, select the Task from the drop-down menu, input a Preferred Description and Revenue Code. There are some suggestions about G-codes. Enter the HCPCS Code, Rate, Modifier and choose the Service Unit Type. Service Units per Visit will auto-generate to 1. Once completed, select the “Add & Exit” button at the bottom of the form.
Manually entered or copied rates now display towards the bottom. To the far right there is a hyperlink option to “Edit” (which will go to the previous screenshot) or the “Delete” which removes the individual rate.

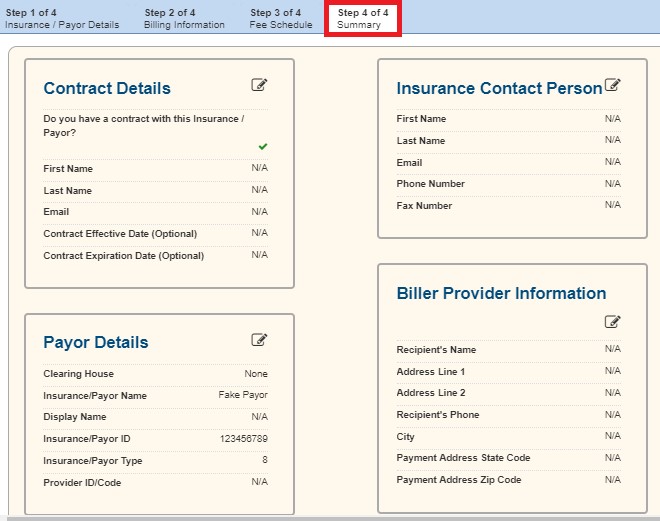
Once completed, select the “Complete” button at the bottom of the page. A green notification will state that the payor has been saved successfully.
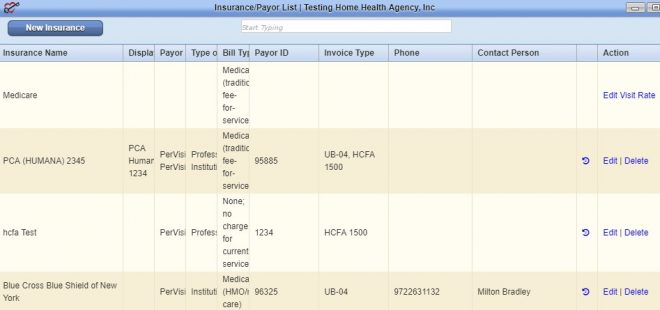
Admin/Lists/Insurances_Payors or View/Lists/Insurances_Payors

Select the “Edit” hyperlink to the far right of the screen under the Action column. This is also where the “Delete” function is found. The ![]() icon will show an Activity Log that lists which users have made any changes to the payor and when they were made. To search for a payor, Start Typing any part of the Insurance, Display Name, Payor Class, Type of Bill, Bill Type, Payor ID, Invoice Type, Phone or Contact Person in the white free text space at the very top of the page.
icon will show an Activity Log that lists which users have made any changes to the payor and when they were made. To search for a payor, Start Typing any part of the Insurance, Display Name, Payor Class, Type of Bill, Bill Type, Payor ID, Invoice Type, Phone or Contact Person in the white free text space at the very top of the page.
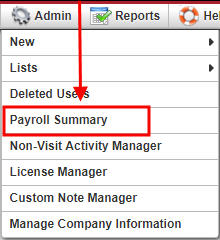
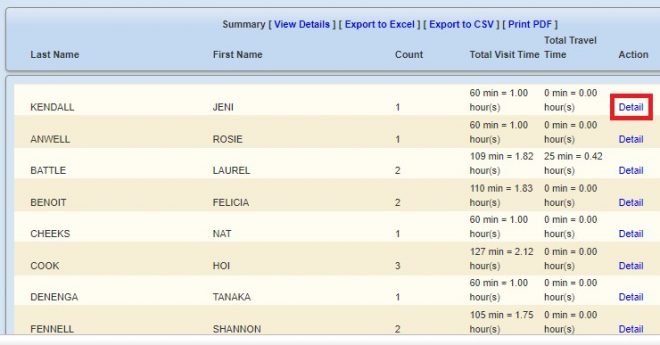
Admin/Payroll Summary
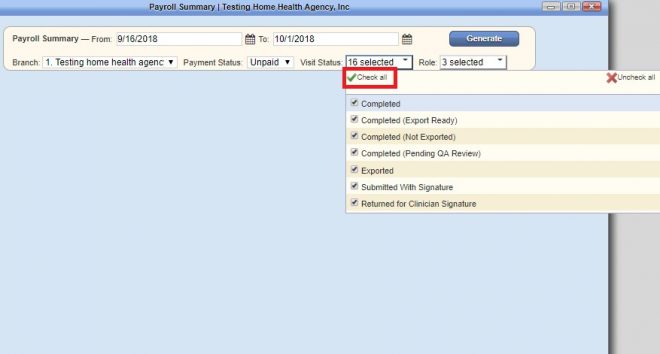
The following window will open with only search criteria at the top. Choose the date range in the From and To entries. Select the branch from the drop-down (if there is more than one). Indicate whether the Payment Status is either Paid, Unpaid or All. Select which types of Visit Status’ should be seen by checking the corresponding boxes. Selecting the green check mark will select all statuses and selecting the red X will uncheck all choices. Also choose the Role (category of employee) or combination of roles from Employee, Contractor and Student/Volunteer. Select the “Generate” button in the top right to see the results.
Employees will be listed by name, showing their visit Count, Total Visit Time and Total Travel Time. There are two ways of looking at the detailed version. The first, under Summary-View Details, will show the details of all employees. Selecting the Detail under the Action column on the far right will show the detail of that employee. With this group, users can either View Details of all employee visits at once (next to Summary), “Export to Excel” or CSV to put the information in an Excel spreadsheet, or view a printed version of the data by selecting the “Print PDF.”
NOTE: CSV is a comma separated value file text file. XLS is Microsoft’s Excel format that is far more expressive than CSV, allowing graphs, formulas and the like to be stored, and it is a binary file.
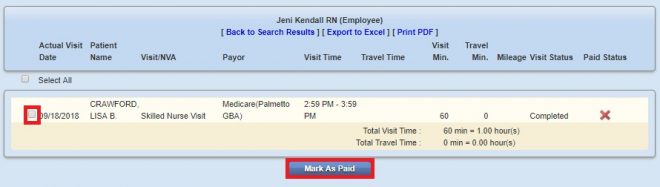
The following is a detail of just one employee. It shows the Actual Visit Date, Patient Name, Visit/NVA, Payor, Visit and Travel Time, Visit and Travel minimum, Mileage, Visit and Paid Status. To change the Paid Status, check the box to the left of the Actual Visit Date and select the “Mark As Paid” button, which will change the red “X” to a green check mark. If the employee has more than one visit that needs to be marked as paid, select the Select All check box at the top left below the column headers. With this data, either “Export to Excel” to put the information in an Excel spreadsheet and/or view a printed version of the data by selecting the “Print PDF” hyperlink below the employee name. Select the “Back to Search Results” to go back to the full list of employees.
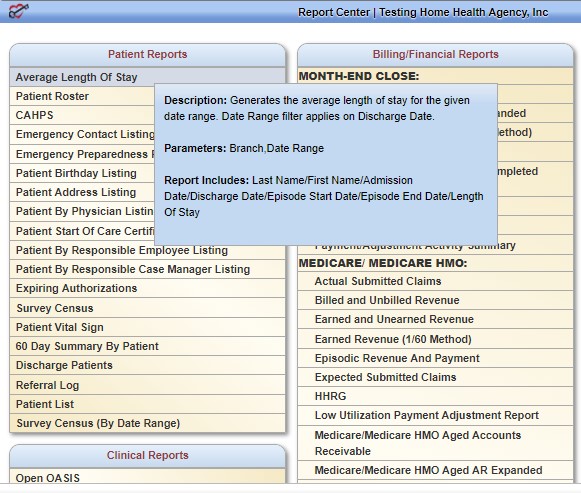
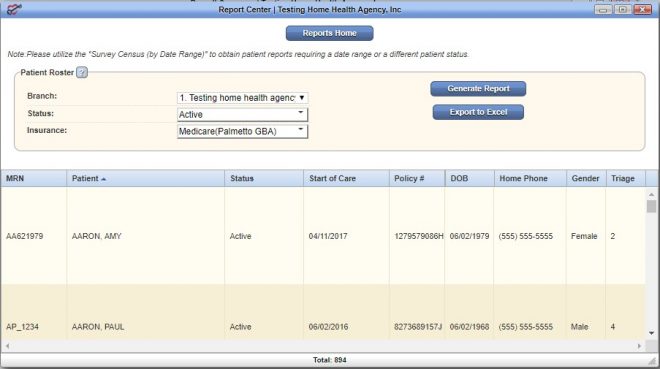
Reports/Report Center
This is the place all AgencyCore reports are found. They are separated into seven categories (with two additional for Missouri and California). The categories are Patient, Billing/Financial, Statistical, Clinical, Payroll, Employee and Schedule Reports. Hovering over the report will show what the report entails, its Description, Parameters and what the Report Includes.
Most of the reports function the same way. In the example report below, Patient Roster, parameters must be chosen, then selecting the button to the right of them to “Generate Report” will display the results below (with a grand total at the very bottom). Selecting the “Export to Excel” will put the information into an Excel spreadsheet. Selecting the “Reports Home” button at the very top of the page will go back to the list of all reports.
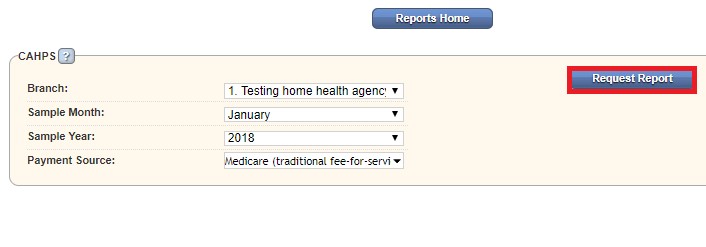
Some reports do not generate instantaneously. For example, the CAHPS report must be requested. To do this, select the parameters then select the “Request Report” button to the right of the parameters.
The request then goes to a different window. It can be found in Reports/Completed Reports. Here, users can retrieve a copy of the finished report and see who ran the report and when. Search through the completed reports by typing the Name, Format, Requested By, Started and Completed date in the text space at the top of the screen. To view the report, select the hyperlink text listed under the Name column. To remove the report, select the “Delete” hyperlink to the far right under the Action column. The refresh button is available in the bottom left of the window.

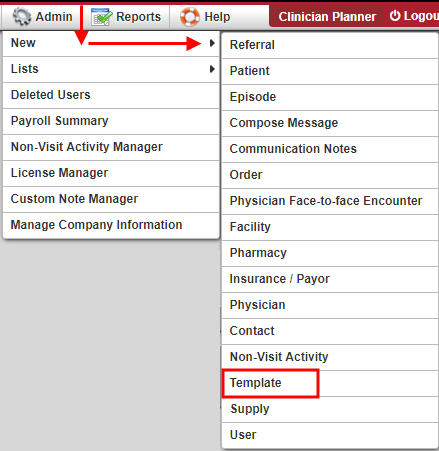
Admin/New/Template
The window below will appear. Create a Name for the template. Then write the template inside the white Text section. The section is limited to 5000 characters. Once completed, select the “Save” button.

NOTE: Templates can be used to save time for writing orders, goals, care plans, physician statements, narratives and other places inside visits.
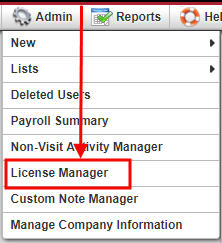
Admin/License Manager
A window will open that will show all current user licenses. Select the “Refresh” button in the top right to make the list completely up to date.
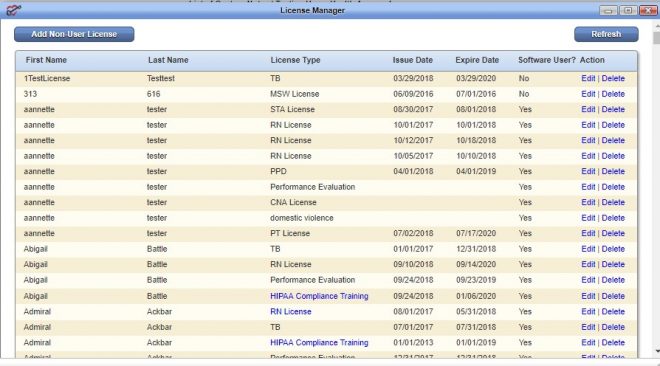
Select the “Add Non-User License” button in the top left. A New License window opens. First, Last Name and Initiation Date are required. Choose the License Type from the drop-down menu. Choose an Expiration Date or add a File Attachment by selecting the “Choose File” button (optional). Select the “Add” button when complete.
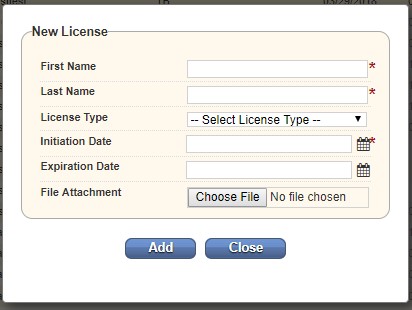
Select the “Edit” hyperlink on the far right under the Action column to edit the information from the previous screenshot or “Delete” to remove the non-user license altogether.
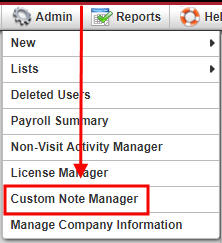
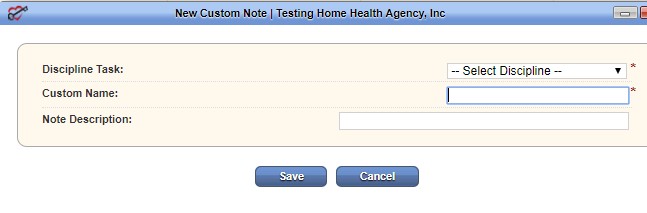
Admin/Custom Note Manger
A window will open that will show all active custom notes. To make changes to any currently listed notes, select the “Edit” hyperlink to the right under the Action column. To remove any notes, select the “Delete” hyperlink under the same column.
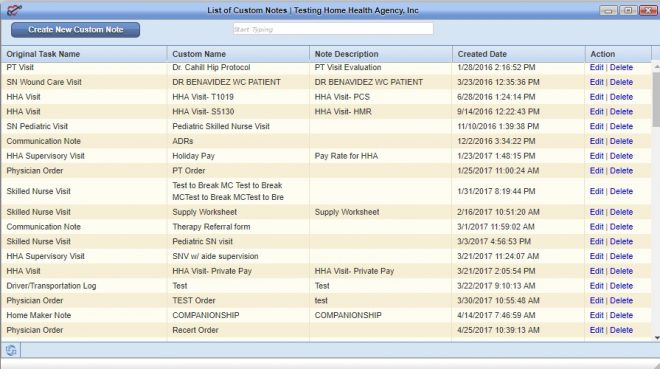
Select the “Create New Custom Note” button in the top left to add a new note. In the New Custom Note window, select the Discipline Task from the drop-down menu and enter the desired Custom Name with an optional Note Description. When complete, select the “Save” button at the bottom.
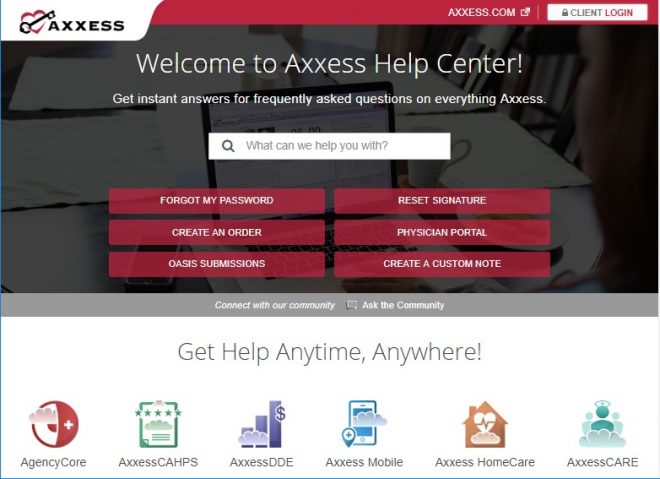
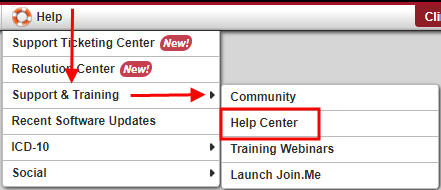
Help/Support & Training/Help Center
A great resource that is available 24/7 is our Help Center. It is a place to get answers to frequently asked questions or watch videos of all Axxess products. It can be accessed by going to:
Or also available at https://www.axxess.com/help/