x
Join our new Axxess User Community to connect, share, learn and grow together.Learn More
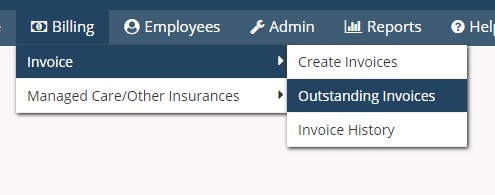
Users with Billing permissions may access the Billing center from the main menu. The Billing Tab contains two main categories:
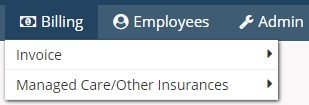
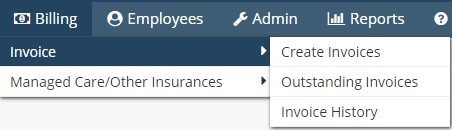
The Invoice Tab contains three submenus:
On the “Create Invoice” option, select the Branch the user wishes to generate invoices for, select the payment source, and the ‘From’ and ‘To’ date. The user has the option to select “Ignore Already Billed Tasks” which removes Tasks that may be associated to another invoice and then select “Generate” once parameters are entered. This generates a list of all clients with tasks that meet the criteria. Client invoices that contain an overlapping date range will appear in orange within the list.
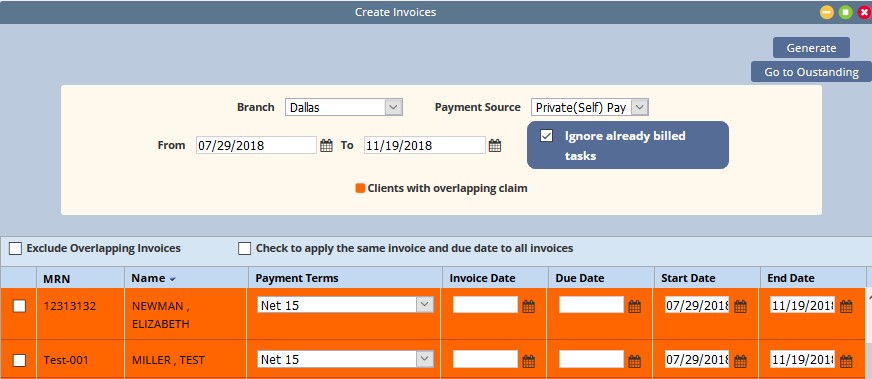
By default, only the invoices that do not have an overlapping date range will be selected. Overlapping invoices may be manually selected for invoice creation. Users have the option to hide overlapping invoices by checking the “Exclude” box.

Billers may individually enter the Invoice Date, Due Date or select to apply the same dates to all selected invoices. Payment Terms default to the payment source set up but may be adjusted. Once all desired invoices are selected, select “Create Invoices.” This creates and moves the invoices to the Outstanding Invoice page. Select “Go to Outstanding” to quickly maneuver to the page showing outstanding invoices or the user can also go to Outstanding Invoice by selecting Billing/Invoice/Outstanding Invoices.
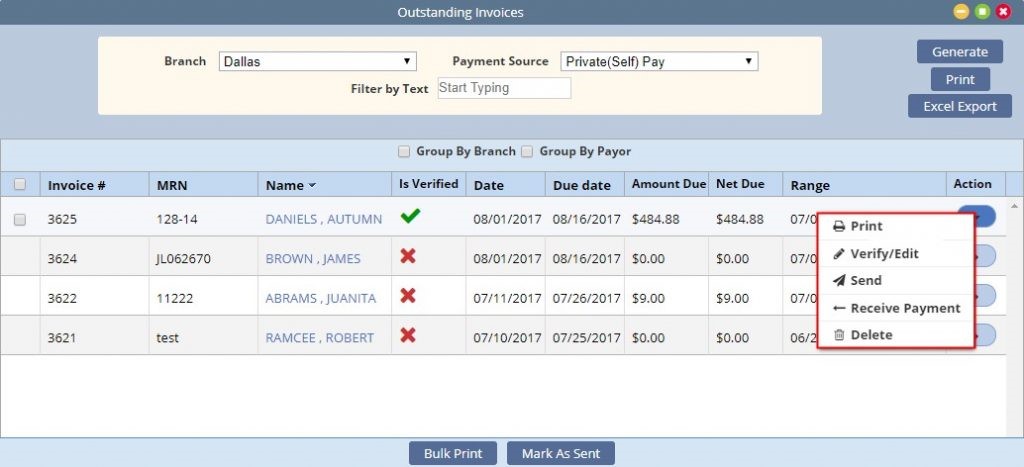
Select the Branch and Payment Source and select “Generate” to pull the created Invoices. Filter by Text will filter the generated list.

The generated invoices display the following summary information:
Invoice #, MRN, Client Name, Is Verified, Invoice Date, Due Date, Amount Due, Net Due, and the invoice Date Range. In addition, options to “Print” the Outstanding Invoice List or “Export” the list to Excel exist.
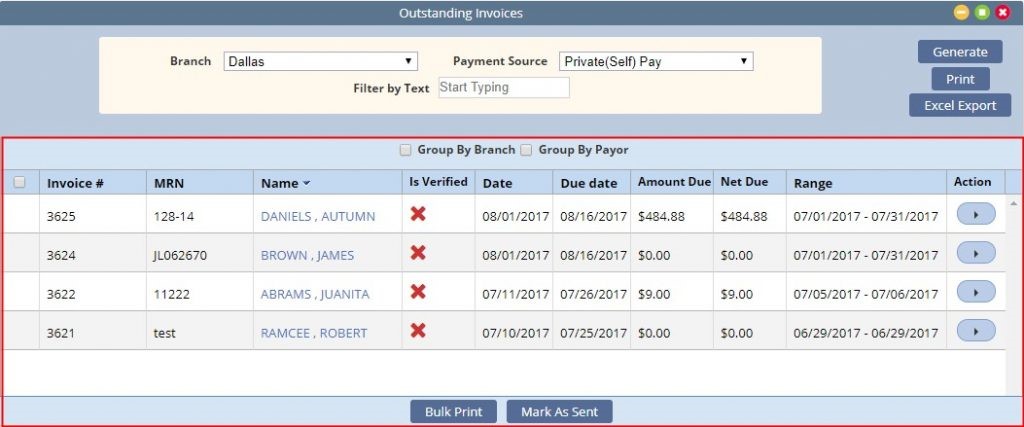
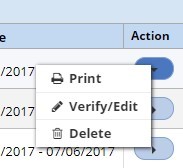
Invoices that are unverified have the following actions: to “Print”, “Verify/Edit” the Invoice or “Delete.”
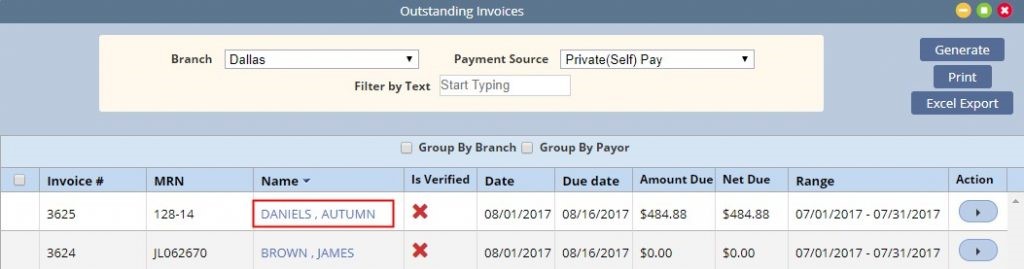
Select the client Name to open the Invoice for verification.
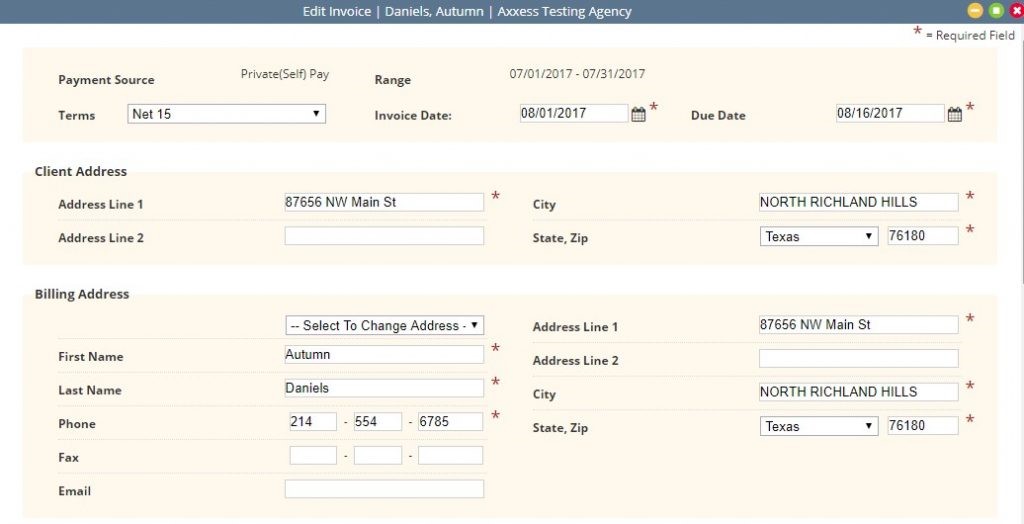
The Edit Invoice page displays the details of the invoice and provides editing as needed. Required fields are indicated with a red asterisk (*).
The top sections display the payment source and date range of the invoice along with modifiable input of terms, date and due date. The Client Address displays from the Client Profile. The Billing address defaults to the client’s address but may be updated to other contact payers.
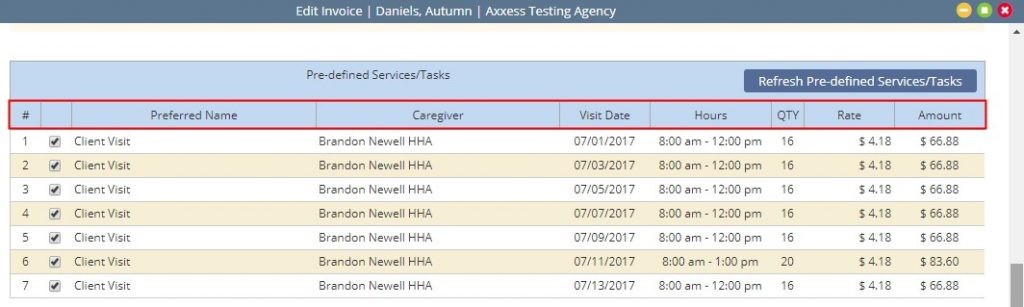
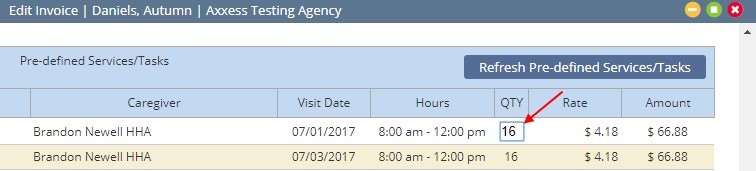
The lower half of the invoice will display billing line items. The Quantity and Rate are editable by selecting the field.
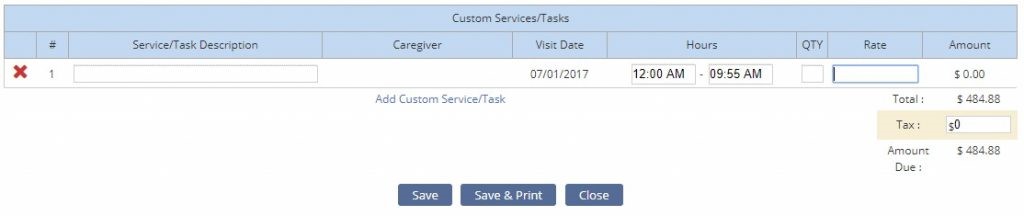
The last section provides the ability to add custom service charges. Select the “Add Custom Service/Tasks” to enter the applicable charges. Add any applicable tax.

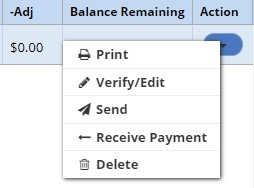
Verified Invoices contain a green check mark in the Verified column. Once verified, a selection field is activated, and the available actions are updated with additional options of “Send” and “Receive Payment.”
There are several options available to submit Invoices to Payment Sources.
Under Actions:
From the Invoice list page:
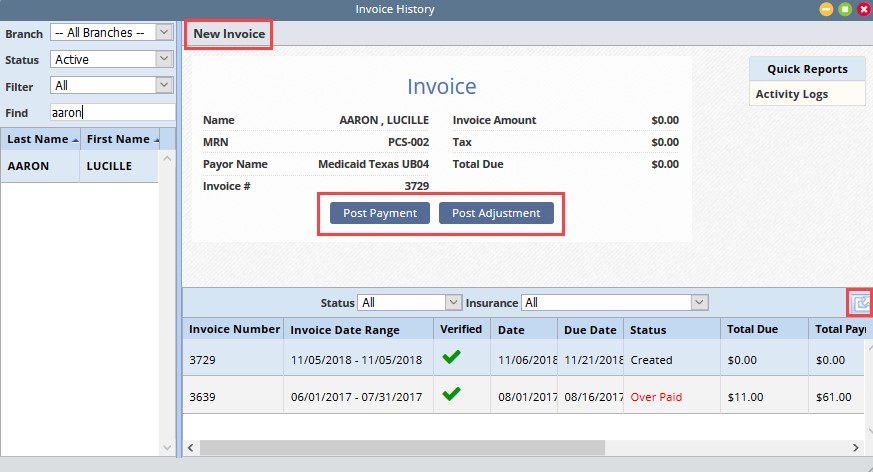
The Invoice History page contains a list of a client’s invoices. For convenience, a new invoice may be added by selecting “New Invoice” at the top of the page. The “Expand” button will expand the list over the invoice summary at the top. Once an invoice is selected, a summary is displayed in the top section of the page with the options to either “Post Payment” or “Post Adjustment.”
The information provided in the list includes: Invoice Number, Date Range, Verified, Date, Due Date, Status, Total Due, Total Payments, + Adjustments, – Adjustments, Balance Remaining and Action.
Options under the Action column include:
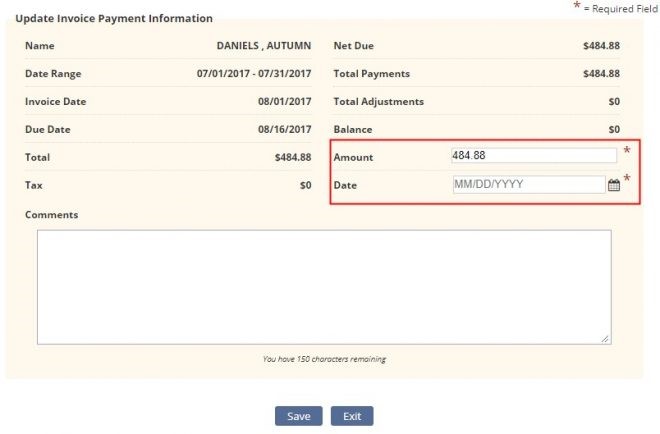
Post Payment contains two required fields:
Post Adjustment contains three required fields:
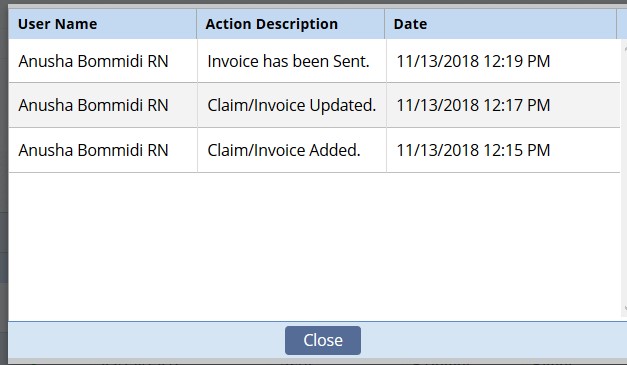
To the right of the client information on the Invoice History allowing the user to view “Activity Logs” showing when the invoice was updated and by whom.
The Managed Care/Other Insurances category contains four sub-menus:
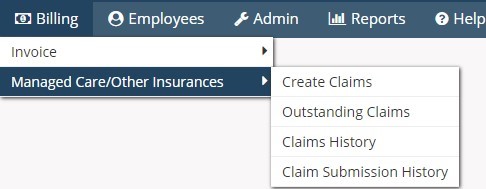
Billing/Managed Care_Other Insurances/Create Claims
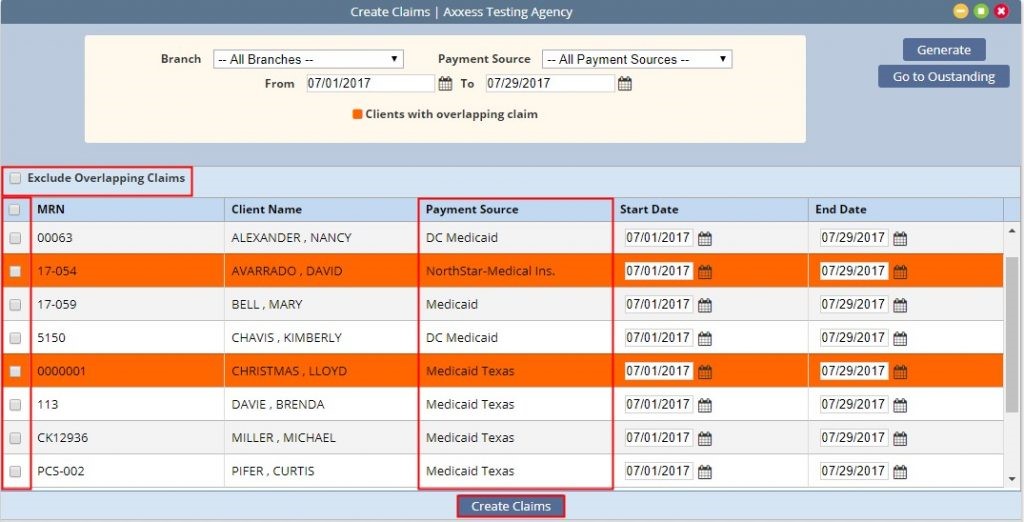
Select the branch, payment source(s) and date range for which claims are being created. Then select “Generate” then the system will generate a list of claims that match the requested parameters.
Claims identified as having overlapping claim dates will be highlighted in orange. These claims may be excluded from the list by selecting “Exclude Overlapping Claims.”
Select the claims to be created and select “Create Claims.” This action moves the claims into the Outstanding Claims page. Users may select the quick link “Go to Outstanding” to navigate to the claim list.
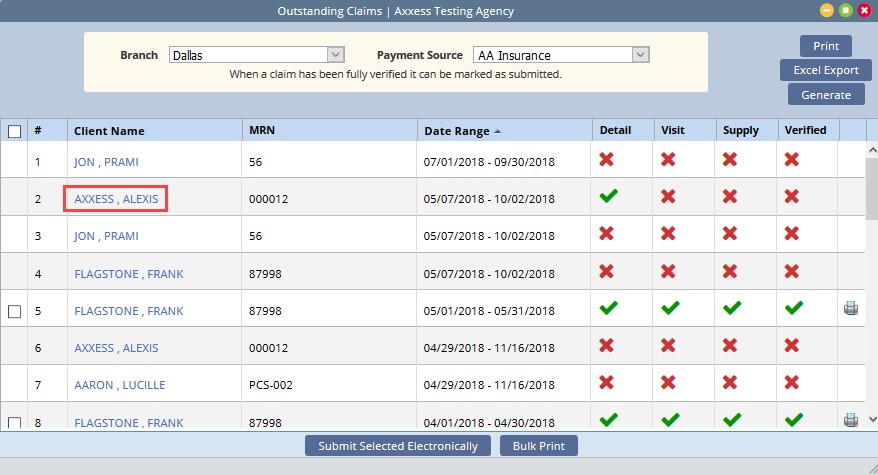
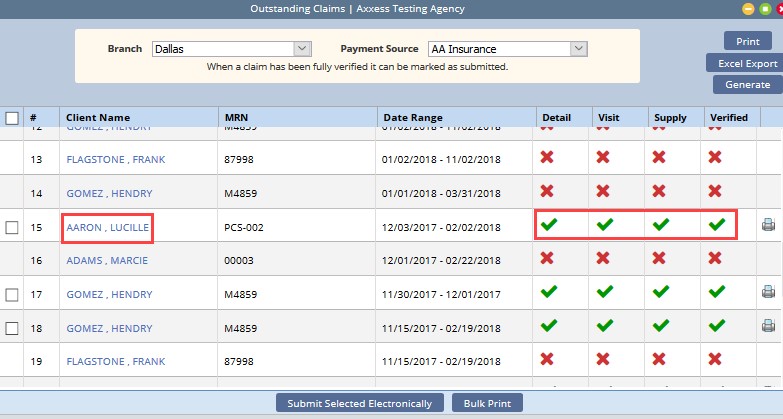
The outstanding claim list will display all generated claims requiring verification to bill. The summary list contains the Client Name/MRN/Claim Date Range and the 4 verification pages of the claim (detail/visit/supply/verified). The last column is the print icon for viewing and downloading the claim.
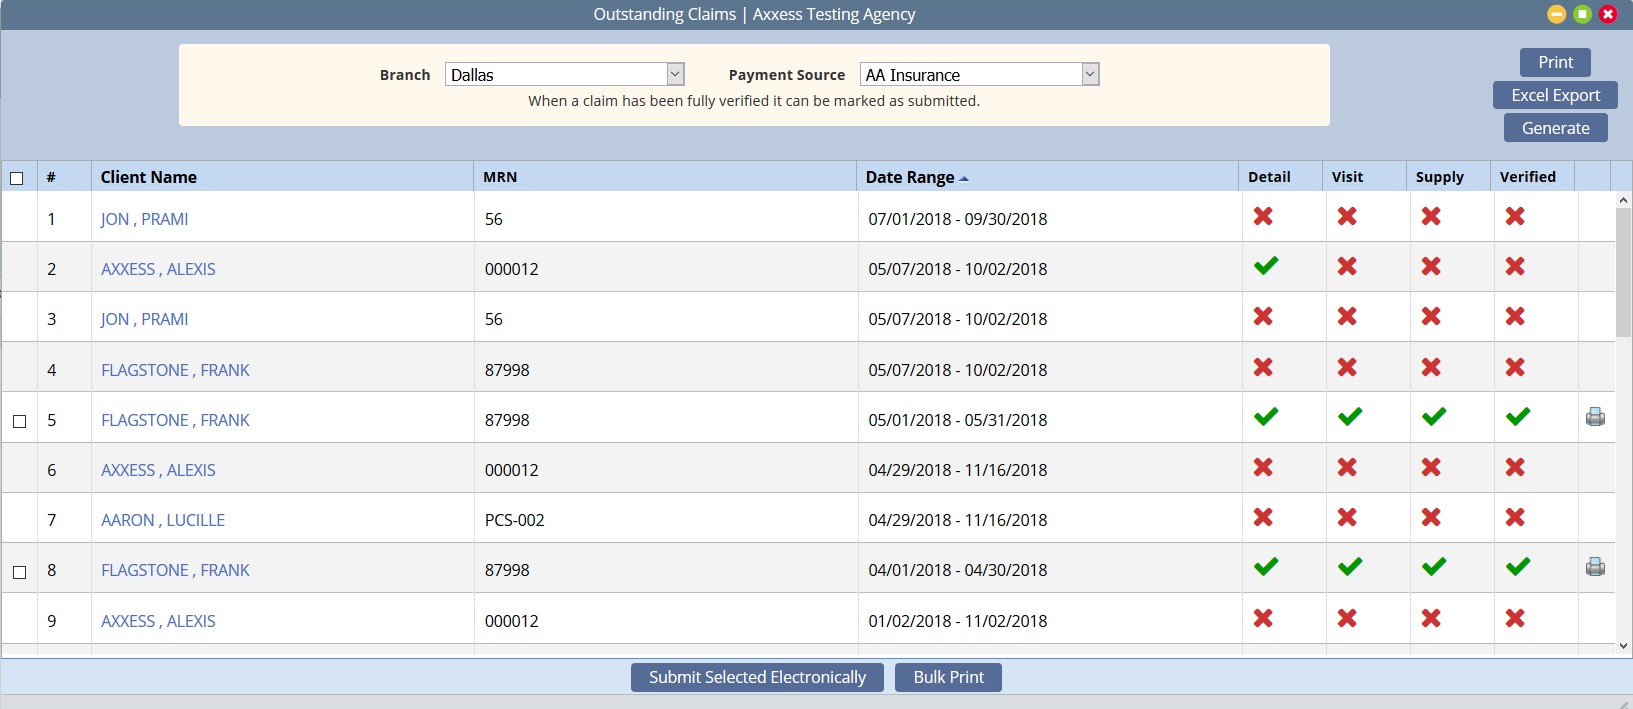
Selecting the Client Name opens the claim for verification.
Step 1-Demographics
Required field completion includes:

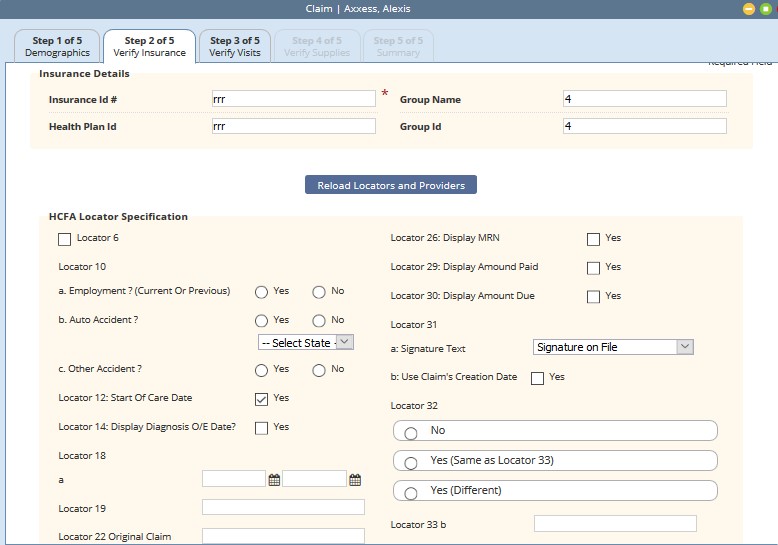
Step 2-Verify Insurance
Insurance Details pull from the client file. Locator Information (UB or HCFA): Add/Edit locator information as needed. The values displayed pull from the payment source setup. If changes have been made to the payer select “Reload Locators and Providers” to pull the new requirements into the claim.
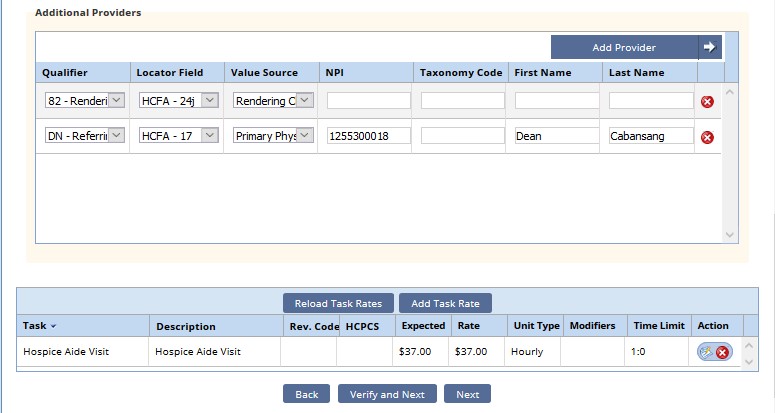
The lower half of the screen displays all rates that have been loaded for the insurance. “Add Additional Task Rates” or “Edit” or “Delete” existing task information as needed.
Step 3-Verify Visits
The claim date range displays at the top of the page for reference. Tasks group into categories.
If no tasks fit a category the category will not display.
Actions include:
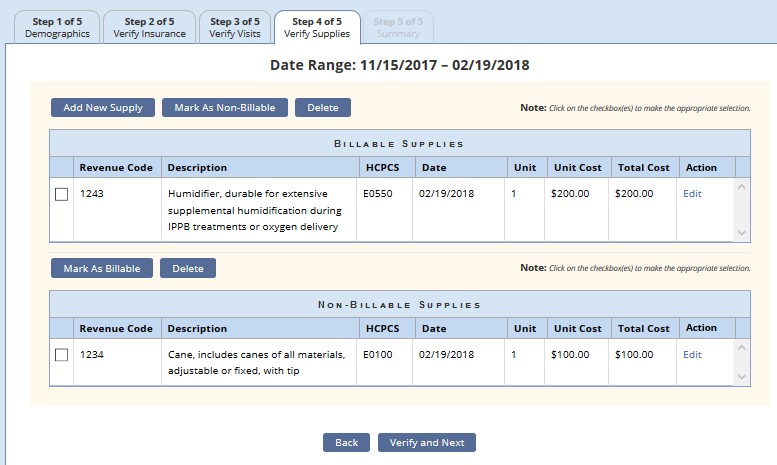
Step 4-Verify Supplies
Recorded supplies (billable and non-billable) display and are editable as needed.
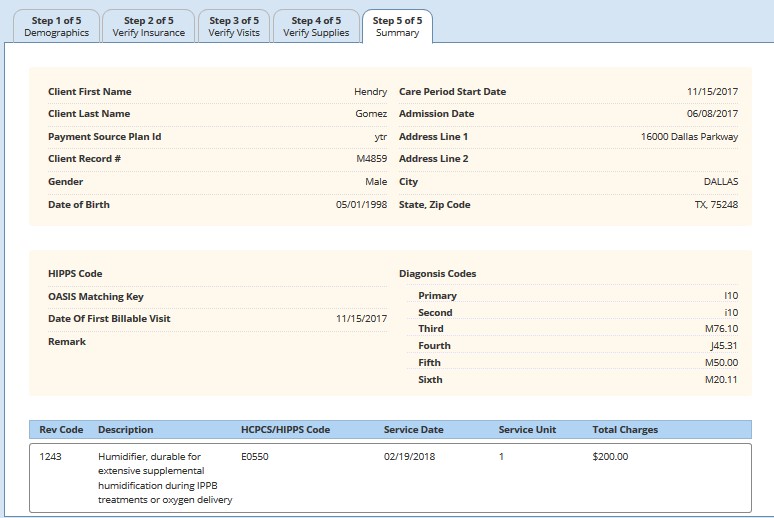
Step 5-Claim Summary
Provides a summary review of the claim. Select “Complete” to finish the verification process.
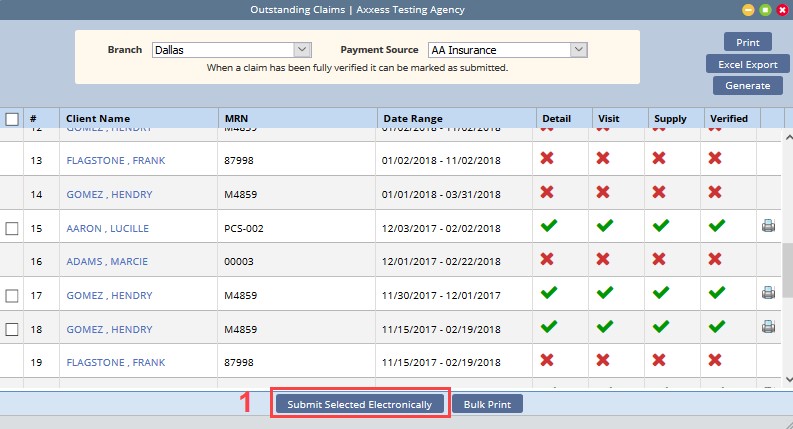
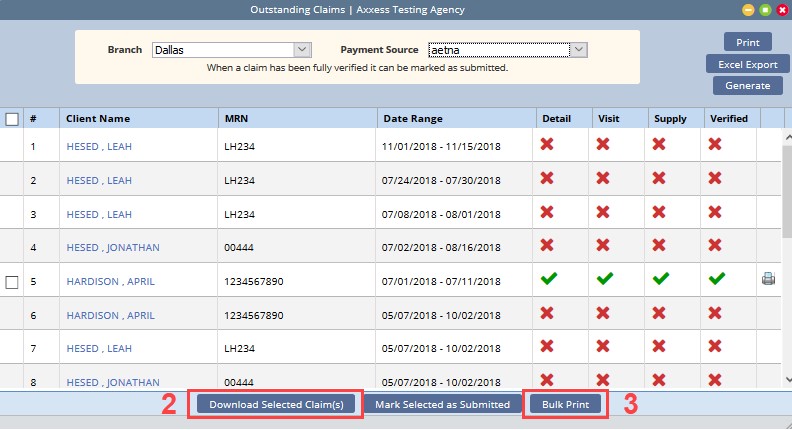
A green checkmark displays when the verification is completed for the pages. Once all checkmarks are present, a selection field presents to the left of the claim.
Claim submission options depend on the payment source setup. Options include:
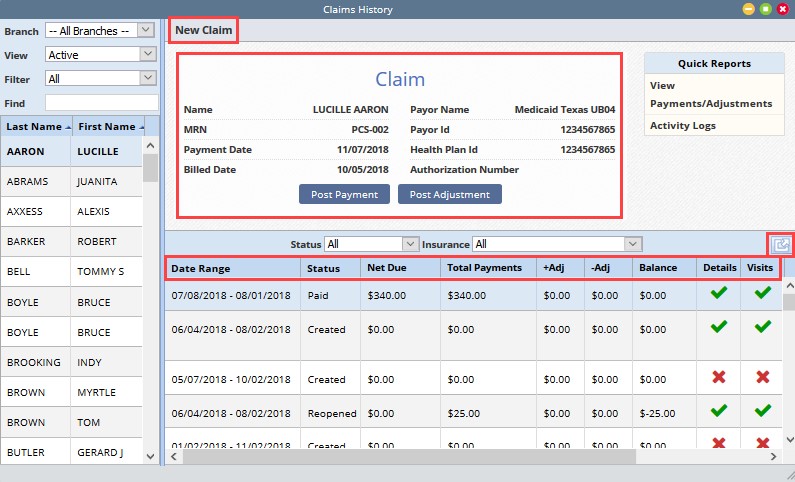
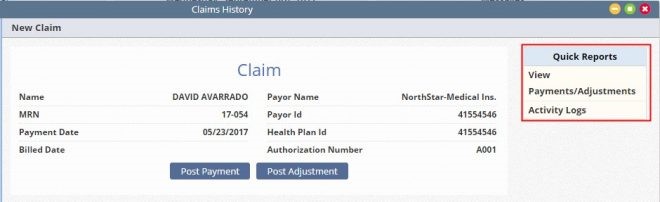
The Claim History page contains the list of a client’s claims. For convenience, a new claim may be added by selecting “New Claim” at the top of the page. The “Expand” icon will expand the list over the claim summary at the top. Select a claim. A summary will then display in the top section of the page with the options to either post payment or adjustment. The information provided in the list includes: Date Range, Status, Net Due, Total Payments, + Adjustments, – Adjustments, Balance Detail/Visits/Supply, Claim Type and Action.
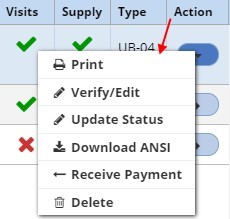
Available Action Items depend on the claim status. Most include the ability to:
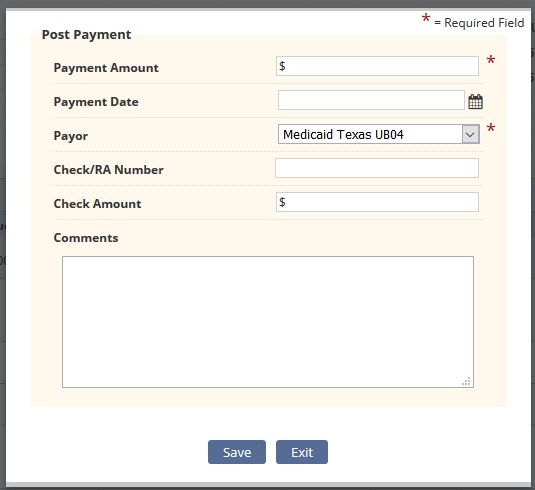
“Post Payment” contains two required fields:
The claim status will automatically update based on the outstanding balance and includes: paid, partially paid and overpaid.
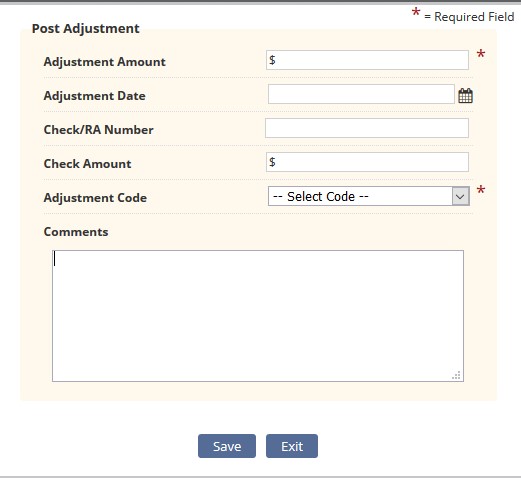
“Post Adjustment” contains three required fields:
To the right of the client information are quick reports associated to the claim selected, allowing the user to view payments and adjustments posted to the claim as well as an activity log showing when the claim was updated and by whom.
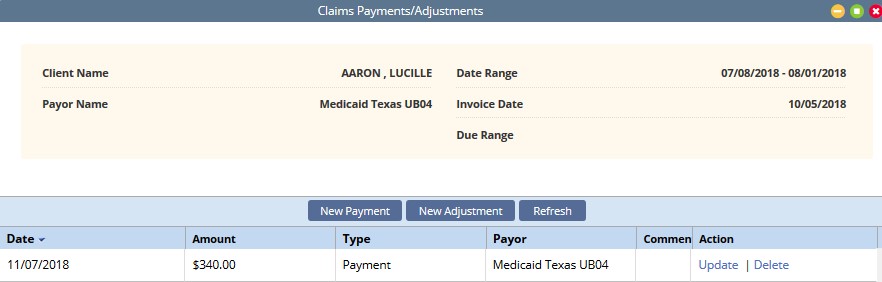
View Payments/Adjustments:
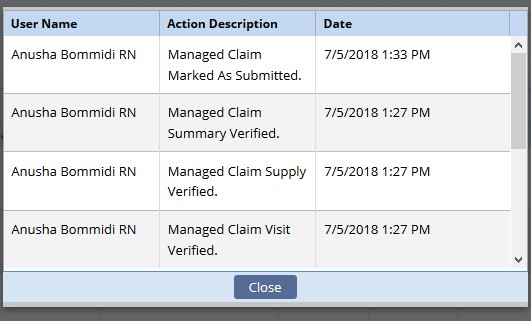
Activity Logs
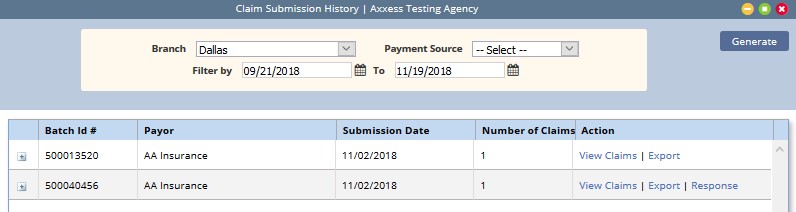
Claims that are electronically submitted will populate to the Claim Submission History page. This menu allows the ability to review batches of claims, the response files and the claims within the batch. Select the branch, payment source and date range and select “Generate” to narrow return results. The summary line item displays the Batch ID, Payer, Submission Date, Number of claims in the batch as well as an action column from which the user may elect to view the claims, export the file or view the response.
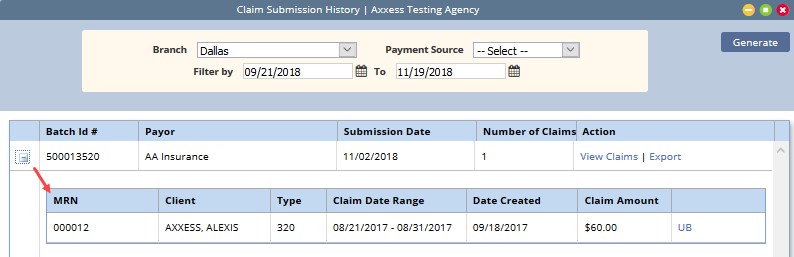
Selecting the expand icon (+) next to the batch will display the list of claims included in the batch. Information includes the Client Record number, Client Name, Type of Bill, Claim Date Range, Date Created, Claim Amount and the ability to view the claim.
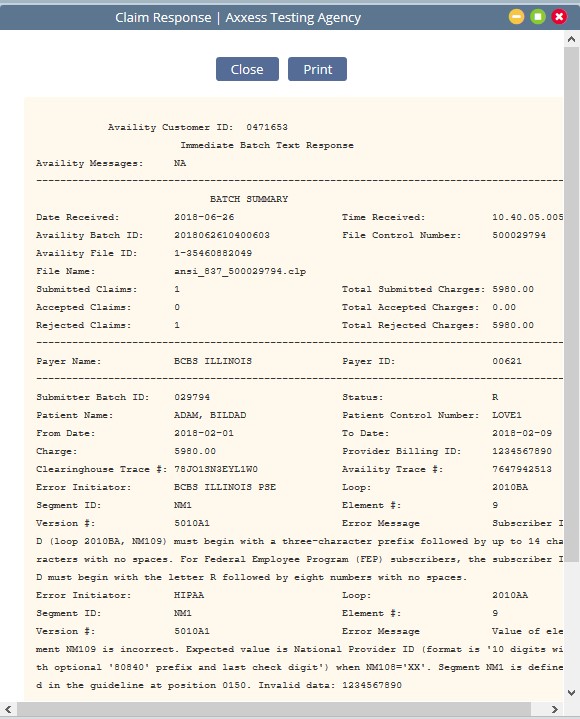
The response file will provide a summary at the top and then list the claims within. Users can “Close” or “Print” upon viewing. It will list the total number of claims submitted along with the number accepted and rejected and provide charges associated with each.
Help/Support & Training/Help Center
A great resource that is available 24/7 is our Help Center. A place to get answers to frequently asked questions or watch videos featuring all Axxess products. It can be accessed by going to
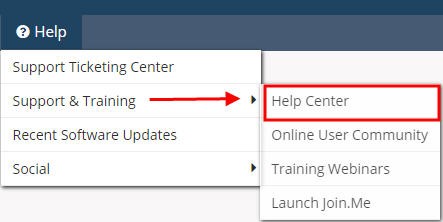
Or also available at https://www.axxess.com/help/