x
Join our new Axxess User Community to connect, share, learn and grow together.Learn More
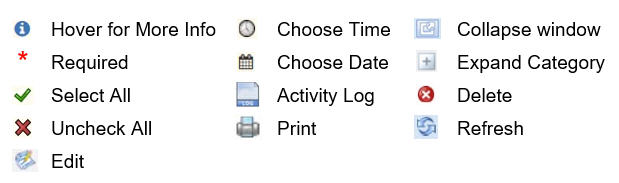
Common Icons & Buttons
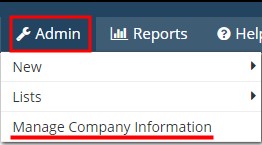
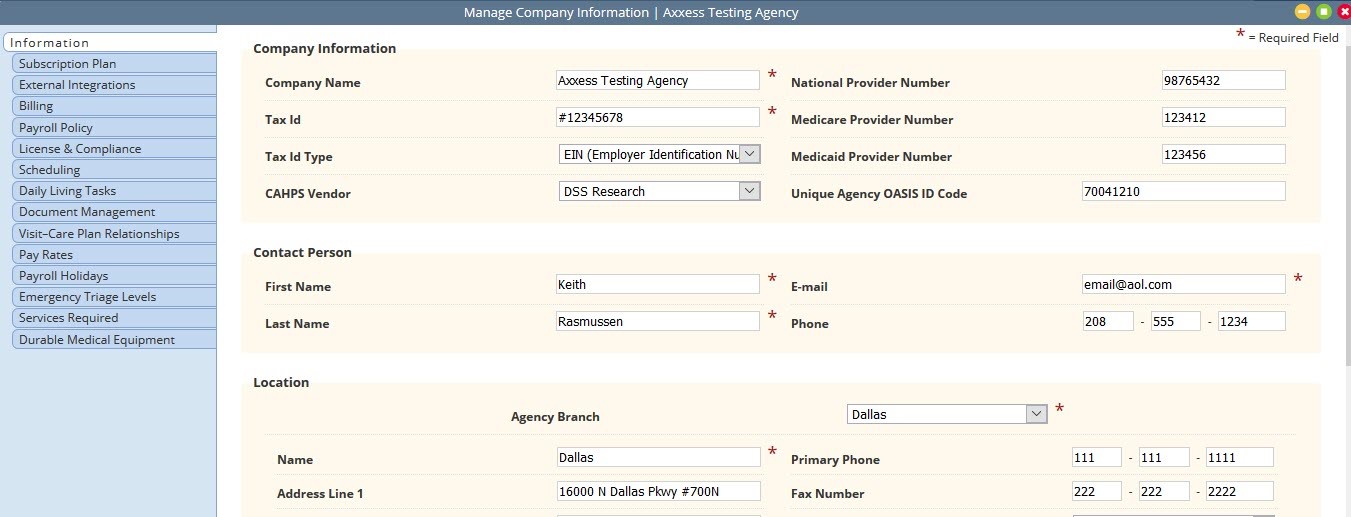
Admin/Manage Company Information
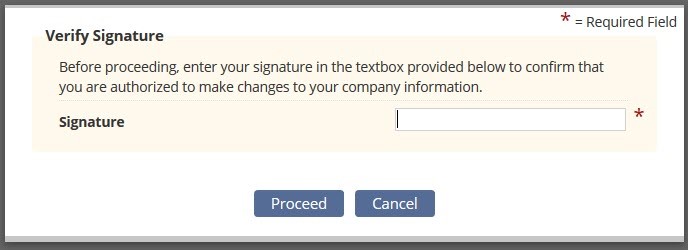
The following window opens and requires the Signature of someone with a specific permission (found in Edit User/Permissions/Administration/Agency) in their user profile. After entering the Signature, select the “Proceed” button.
NOTE: For updating the Signature, see Office Overview
Manage Company Information is split up into 15 tabs found on the left side of the window:
Where users enter the agency’s information. ID’s and Provider Numbers are retrieved outside of Axxess.
NOTE: Anything with a red asterisk (*) means the information is required to save the page.
Select the following buttons to toggle through the Manage Company Information window.
![]()
Selecting “Save” will just keep the information put in the current page. Selecting “Save & Next” will keep the current page information and move on to the next tab. “Next” will move to the next tab without saving any information. “Close” will shut down the Manage Company Information window.
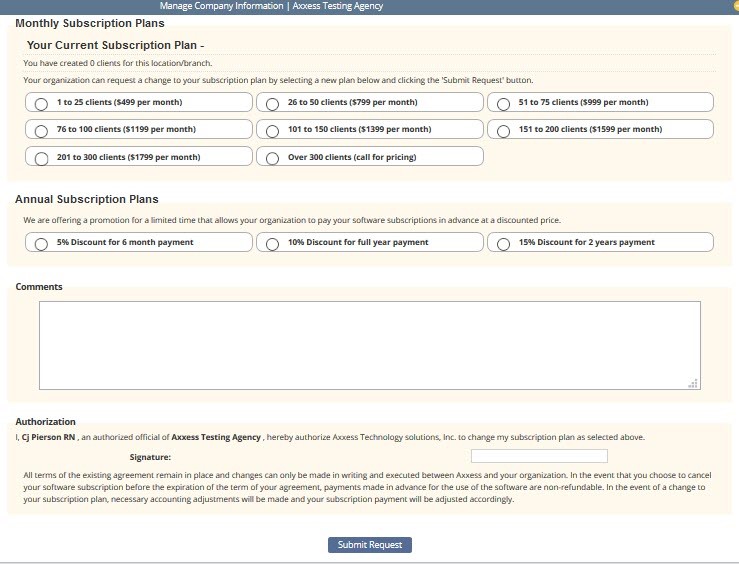
In this section the current Monthly Subscription plan is shown. This plan is based off the Number of Users and/or Active Census and can be adjusted by submitting a written request in the Comments section, entering the user’s electronic Signature and selecting the “Submit Request” button. Upgrade the Plan can only be done through the request form here, if users wish to downgrade their Plan, enter a Ticket in the Support Ticketing Center.
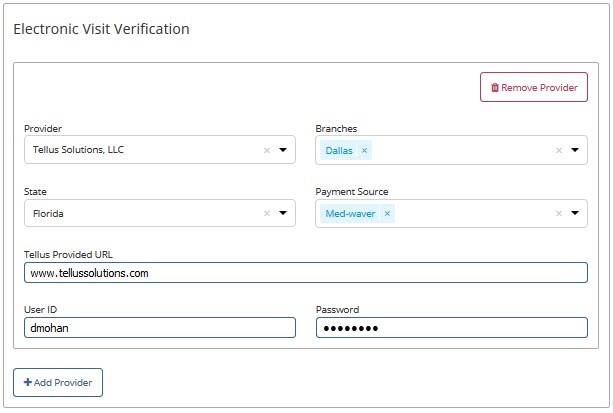
The agency can connect their HomeCare application to select outside vendors for services like Electronic Visit Verification (EVV). Enter the Provider, Branches, State, Payment Source, URL, ID and Password to connect.
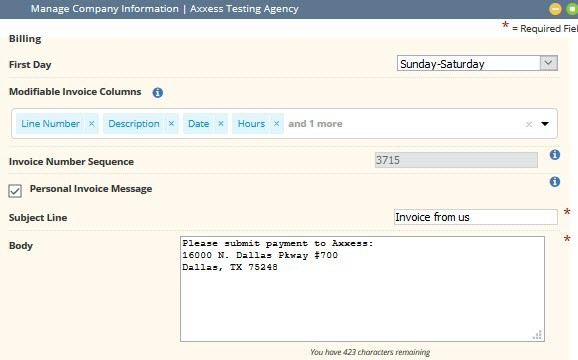
This window allows users to decide Billing settings. Indicate weekly billing cycle, Modifiable Invoice Columns, and set the agency’s Invoice Number Sequence. If the agency would like to have a Personal Invoice message, check the box and fill out the Subject and Body of the message. Hover over the information ![]() icon to get insight into questions.
icon to get insight into questions.
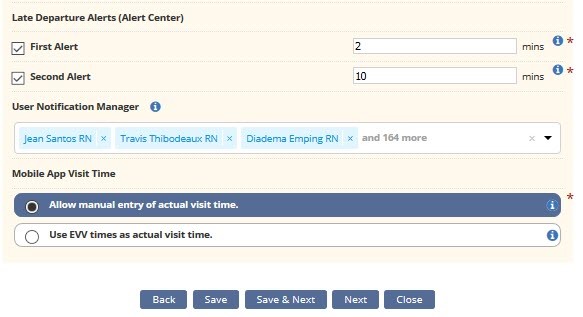
Determine EVV Time Management settings. Decide how long the First and Second Alert will be for Late Arrivals and Departures (in minutes) and who will be notified. Then determine whether the Axxess HomeCare mobile app will allow for manual time entry or whether EVV will be the actual visit time.
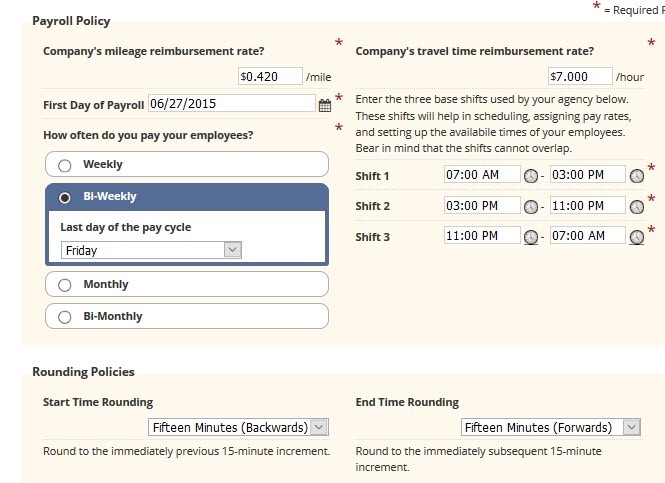
Determine how employees will be paid when it comes to mileage, travel time, payroll date and cycle. Also, determine what will be listed as the three base shifts of the day.
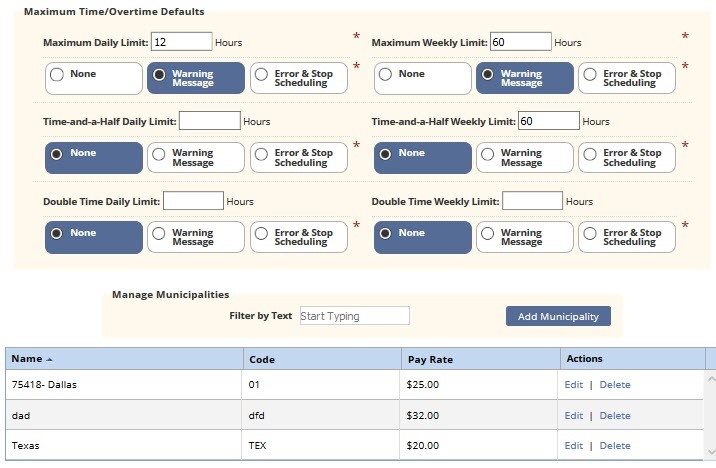
Determine if the agency will Round Start or End Time for shifts (selecting ‘none’ is available). Enter the Maximum/Defaults if the agency pays overtime. Add Municipalities if employees are paid a certain rate per region. After they have been added, they can be edited or removed by selecting the “Edit” and “Delete” hyperlinks.
NOTE: The following tabs have search functionality at the top of the screen to narrow down results. There are also options in some tabs to filter between active or inactive entries.
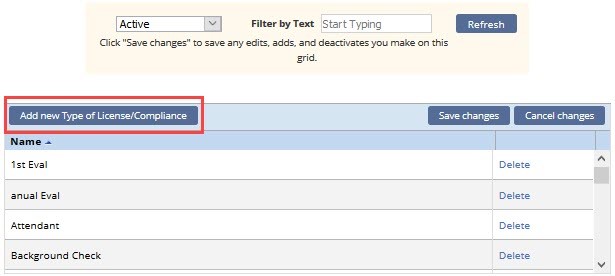
Allows agencies to manage licenses or compliance items that must be completed/updated. Select “Add new Type of License/Compliance” and a free text space will open right below. Enter the name, then select “Save changes.” If any licenses were added in error, select the “Delete” hyperlink to the right.
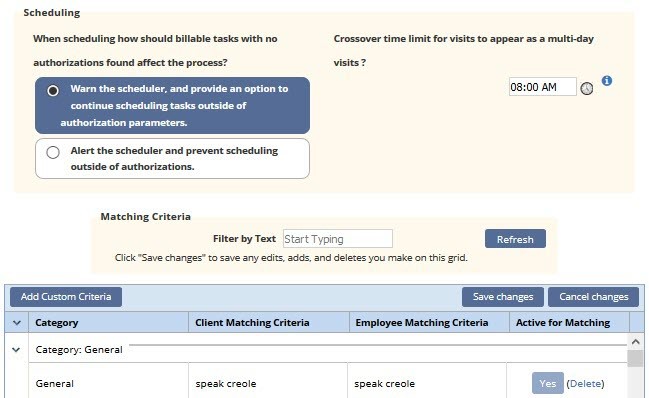
Agencies must determine if they will allow users to schedule billable tasks without authorization and what the Crossover time limit will be. Select “Add Custom Criteria” to limit scheduling to only those employees meeting criteria, i.e. language, smoker, pet-friendly. A free text space will open right below. Choose a Category from the drop-down menu and then enter the Client & Employee Matching Criteria. Select “Save changes” to keep the changes. If any Criteria were added in error, select the “Delete” hyperlink to the right.
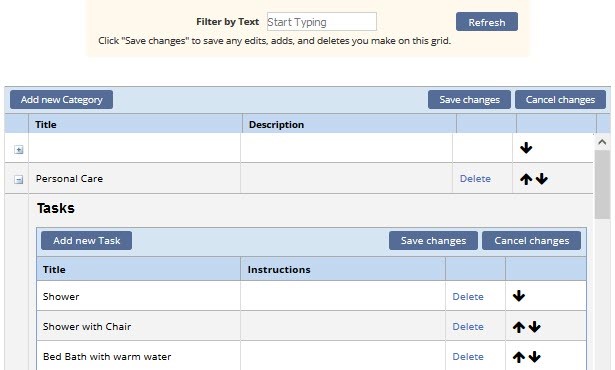
Agencies can determine what daily living tasks that their employees can be asked to perform. Select “Add new Category” to add to the list. A free text space will appear, and a Title and Description must be entered. Select “Save changes.” Select the plus sign icon to expand the Category and then select “Add new Task.” Enter the Title and Instructions of the Task then select “Save changes.” Change the order by selecting either up or down arrows for Tasks or Categories. If any Tasks/Categories were added in error, select the “Delete” hyperlink to remove. The changes made in Daily Living tasks will appear on the personalized aide note/Custom Visit Note.
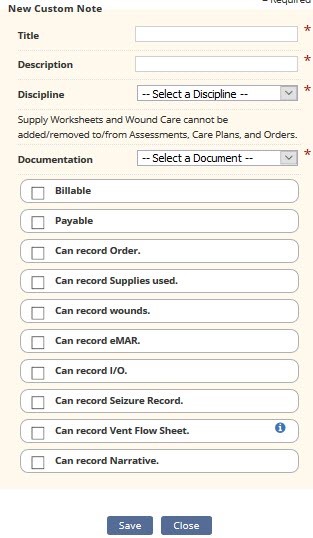
The agency can create custom notes. Select “New” in the top right to add a custom note. Notes created here will appear in the Schedule Center allowing staff to schedule visits.
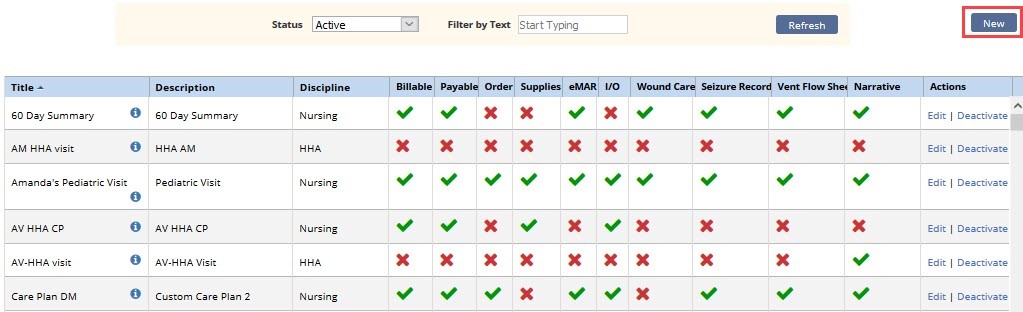
Give the note a Title, Description and then choose the Discipline and what type of assessment will be in the note. Then indicate whether the note will be Billable or Payable, whether the user’s can record an Order, Supplies used, wounds, eMAR, I/O, Seizure Record, Vent Flow Sheet and/or a Narrative. Select “Save” when completed. If custom notes need to be edited or no longer apply, select the “Edit” and “Deactivate” hyperlinks to make updates.
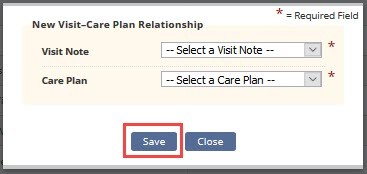
Agencies can add relationships between Custom visit notes and Custom care plans. Select “New” to add and link one of the combinations.

Choose from the drop-down menu for Visit Note and Care Plan then select “Save.” Select the “Deactivate” hyperlink if the relationship needs to be removed.
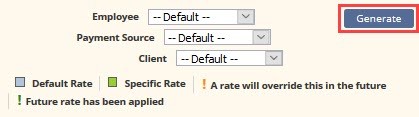
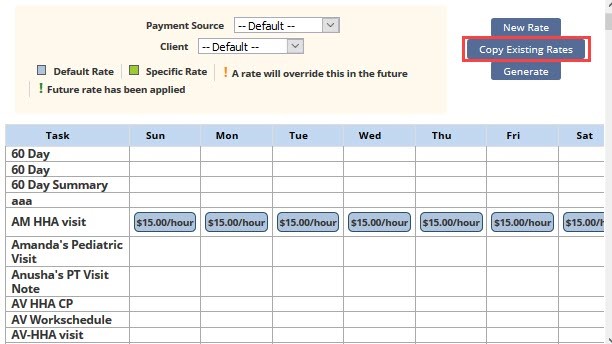
Set up company pay rates for all employees/users. Individual pay rates can be added under the Employee Center. Use the section at the top of the page to filter for specific Employee, Payment Source and/or Client by selecting one or multiple drop-down menus. Then select “Generate.” The legend below the filter explains that in the main section of the tab, the Default Rate will be shaded blue, the Specific Rate will show as green. The orange exclamation point will indicate “A rate will override this in the future” and the green exclamation point indicates that a “Future rate has been applied.”
The main stage of the tab displays how a Task is paid per day showing each day of the week.
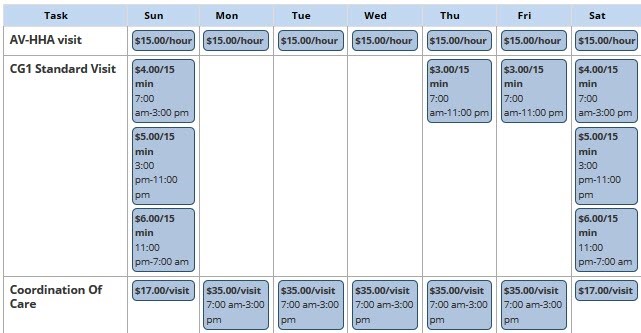
Hovering over a rate will give you more specifics about the rate and select the “Edit” or “Delete” hyperlinks to make updates.

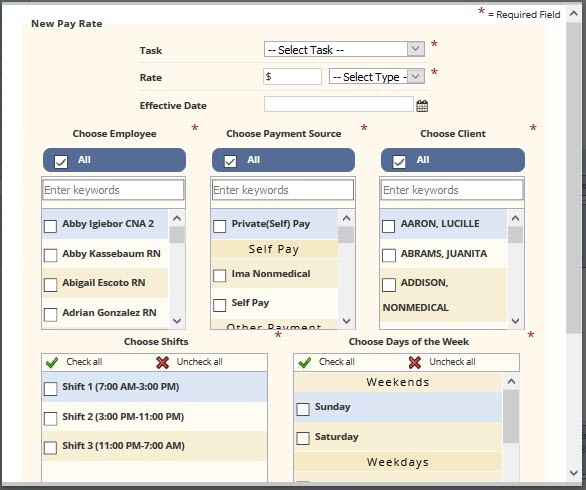
Select the “New” button in the top right to add a rate. Choose the Task from the drop-down, enter the dollar amount and the choose the time type then enter the Effective Date or select the calendar icon to choose. Then select the box to determine which Employee, Payment Source and/or Client for which the rate is applicable. To search for a specific Employee, Payment Source and/or Client, enter keywords for search in the free text space above the checkboxes. Select the All checkbox if the rate applies to all Employees, Payment Sources and/or Clients. Then decide if the rate applies to a specific Shift or Day of the Week. Select the green check mark ![]() icon if the rate applies to all shifts and/or Days. Select the red
icon if the rate applies to all shifts and/or Days. Select the red ![]() icon to uncheck all boxes. (Not Shown) Determine if the pay rate should include Mileage and/or Travel Time. If either box is selected, enter the rate. If they are not checked, the default Payroll Policy rate will be applied for mileage and travel time. Select “Save & Close” to complete the window.
icon to uncheck all boxes. (Not Shown) Determine if the pay rate should include Mileage and/or Travel Time. If either box is selected, enter the rate. If they are not checked, the default Payroll Policy rate will be applied for mileage and travel time. Select “Save & Close” to complete the window.
Users can enter default holidays or create their own agency-specific holidays. Holidays can be edited, deleted and/or deactivated by selecting any of the hyperlinks. Select “Add Default Holidays” to choose from the following list:
Then select “Add Holidays” to add to the rest of the list. Select “New” to add an agency-specific holiday.
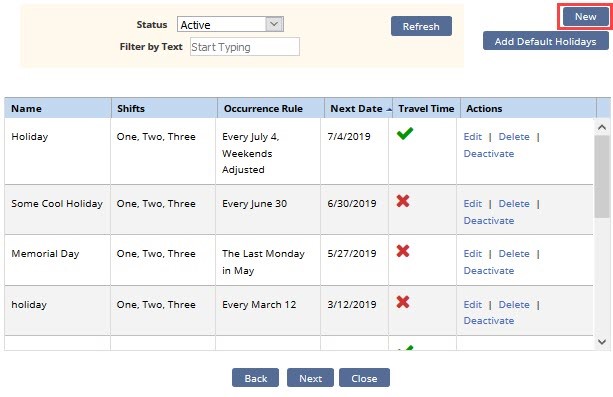
Enter the Payroll Holiday Name, then decide how often the holiday will occur and the time. Then determine whether the holiday follows specific Rules. (Not Shown) Select “Save” once completed.

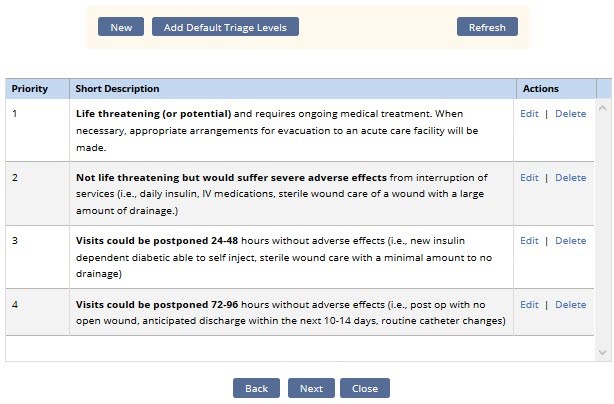
The agency can choose from either default triage levels or add ones of their own. Select the “Add Default Triage Levels” to add a preset triage level. Select the “Edit” or “Delete” hyperlinks to make updates. The Default Triage Levels are:
Priority 1 – Life-threatening (or potential).
Priority 2 – Not life threatening but would suffer severe adverse effects.
Priority 3 – Visits could be postponed 24-48 hours without adverse effects.
Priority 4 – Visits could be postponed 72-96 hours without adverse effects.
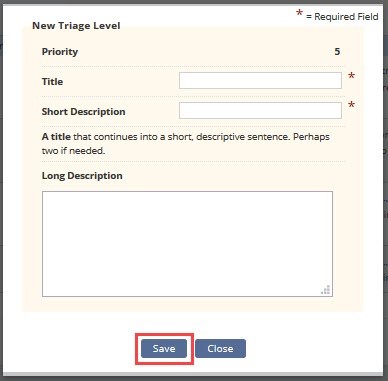
Select “New” to add an agency-specific Level.
The Priority Level will default to the next number and cannot be edited. Enter a Title, Short & Long Description then select “Save.”
Agencies can add default services and/or create new services. Select “Add Default Services Required” to fill the table with typical default services found in home care. Select “New” to add an agency-specific service.
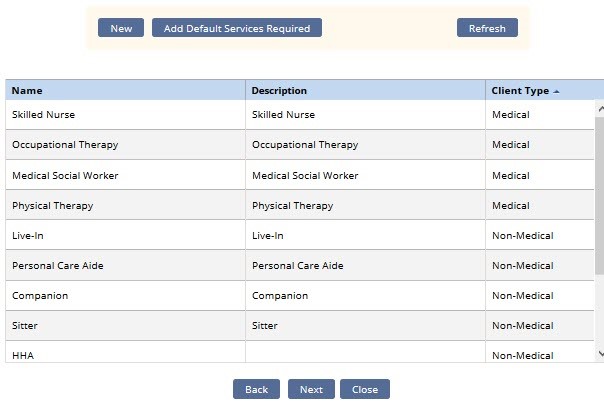
Enter the Name, choose the Client Type from the drop-down menu and enter a Description. Then select “Save” when complete.

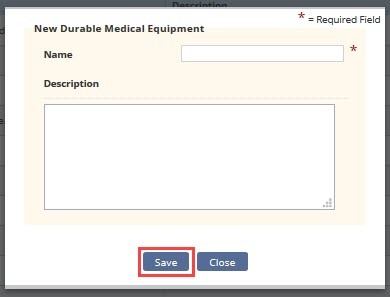
Agencies can add default Durable Medical Equipment (DME) and/or create new DME. Select the “Edit” or “Delete” hyperlinks to make updates to the DME list. Select “New” to add an agency-specific DME.
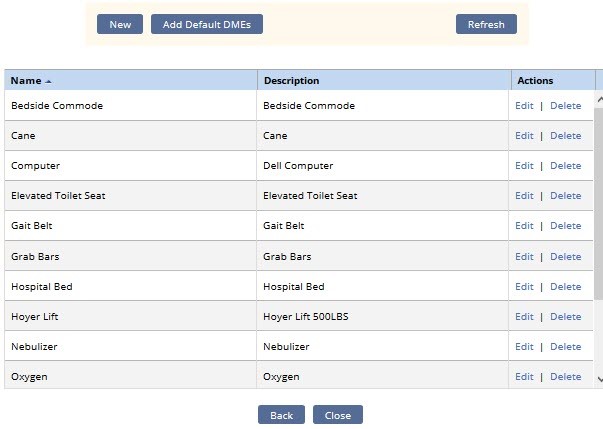
Enter the Name and Description then select “Save.”
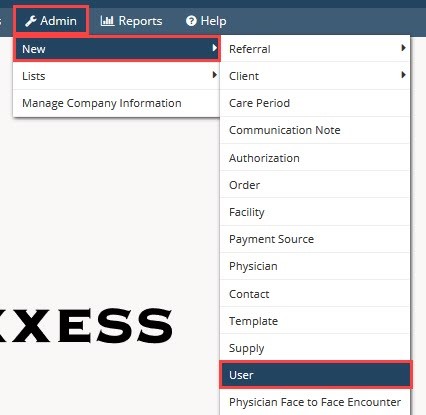
Admin/New/User
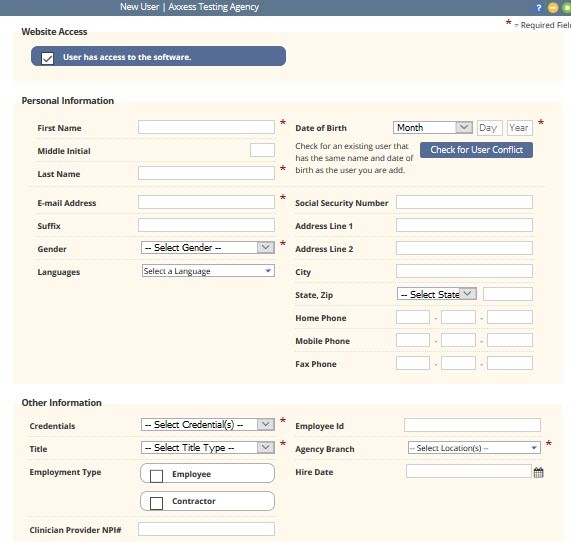
A window will open and the user’s information must be entered. All asterisked items are required. The New User window is divided into six tabs:
Fill out the demographics of the user. The Permissions tab and the email address will no longer be required if the “User has access to the software” option is unchecked. Fill in all available information. Select additional boxes by selecting the Agency Branch drop-down menu if the user works at more than one branch.
Select the “Check for User Conflict” button to prevent adding duplicate users which will check for the user’s name and date of birth.
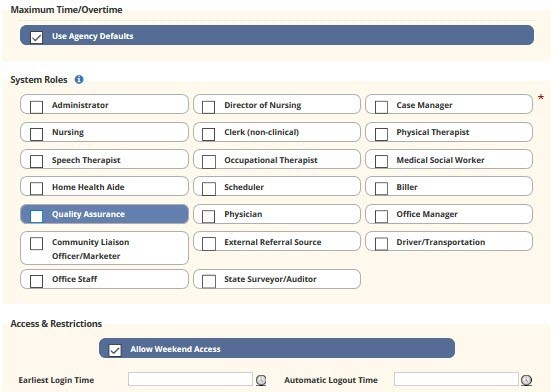
Check the box for agency defaults for Maximum Time/Overtime which was created in the previous section of the manual. Roles are important in the software because they determine what a user can or cannot see, select, delete or undo.
There is also a restriction function that will allow agencies to limit the times that users can use the software. For example, if the “Allow Weekend Access” box is not checked and a user attempts to log in on a Saturday, the system will not allow entry. Times can also be adjusted for the earliest time a user can log in and/or when they are automatically logged out of the HomeCare application.
(Not Shown) Enter optional Comments with a 500 character limit. Select “Create & Next” to save progress and go to the next tab.
A green disappearing notification will display that confirms, “User has been created.”
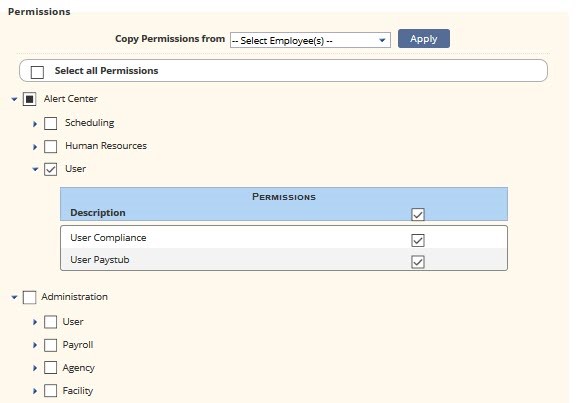
The Permissions can be copied from a previously entered user using the “Copy Permissions from” drop-down menu. For example, if the agency is entering a new RN, a current on staff RN can be selected that will have the same software access. Select the “Apply” button to finish the copy. To save time there is a “Select all Permissions” checkbox that will check every single permission box below. There are categories, sub-categories and individual permissions. In the example below, Alert Center is the category, User is the subcategory and User Compliance is the individual permission. The Categories are Alert Center, Administration, Billing Clerical, Clinical, QA and Reports.
At the bottom of the window, there are five different buttons that can navigate through the New User window.
![]()
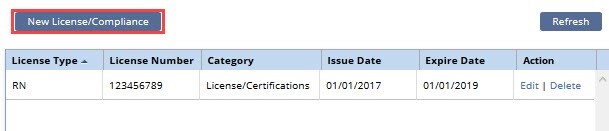
Agencies can keep track of a user’s licenses and compliance in this section. Select the “Edit” or “Delete” hyperlink to make updates. Select “New License/Compliance” to add licenses.
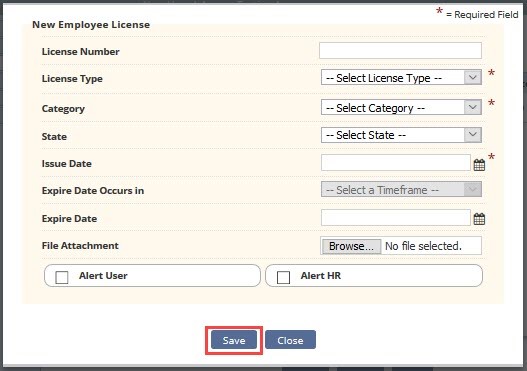
Enter the License Number and choose the Type, Category and State from the corresponding drop-down menus. Choose or enter the Issue Date. Then choose the Timeframe of when the Expire Date Occurs in the drop-down menu. Enter the Expire Date and add any scanned documents by selecting the “Browse” button and finding the file on the computer. Select the Alert User and/or Alert HR to set a reminder in the system to follow up on the user’s license or compliance. Select “Save” when complete.
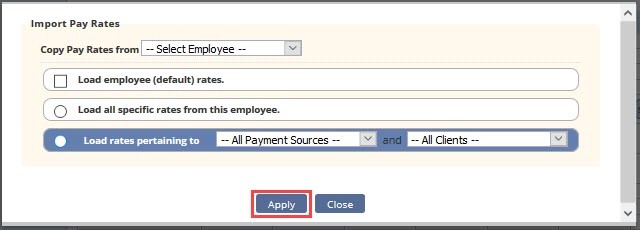
See Admin/Manage Company Information/Pay Rates for the functionality of sorting, viewing and updating rates. Select “Copy Existing Rates” to duplicate rates from another user.
Choose an employee from the Copy Pay Rates from the drop-down menu. Check the box to Load employee (default) rates or select the bullets to Load specific rates and/or Load rates pertaining to specific Payment Sources or Clients. Select “Apply” when complete.
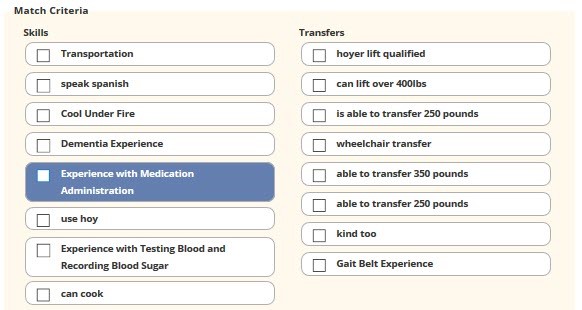
Agencies can determine how users are matched with clients. Select the one or more boxes next to a user’s Skills, Transfers, Personality Traits, Pets and/or General criteria.
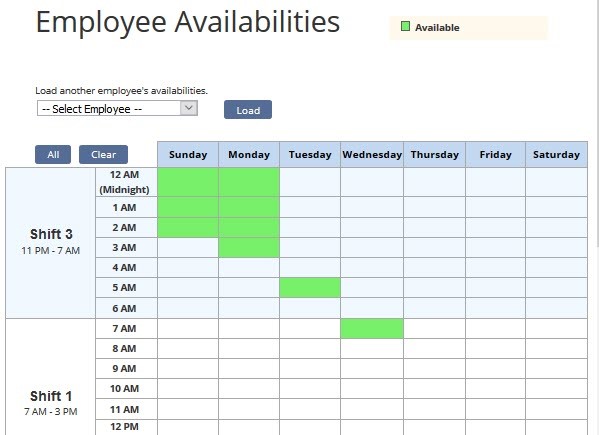
Enter user’s availability to work in the following grid. Select squares in the grid using the plus icon. After selecting, the square will turn green. Choose an Employee from the Load another employee’s availabilities drop-down menu then select “Load” to copy availability from another user. Select the “All” button to select every square in the grid or select “Clear” to remove all green squares.
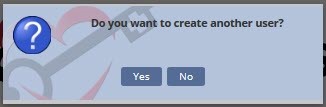
Select the “Exit” button at the bottom to leave the New User window. The following prompt will show. Select “Yes” to add another worker or select “No” to move on.
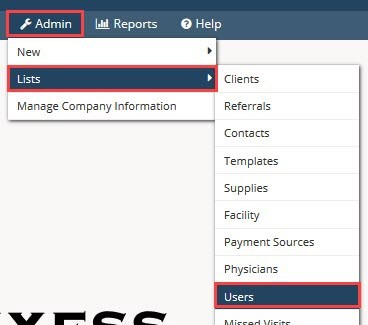
Admin/Lists/Users
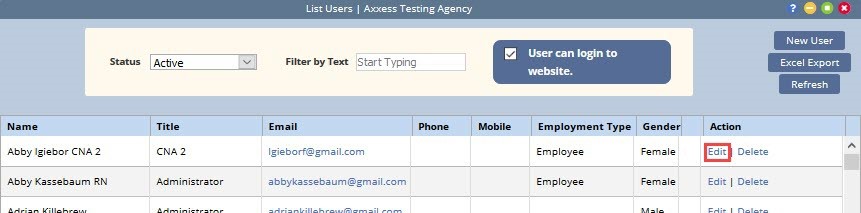
A window will open that will show a list of all current users. To filter for users, choose the Status from the drop-down menu and start typing any user information in the Filter by Text space. A new user can also be added from here selecting the “New User” button in the top right.
Agencies can export the list of all users to an Excel spreadsheet by selecting the “Excel Export” button in the top right. The agency can “Delete” users by selecting the hyperlink to the far right under the Action column. To edit a user, select the Edit hyperlink under the action column. The total number of Active users will show at the bottom of the window.
The Edit User window is split up into seven tabs. The only tab that was not previously shown in the new user steps (above) is the Immunization tab.
Where user immunizations are tracked. The list can be exported to an Excel spreadsheet by selecting the “Export to Excel” button in the top right. To add an immunization, select the “Add Immunization” button in the top left.
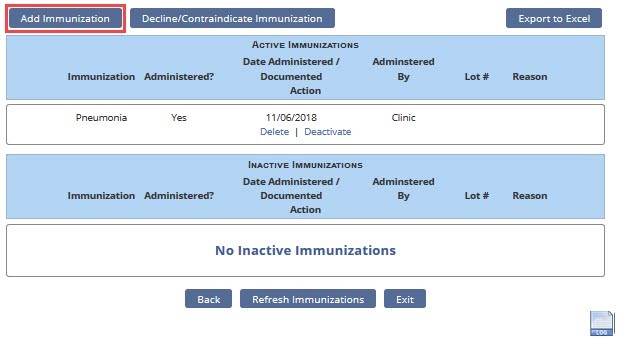
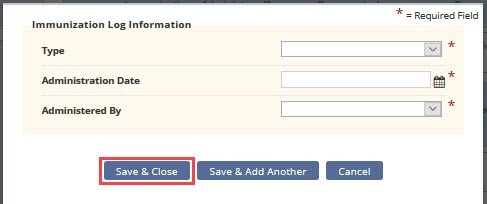
A new window will open in which agencies must choose the Type of immunization and who it was “Administered By” from their corresponding drop-down menus. Then select the “Date Administered” by writing in or selecting in the calendar. Agencies can “Save & Close” the one or if there is more than one immunization to add, select the “Save & Add Another” to continue with another blank “Immunization Log Information” window.
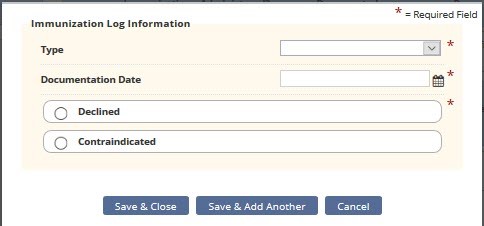
It will then show up under the “Active Immunizations” section. If a user declines an immunization, it can also be added by selecting the “Decline/ Contraindicate Immunization” button at the top of the page. It will open another log information window where the “Type of Immunization,” must be chosen again then either write in or select the date from the calendar. Then mark whether the immunization was “Declined” or “Contraindicated.” Agencies can “Save & Close” the one or if there is more than one declined immunization, select the “Save & Add Another” to continue with another blank “Immunization Log Information” window.
Also, an option to “Delete” or “Deactivate” an immunization by selecting the hyperlinks below the Date Administered. Once an immunization is inactivated, it falls under the “Inactive Immunizations” section where it then can also be deleted or reactivated.
NOTE: The Activity Log ![]() icon will show who and when a user made an edit in any window provided.
icon will show who and when a user made an edit in any window provided.
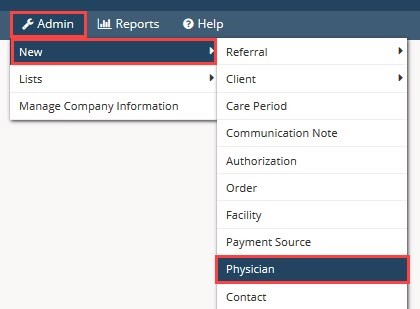
Admin/New/Physician, Admin/Lists/Physicians/New Physician or Create/Physician.
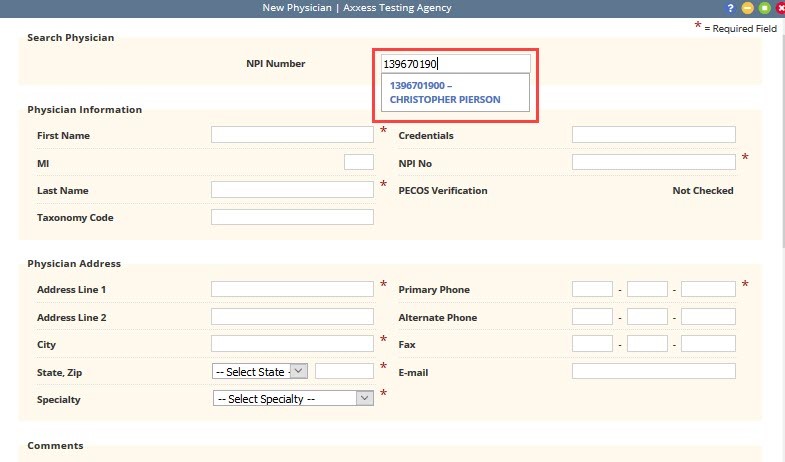
A new window will open. The quickest way to enter a physician is to begin entering their “NPI number.” As the number is typed, physicians and their corresponding NPI numbers will appear below for selection. After selecting the physician and hitting the tab key the Physician Information and Address will auto-fill based on the information that is in the NPI registry. This can still be edited. Everything with a red asterisk is required.
NOTE: If the NPI number is unknown, use the following website: https://npiregistry.cms.hhs.gov/registry/
Notice if the physician is already listed in the NPI registry, then the system will automatically do a “PECOS Verification.” A green check mark indicates they are PECOS verified, a red “X” indicates they are not.
![]()
Select the “Add License” button to add any licenses tied to the physician. Enter the License Number, choose the State, enter the Issue & Expiration Date with an option to add Attachments (only after a physician is saved). Select “Save” to finish.
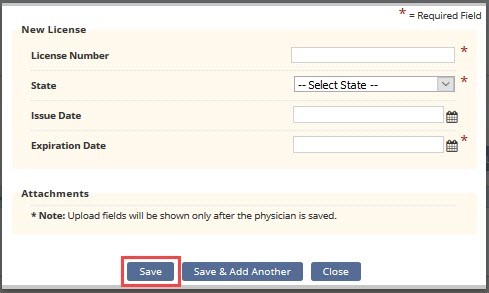
Select “Save” to complete the new physician addition.
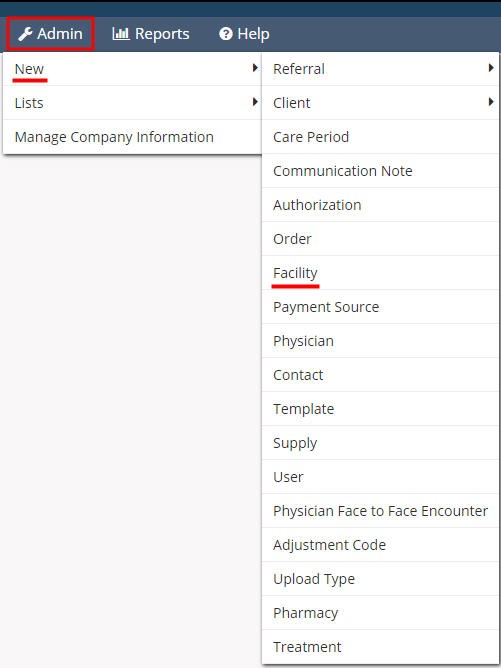
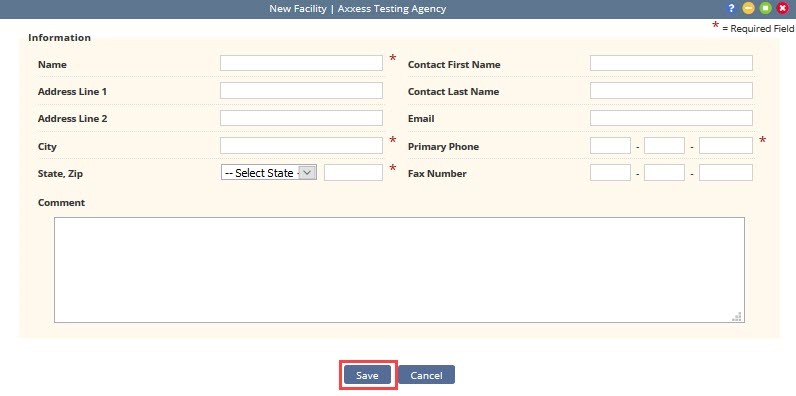
Admin/New/Facility, Admin/Lists/Facility/New Facility or Create/Facility
A new window will open. Enter the Name, City, State & Zip along with the Primary Phone. The more information entered the better. When finished, select the “Save” button at the bottom.
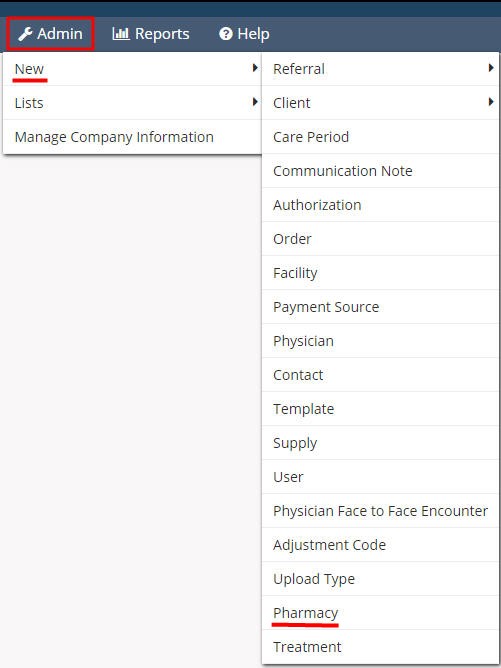
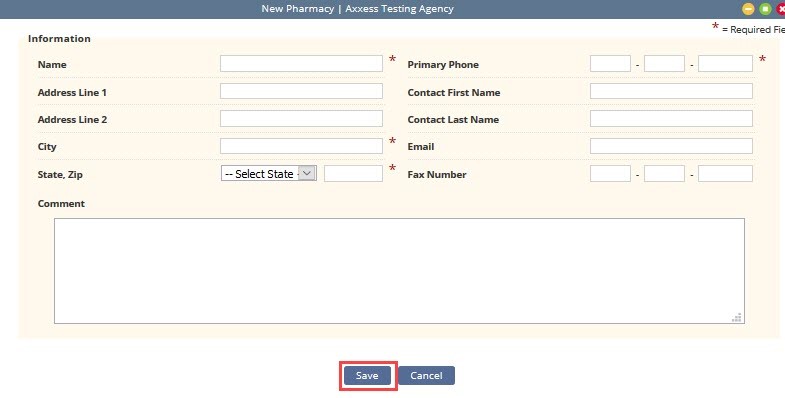
Admin/New/Pharmacy, Admin/Lists/Pharmacies/New Pharmacy or Create/Pharmacy.
A new window will open. Enter the Name, City, State & Zip along with the Primary Phone. When finished select the “Save” button at the bottom.
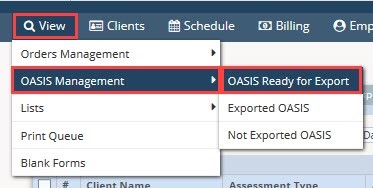
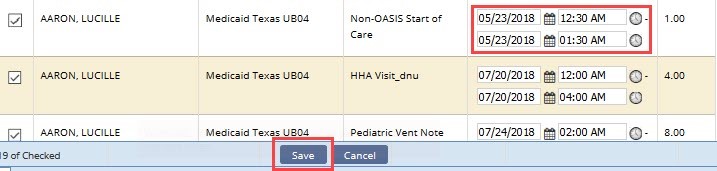
View/OASIS Management/OASIS Ready for Export
A new window will open. Filter for OASIS by choosing the Branch (if more than one) from the drop-down menu. Then select “Refresh.” The client OASIS visits that meet the criteria will appear below.
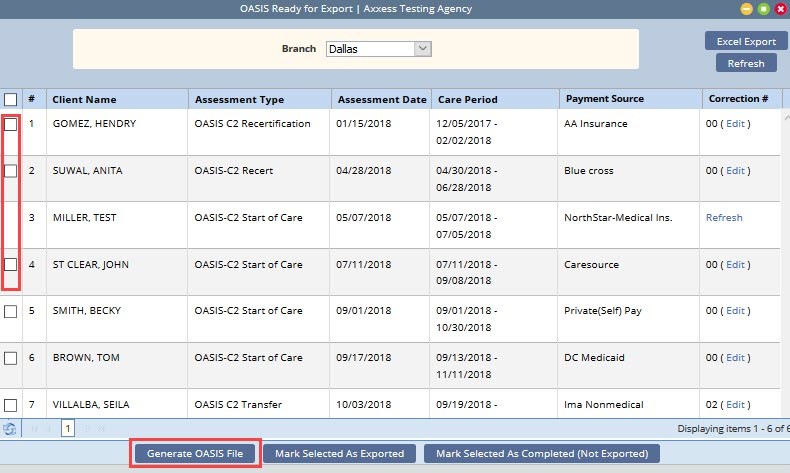
There are checkboxes to the left of every client name listed. Select one or multiple then choose one of the buttons down below. If “Generate OASIS File,” is chosen, the system will download the raw OASIS file on the computer to be uploaded to Center for Medicare and Medicaid Services (CMS).
NOTE: Create a folder on the computer where OASIS files can be stored for easy access.
Once OASIS file(s) have been sent to CMS and accepted per the Final Validation report, go back inside the window, check the boxes of the OASIS that were submitted again (far left), then select the “Mark Selected As Exported” button at the bottom. A new window will open confirming that the OASIS file(s) have been accepted by CMS. To confirm, select “Yes.”

Similarly, if an OASIS needs to be marked as completed, but was not exported, check the box next to the Client Name and then select the “Mark Selected As Completed (Not Exported)” button at the bottom of the page. A confirmation window will open, select the “Yes” button.

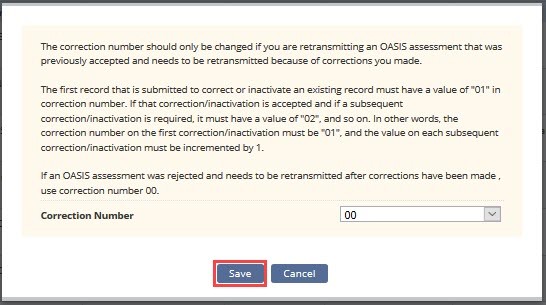
The list of OASIS can be exported to an Excel Spreadsheet by selecting the “Excel Export” in the top right of the window. If submissions have been rejected and a corrected OASIS is being resubmitted, users can change the Correction # by selecting the “Edit” hyperlink on the far right of each OASIS line. A new window will open, and a warning will appear. Change the “Correction Number” by selecting from the drop-down menu and then selecting the “Save” button.
View/Orders Management

Split up into four sections:
This window houses orders that are ready to be sent to the physician for signature. Filtering for orders begins with the Branch (if more than one) from the drop-down menu. Choose the Date Range of the orders planning to be sent. Start typing any Order (number), Client, Type or Physician name in the free text space to narrow down the order list even further.
If the window has been open while orders are approved to be sent in other windows, select the “Refresh” button to show the up to date list.
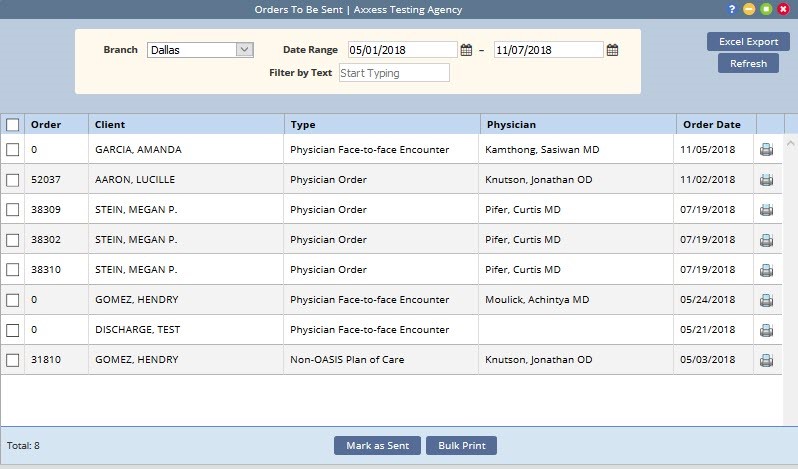
To print an order, select the printer ![]() icon on the far right of the order. Once printed, check the boxes to the left of the order and select the “Mark as Sent” button (at the bottom). They will then be marked as sent to the physician and a green disappearing notification will confirm.
icon on the far right of the order. Once printed, check the boxes to the left of the order and select the “Mark as Sent” button (at the bottom). They will then be marked as sent to the physician and a green disappearing notification will confirm.
Select more than one checkbox and then select the “Bulk Print” button to print more than one order at once. To export the list of orders that meet the search parameters select the “Excel Export” button in the top right.
This window houses orders need to be marked as signed by the physician. Filtering for orders begins with the Branch (if more than one) from the drop-down menu. Choose the Date Range of the orders planning to be signed. Start typing any Order (number), Client, Type or Physician name in the free text space to narrow down the order list even further.
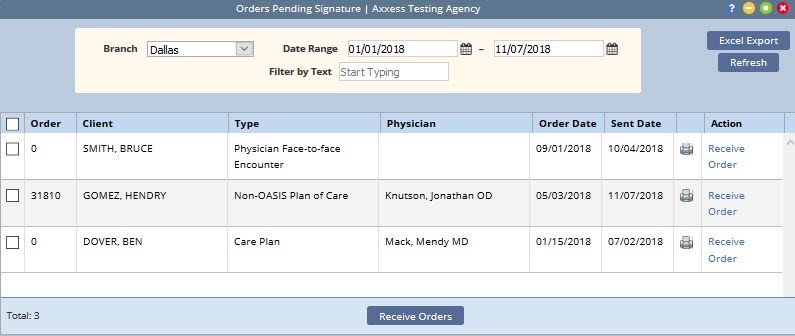
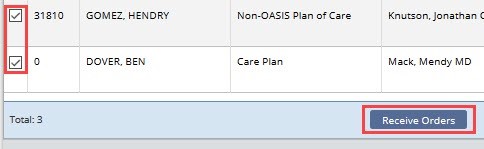
To mark a single order as signed, select the “Receiver Order” hyperlink to the right of the printer icon. Multiple orders can be marked as signed by checking the boxes to the left of the order then select the “Receive Orders” button at the bottom of the page.
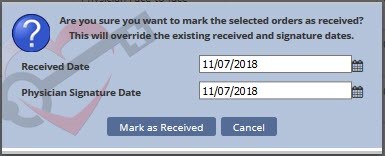
A new window will open to confirm/enter the Received and Physician Signature Date then select the “Mark as Received” button. The date auto-populates with today’s date. Once marked as signed they will disappear from the Orders Pending Signature window and be in the Orders History section.
Where all orders in every status are housed. Filtering for orders begins with the Branch (if more than one) from the drop-down menu and choose the Date Range. The results can be sorted by nine different columns by selecting the column heading: Order #, Client, Type, Physician, Electronic, Date, Sent Date, Received Date and MD Sign Date.
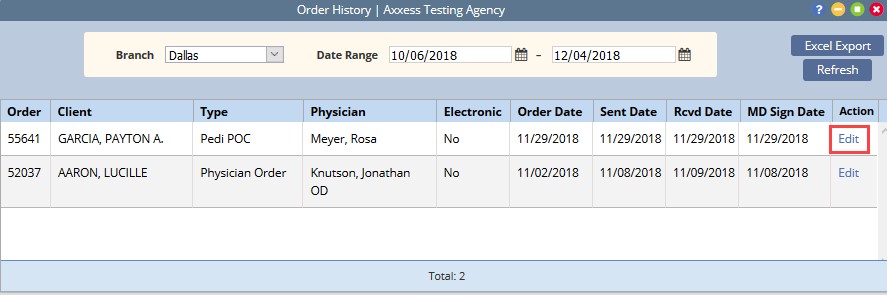
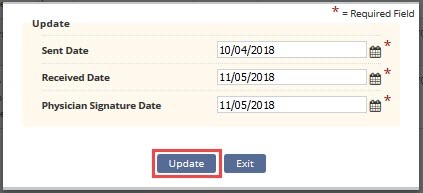
Select the “Edit” hyperlink to make updates. A new window will open, type in the date or select the calendar icon to adjust the order’s Sent, Received and/or Physician Signature Date. Select “Update” to save.
Select the “Refresh” button in the top right for the Orders History window to reflect the most recent status of all orders. Select the “Excel Export” button in the top right to create an Excel spreadsheet of all orders in the window (based off search parameters).
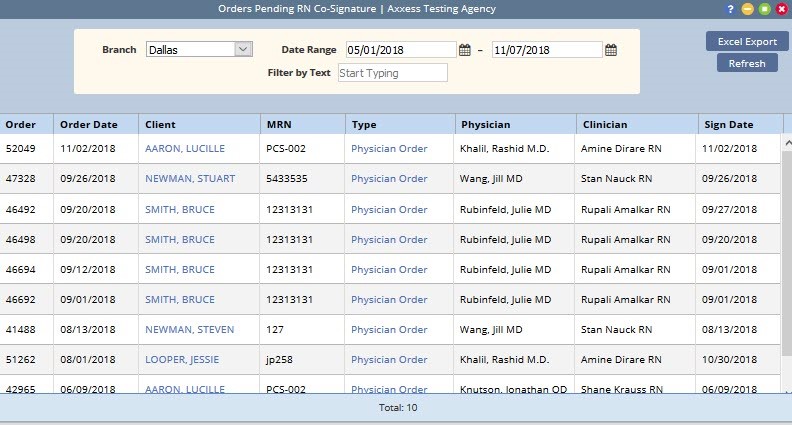
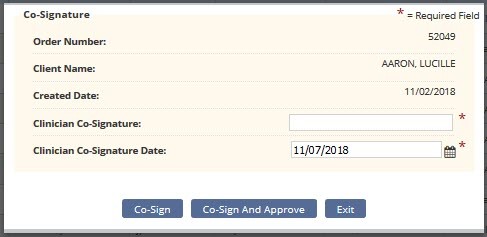
This is the section where orders are housed that need a co-signature because the user that signed the order requires a co-signature (per their permissions).
To find a specific order, choose the Branch (if more than one) from the drop-down menu, then select a Date Range. Start typing any Order (number), Date, Client, MRN, Type, Physician, Clinician and/or Sign Date in the free text space to narrow down the order list even further.
The list of orders can also be exported to an Excel Spreadsheet by selecting on the “Excel Export” spreadsheet button in the top right of the window.
Selecting the Client name hyperlink will take the user to the client’s chart. To co-sign an order, select the hyperlink under the column “Type.” A new window will open showing the printed version of the order. There are five options/buttons of what to do with the order (depending on permissions). The “Return” button works identically to a QA clinician returning a task to the submitter. “Download” will download a PDF version of the order on the computer. Select “Co-Sign.”
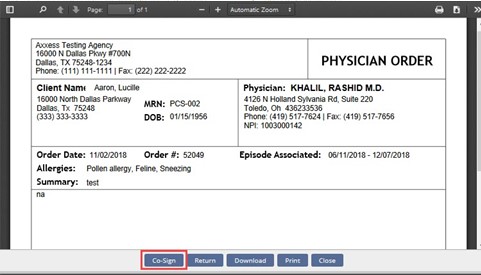
The co-signature window will open (shown below). After entering the co-signature, the user can either choose to “Co-Sign” the order or “Co-Sign And Approve.” After co-signing, the order will disappear from the Orders Pending RN Co-Signature window.
Admin/New/Payment Source, Admin/Lists/Payment Sources/Payment Source or View/Lists/Payment Sources/Payment Source.
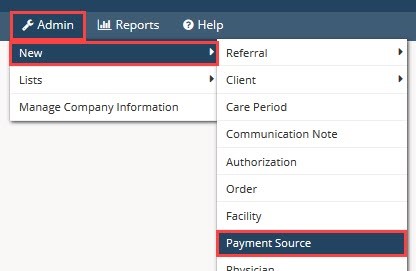
A new window will appear. The new payer window is split up into four tabs:
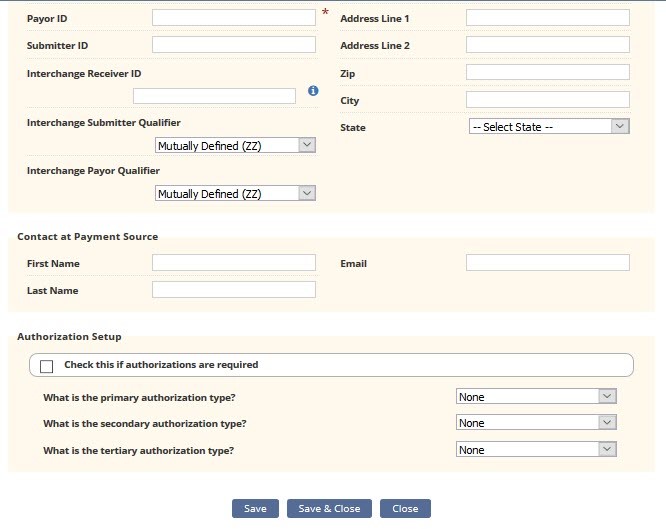
Enter the Display Name and select the Invoice Type. Whichever type is chosen will dictate which tabs will be available on the left.
Choose the Payer & Bill Type from the drop-down menus. Enter the Taxonomy, Tax ID and select the Agency NPI. Select whether the payment source requires a Secondary Provider ID or the Agency has a contact with the insurance.
If UB-04 or HCFA 1500 were chosen, a Clearinghouse will have to be chosen. Then the agency must decide who is doing the billing. Then enter the Payer Information.
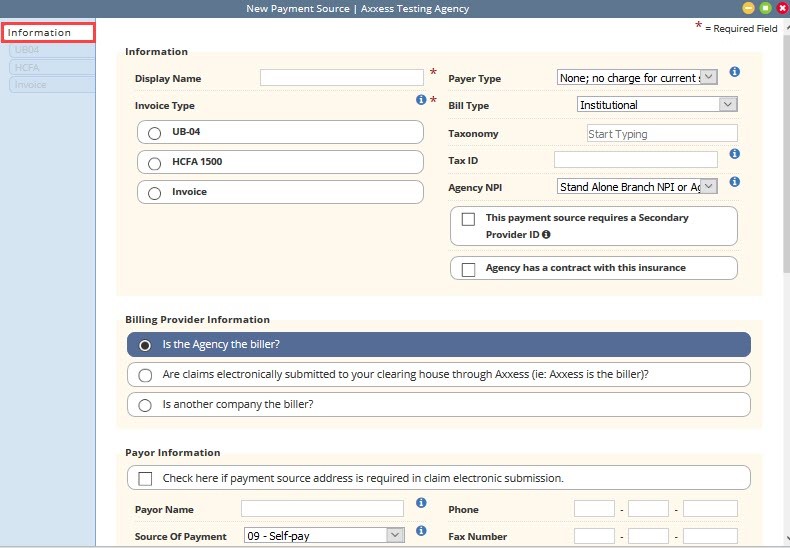
NOTE: The information ![]() icon is a reference. Hover over the icon for more insight about that question or section.
icon is a reference. Hover over the icon for more insight about that question or section.
Enter the person used to communicate at the Payment Source and then decide on how Authorizations will be setup. Select “Save & Close” if the new payment source is complete or “Save” to continue to the next tab (depending on Invoice Type).
NOTE: If all required information is not entered, the following disappearing notification will appear:
The required sections that are missing information will be highlighted in red:
![]()
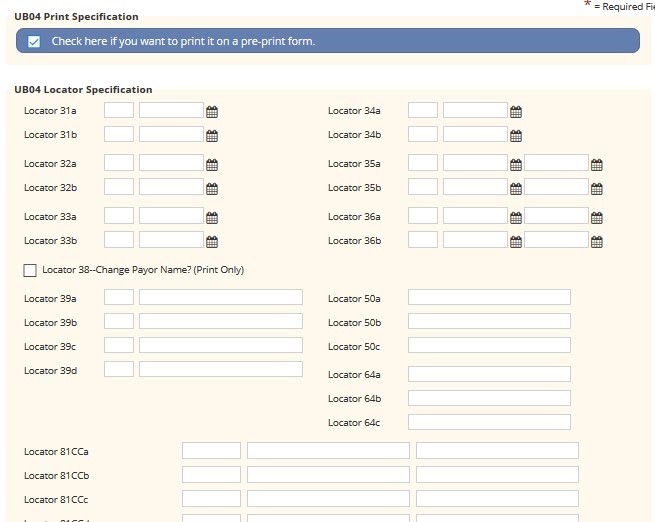
Depending on how the insurance pays out, whether episodic or per visit, will determine if this tab is active. The payer being added in the screenshot below is for the UB04. Fill out the Locator sections 31a through 81CCd on the form and their corresponding dates.
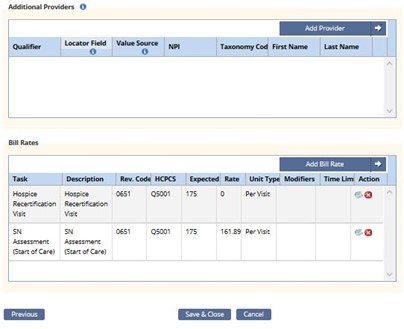
Below is the Additional Providers and Bill Rates sections. Selecting the “Add Provider” button to enter an additional provider. A line will appear in the Provider section, choose the Qualifier, Locator Field and Value Source drop-down menus. If Providers need to be removed, select the red ![]() icon. Then select the “Add Bill Rate” button.
icon. Then select the “Add Bill Rate” button.
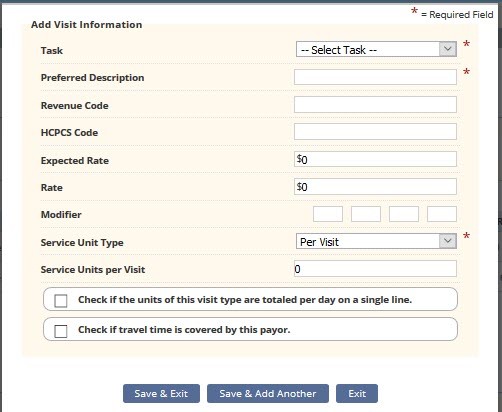
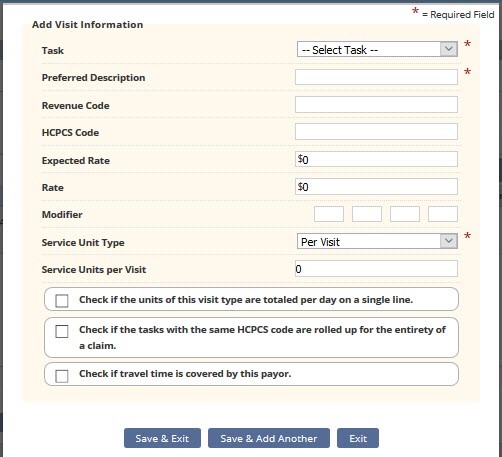
A new window will open. Fill out the Add Visit Information form and select “Save & Exit” or select “Save & Add Another” for additional entries.
Select the “Previous” button to get back to the Information tab or tap on the “Save & Close” button at the bottom to complete the Payment Source.
In this step the agency will need to decide if they want HCFA1500 printed on a pre-print form. After that, the HCFA Locators must be entered and chosen.
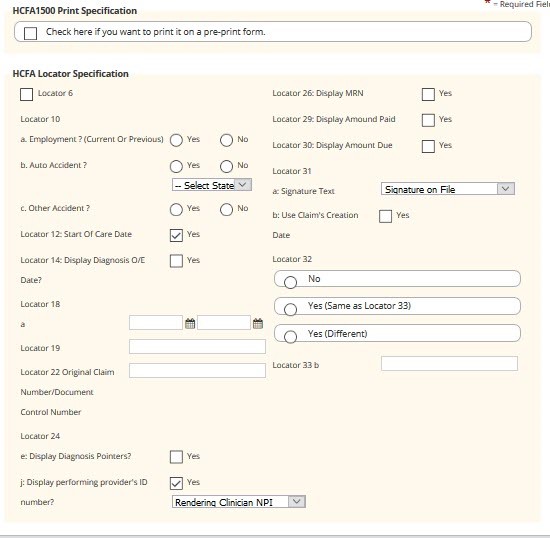
Below the Locators are the Additional Providers and Bill Rates. Selecting the “Add Provider” button to enter an additional provider. A line will appear in the Provider section, choose the Qualifier, Locator Field and Value Source drop-down menus.
If Providers need to be removed, select the red ![]() icon. Then select the “Add Bill Rate” button.
icon. Then select the “Add Bill Rate” button.
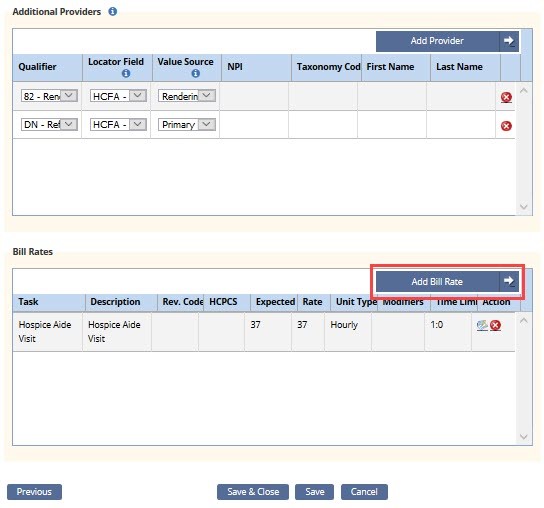
A new window will open. Fill out the Add Visit Information form and select “Save & Exit” or select “Save & Add Another” for additional entries. To edit previously entered Bill Rates, select the edit ![]() icon or if they need to be removed, select the red
icon or if they need to be removed, select the red ![]() icon.
icon.
Select the “Previous” button to get back to the Information tab or tap on the “Save & Close” button at the bottom to complete the Payment Source.
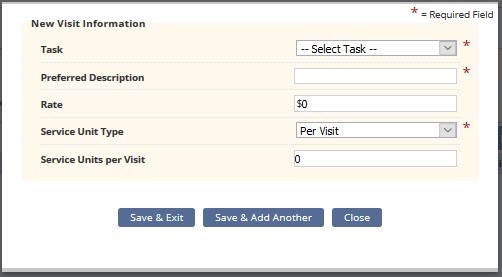
The last step tab allows for agencies to set up Payment Sources that require an Invoice. First decide the Payment Terms and select the checkbox if the agency needs to add billing comments for each visit. There is space for Comments and a section for Invoice Bill Rates. Select “Add Invoice Rate” to add a new invoice rate.
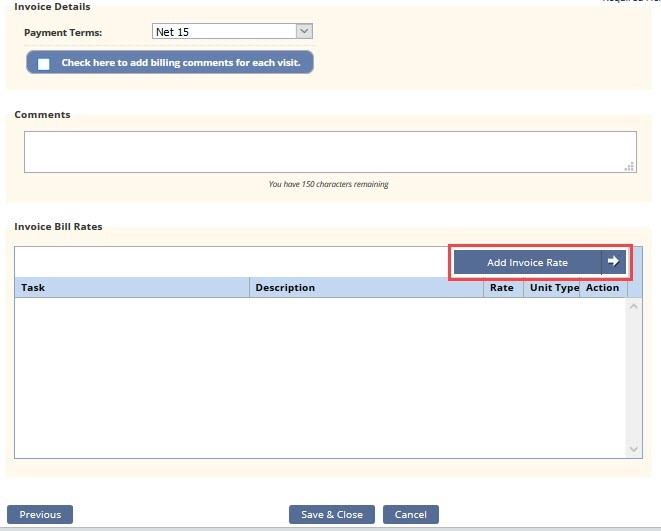
Choose the Task and Service Unit Type then enter the Preferred Description, Rate and Service Units per Visit. Select “Save & Exit” to finish or select “Save & Add Another” for additional entries. To edit previously entered invoice rates, select the edit ![]() icon or if they need to be removed, select the red
icon or if they need to be removed, select the red ![]() icon.
icon.
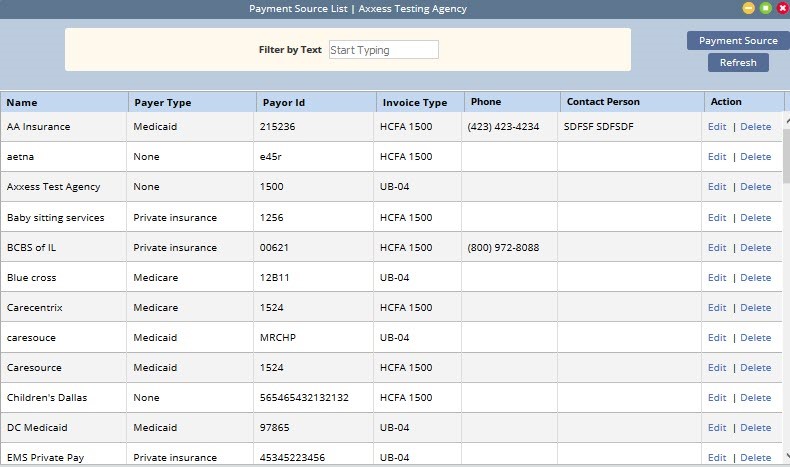
Admin/Lists/Payment Sources or View/Lists/Payment Sources.
Select the “Edit” hyperlink to the far right of the screen under the Action column. This is also where the “Delete” function is found. To search for a payment source, Start Typing any part of the Name, Payer Type, Payer ID, Invoice Type, Phone or Contact Person in the white free text space at the very top of the page.
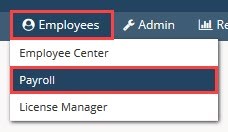
Employees/Payroll
The following window will open with only search criteria at the top. Select the branch from the drop-down menu (if there is more than one). Choose to show Late Tasks, the Pay Period, Task Status, Employee Type and Payroll Status.
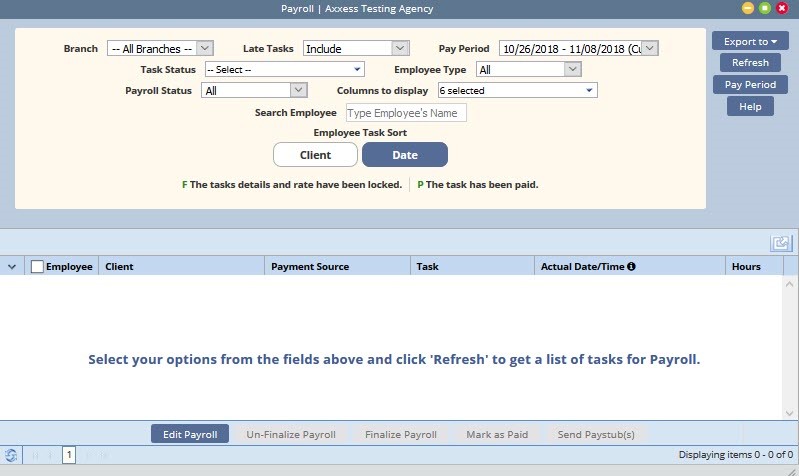
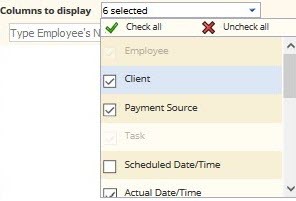
Select which Columns to display by checking the corresponding boxes. Selecting the green check mark will select all statuses and selecting the red X will uncheck all choices. Search for Employees by Name and then decide whether to sort Employee tasks by Client or Date. Then select the “Refresh” button to see the results.
To minimize the search window to see more employees, select the collapse ![]() icon Employees will be grouped by their name with a checkbox next to them. Selecting the > icon to the left of their name will expand their list of payable items. They are organized in the following columns: Client, Payment Source, Task, Actual Date/Time and Hours. For the top right menu items, export the payroll list by selecting the “Export to” button and select Excel. Select the “Pay Period” button to create a new Pay Period.
icon Employees will be grouped by their name with a checkbox next to them. Selecting the > icon to the left of their name will expand their list of payable items. They are organized in the following columns: Client, Payment Source, Task, Actual Date/Time and Hours. For the top right menu items, export the payroll list by selecting the “Export to” button and select Excel. Select the “Pay Period” button to create a new Pay Period.

The dates auto-generate to after the newest created pay period. Select the “Create” button.

Select the “Help” button to get more insight on how to set up Payroll.
Select the “Refresh” button to see the search results below based on the parameters.
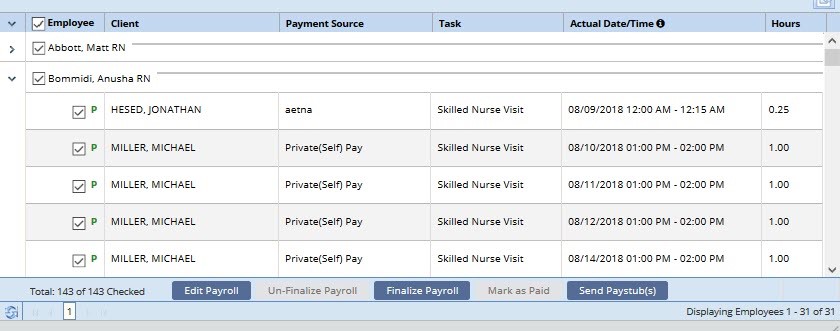
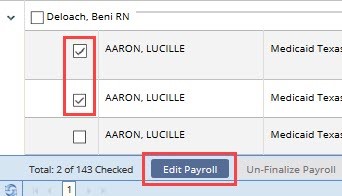
Select the Employee checkbox to check all employee boxes and again to deselect all. After selecting all employees in a previous pay period, the blue buttons at the bottom become active. To make payroll edits, select the box(es) next to the Client name and select the “Edit Payroll” button.
The Actual Date/Time becomes editable. Enter to select different days and times for tasks. When done editing, select the “Save” button.
Select an Employee and then the “Finalize Payroll” button.

The task updates with a green F next to the checkbox meaning the task details and rate have been locked. If an employee was marked as Finalized but should not have been, select the box next to their name and then select the “Un-Finalize Payroll” box and the green F will be removed. If you select the same employee checkbox and then select the “Mark as Paid” button, the task then updates with a green P next to the checkbox meaning the task has been paid.
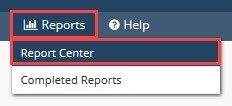
Reports/Report Center
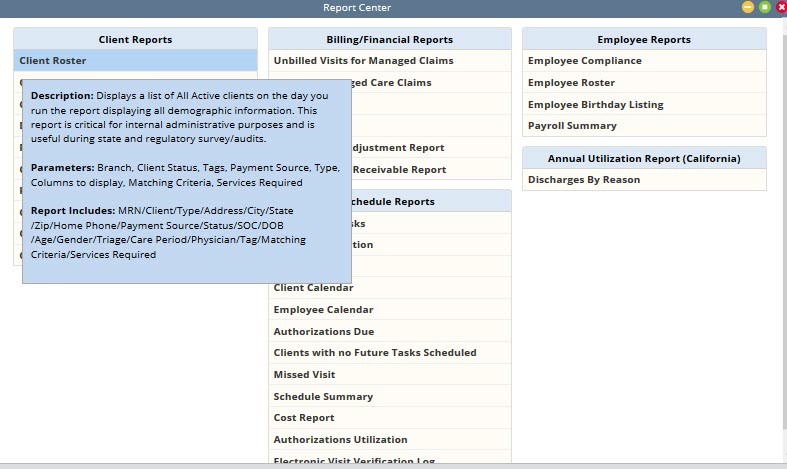
This is the place all HomeCare reports are found. They are split up into four categories (with one additional for California). The categories are Client, Billing/Financial, Employee and Schedule Reports. Hovering over the report will show what the report entails, its Description, Parameters and what the Report Includes.
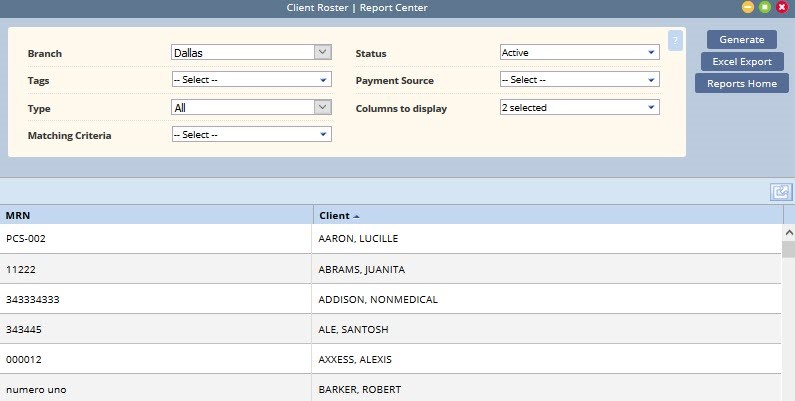
Most of the reports function the same way. In the example report below, Client Roster, parameters must be chosen, then select the “Generate” button to the right to display the results below.
Selecting the “Excel Export” will put the information into an Excel spreadsheet. Selecting the “Reports Home” button will go back to the list of all reports.
Some reports do not generate instantaneously they must be requested. To do this, select the parameters then select the “Request Report” button to the right of the parameters. The request then goes to a different window. It can be found in Reports/Completed Reports.
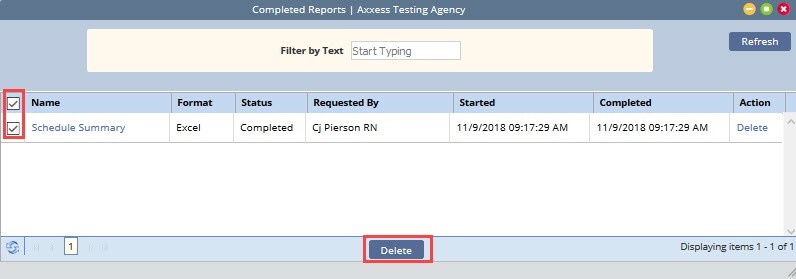
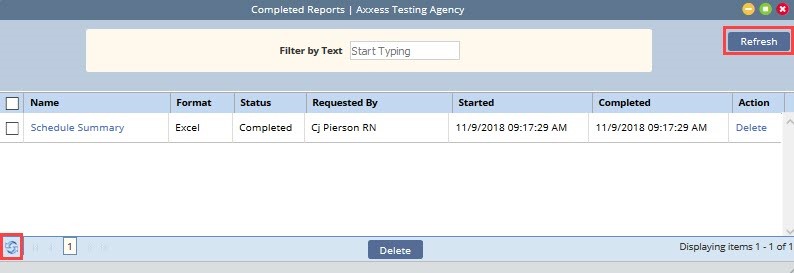
Here, users can retrieve a copy of the finished report and see who ran the report and when. Search through the completed reports by typing the Name, Format, Status, Requested By, Started and Completed date in the free text space at the top of the screen.
To view the report, select the hyperlink text listed under the Name column. To remove the report, select the Delete hyperlink to the far right under the Action column or check the box(es) next to the report and then select the “Delete” button.
The refresh ![]() icon is available in the bottom left of the window to get the latest update or select the “Refresh” button in the top right of the window.
icon is available in the bottom left of the window to get the latest update or select the “Refresh” button in the top right of the window.
Admin/New/Template

The window below will appear. Create a Name for the template. Then write the template inside the white Free Text section. The section is limited to 5000 characters. Once completed, select the “Save” button.
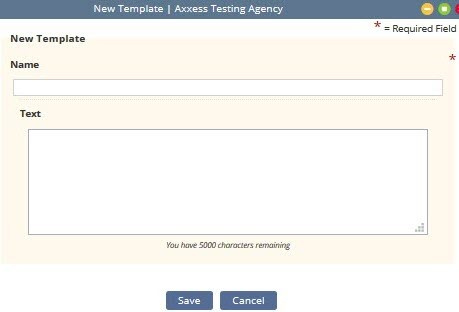
NOTE: Templates can be used to save time for writing orders, goals, care plans, physician statements, narratives and other places inside visits
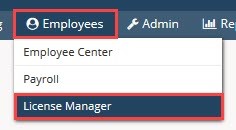
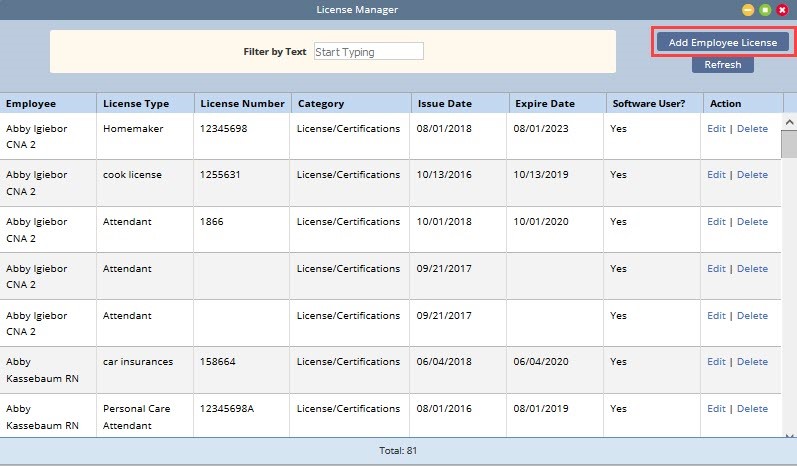
Employees/License Manager
A window will open that will show all current user licenses. Start Typing an Employee, License Type, Number, Category, Issue Date, Expire and/or Software User to narrow down the list. Select the “Refresh” button in the top right to make the list completely up to date. The total number of licenses displays at the bottom. Select the “Add Employee License” button in the top right.
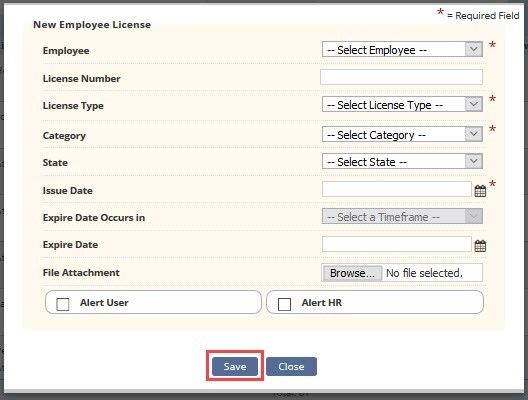
A New Employee License window opens. Choose the Employee, License Type, Category and State from the drop-down menu. Enter the License Number, Issue & Expire Date. Add a File Attachment by selecting the “Browse” button. If the agency would like the system to remind the User or HR about the expiring license, check the Alert User and/or Alert HR boxes and designate an Alert Date. Select the “Save” button when complete.
Select the “Edit” hyperlink on the far right under the Action column in order to edit the information from the previous screenshot or “Delete” to remove the employee license altogether.
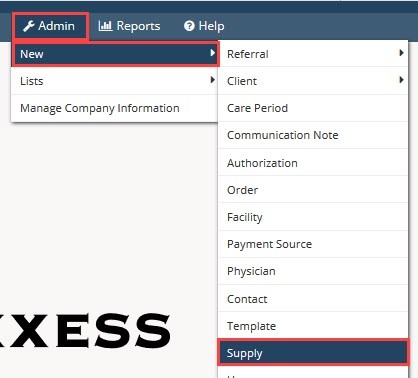
Admin/New/Supply
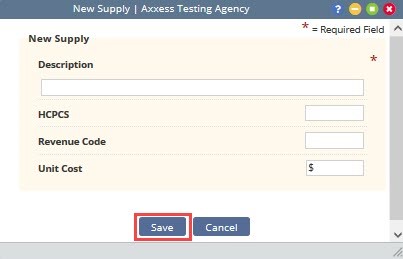
The New Supply window opens. Enter the Description, HCPCS, Revenue Code and the Unit Cost. Then select the “Save” button.
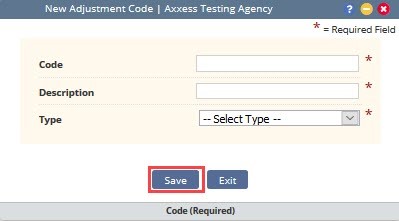
Admin/New/Adjustment Code
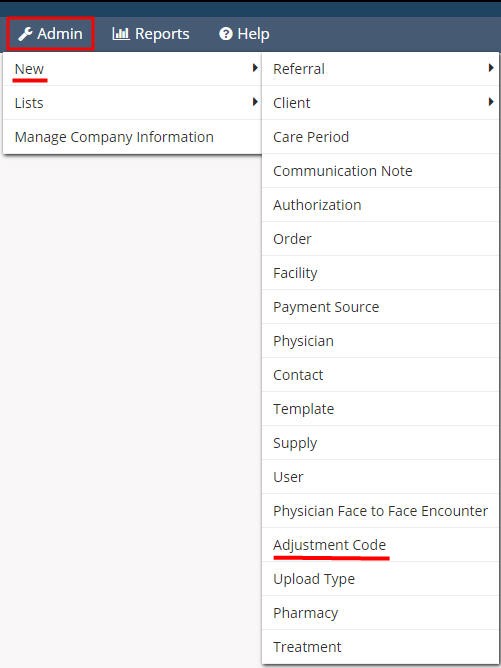
The New Adjustment Code window opens. Enter the Code, Description and choose from a Negative or Positive Type. Then select the “Save” button.
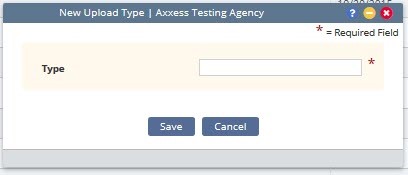
Admin/New/Upload Type
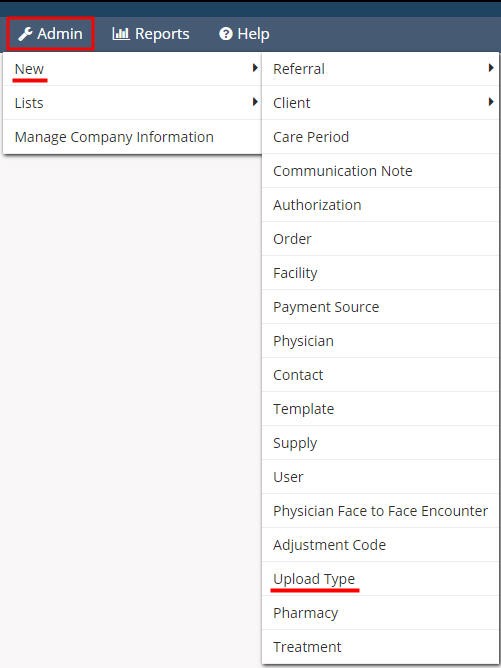
The List Upload Type window opens. Selecting the “Excel Export” will put the information into an Excel spreadsheet. Select the “Refresh” button in the top right to make the list completely up to date. Select the “New Upload Type” button to add an additional type.
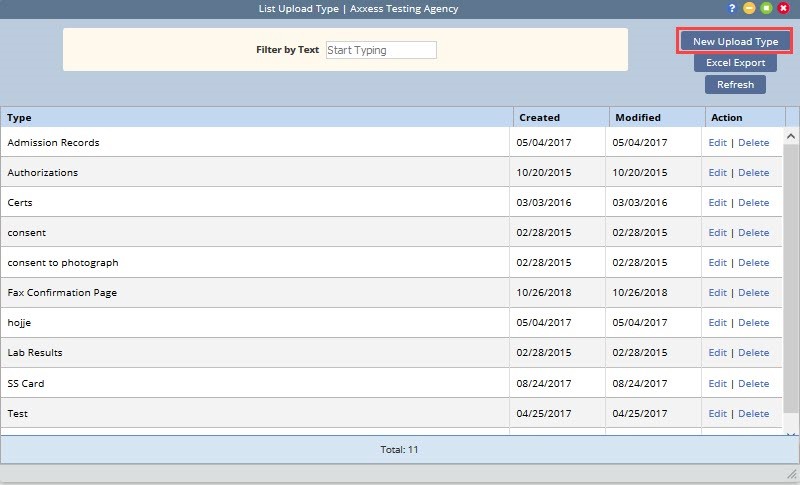
Enter the Type and select the “Save” button.
Select the “Edit” hyperlink on the far right under the Action column to edit the information from the previous screenshot and see the Activity Log. Additionally, select the “Delete” hyperlink to remove the Upload Type altogether.
Help/Support & Training/Help Center
A great resource that is available 24/7 is our Help Center. It is a place to get answers to frequently asked questions or watch videos of all of Axxess products. It can be accessed by going to
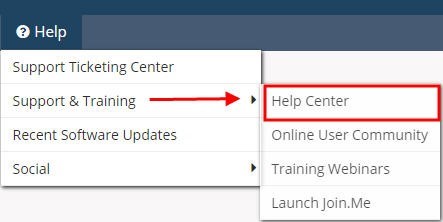
Or also available at https://www.axxess.com/help/