Orders enable users to update medications, DME, supplies and more on the Comprehensive Plan of Care. If IDG is being used, order updates will automatically display on the IDG Summary/Comprehensive Assessment Update screen so IDG members can review plan of care updates during IDG meetings.
Orders can be created in multiple ways:
Patient/Employee Schedule
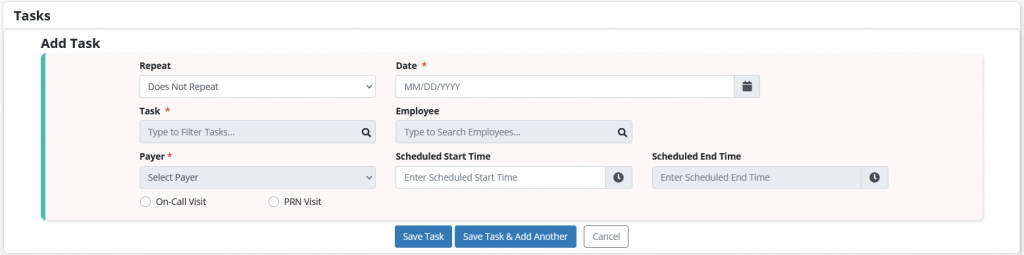
To create an order from the Patient Schedule or Employee Schedule screen, navigate to the Schedule tab and select Patient Schedule or Employee Schedule. Click Add Task and select Order from the Task drop-down menu.
Schedule tab ➜ Patient Schedule or Employee Schedule ➜ Add Task ➜ Task ➜ Order
Patient Profile
To add an order from a patient’s profile, navigate to the Patients tab and select Patient Charts. Click Edit Profile. On the Pharmacy and DME tab, select Update DME or Update Supplies. Click Yes in the pop-up to create the order.
Patients tab ➜ Patient Charts ➜ Edit Profile ➜ Pharmacy and DME tab ➜ Update DME or Update Supplies ➜ Yes

Medication Profile
To create an order from a patient’s medication profile, navigate to the Patients tab and select Medication. Click Update Medications and select Yes in the pop-up to create the order.
Patients tab ➜ Medication ➜ Update Medications ➜ Yes
Clinical Visits
To create an order from a clinical visit, click Add Order in the visit.
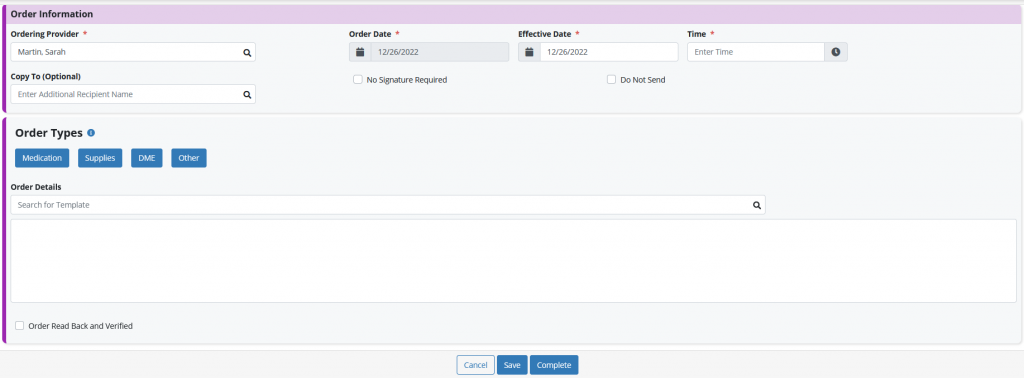
The following fields appear in the Order Information section of orders:
Ordering Provider – The palliative provider’s name automatically populates in this field but can be changed to any provider in your organization’s Providers list.
Copy To (Optional) – If any other provider needs to receive the order, enter their name here. Any provider in your organization’s Providers list can be added.
Order Date
The Order Date field cannot be edited.
When the order is created through the Patient Schedule or Employee Schedule screen, the order date is generated by the patient’s schedule.
When the order is created through a clinical document, the clinical document date populates as the order date.
When the order is created through the patient’s profile or medication profile, the date selected when opening the order populates as the order date.
Effective Date – The current date automatically populates in this field. If you want the order to start on another date, you can enter the desired date.
Time – Enter the time the order was received.
Selecting the Do Not Send checkbox will prevent the order from being sent to the provider. When this is selected, the order will automatically update to Completed With Signature status.
If the order you’re creating is just for documentation purposes, select the No Signature Required checkbox.

Select the desired order type under Order Types to navigate to and edit the respective section of the patient’s chart.
To update supplies from a clinical document, select Add Order in the document. In the order, select Supplies under Order Types.
Supplies can also be updated directly from the patient’s chart. To update supplies from a patient’s chart, navigate to the Pharmacy and DME tab and click Update Supplies.
Select Yes in the pop-up to create an order and link supplies. To select an existing order, click Select Order. Once an order has been selected, the patient’s supplies can be added. To start a new order, select Create Provider Order.

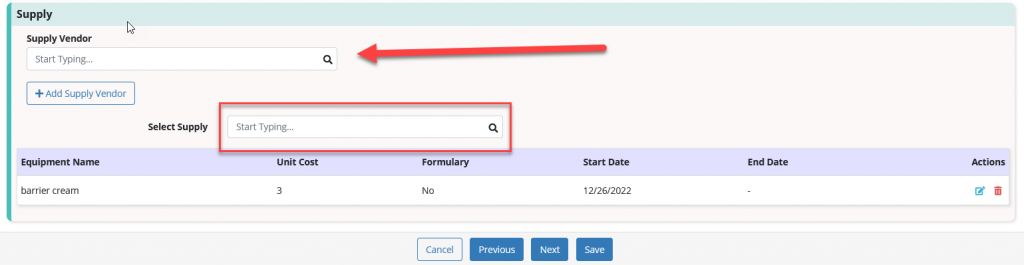
To add a supply, start typing in the Select Supply field and select the desired supply from the drop-down menu. Supplies in your organization’s Supplies list will appear in this menu for selection. If the supply you are looking for does not appear, contact an administrator at your organization to request the supply be added.
Once a supply has been selected, enter the start date and click Save. To discontinue a supply, click the edit icon under Actions in the patient’s profile. Enter an end date and click Save. Supply updates completed in the patient’s profile will flow to the Comprehensive Plan of Care.
You can also add a supply vendor to the patient’s profile from this screen.
To update DME from a clinical document, select Add Order in the document. In the order, select DME under Order Types.
DME can also be updated directly from the patient’s chart. To update DME from a patient’s chart, navigate to the Pharmacy and DME tab and click Update DME.
Select Yes in the pop-up to create an order and link DME. To select an existing order, click Select Order. Once an order has been selected, the patient’s DME can be added. To start a new order, select Create Provider Order.
To add DME, start typing in the Select DME field and select the desired DME from the drop-down menu. DME in your organization’s DME list will appear in this menu for selection. If the DME you’re looking for does not appear, contact an administrator at your organization to request the DME be added.
Once DME has been selected, enter the start date and click Save. To discontinue DME, click the edit icon under Actions in the patient’s profile. Enter an end date and click Save. DME updates completed in the patient’s profile will generate in the DME section of the order in a read-only format and flow to the Comprehensive Plan of Care.
You can also add a DME vendor to the patient’s profile from this screen.
To update orders that do not fall into any of the above categories, such as a discharge order for a live discharge patient, select Other under Order Types in the order.

To complete an order, check the box next to Order Read Back and Verified and click Complete.

To save your work and return later to complete the order, click Save. Click Cancel to erase any changes that were made prior to the last save.