Axxess Palliative Care provides a robust Payroll Center that enables users to generate payroll export files with the data elements and formatting required by the organization’s payroll vendor.
This feature facilitates seamless payroll processes by enabling users to easily and accurately calculate and report payroll data according to vendor specifications. To use the Payroll Center, organizations must enable it in Company Setup.
To enable the Payroll Center, navigate to the Payroll tab in Company Setup. Confirm that the correct provider is selected in the Provider filter at the top of the screen, and click Enable in the Payroll Center section.
Admin tab ➜ Company Setup ➜ Payroll tab ➜ Payroll Center section ➜ Enable
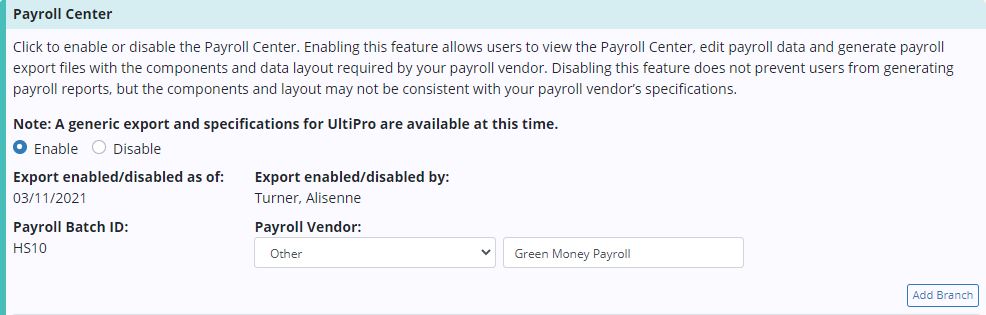
Select the appropriate vendor in the Payroll Vendor drop-down menu. The selected payroll vendor will determine the format and specifications included in payroll file exports. Vendor-specific export files are available for vendors listed in the Payroll Vendor menu.
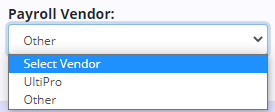
If your payroll vendor is not present in the drop-down menu, select Other and enter the name of your payroll vendor in the text field next to the Payroll Vendor menu. The selected payroll vendor can be changed any time in Company Setup.

Click Add Branch to associate a payroll company code/ID to the payroll branches within your organization. Select the branch, enter the payroll company code/ID (provided by your payroll vendor) and enter the start date.
Users can edit, delete or deactivate payroll company codes/IDs using the edit, delete and deactivate icons ( ![]() ) under Actions.
) under Actions.

Click Save at the bottom of the screen to finish enabling the Payroll Center.
Axxess Palliative Care enables organizations to create payroll cycle groups and assign users to each group. This functionality helps organizations manage multiple payroll cycles seamlessly.
To manage payroll cycle groups, users must have permission to access Company Setup and payroll in Axxess Palliative Care.
To access the Payroll Center, users must have permission to view, add and edit company payroll in Axxess Palliative Care.
To give a user permission to view, add and edit company payroll, edit the user’s profile and navigate to the Permissions tab. In the Administration section, select View, Add and Edit next to the Company Payroll permission. Click Save to finish granting the permissions to the user.
People tab ➜ People Center ➜ Edit ➜ Permissions tab ➜ Administration section ➜ Company Payroll ➜ View/Add/Edit ➜ Save

Select View, Add and Edit next to the User Payroll permission.
People tab ➜ People Center ➜ Edit ➜ Permissions tab ➜ Administration section ➜ User Payroll ➜ View/Add/Edit ➜ Save

In the Administration section, select View and Edit next to the Company Setup permission.
People tab ➜ People Center ➜ Edit ➜ Permissions tab ➜ Administration section ➜ Company Setup ➜ View/Edit ➜ Save

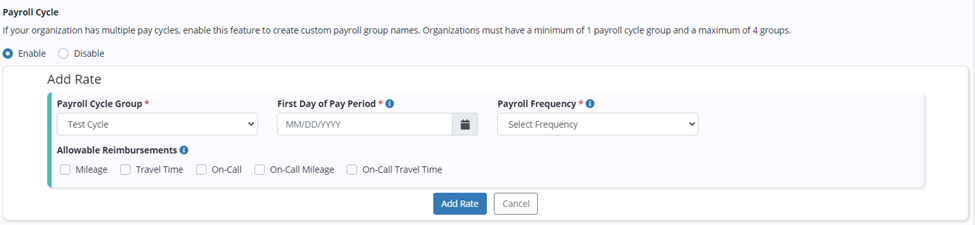
To enable payroll cycle, navigate to Company Setup under the Admin tab. On the Payroll tab, navigate to the Payroll Policy section and select Enable under Payroll Cycle.
Admin tab ➜ Company Setup ➜ Payroll tab ➜ Payroll Policy ➜ Payroll Cycle ➜ Enable

Once payroll cycle groups are enabled, enter a payroll cycle name. To add a payroll cycle, click enter a name for the cycle under the Add Cycle section. Click Add Cycle again to finish adding the payroll cycle.

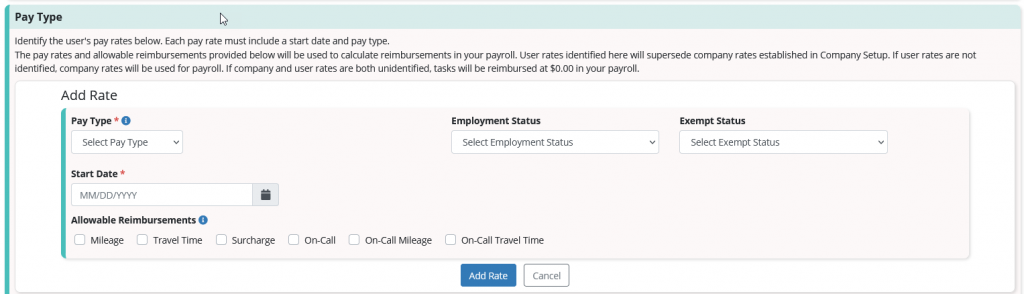
To add a pay rate, click Add Rate and enter the first day of the pay period, select the payroll frequency, and select any allowable reimbursements. Click Add Rate again to finish adding the pay rate.
Once payroll cycles are enabled in Company Setup, a new Payroll Cycle Group filter will appear in the Payroll Center and Payroll Report.
When a payroll group is selected, the date ranges will appear in the date range box. The list will reflect the payroll cycle groups that were created in Company Setup.

A new late tasks filter now appears in the Payroll Center with the following options: Include, Exclude and Show Only.
Once multiple payroll cycles are enabled in Company Setup, organizations can assign active users to each payroll cycle group.
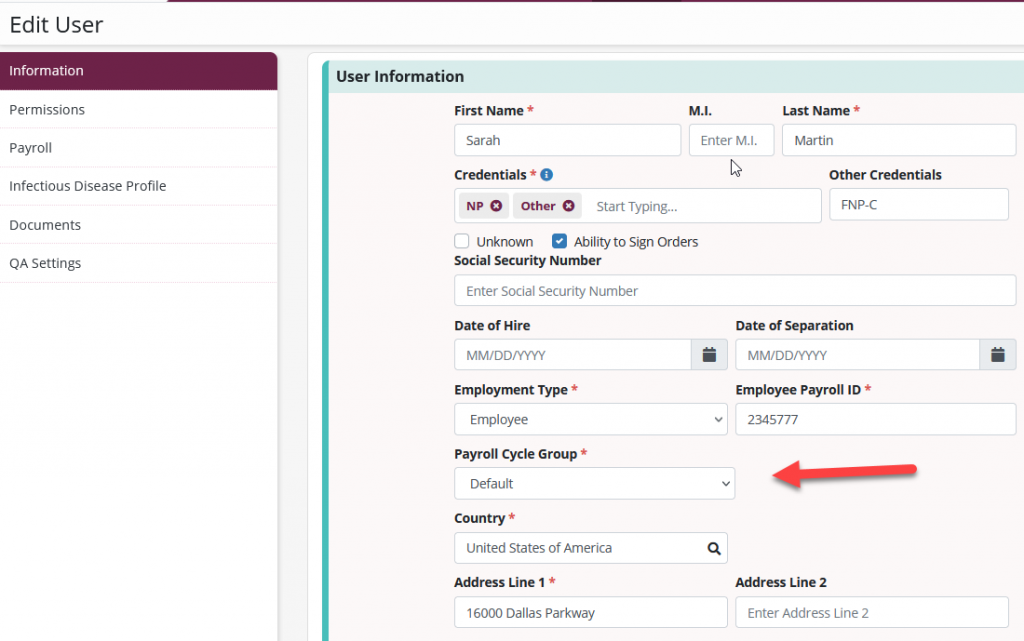
To assign a user to a payroll cycle group, edit the user’s profile and navigate to the Payroll tab. Select a group from the Payroll Cycle Group menu and click Save.
People tab ➜ People Center ➜ Edit ➜ Payroll tab ➜ Payroll Cycle Group ➜ Save
The list of groups in the Payroll Cycle Group drop-down menu reflects the list of groups set up in Company Setup. When an employee is a contractor, volunteer or student/trainee, the payroll group designation is optional.
When multiple payroll cycles are enabled in Company Setup, the following optional items appear under Pay Type on the Payroll tab of user profiles:
Axxess Palliative Care enables users to pull cross-location visits to an employee’s primary location for payroll approval. This feature enables multisite organizations to streamline payroll processes for clinicians who work in multiple locations
To enable multilocation payroll, users must have permission to manage company payroll settings in Axxess Palliative Care.
To enable multilocation payroll, navigate to Company Setup under the Admin tab. On the Payroll tab, navigate to the Multilocation Payroll section and click Enable. Click Save to finish enabling multilocation payroll.
Admin tab ➜ Company Setup ➜ Payroll tab ➜ Multilocation Payroll ➜ Enable ➜ Save
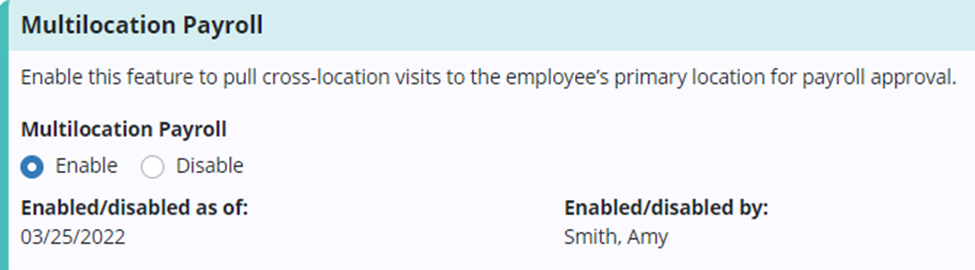
When Multilocation Payroll is enabled, users can pull cross-location visits to the employee’s primary location for payroll approval.
When a location is selected in the Payroll Center, all visits and non-patient activities that an employee worked will display under their primary branch. Users can approve time worked across locations even if they do not have permissions.
Payroll will pull to the employee’s primary location. The billing of the visit will remain with the office to which the patient is associated.
In Company Setup under Company Information, you will find company code, program (service) code and location (office/branch) code. These codes are used for generating the Payroll Export Report/Multilocation Payroll Report. These codes are alpha-numeric code up to four digits and should be unique.
To access the Payroll Center, navigate to the People tab and select Payroll Center.
People tab ➜ Payroll Center
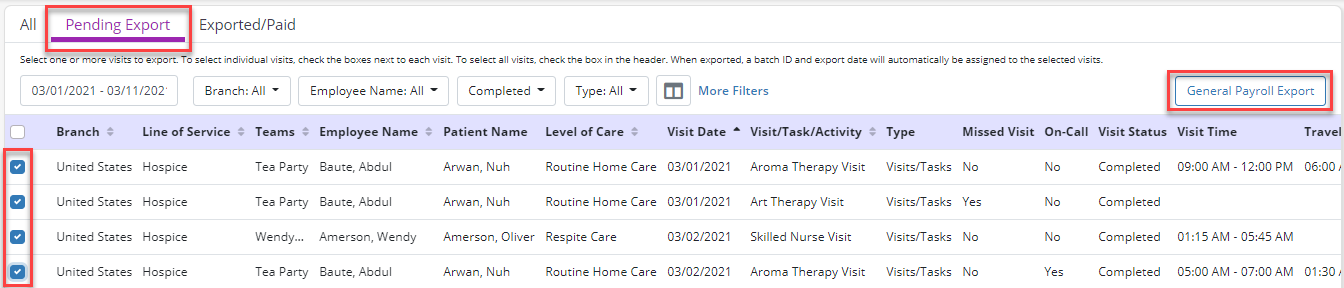
Users can toggle between the All, Pending Export and Exported/Paid tabs at the top of the Payroll Center.
|
The All tab shows visits and non-patient activity (NPA) tasks in all statuses. |
|
|
The Pending Export tab shows visits and NPA tasks that have not been exported. |
|
|
The Exported/Paid tab shows visits and NPA tasks that have been exported and marked as paid. |
On each tab, users can filter by date range, branch, employee name, visit status and type.
The Payroll Center automatically updates every hour, with the most recent update time displayed in the top‑right corner of the screen. Click the Refresh button to manually update the Payroll Center. This button can be clicked every five minutes.

Users can export visits and non-patient activities from the All and Pending Export tabs. To export visits or NPA tasks, check the boxes next to the visits/tasks you want to export and click General Payroll Export.
Click Export in the confirmation pop-up to finish exporting the selected visits/tasks.

When exported, a batch ID and export date will automatically be assigned to the selected visits. The exported visits/tasks will move from the Pending Export tab to the Exported/Paid and All tabs, and the system will generate a payroll export CSV file that the user can save and edit.
