x
Join our new Axxess User Community to connect, share, learn and grow together.Learn More

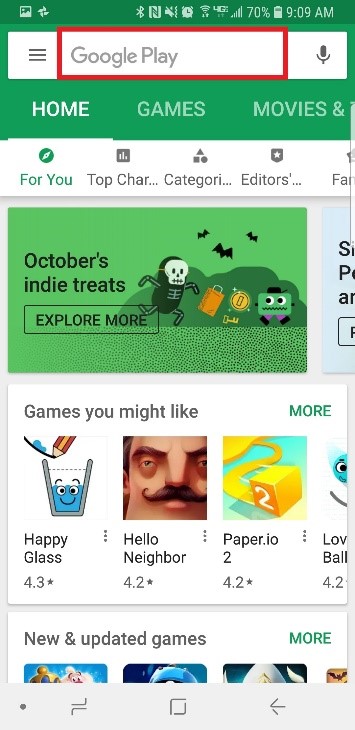
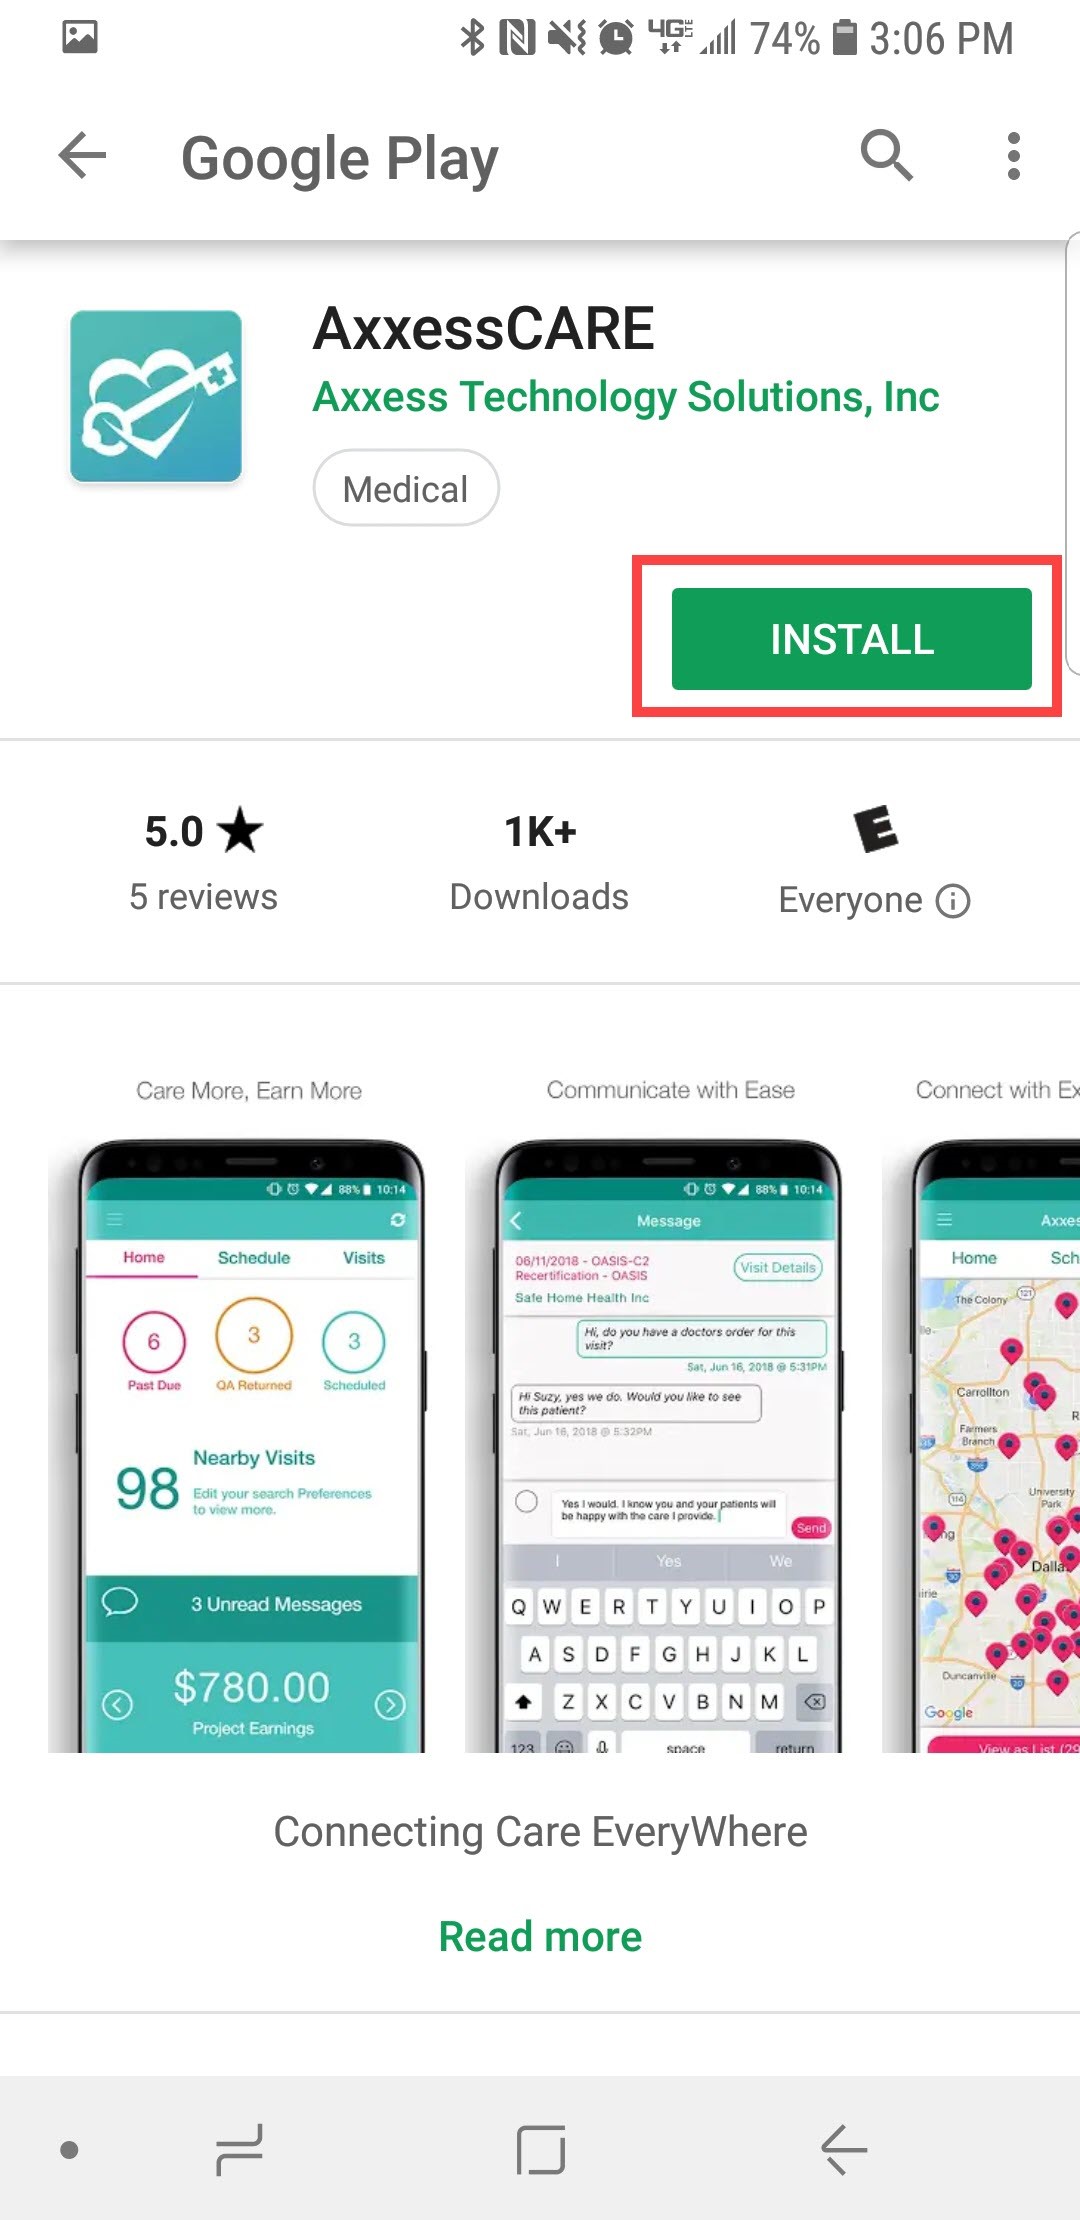
Go to the Google Play Store.
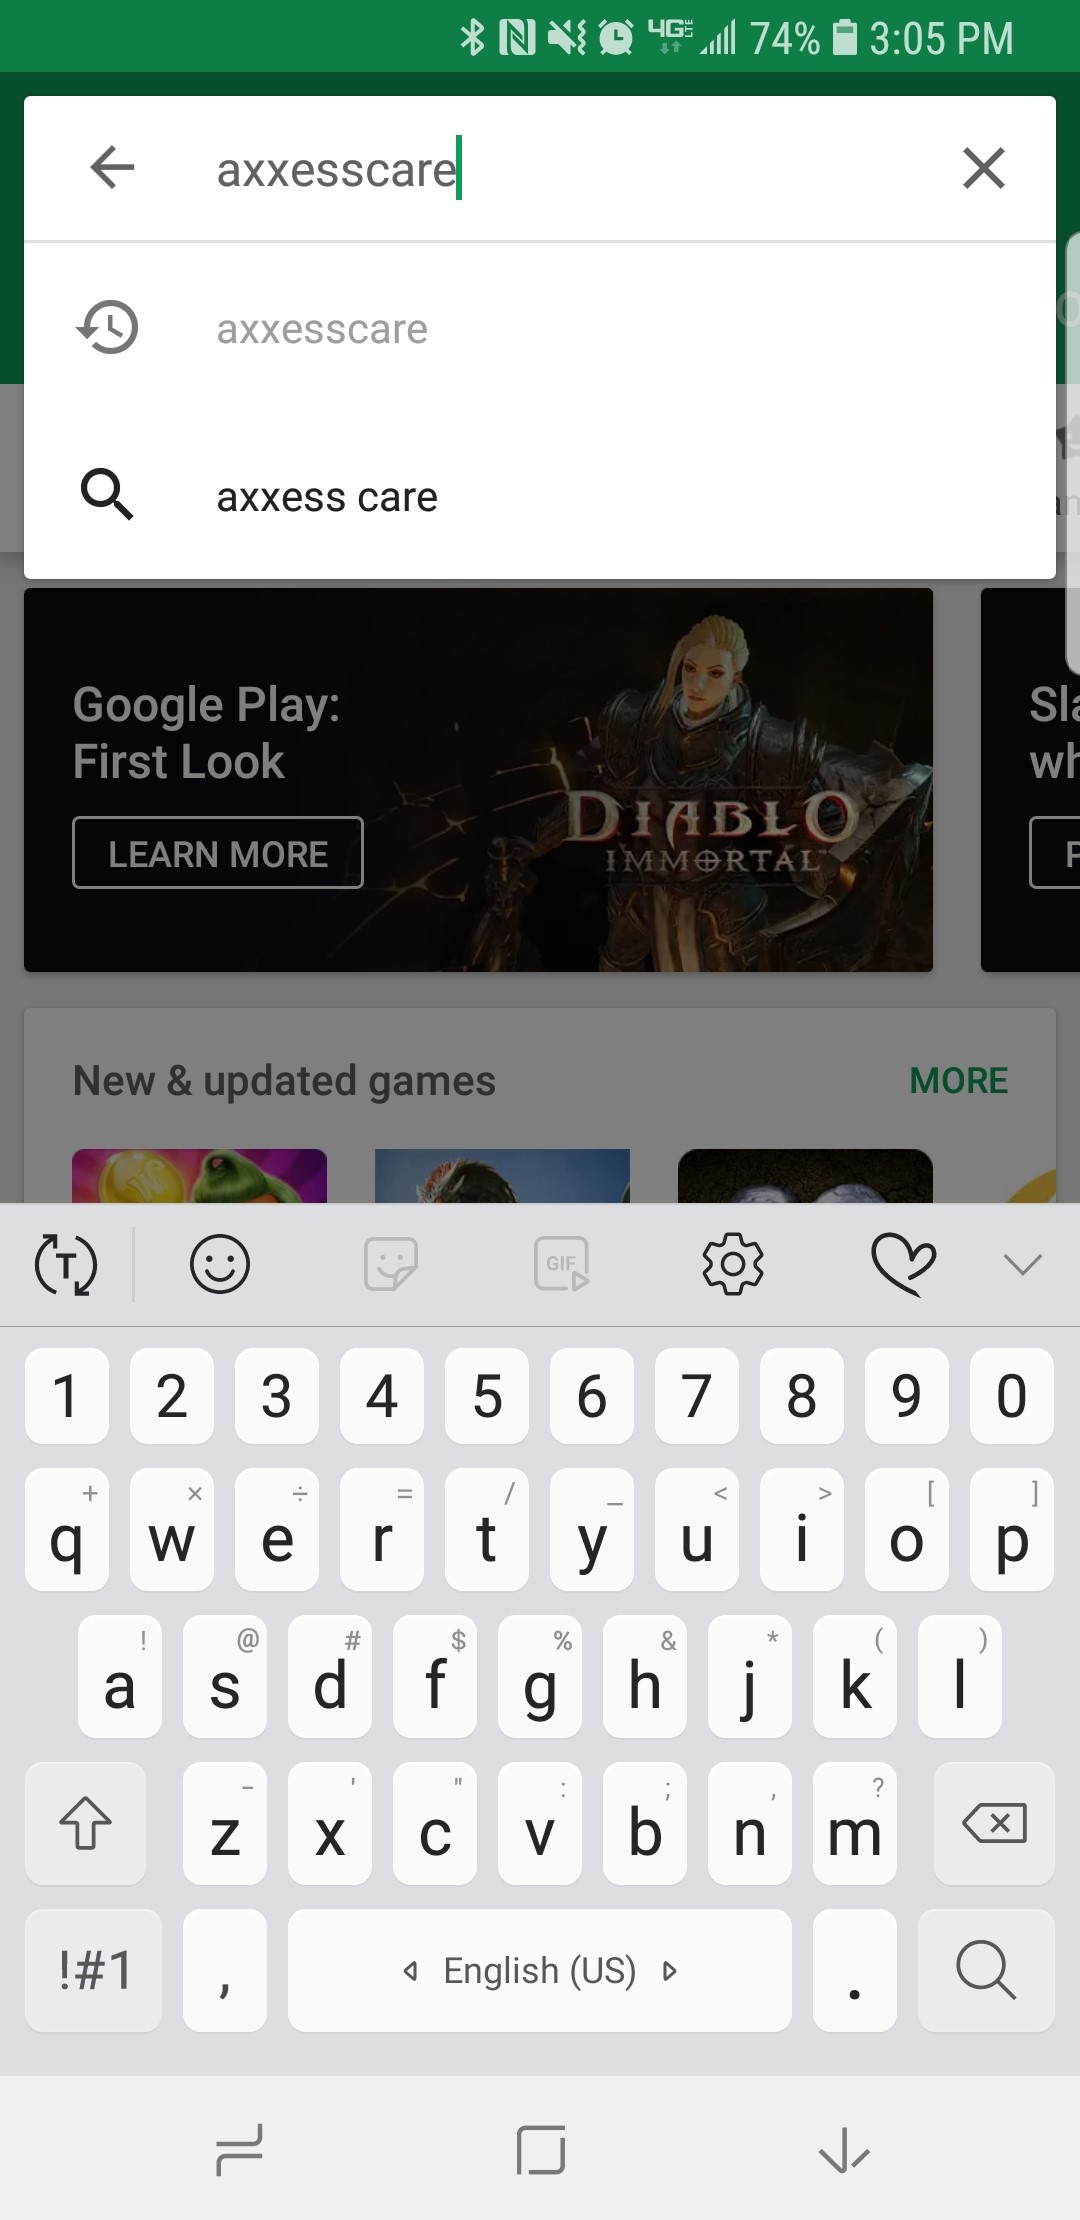
Tap on the search bar at the top of the page.
Search for “AxxessCARE.” The app is teal and has the Axxess logo (heart & key). Tap on the result.
Tap on “Install.”
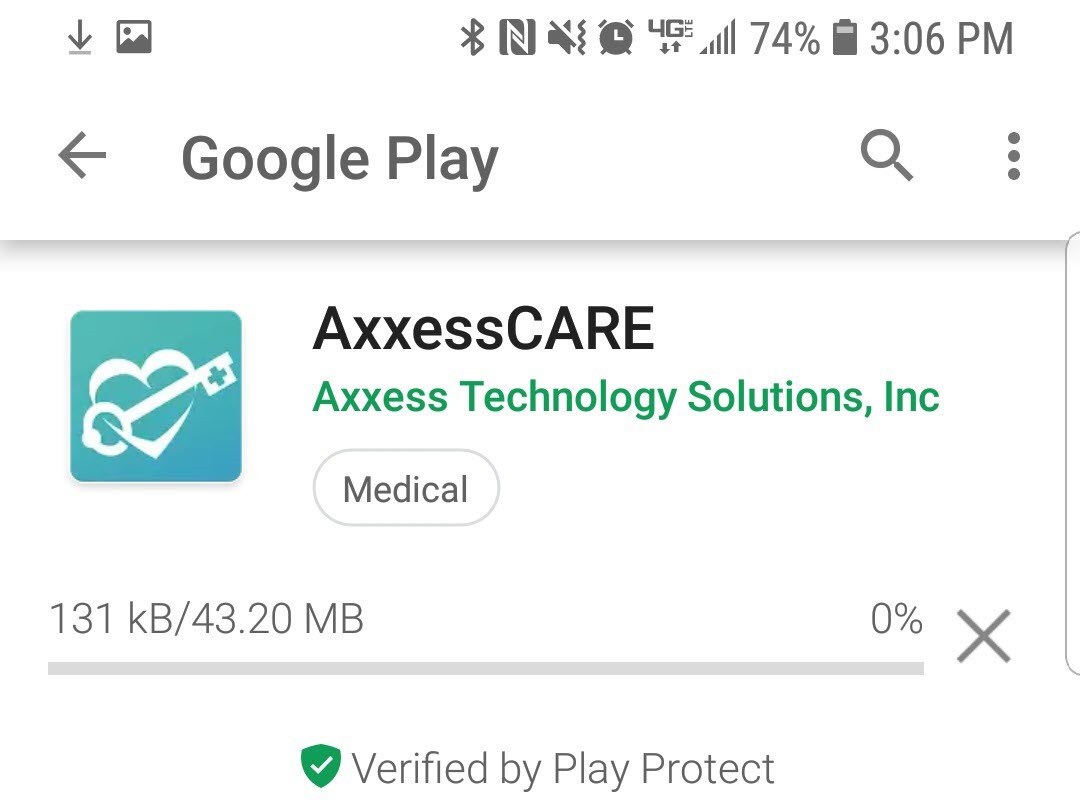
The app will begin downloading.
Once the download is complete there is an option to “UNINSTALL.” Tap on “OPEN.”
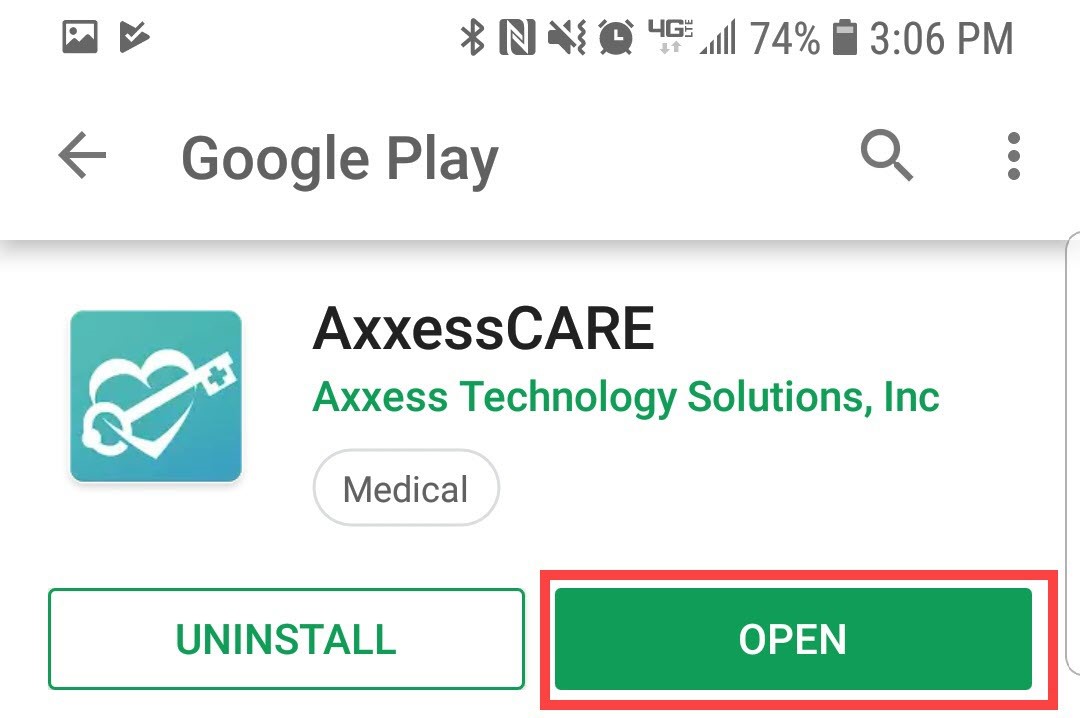
NOTE: The app will now be located with the rest of the apps. Always download the latest update from the Play Store for free.
“Allow” Axxess to make phone calls to be able to call patients from the device.

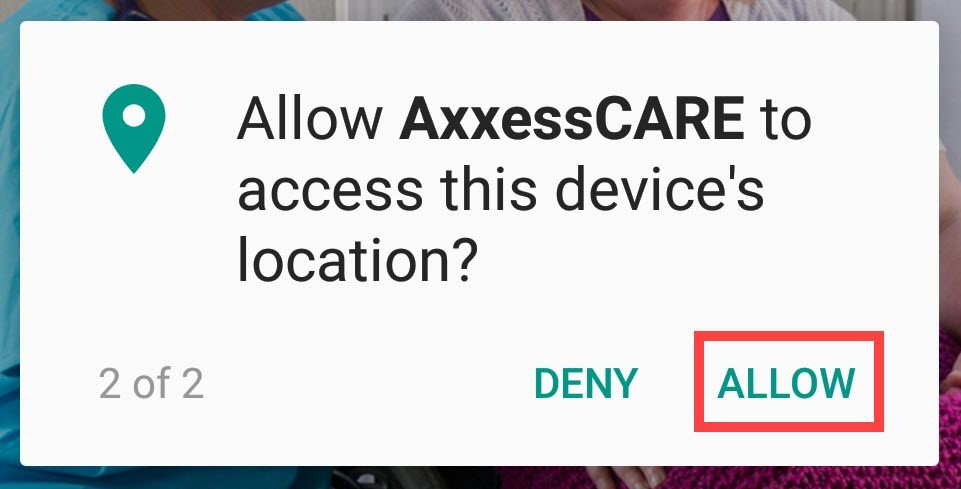
“Allow” Axxess to access the device’s location. Allowing this feature is critical for the app to be able to pinpoint locations accurately for Electronic Visit Verification (EVV), which will be covered later.
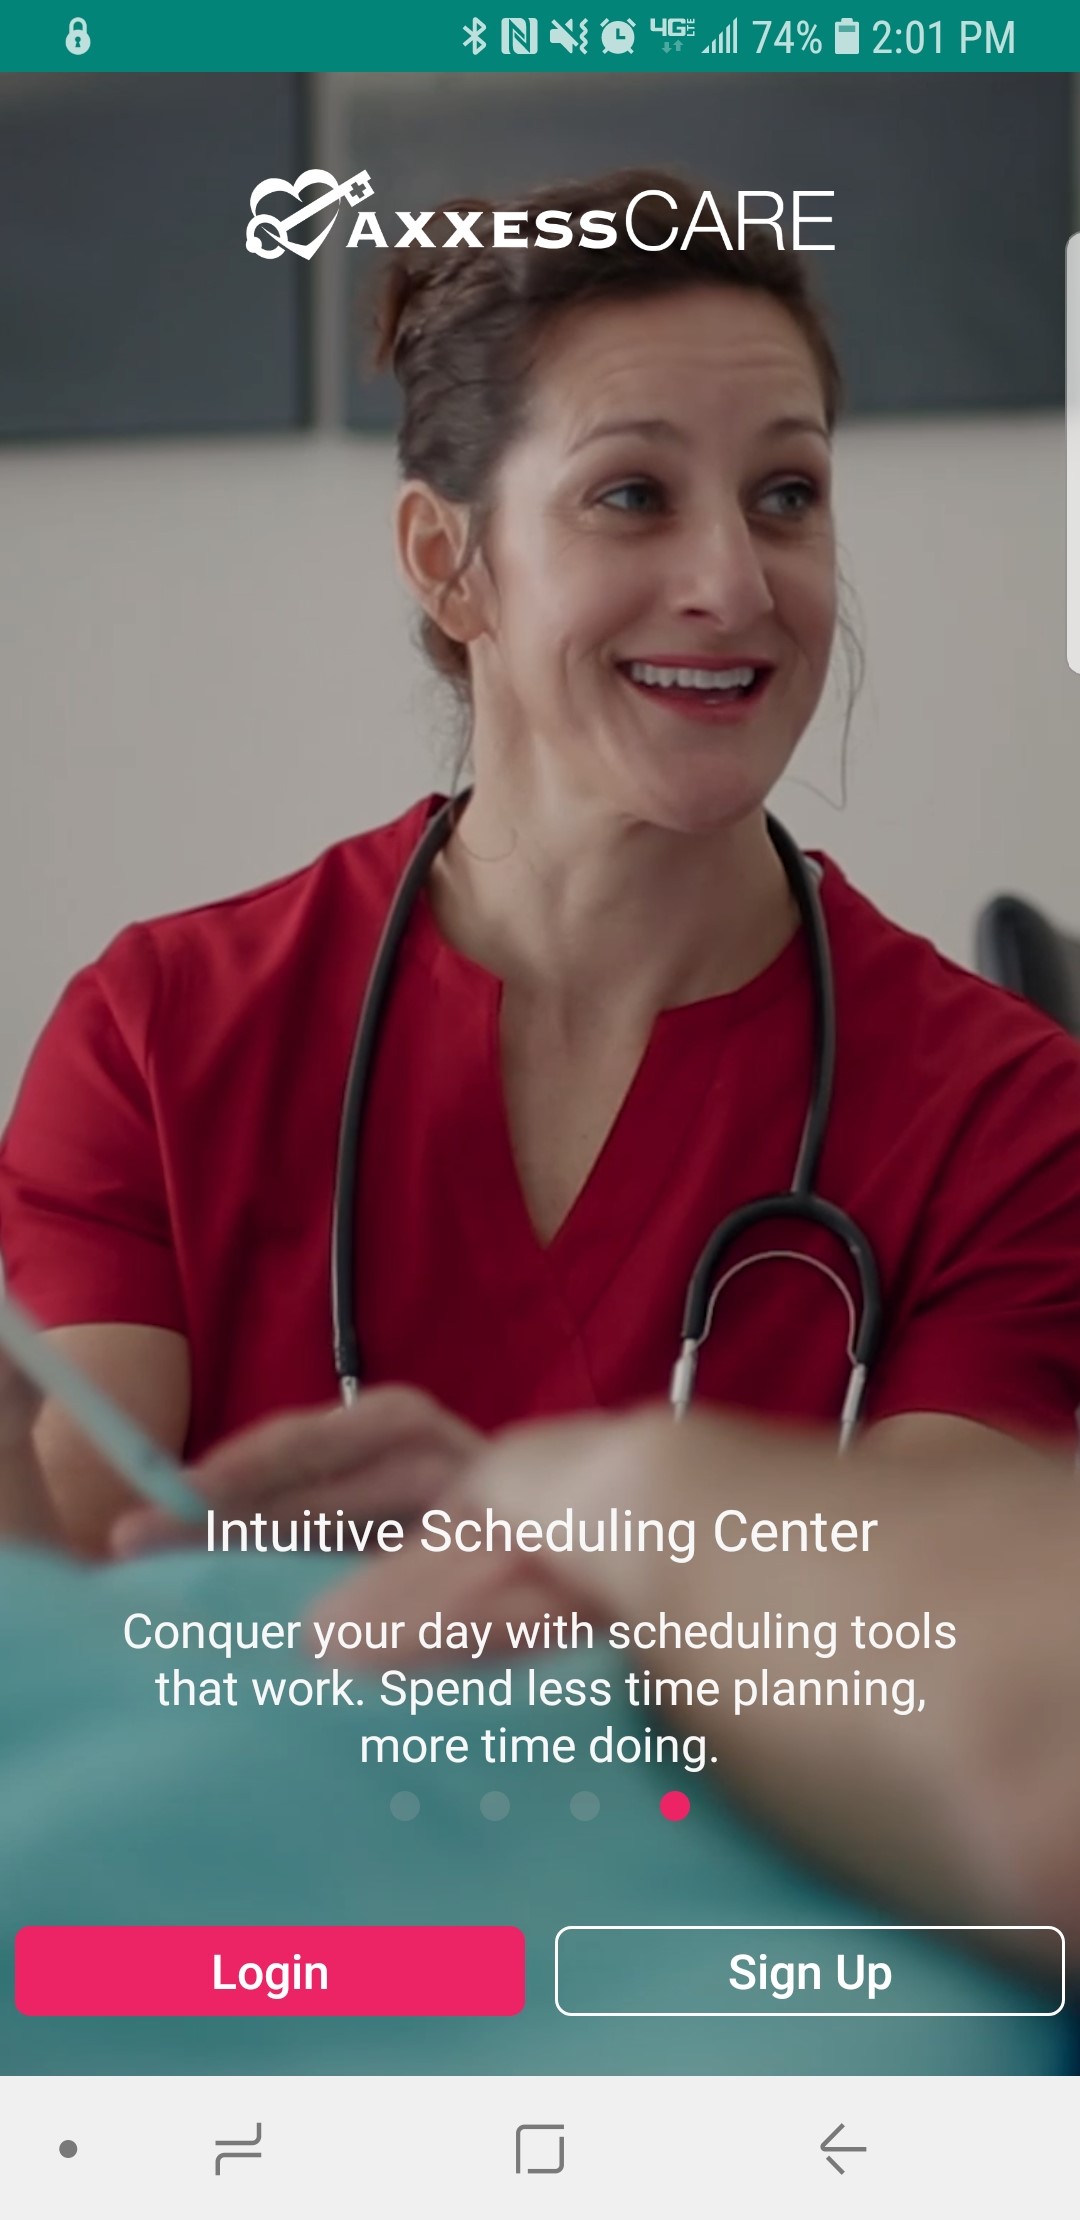
Tap on the pink “Login” button.
The following is the login screen. To utilize AxxessCARE, a clinician must sign up using an active Axxess account. Enter the email that was provided to the organization and the password that was established while logging into the desktop version of AgencyCore. If the user does not have an account, tap on the pink “Sign up” hyperlink. If the password was forgotten, then tap the “Need Help?” hyperlink. The version number of the app will be listed at the bottom. After the email and password are entered, tap on “Log In.”
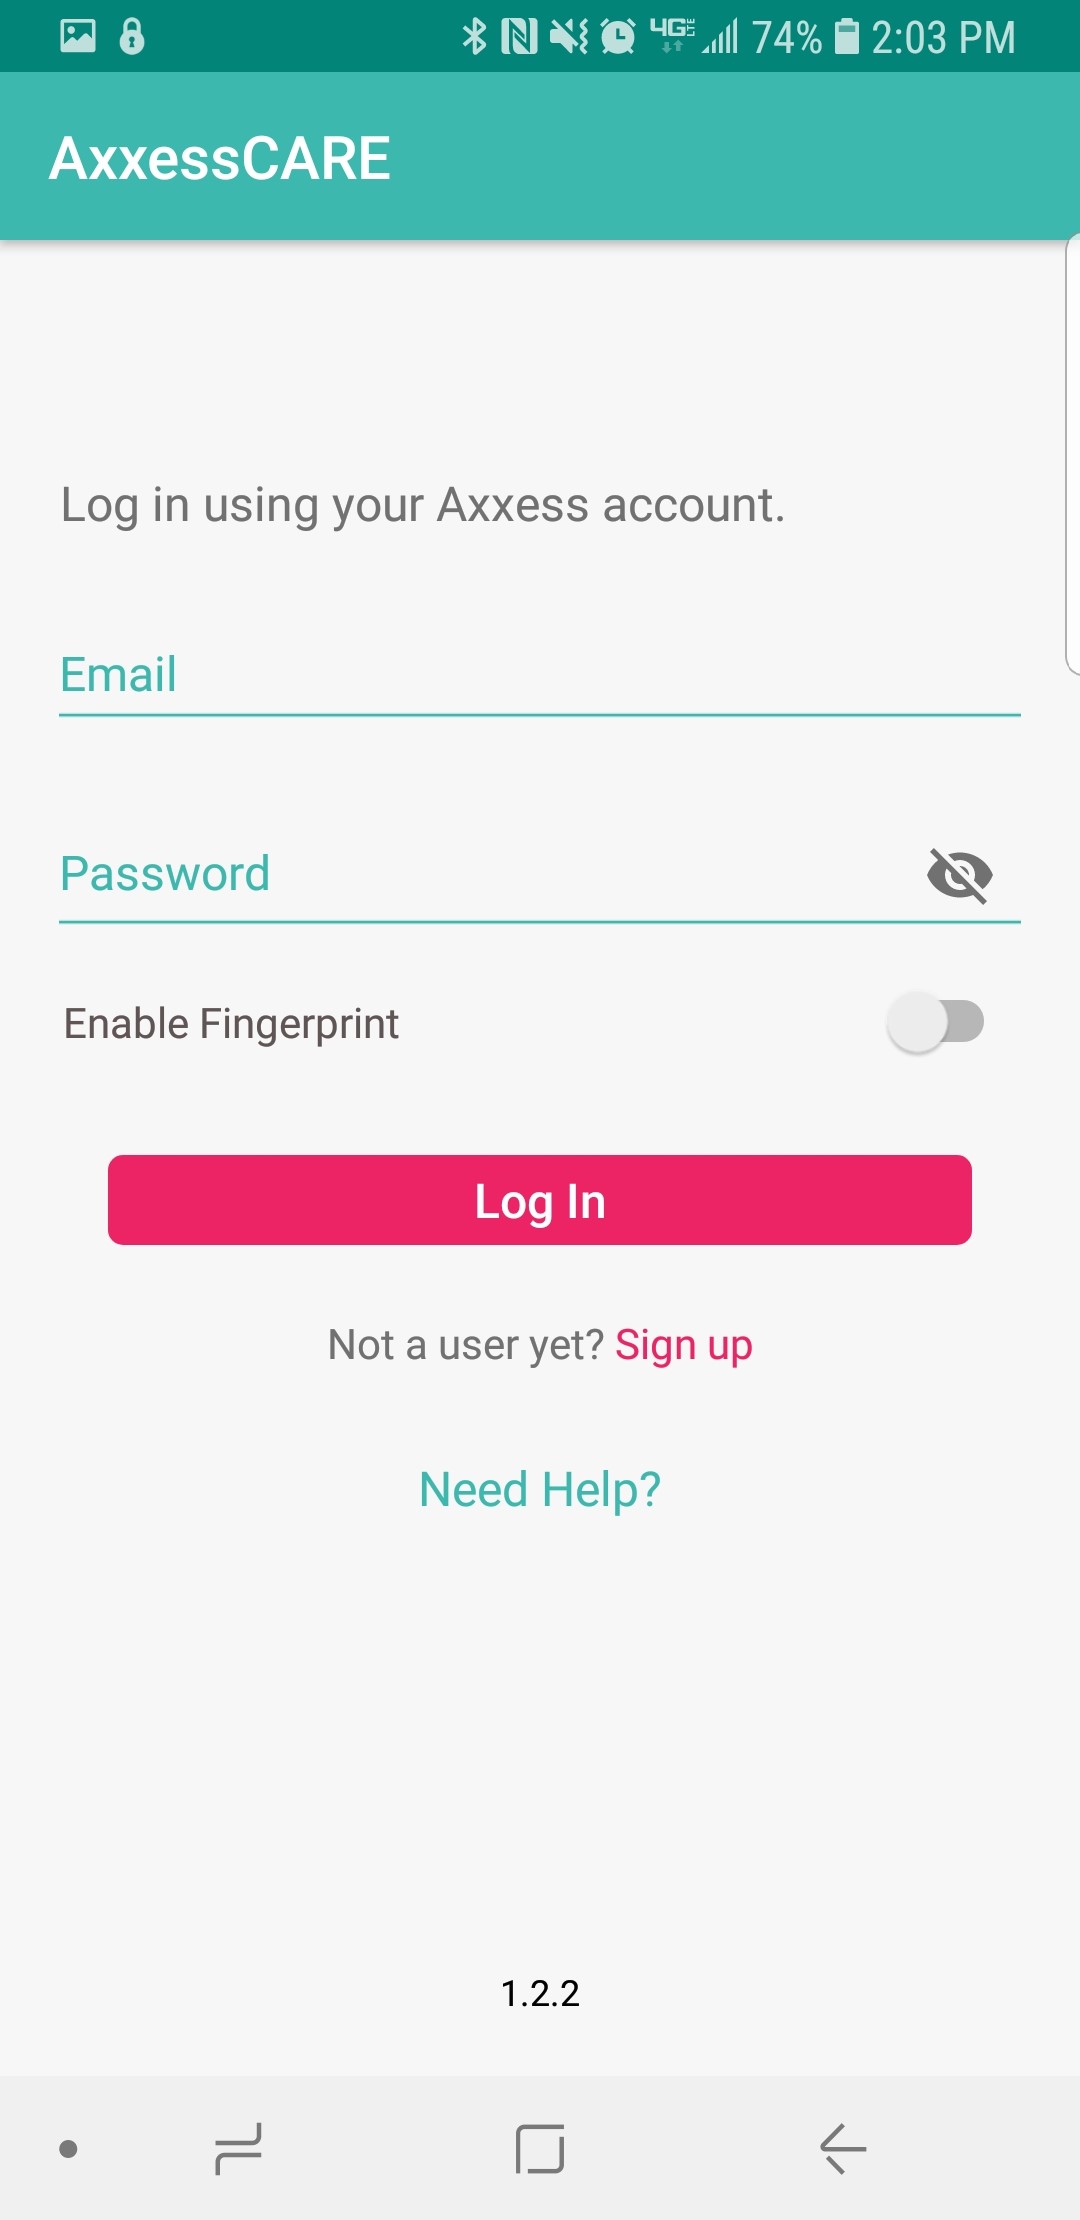
NOTE: Depending on the Android version or device type, users can use their fingerprint to log in by moving the “Enable Fingerprint” slider.
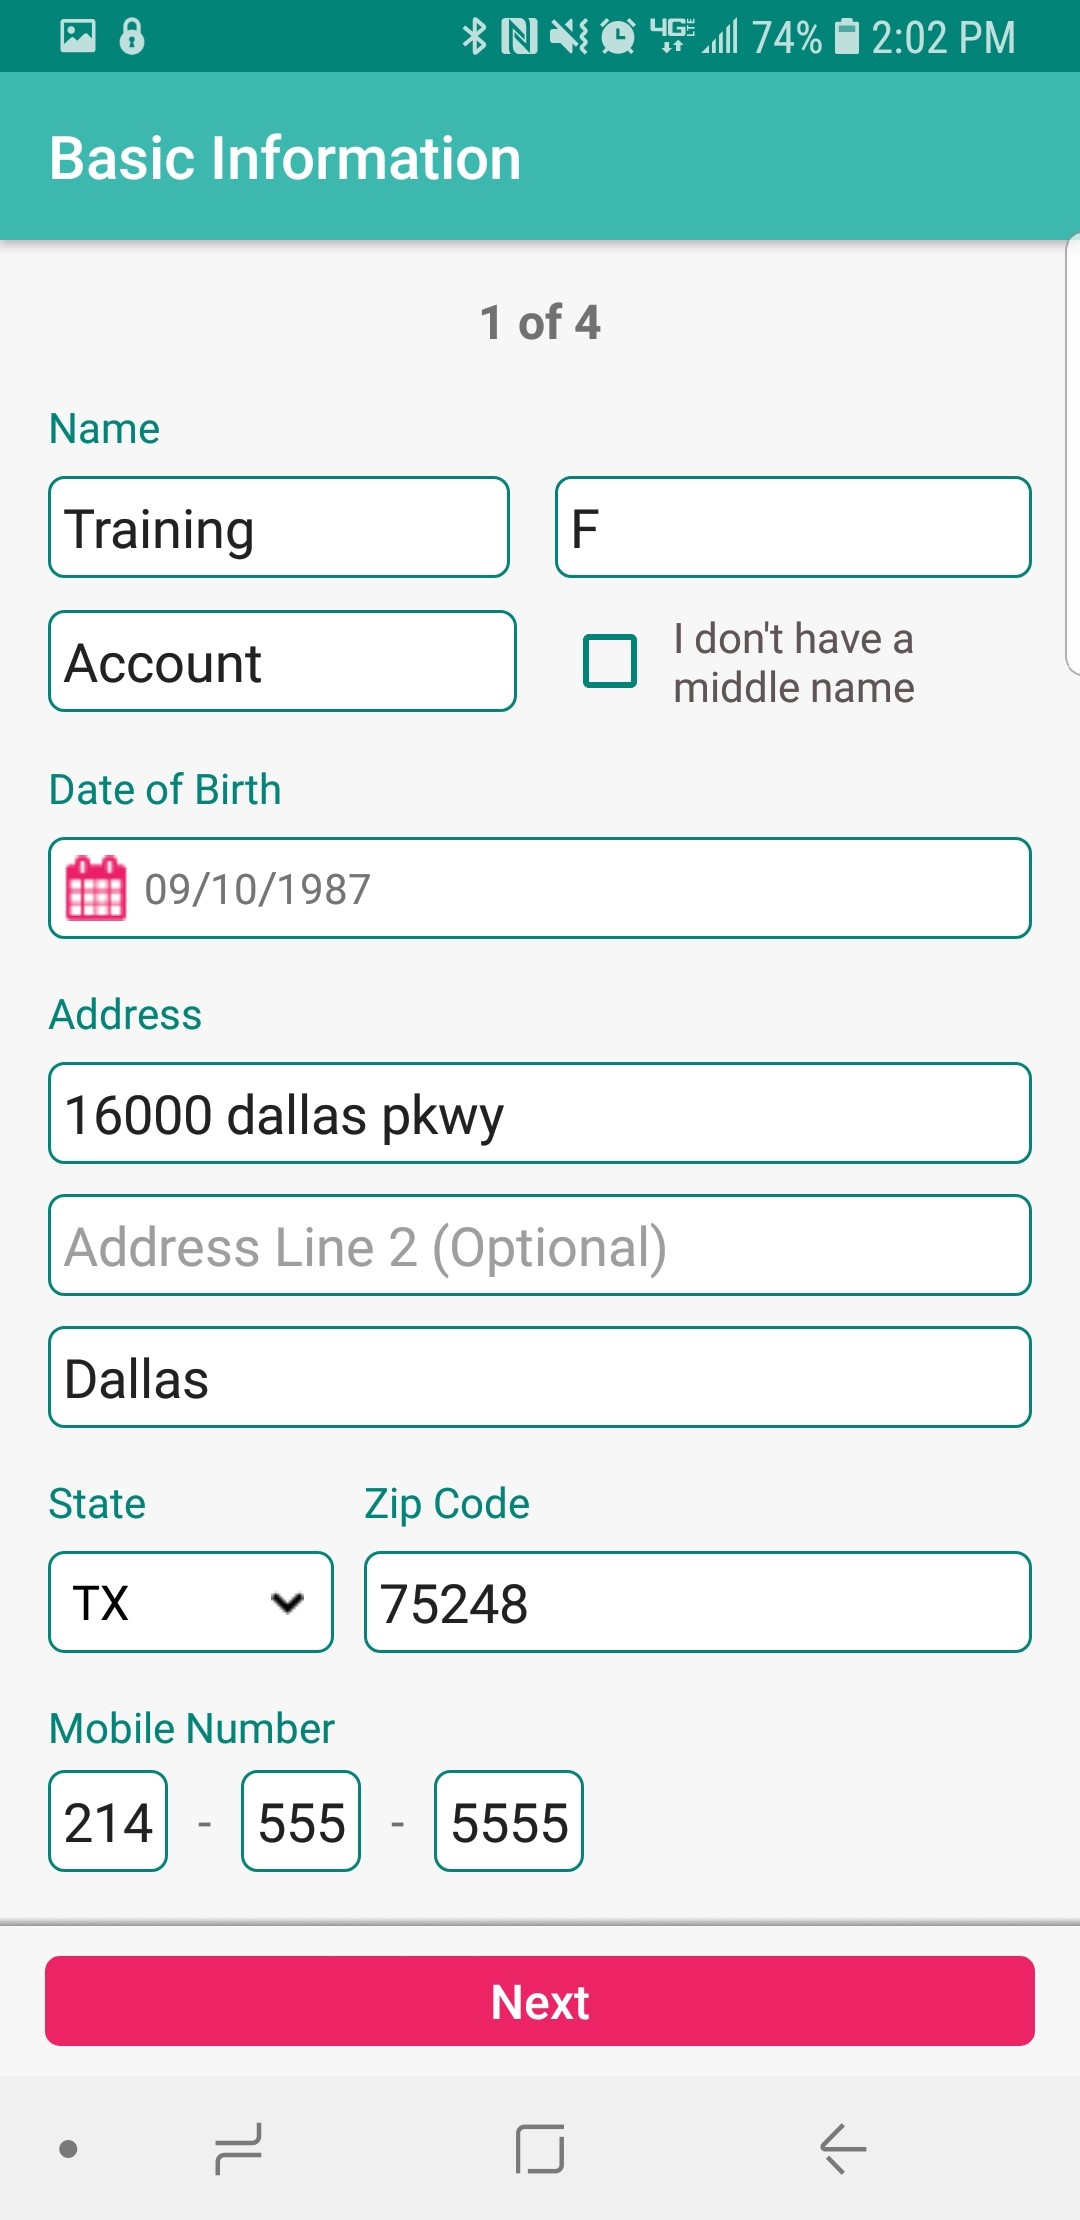
Setting up a new account is done in three steps:
After entering Basic Information, the Nearby Opportunities screen will display showing what visits are available in the area. The day, date and type of visit is listed. Below that is the organization the patient belongs to. Below that is the Pay Rate and how far the visit is based on the device’s GPS. Tap on “Continue” to finish the sign-up process.
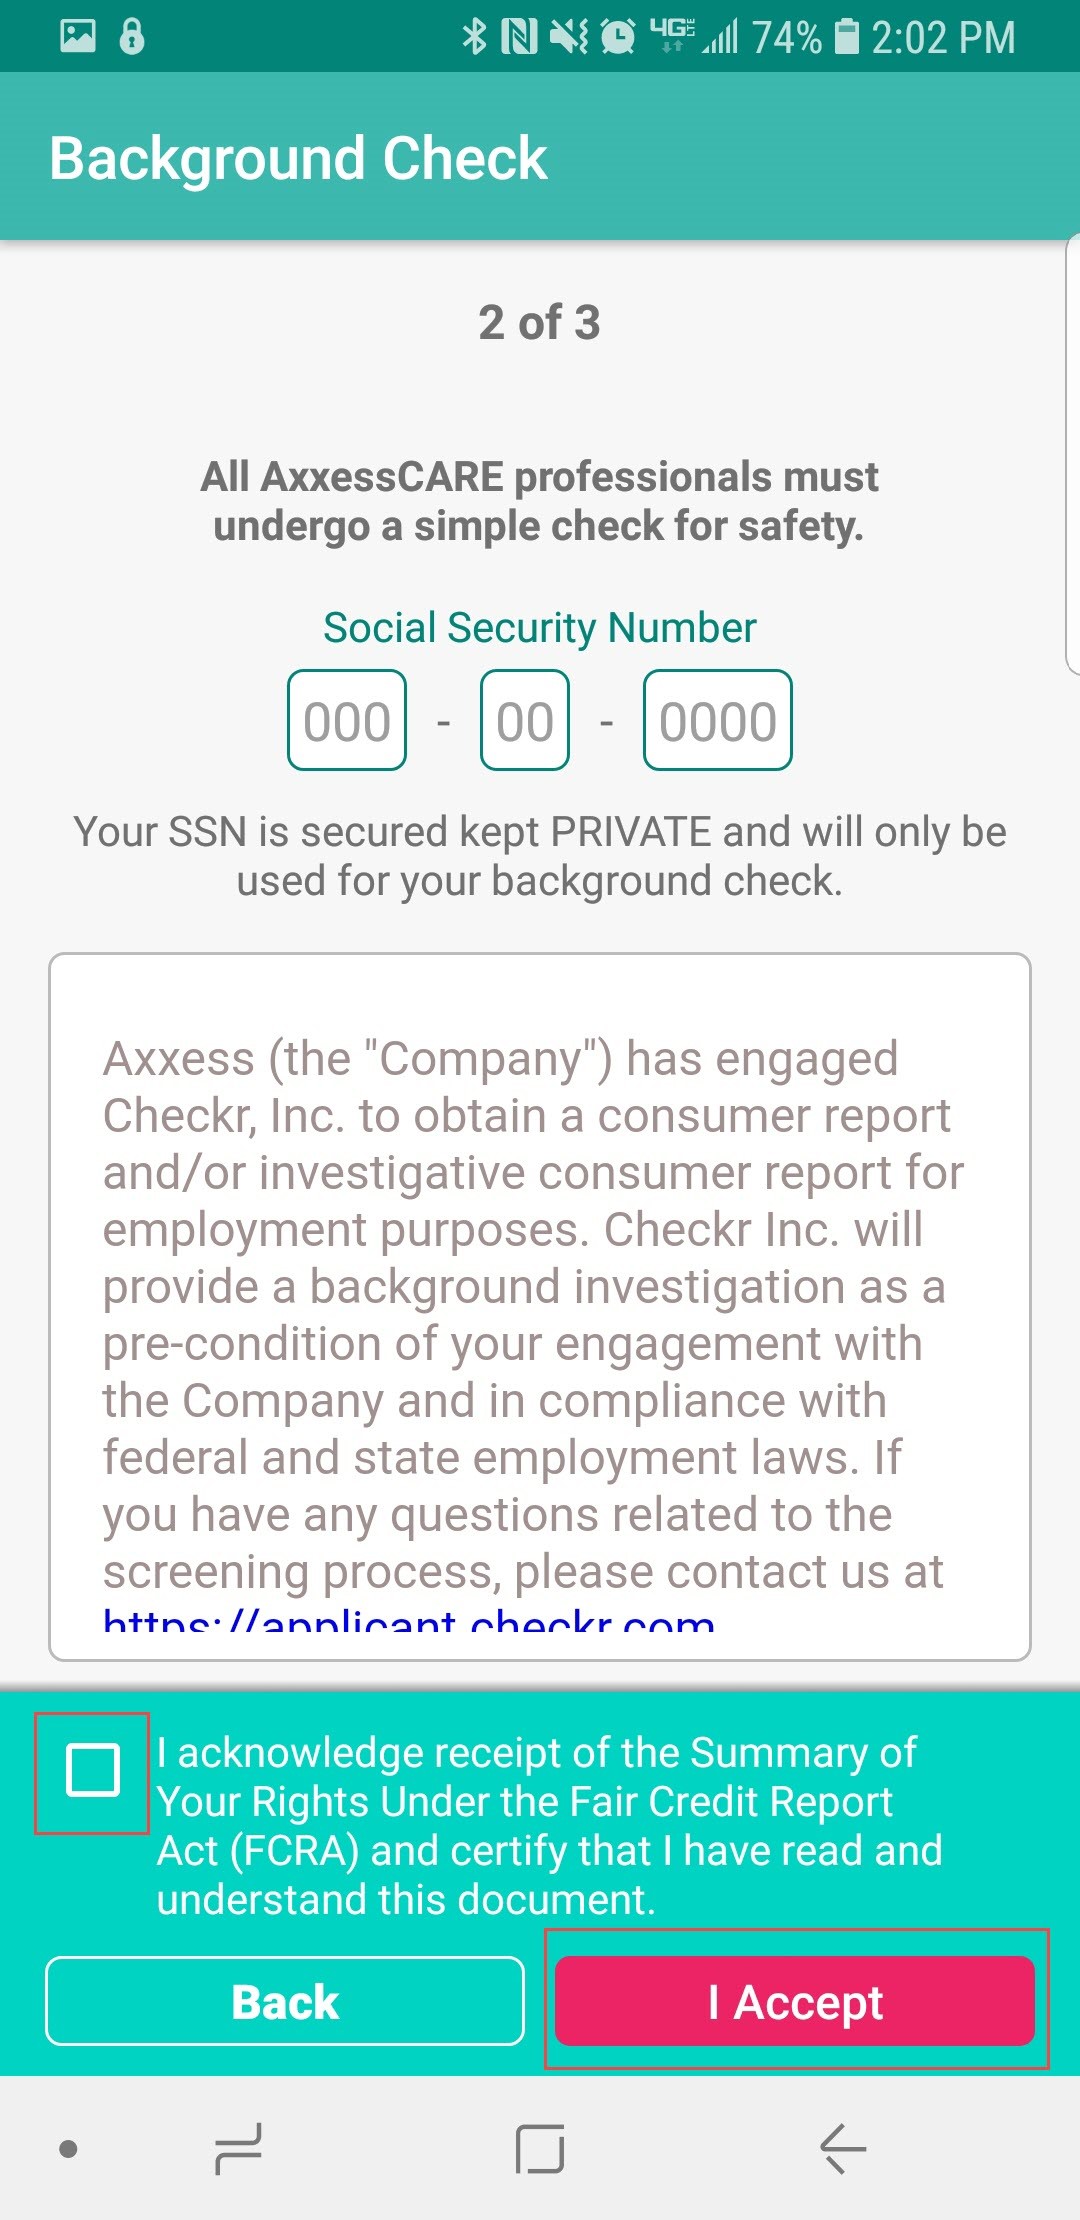
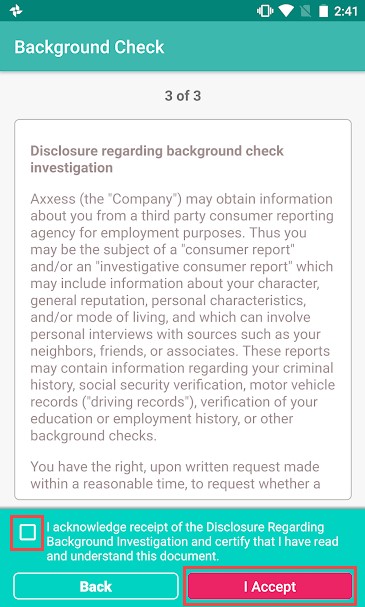
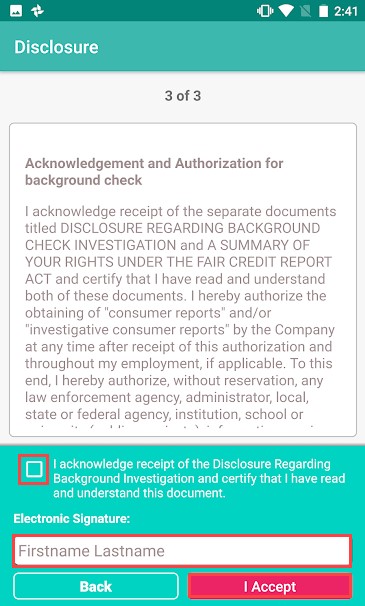
Then another Background Check screen will show more information. Tap the Fair Credit Report Act (FCRA) acknowledgment receipt checkbox, then tap “I Accept.”
NOTE: The Electronic Signature must match the first and last name chosen during step 1 of the sign-up process.
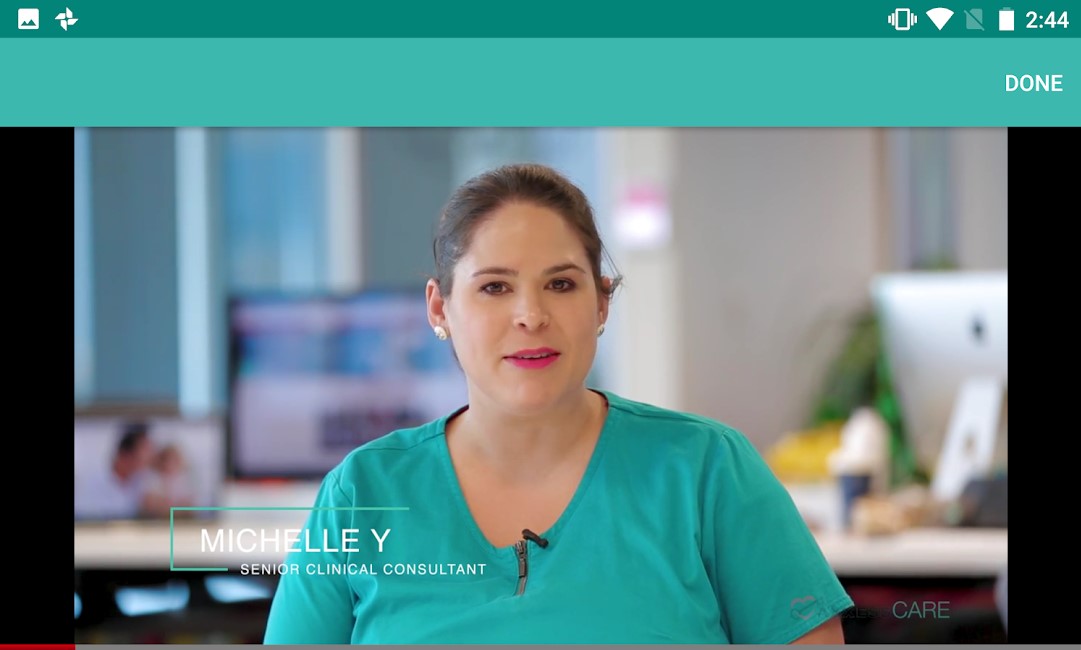
A video will show about the AxxessCARE product. Tap on “Done” in the top right to skip/continue.
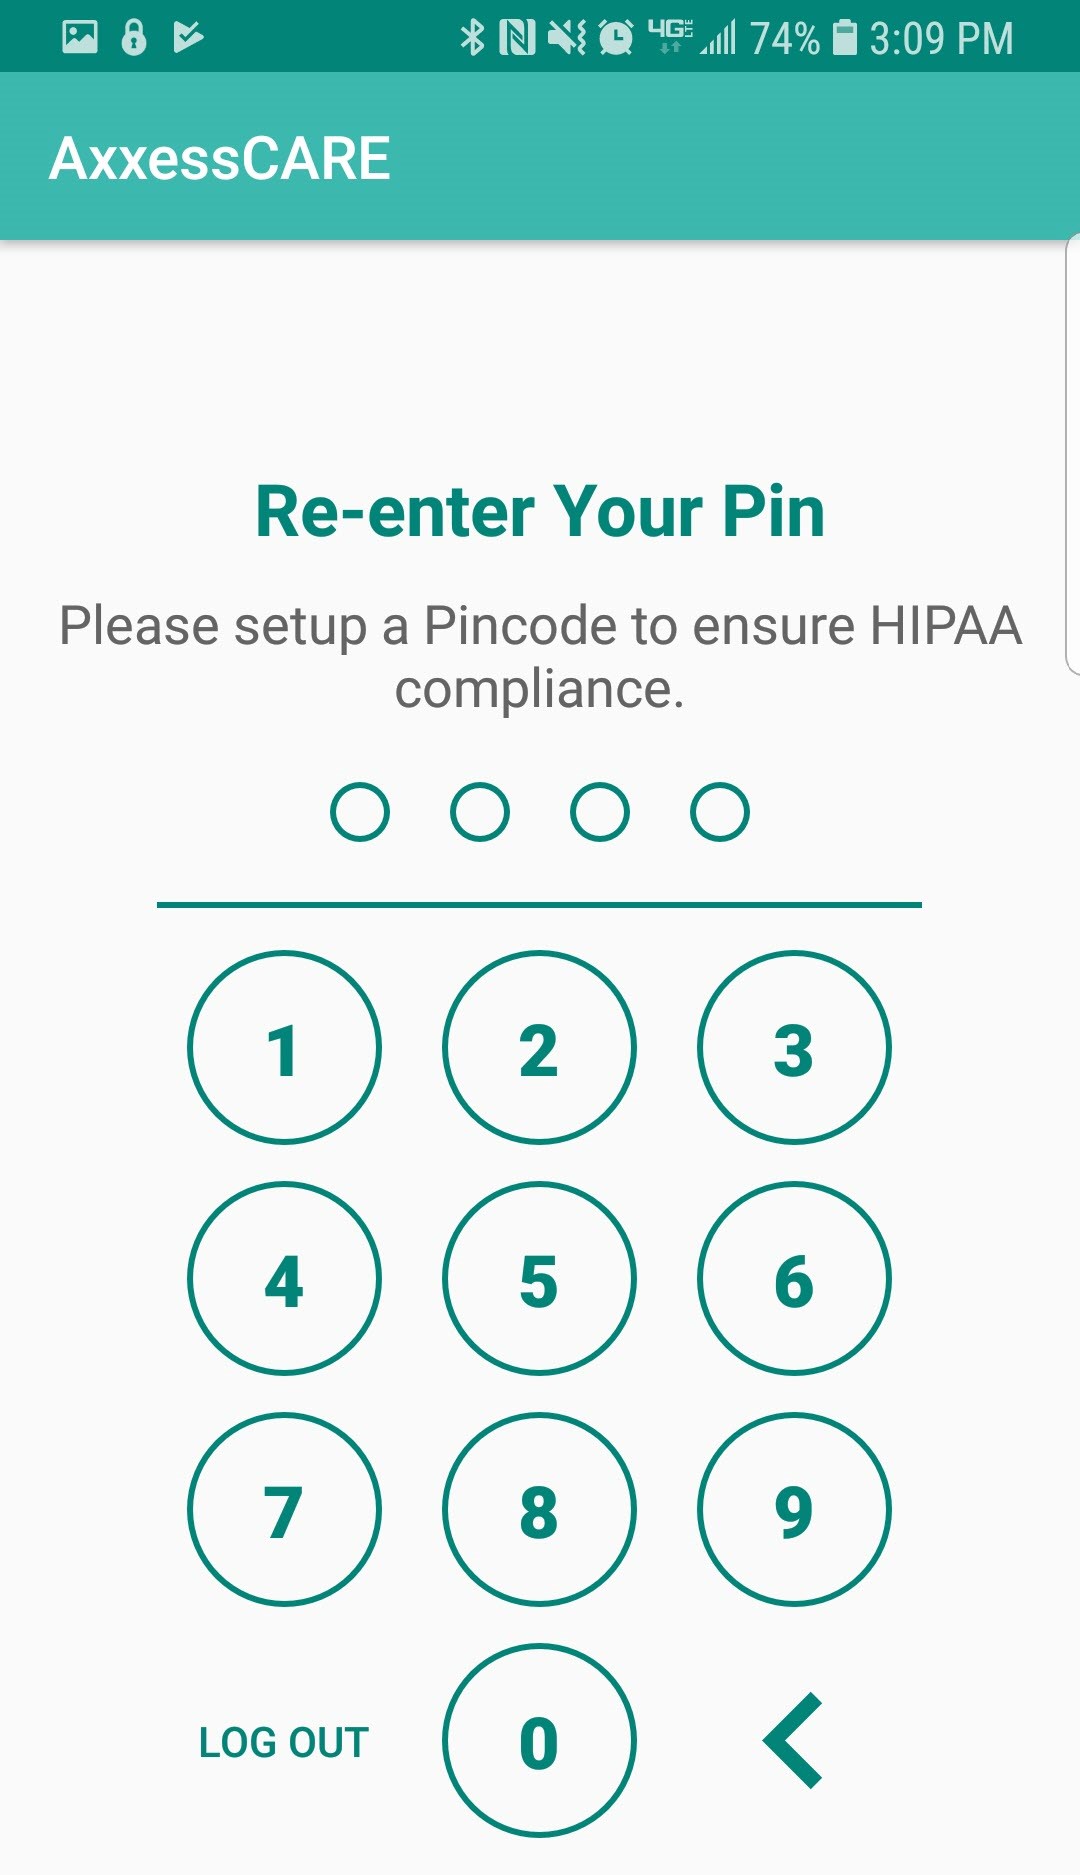
After completing setting up a New Account, the following prompt will ask the user to enter a 4 digit PIN code:
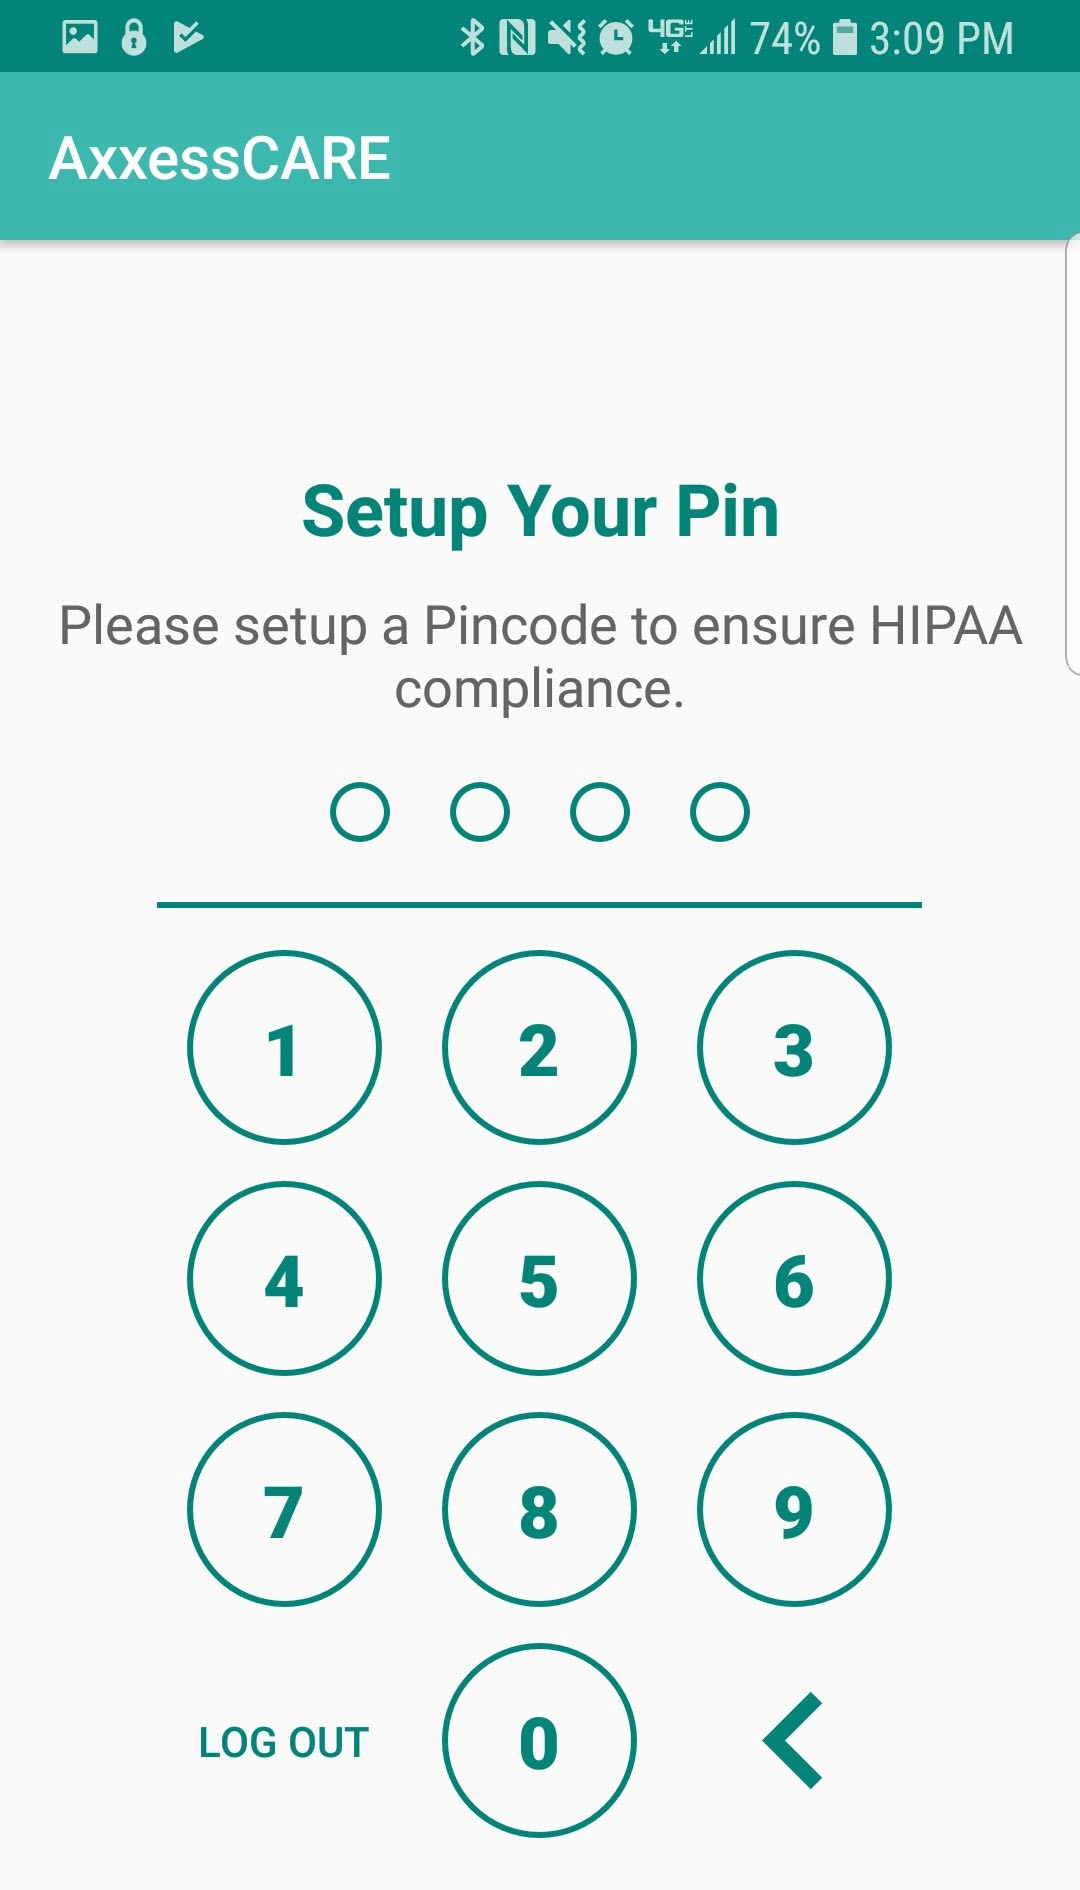
Once a 4-digit passcode has been entered, confirm the passcode by entering it one more time. Any time users leave the app and come back or the app times out due to inactivity, the passcode must be reentered.
NOTE: After five incorrect attempts, the user will be prompted to log back into the app and create a new pin.
If a new user is being created, the profile set up is still not finished. The following window will show instructing that the user “must review and sign vaccination forms before applying for visits.” Tap on “COMPLETE NOW” to go to the User Profile and complete the sign up (profile covered below).
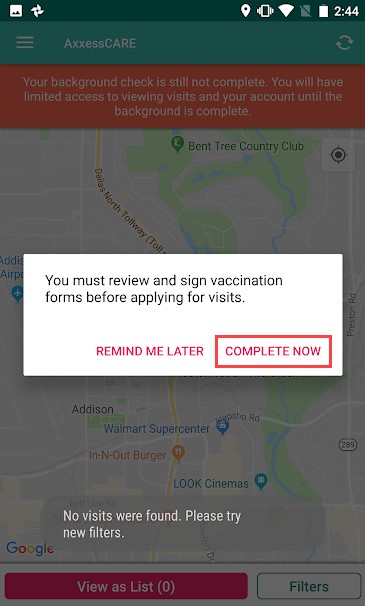
Trying to view visits will display the following orange warning until the background check is complete.


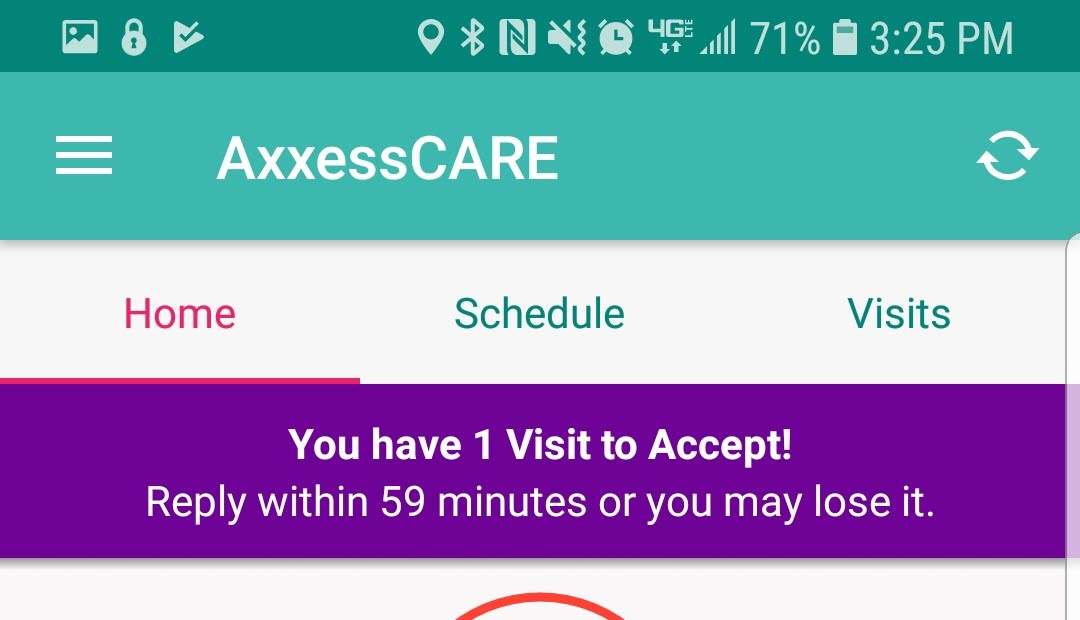
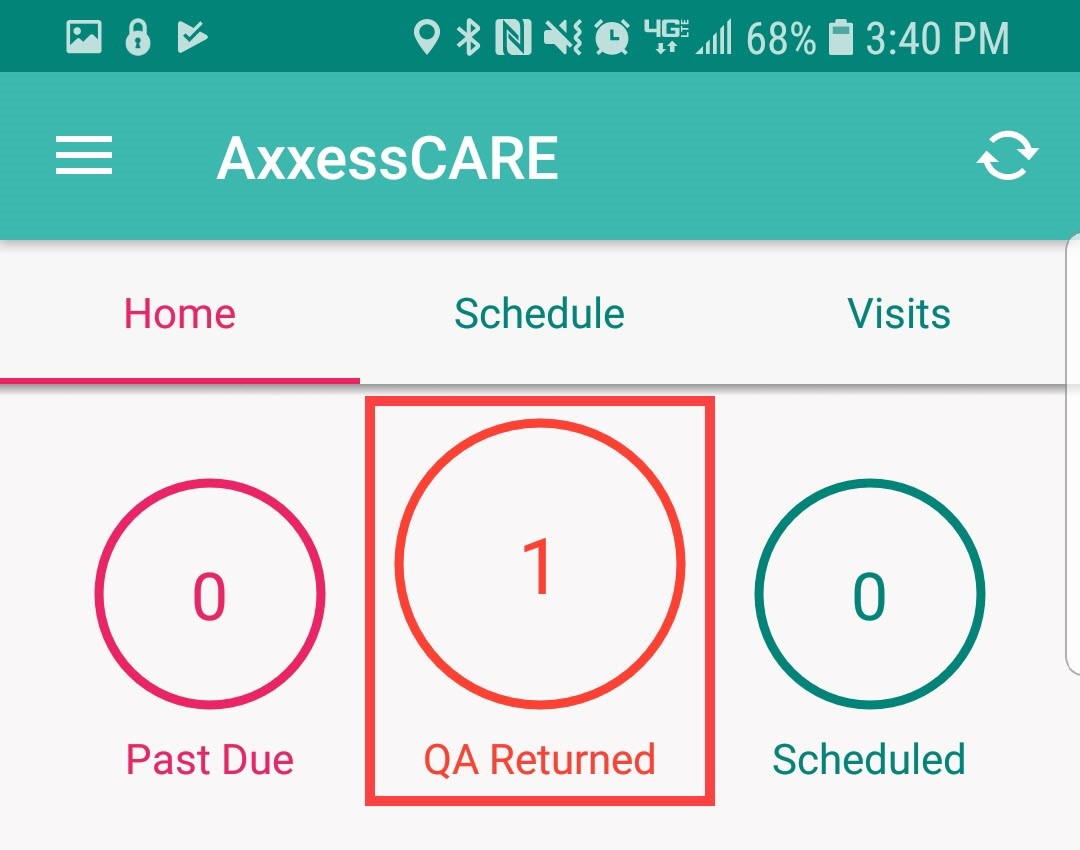
The following is the AxxessCARE Home screen. It’s split in between three tabs; Home, Schedule and Visits. The section being viewed will be highlighted in pink at the bottom of the tab. To refresh the screen, tap the refresh ![]() icon. See any visits that are Past Due, QA Returned and/or Scheduled (more details later). Below that shows how many visits are currently available in the area.
icon. See any visits that are Past Due, QA Returned and/or Scheduled (more details later). Below that shows how many visits are currently available in the area.
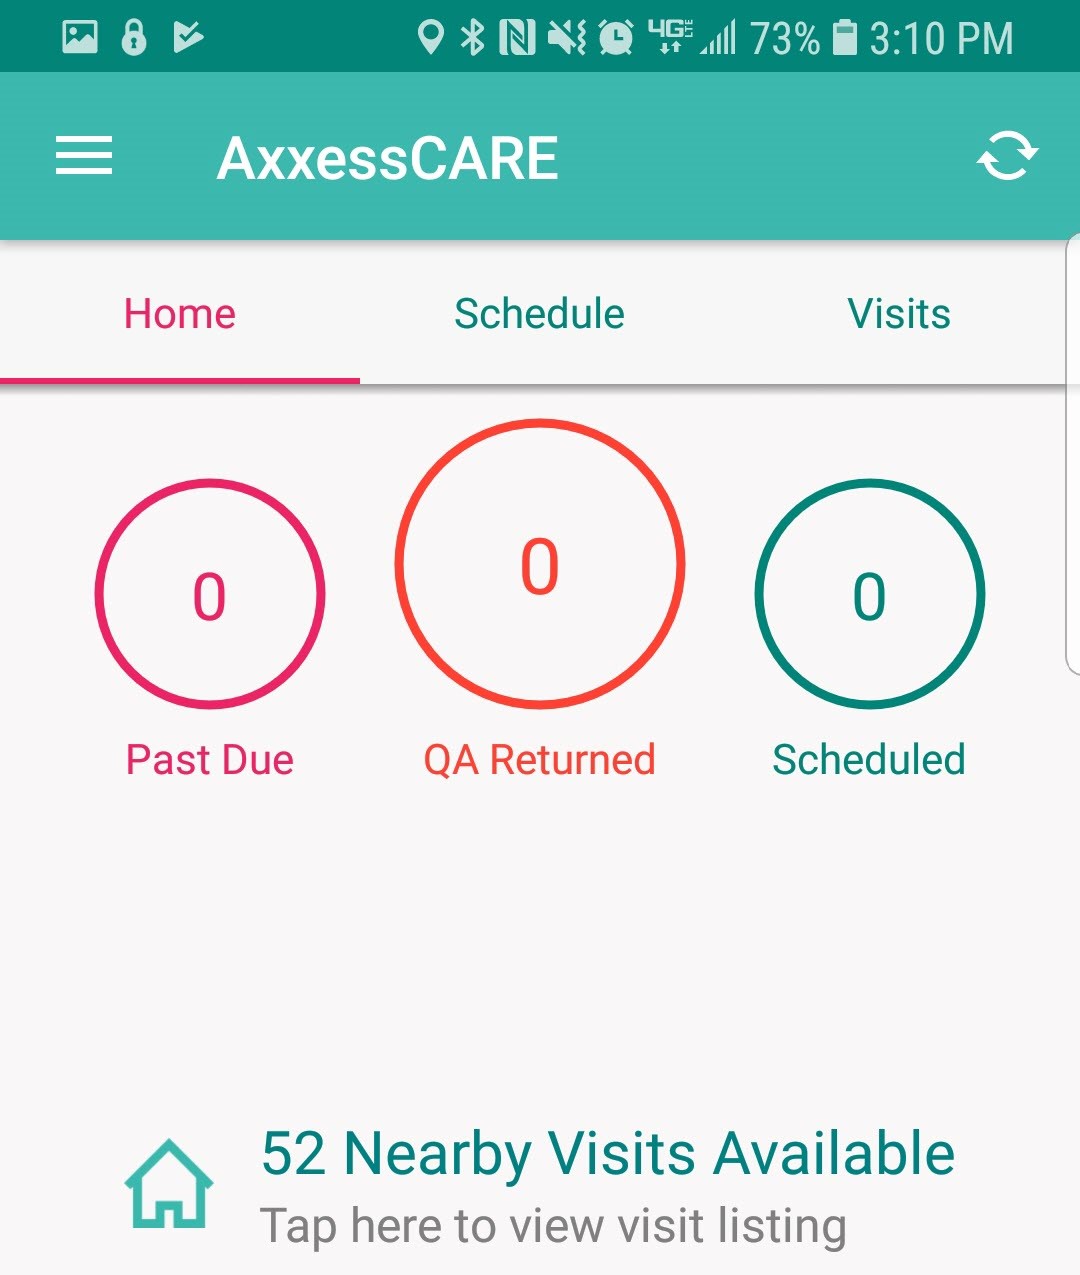
Below that any Unread Messages an organization sends will show in the counter. The bottom portion shows seven, colorful links that can be seen by swiping left:

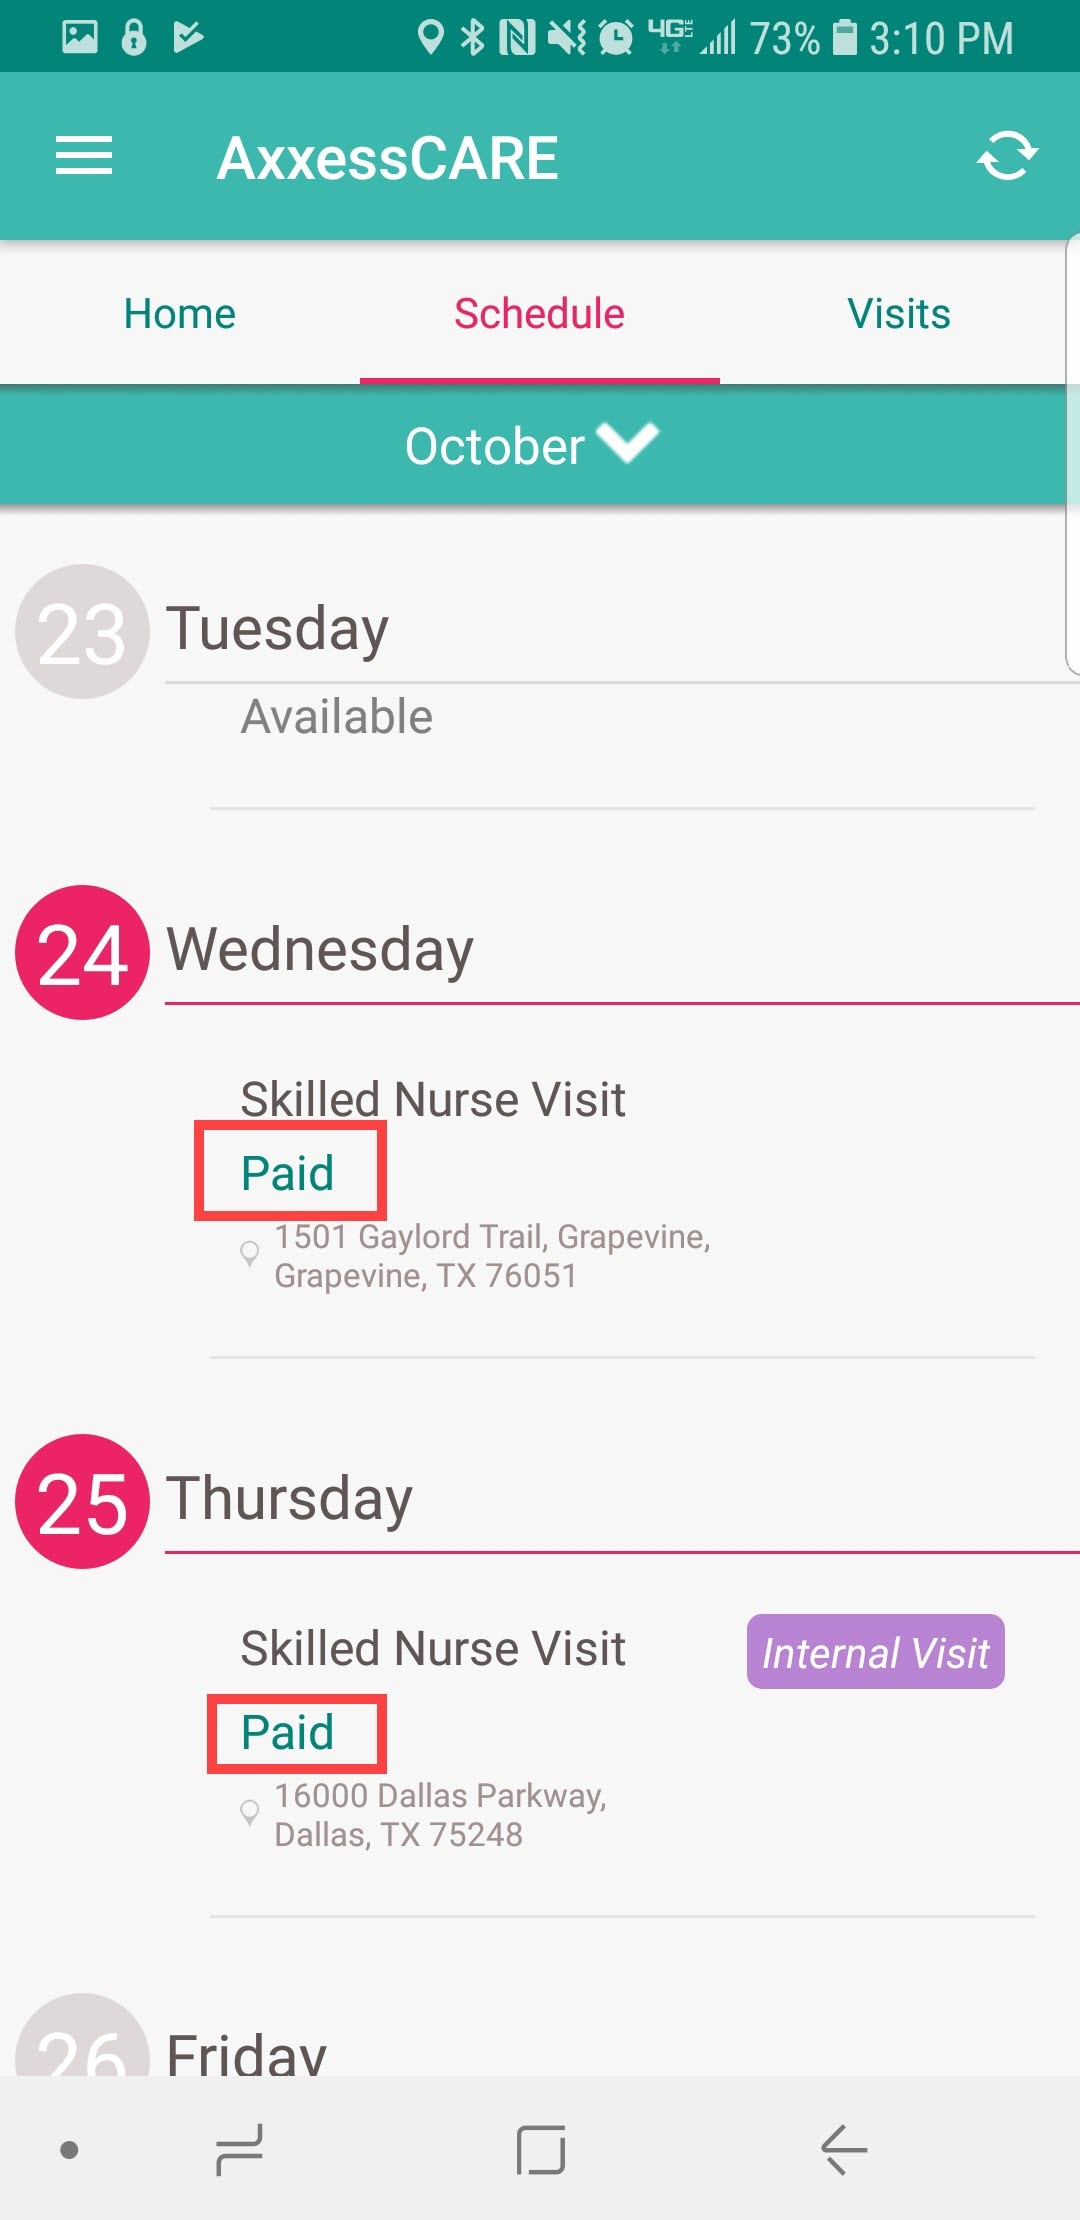
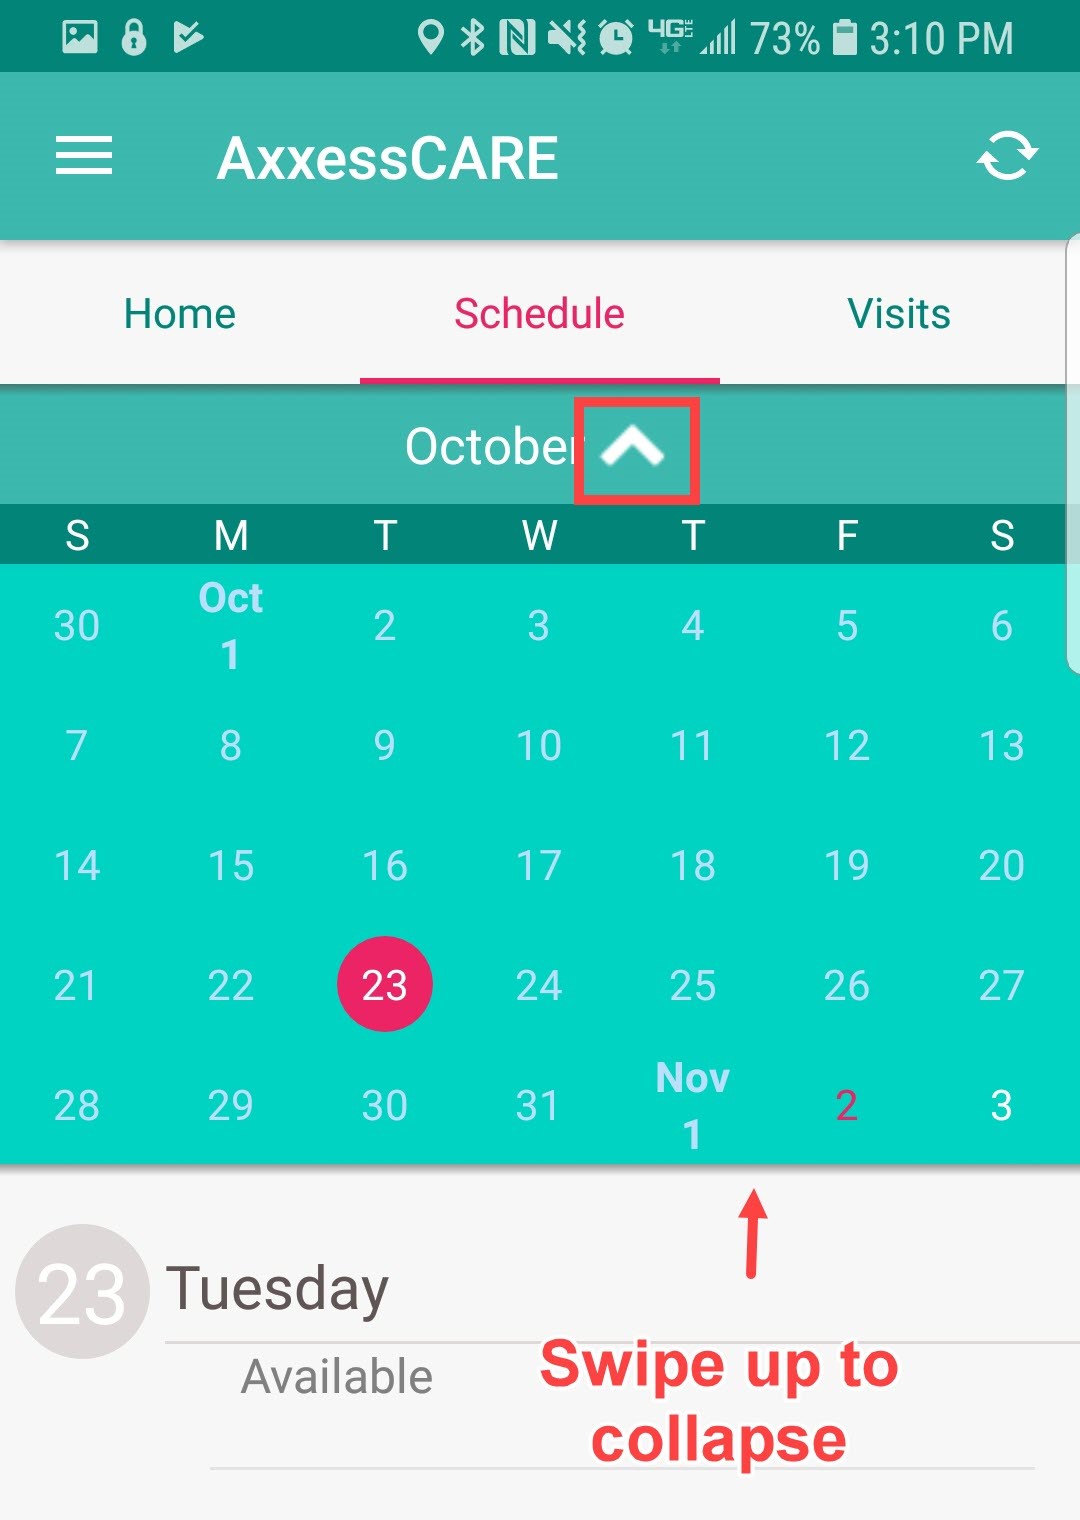
The following is the Schedule tab. It shows a rolling calendar of past and upcoming days. If there is a visit on a day, the date number on the left will be pink. Tap on the month with the drop-down arrow.
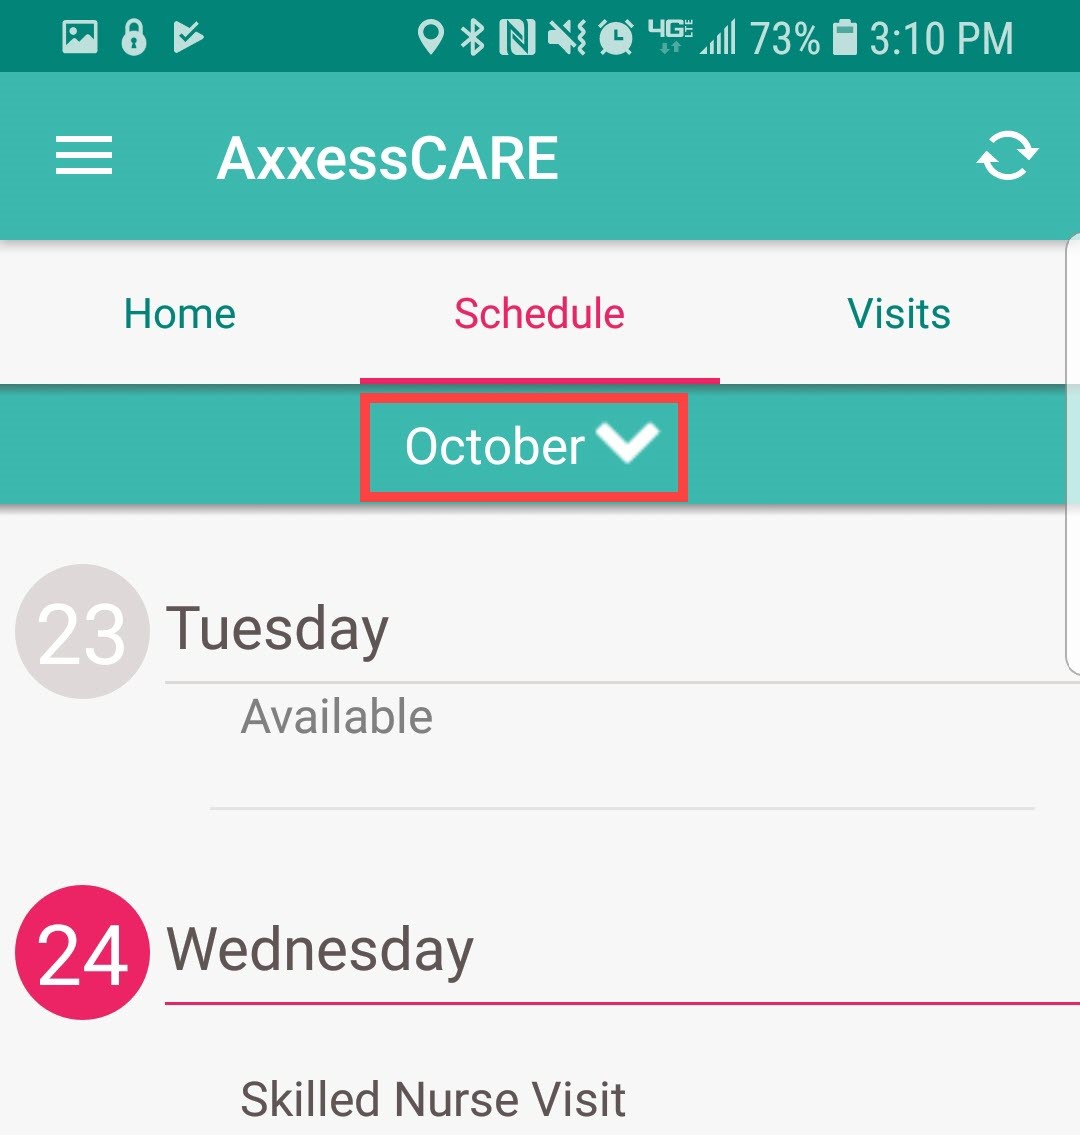
This will show the calendar in a monthly view. The number of the current day will be in pink text. To collapse the monthly view, either tap on the upward facing arrow or swipe up on the list calendar.
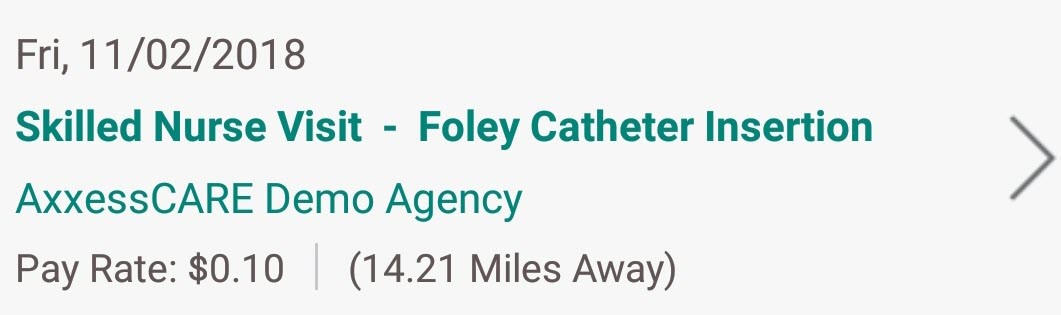
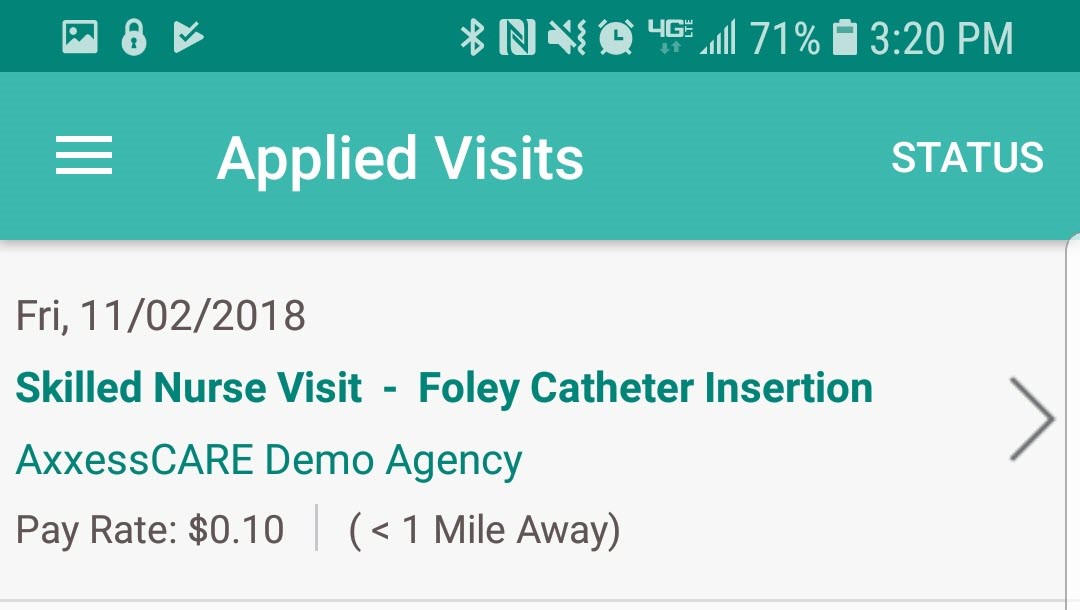
The third tab shows available visits for the application. It lists the day, date, type of visit, organization, pay rate and how far away the visit is.
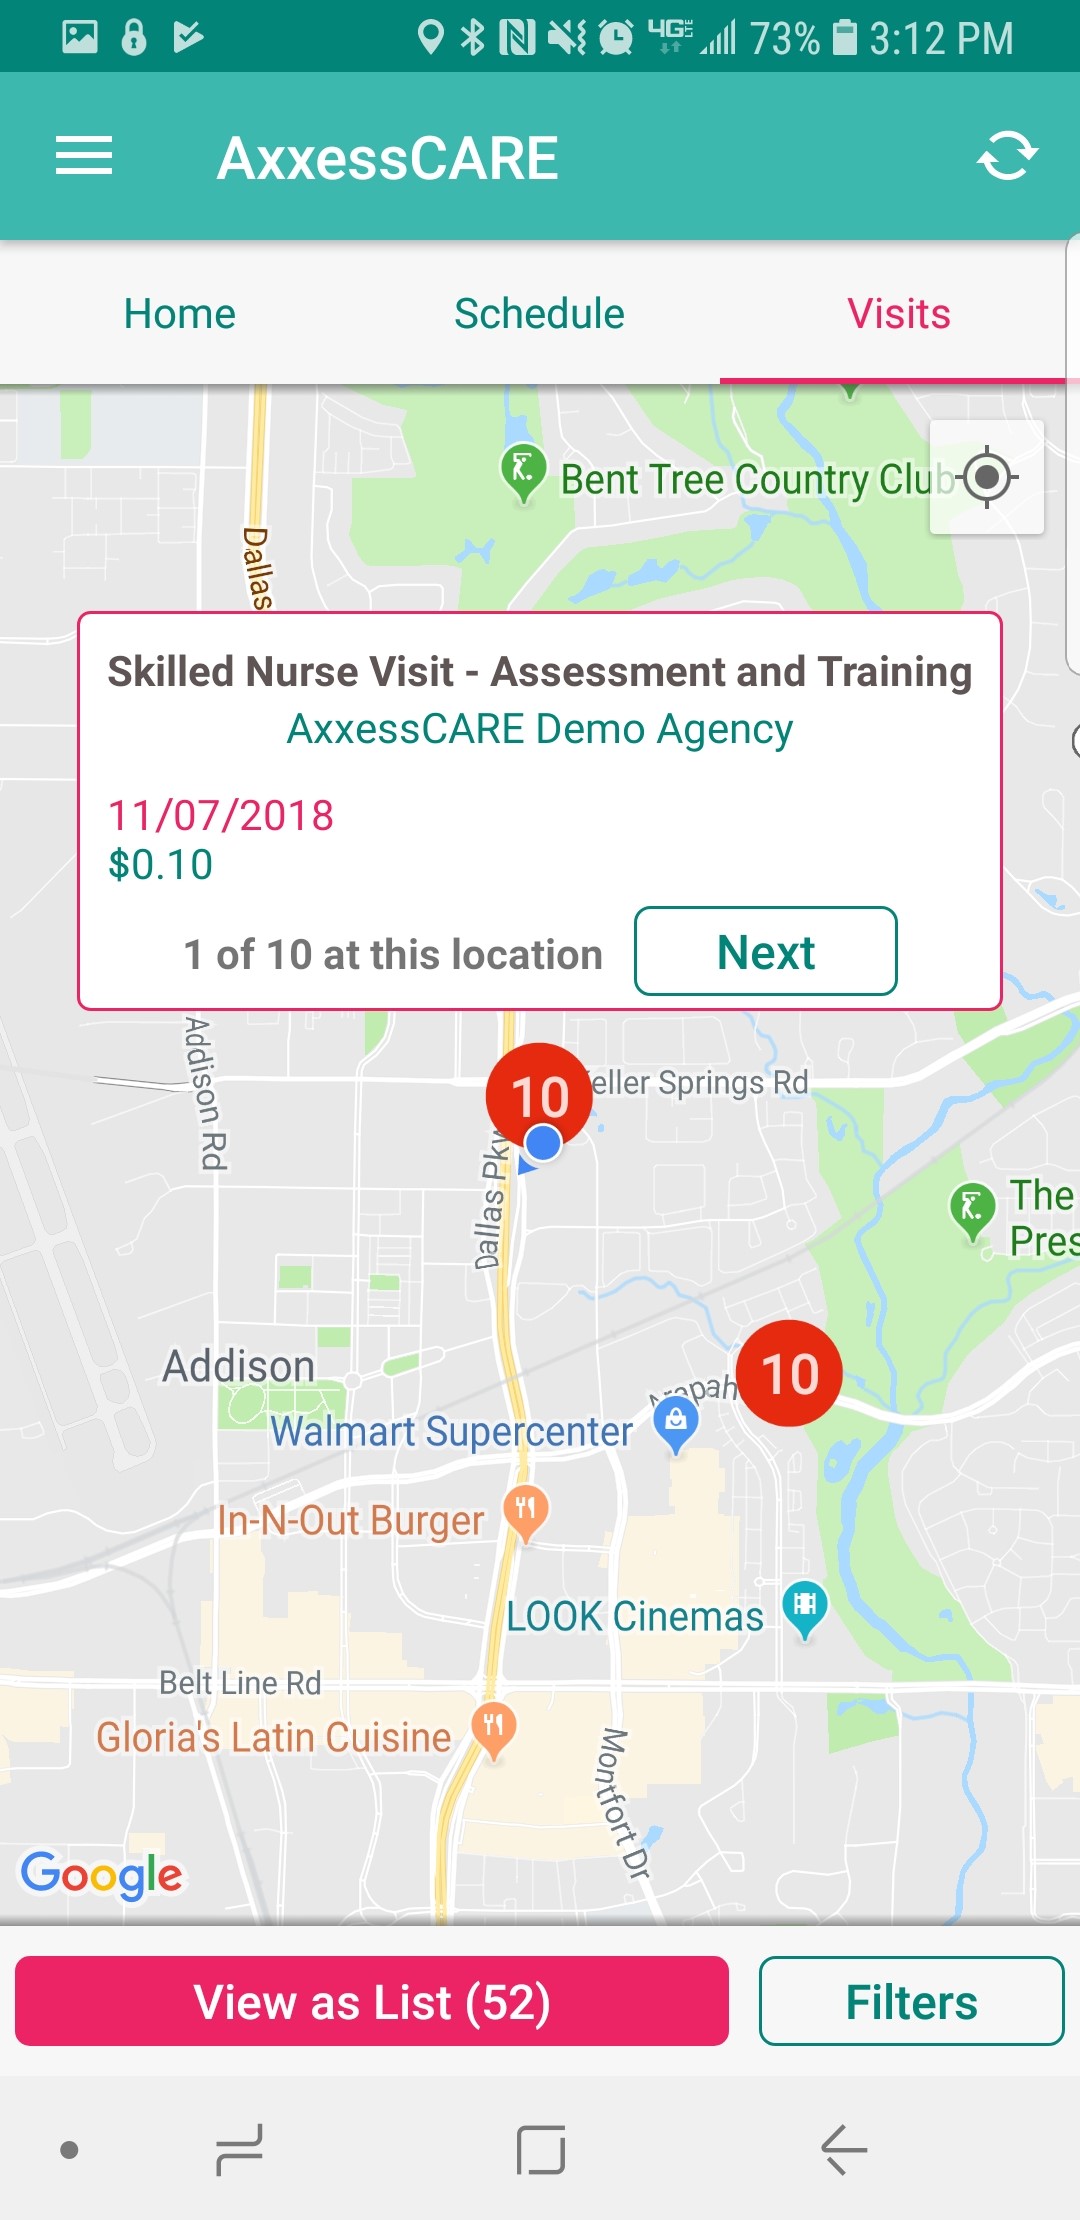
The list can also be shown in map view by tapping on the “View as Map” button. The number in parentheses shows how many visits are currently available in the area.

Available visits will be listed by a PIN ![]() icon. Tap on the PIN to view details about the visit. It will list the type of visit, organization, date and rate. If there is more than one visit available at the same location, there will be an orange circle
icon. Tap on the PIN to view details about the visit. It will list the type of visit, organization, date and rate. If there is more than one visit available at the same location, there will be an orange circle ![]() icon with the number of visits available. Tap the next button to look through all visits. Another way to search through available visits is by tapping the “Filters” button in the bottom right.
icon with the number of visits available. Tap the next button to look through all visits. Another way to search through available visits is by tapping the “Filters” button in the bottom right.
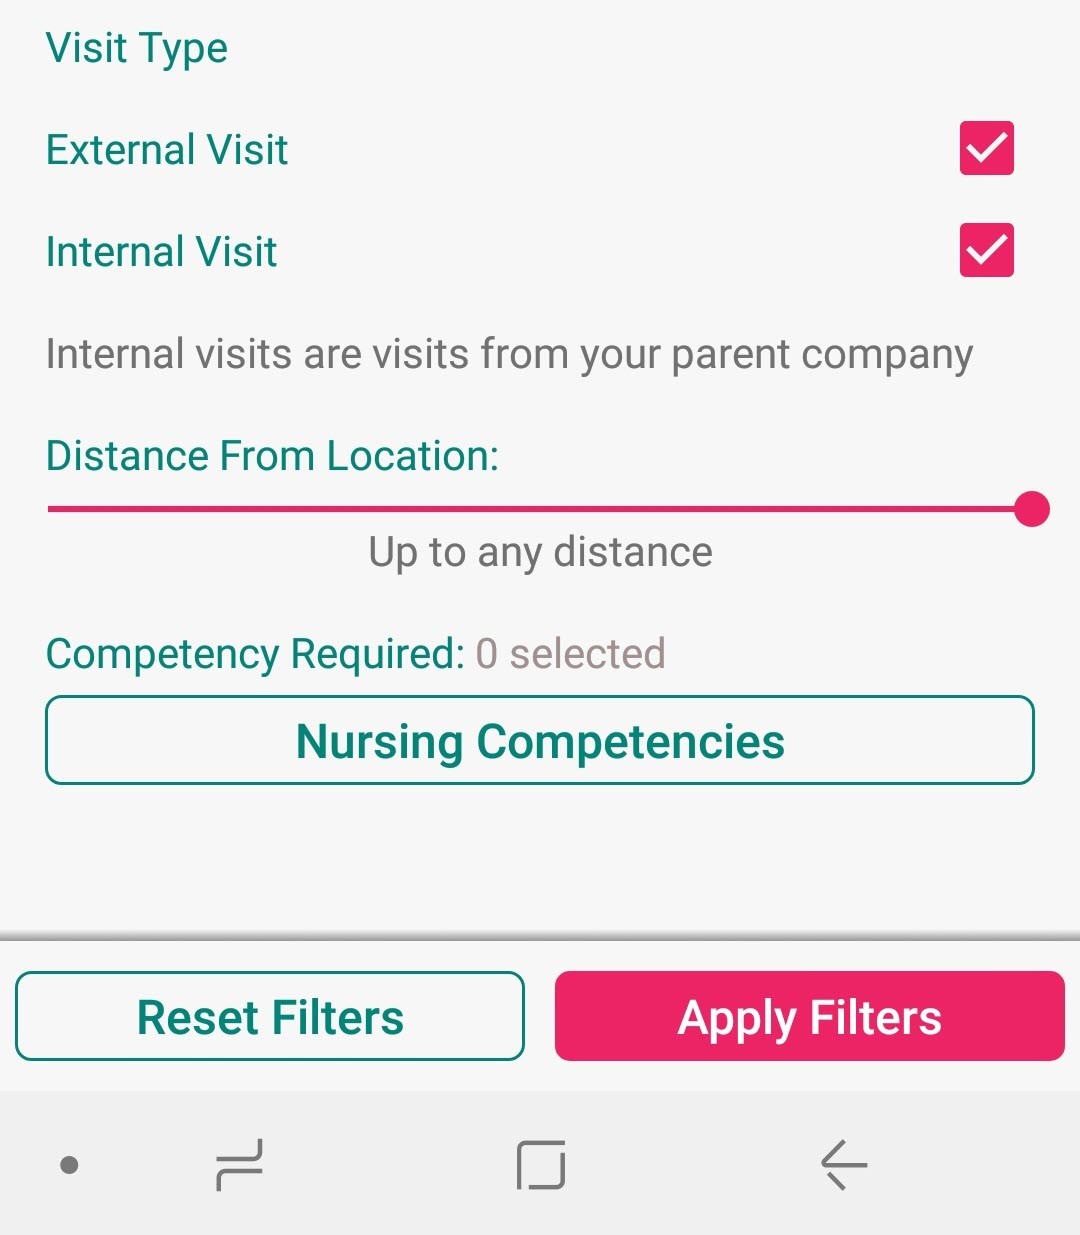
The three tabs inside the filter are All, Not Applied and Applied. The tab being viewed is highlighted in pink. Search by Location by typing an address in the text space or tapping the house ![]() icon which will enter the address of the Current Location. Enter a date range by either typing it in or tapping the calendar icon and choosing the date range. Decide the minimum acceptable pay range for a visit by dragging the pink dot along the line.
icon which will enter the address of the Current Location. Enter a date range by either typing it in or tapping the calendar icon and choosing the date range. Decide the minimum acceptable pay range for a visit by dragging the pink dot along the line.
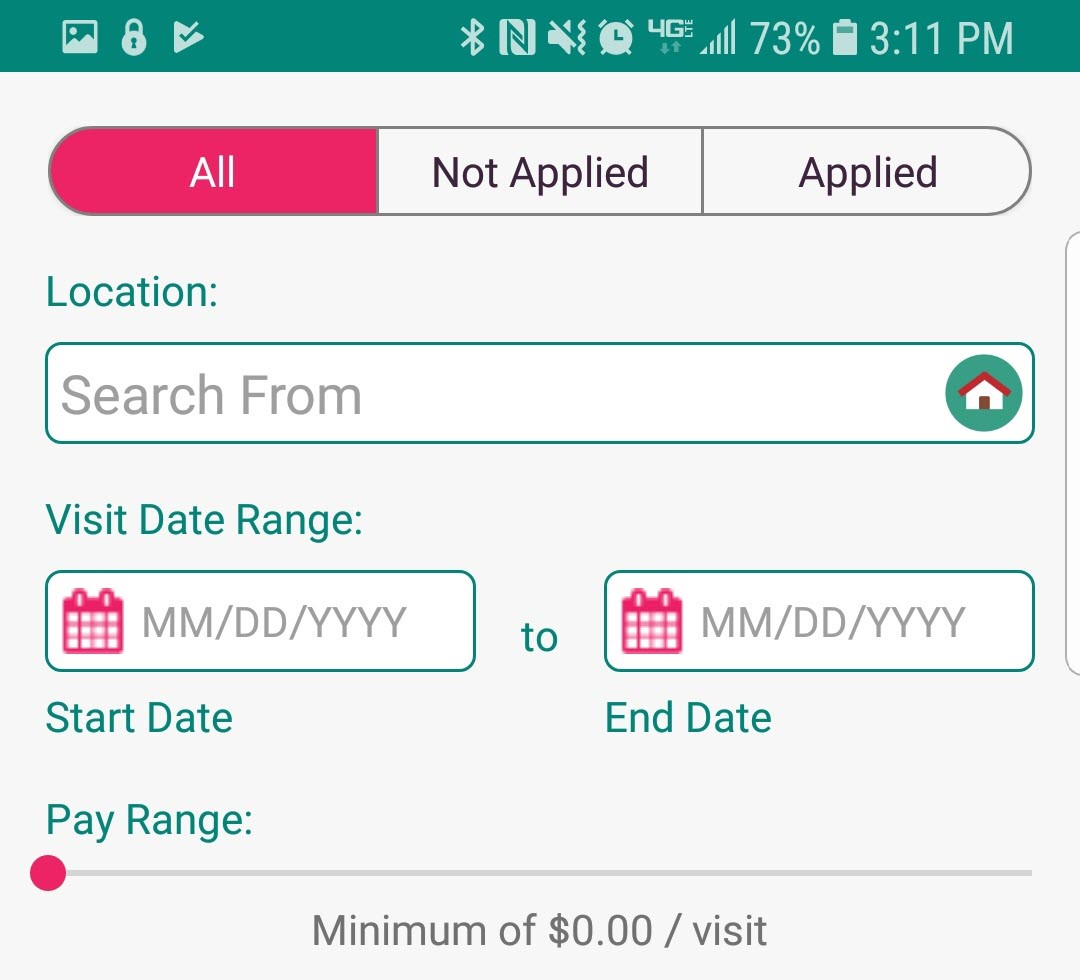
In the bottom half of the page, view visits that are External or Internal by checking the boxes. Internal visits are visits from the user’s parent organization/agency. Use the pink dot on the pink line to determine how wide (in miles) the search for visits should be. Tap on the “Nursing Competencies” button to select all applicable competencies, i.e. IV, CHF or COPD Management, etc. Then either tap “OK” in the bottom right to return. After selecting the filters, tap on the “Apply Filters” button or tap “Reset Filters” to set back to the default parameters.
Visits that are posted from the user’s primary organization and are only available to the staff members of that agency will show the following purple icon:


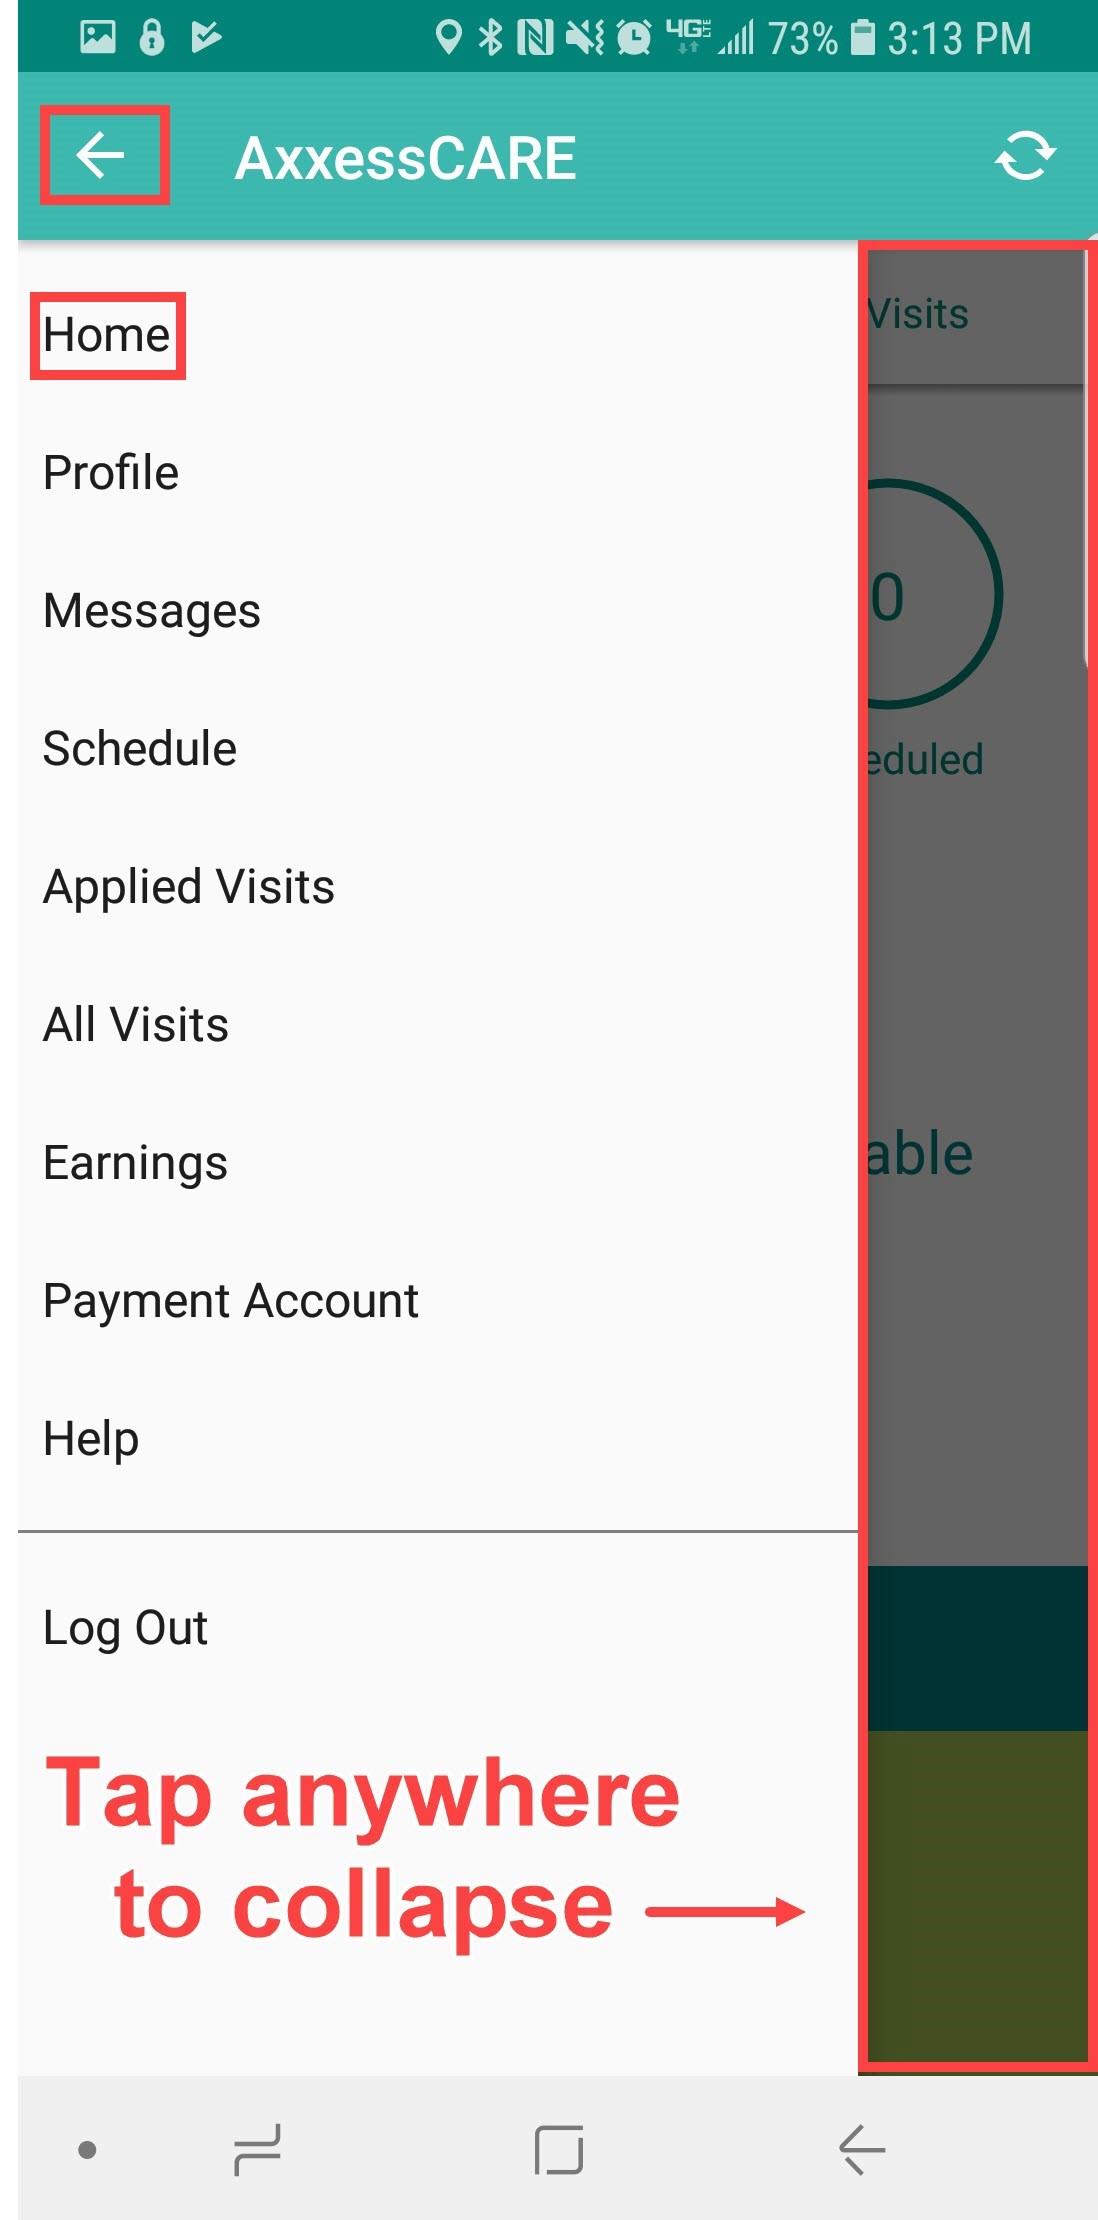
Tap on the menu button ![]() icon in the top left to see the Side Menu. It has the following 10 options:
icon in the top left to see the Side Menu. It has the following 10 options:
Tap on Home, the back arrow or tap anywhere outside of the side menu to collapse.
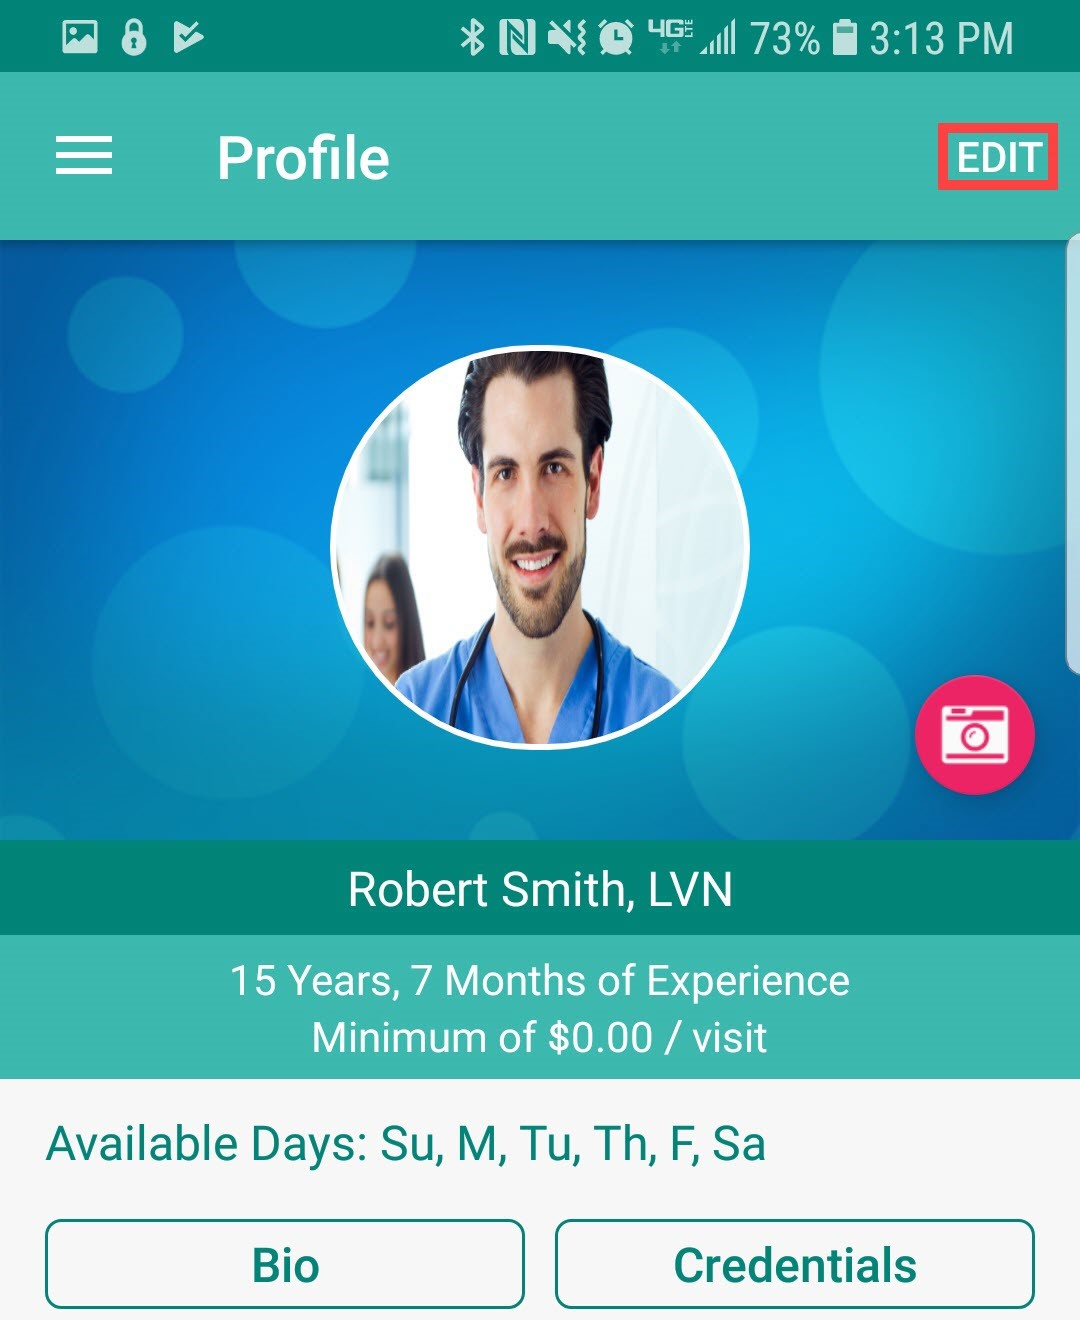
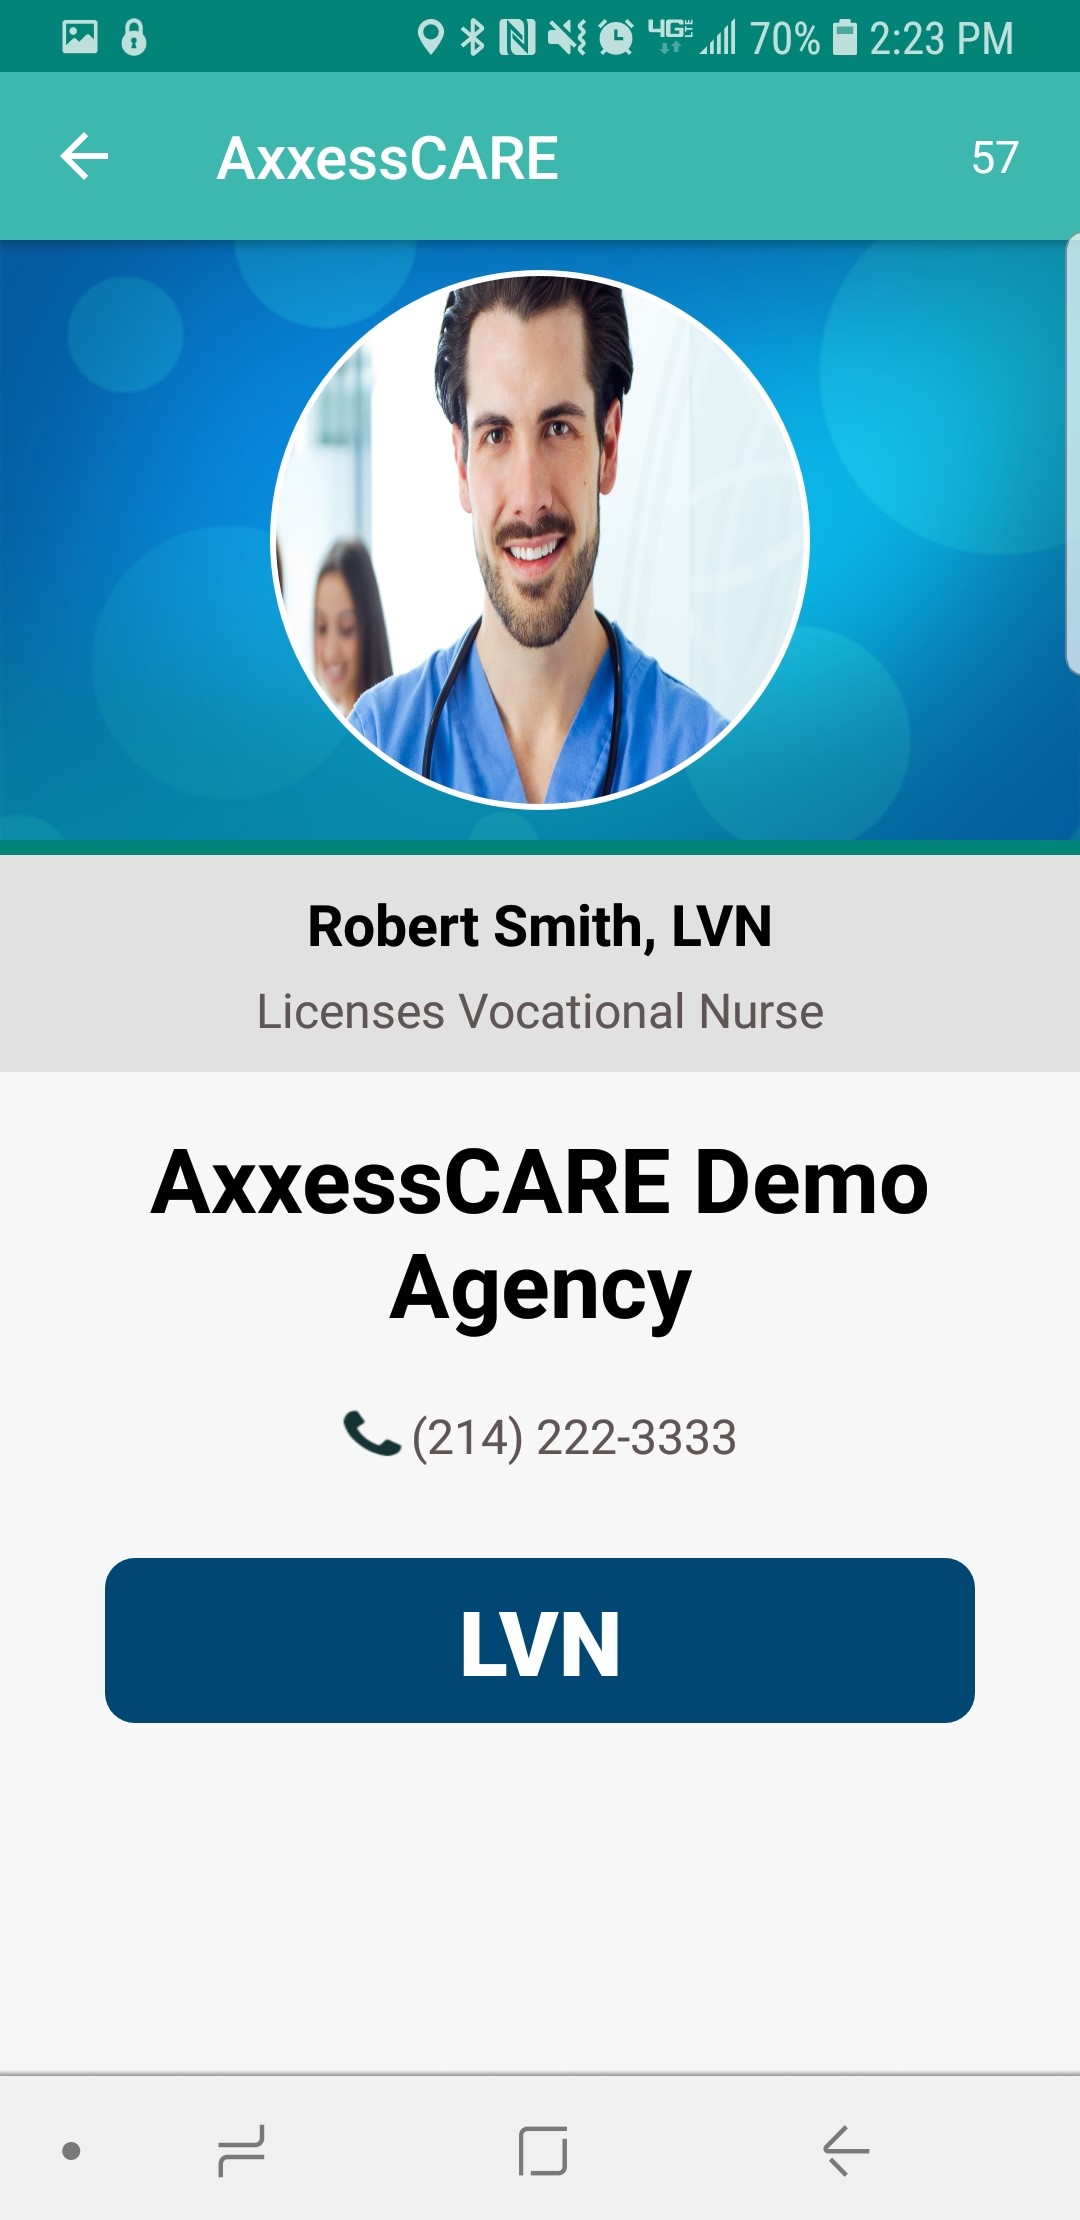
Tapping on Profile goes to the personal clinician profile. The Profile will show the user’s picture. To upload a picture tap on the camera ![]() icon. Choose to “Take a Photo” or “Choose from Library.” The Profile will list the name and credentials, length of time in the field, rate and available days. The bottom portion will show the reviews received from agencies that the user has performed a visit. Tap on the Edit option in the top right.
icon. Choose to “Take a Photo” or “Choose from Library.” The Profile will list the name and credentials, length of time in the field, rate and available days. The bottom portion will show the reviews received from agencies that the user has performed a visit. Tap on the Edit option in the top right.
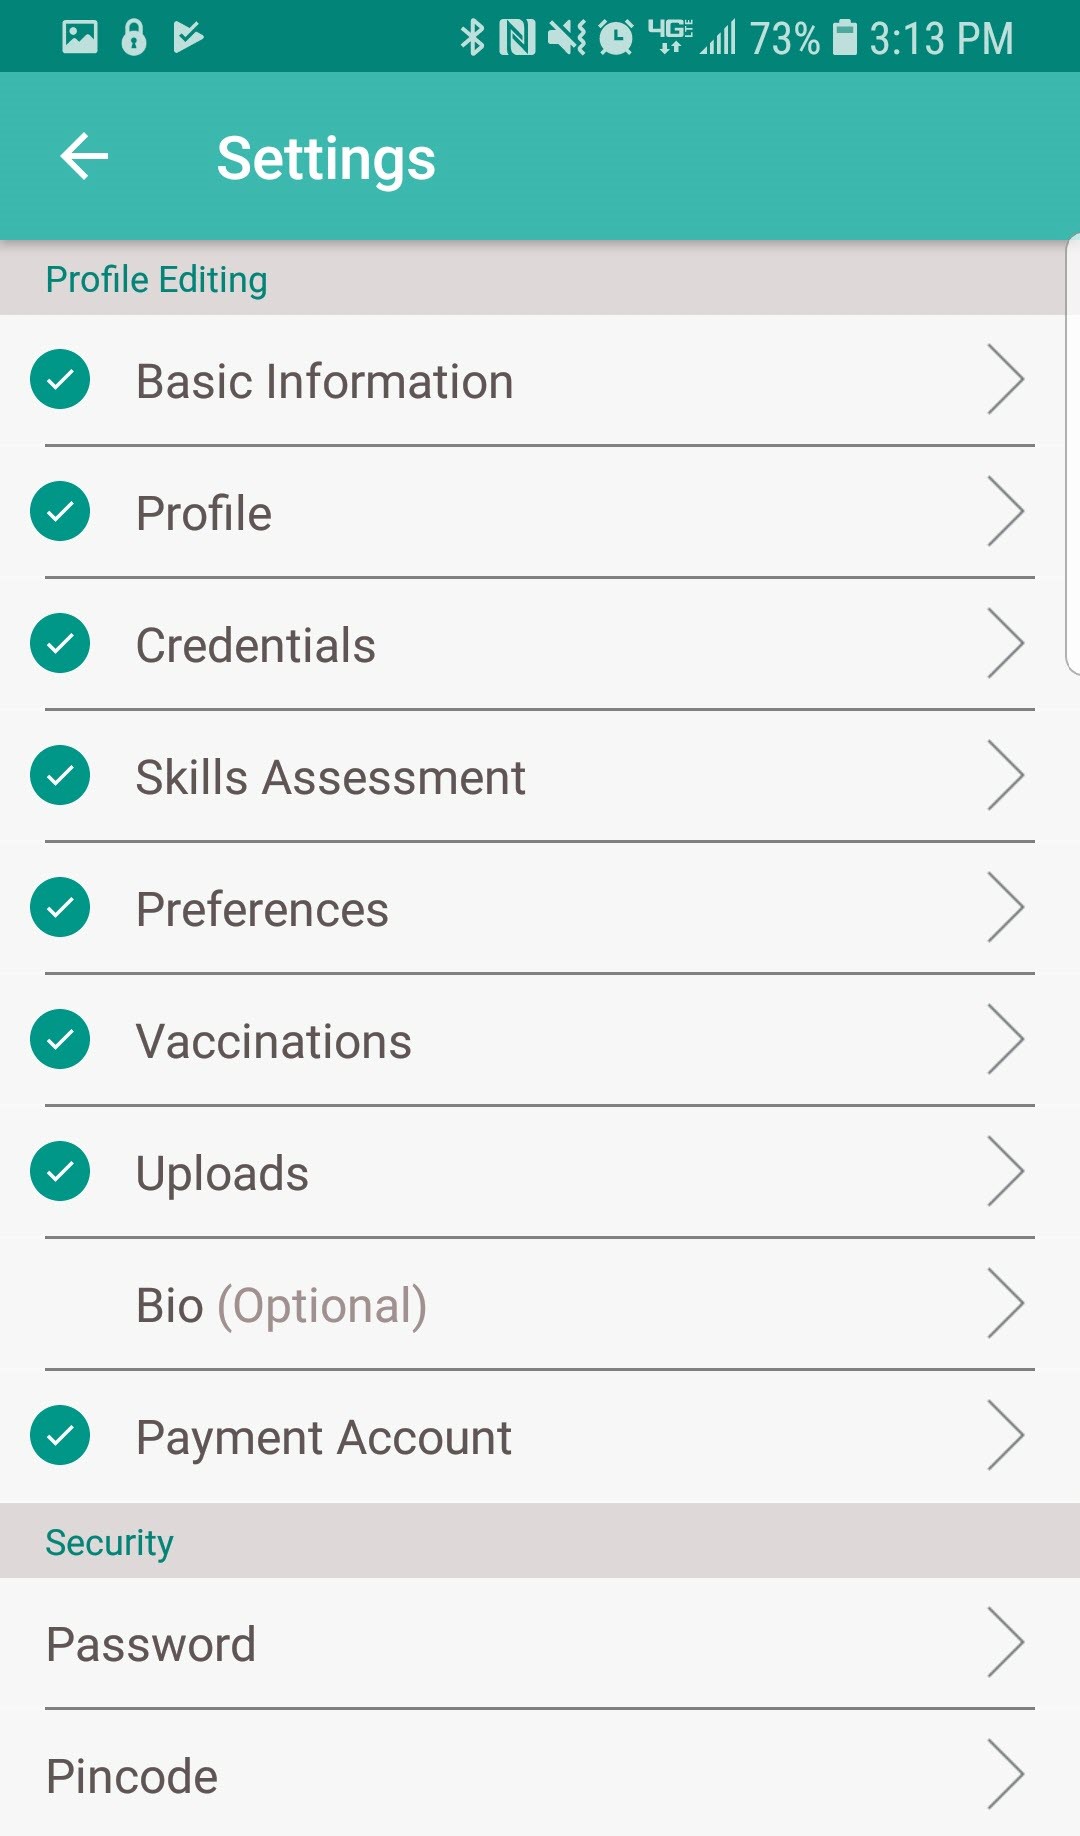
Make edits to the personal profile including changing the Passcode and Password. The Profile Editing screen reviews the nine-step process of setting up the profile. They are:
Go back and make edits by tapping on each step. The steps will show the green check mark ![]() icon when complete. Tap on the back arrow
icon when complete. Tap on the back arrow ![]() to return to Profile.
to return to Profile.
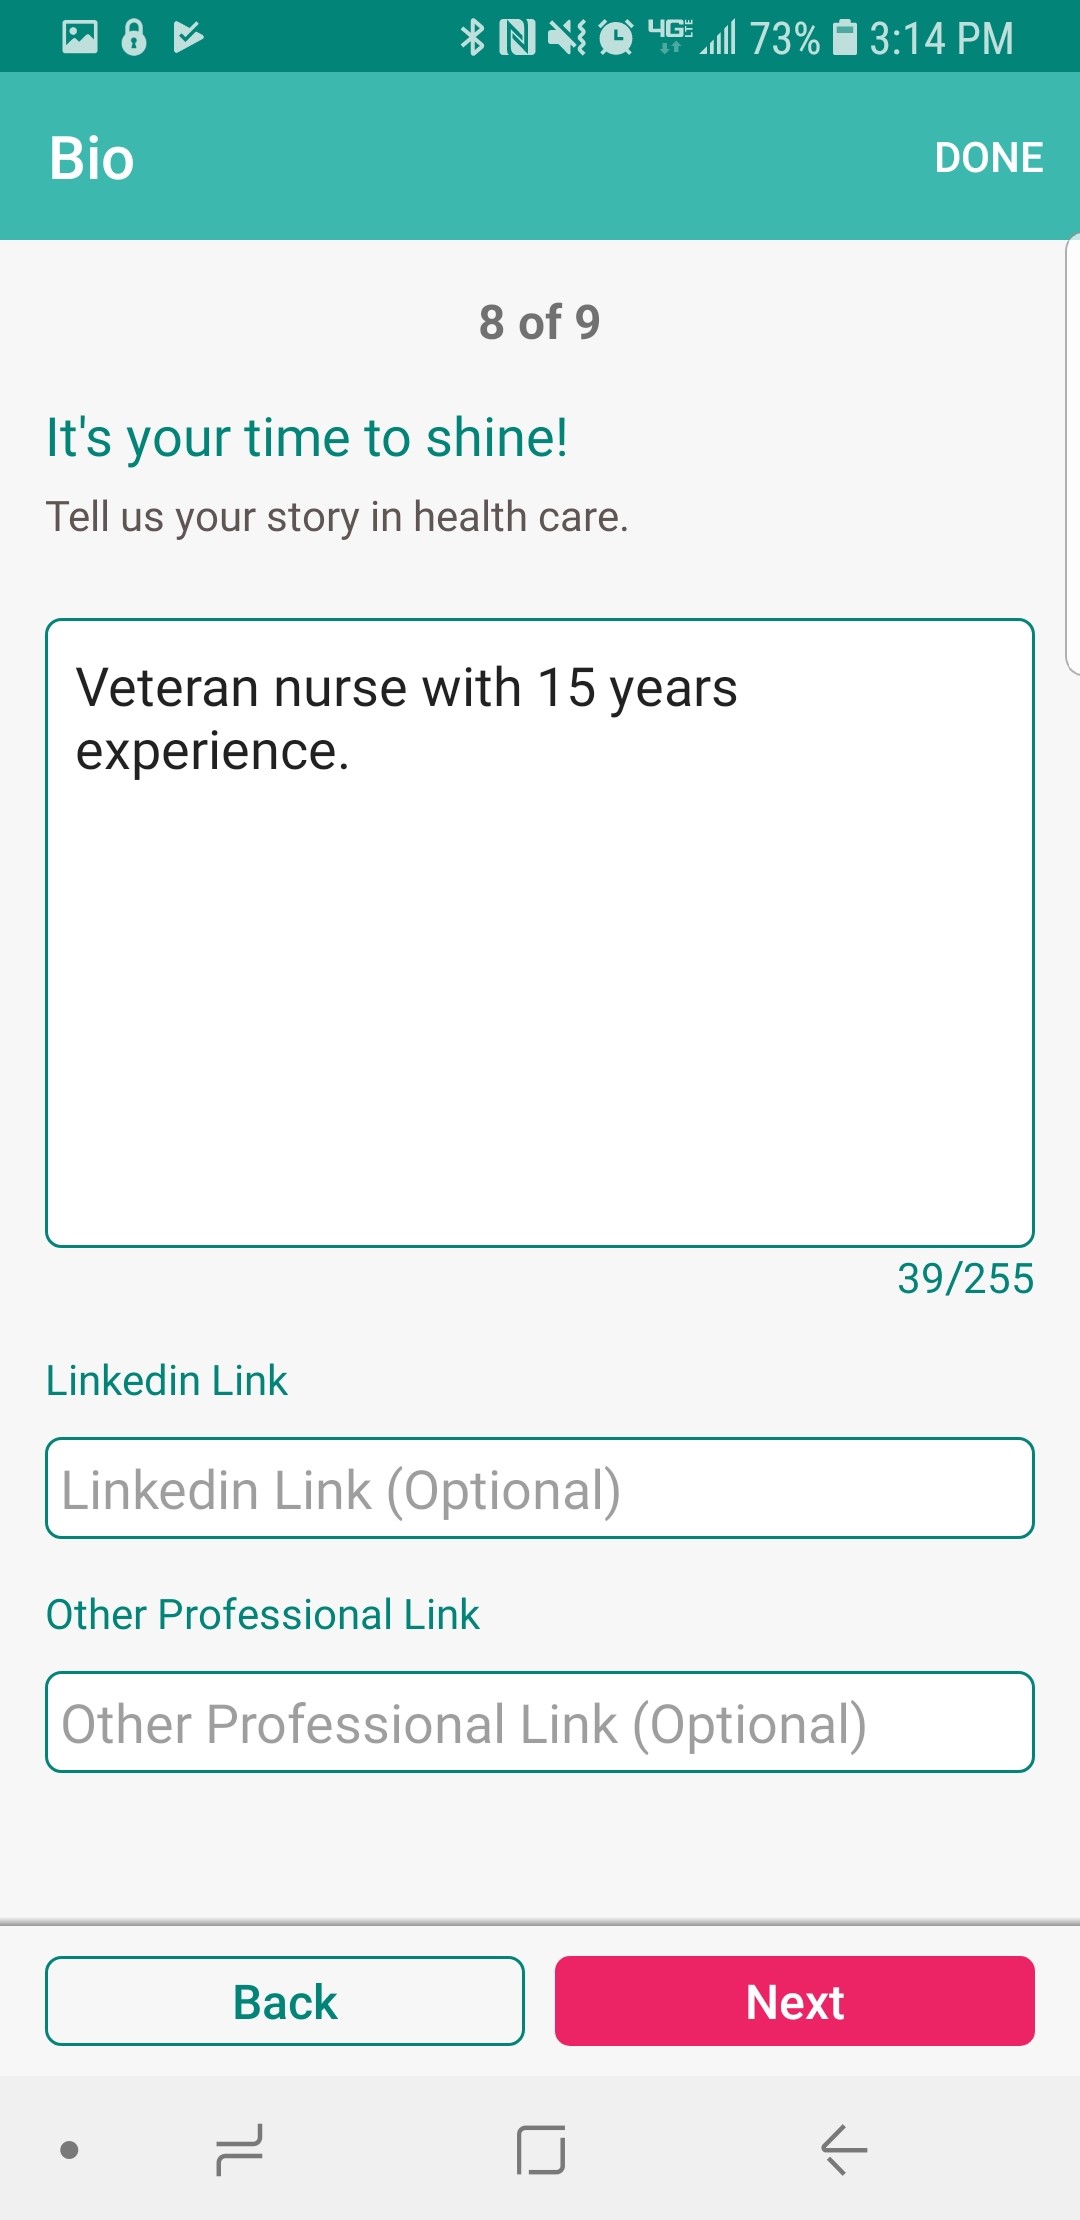
Tap on the “Bio” button from the Profile.

Users enter their experience in the healthcare industry in the free text space. Below there are also text spaces to enter optional links to their LinkedIn Profile or Other Professional Link. The next two steps are setting up payments which will be explained later.
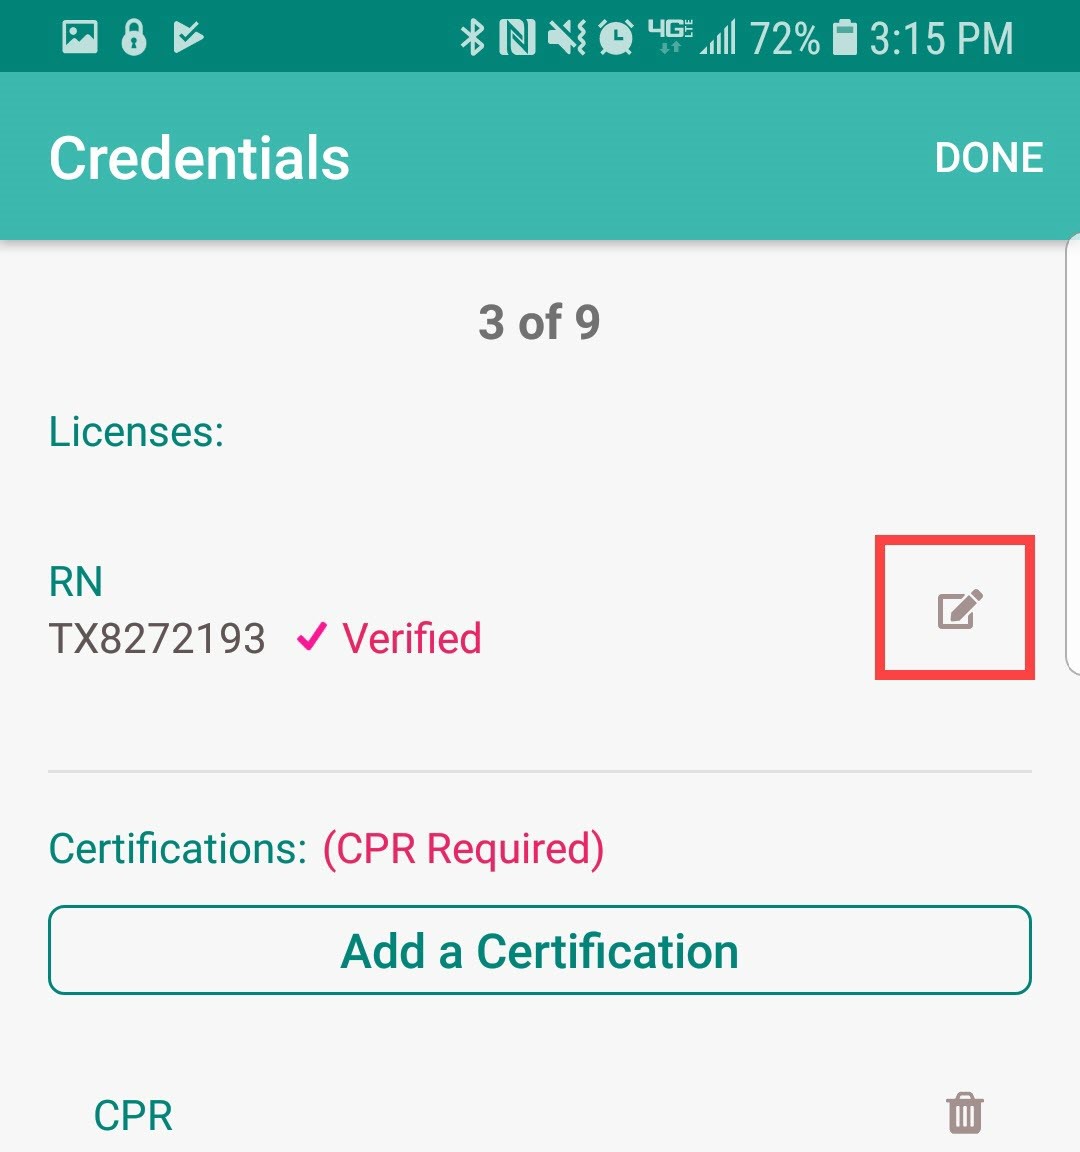
From the Profile, tap on “Credentials.”

The page will list licenses and certifications. To edit a license, tap on the edit ![]() icon.
icon.
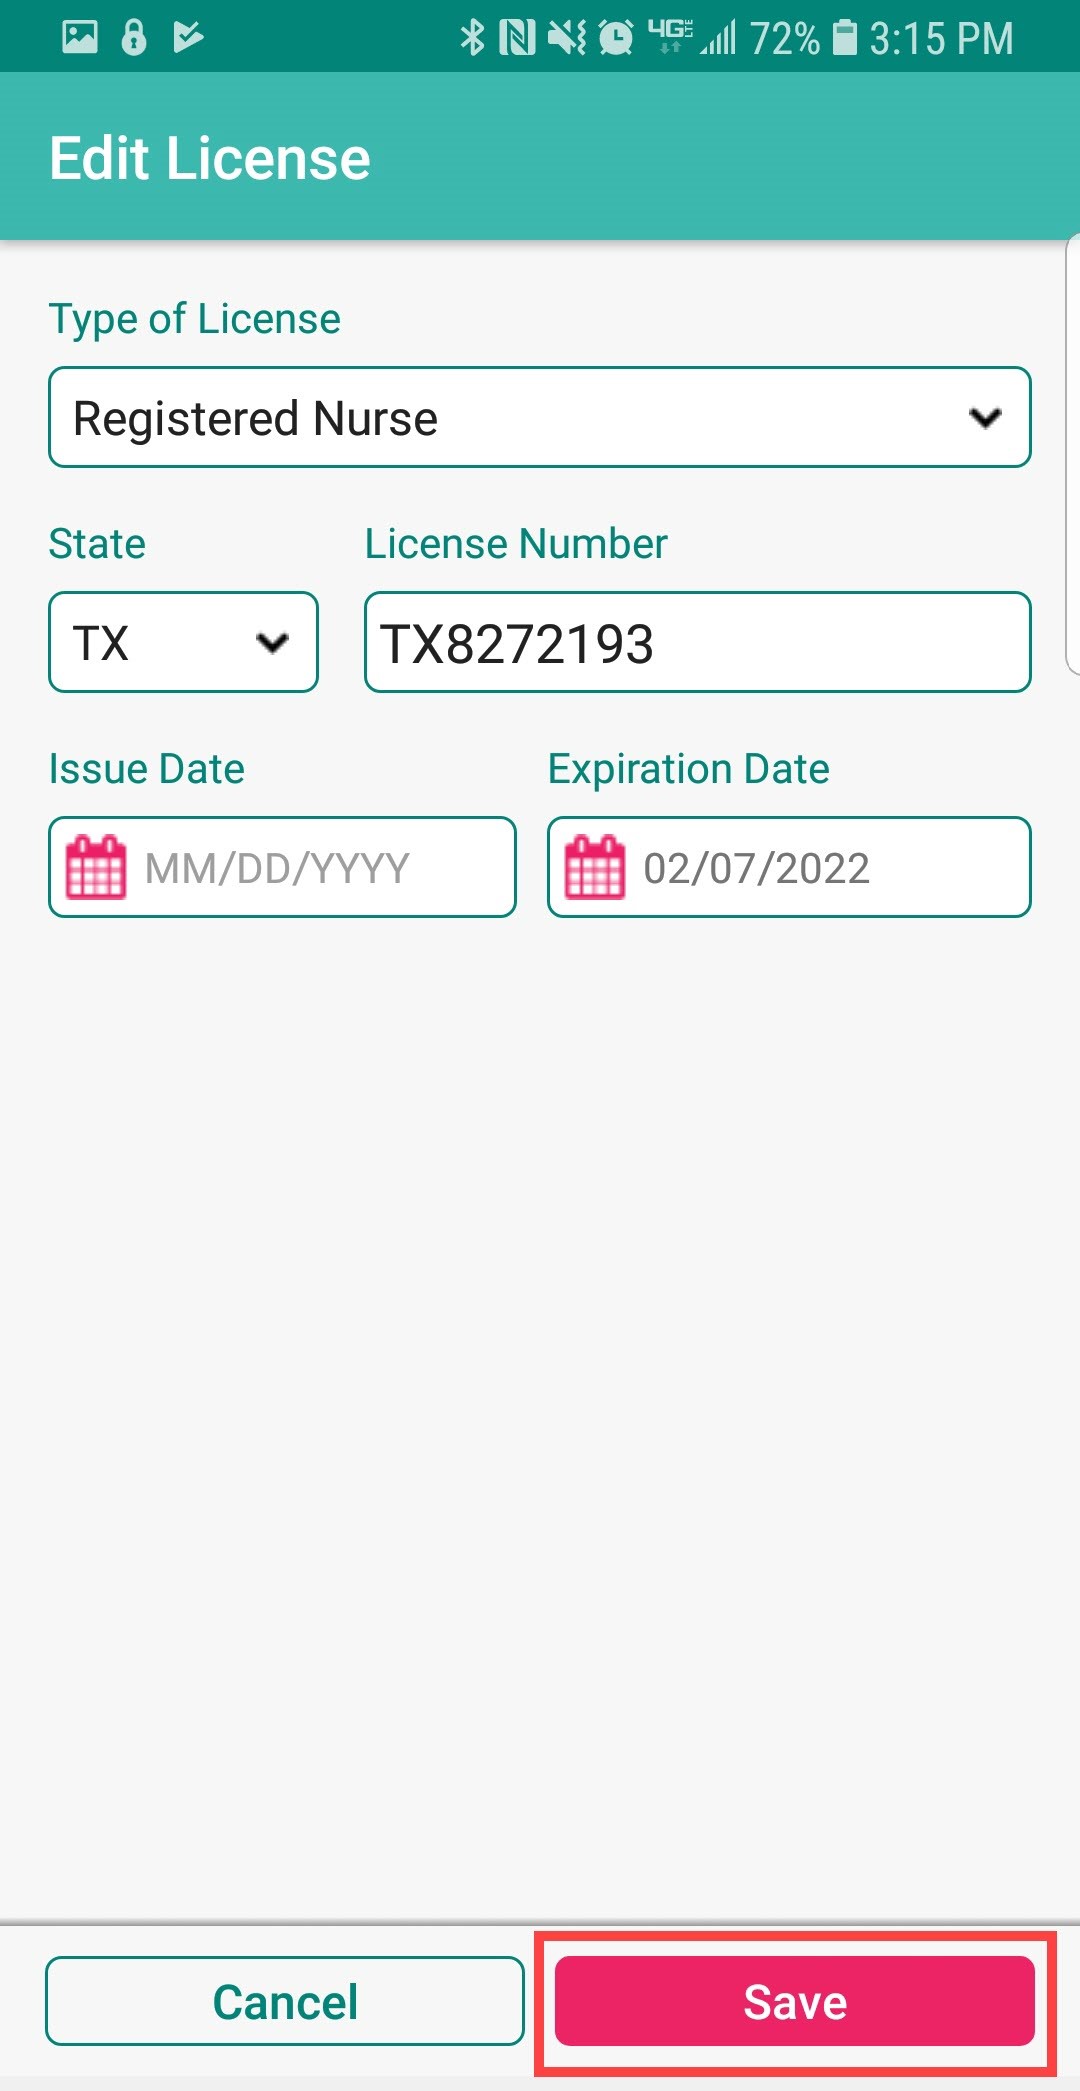
From the Add License page, tap on the Registered Nurse drop-down menu to choose from a list of other licenses. Fill in the License State, Number, Date and Expiration Date. Then tap on the “Save” button.
Back at the Credentials page, tap on the “Add A Certification” button.
![]()
Tap the drop-down menu below Type of Certification to find a certification. Enter an Expiration Date. Then tap “Tap to Add” to add a photo of the certification. Then tap the “Save” button.
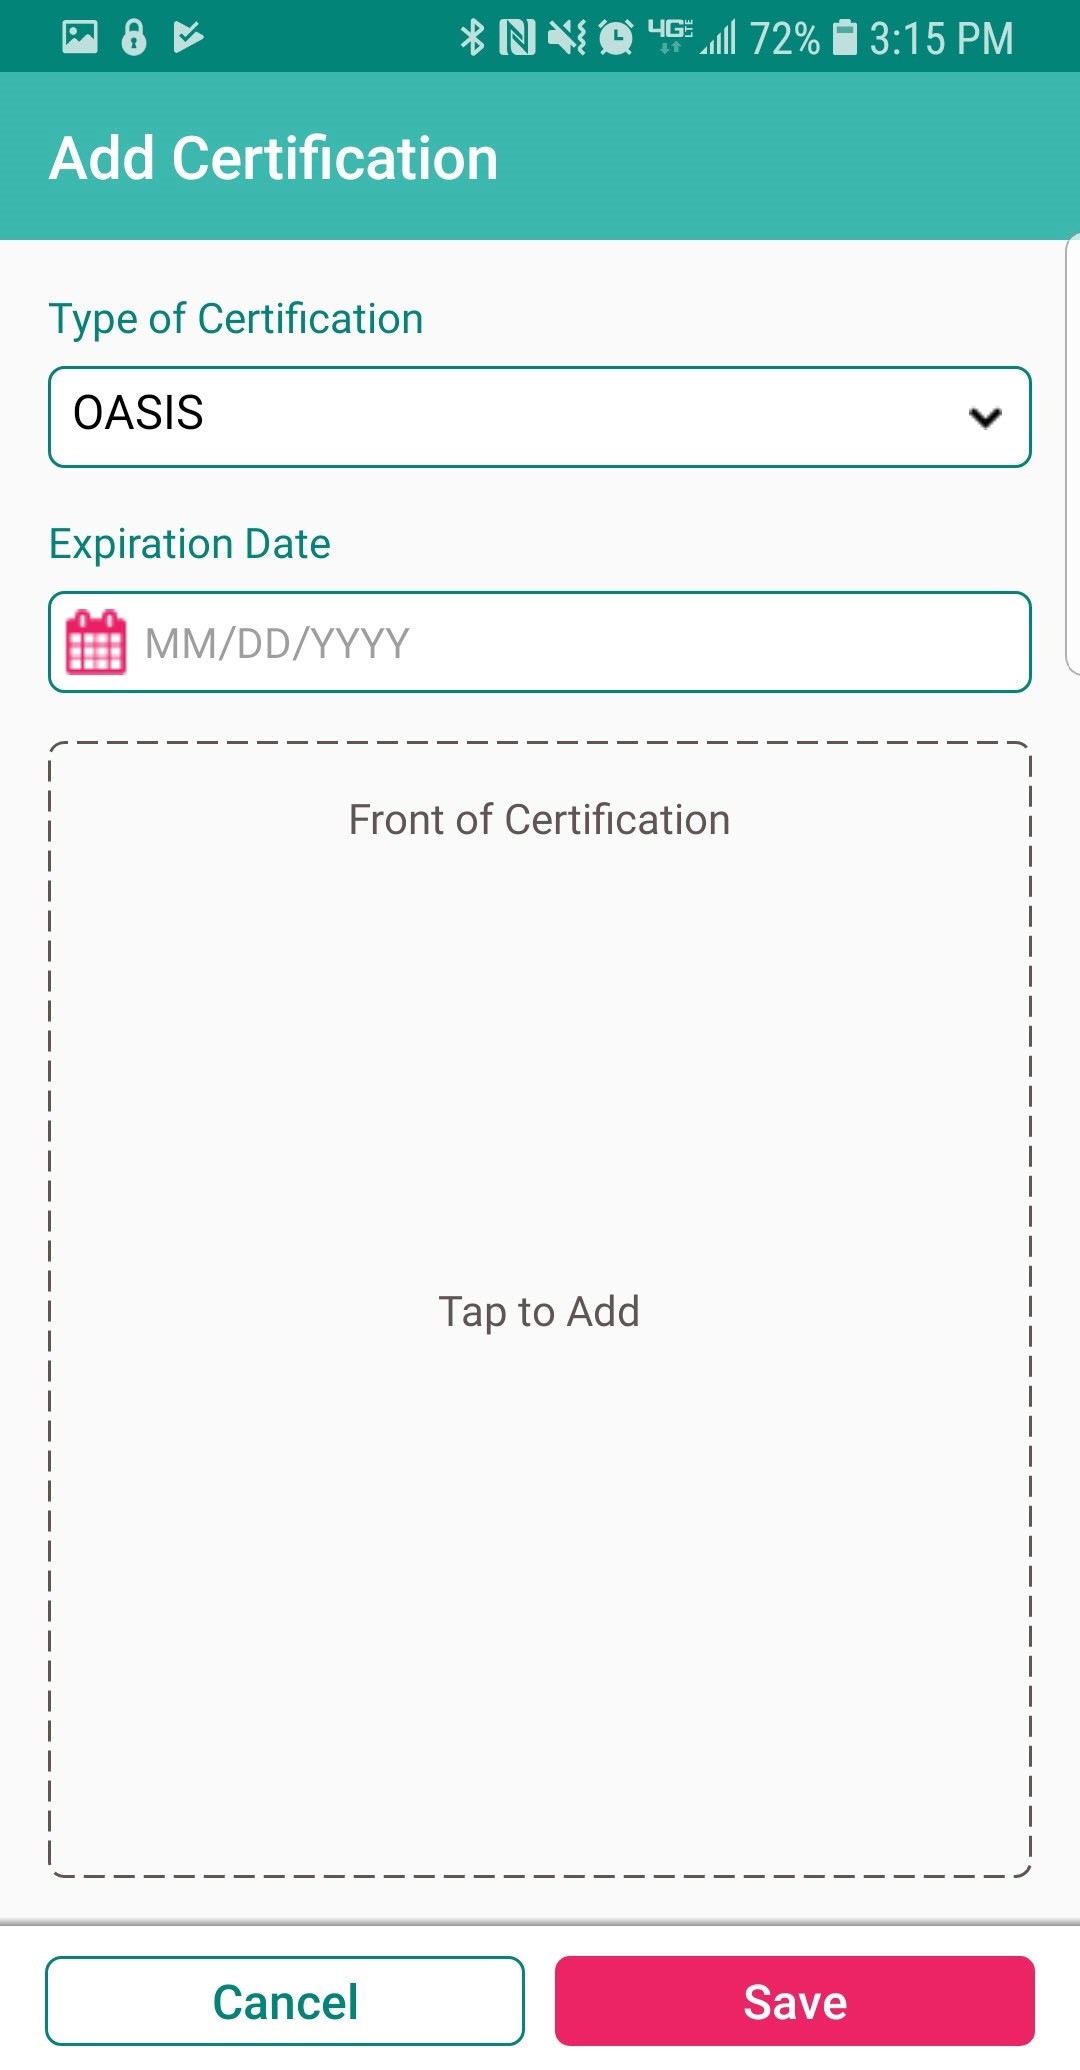
NOTE: Adding the CPR Certification is required.
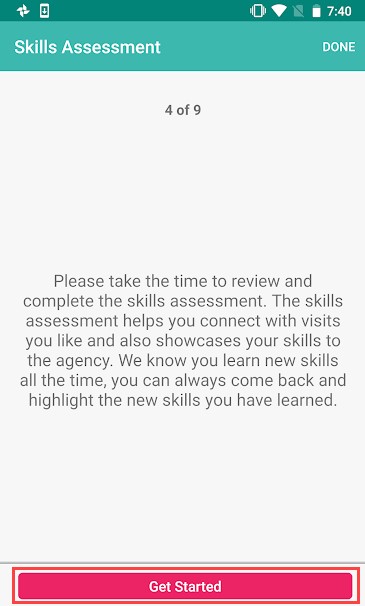
Clinicians must document their skills in the Skills Assessment. Tap on “Get Started.”
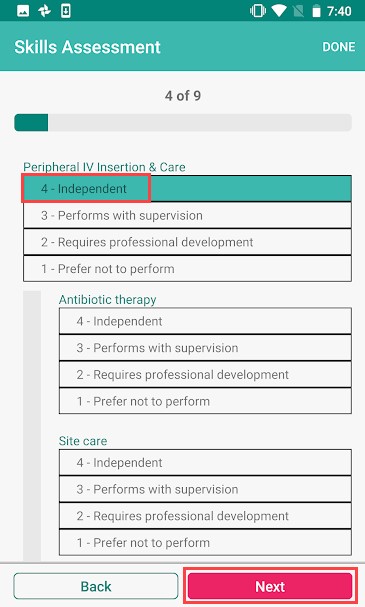
Select the skill level for each category of care between Independent, Performs with supervision, Requires professional development and Prefer not to perform. Tap “Next” to move on to more assessment categories.
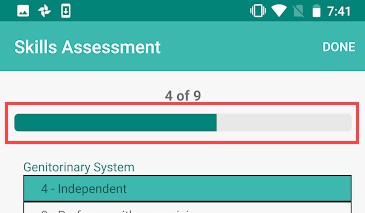
As the user makes their way through the assessment, the progress bar will move at the top.
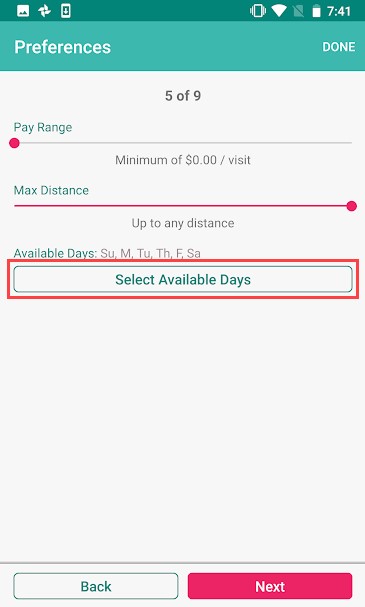
Clinicians must decide specific preferences on the minimum Pay Range, the Max[imum] Distance willing to travel and which days they are willing to work. Tap “Select Available Days” to choose the days.
Check the boxes of the day(s) the user is available to complete visits in AxxessCARE. Tap “OK” when complete.

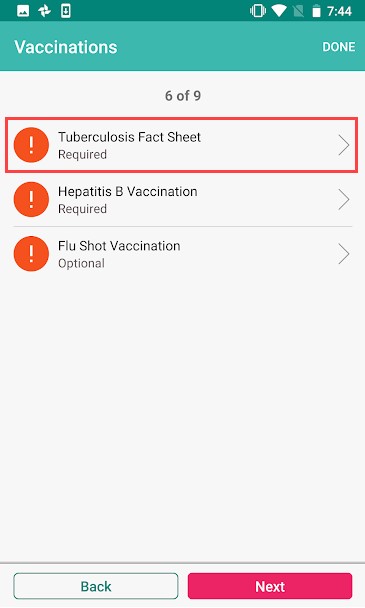
During initial setup, clinicians will need to document their vaccinations. Tuberculosis and Hepatitis B are required. Tap the first vaccination.
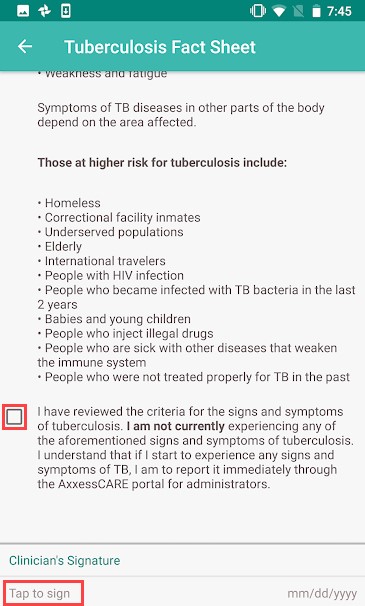
Read the Tuberculosis Fact Sheet, then check the box confirming the text was read. Then tap “Tap to sign” in the bottom left.
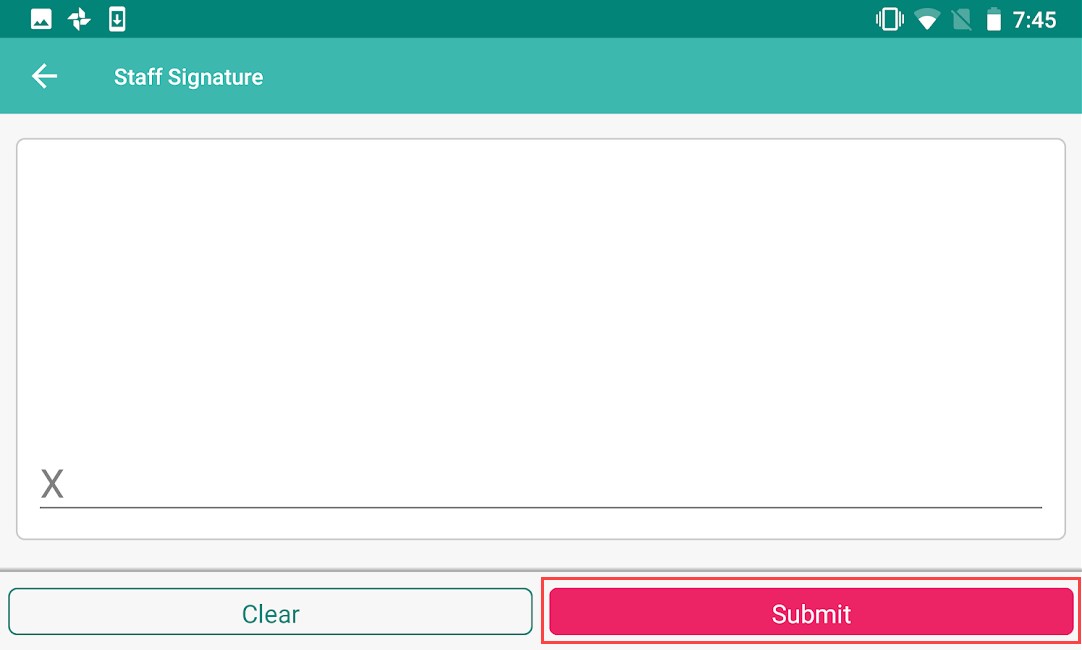
The clinician will enter their signature, then tap the “Submit” button.
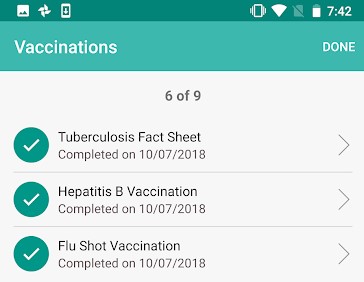
Complete each vaccination and the page will change from exclamation points to check marks signifying completion.
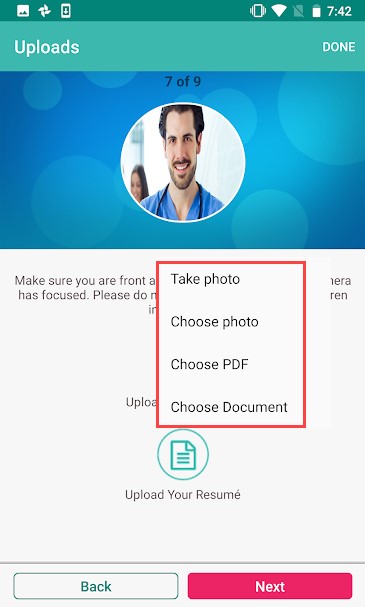
It is recommended that the clinician upload their Profile Photo and Resume. Tap on either icon to upload.

Then choose to take a photo or find a file from the device to upload.
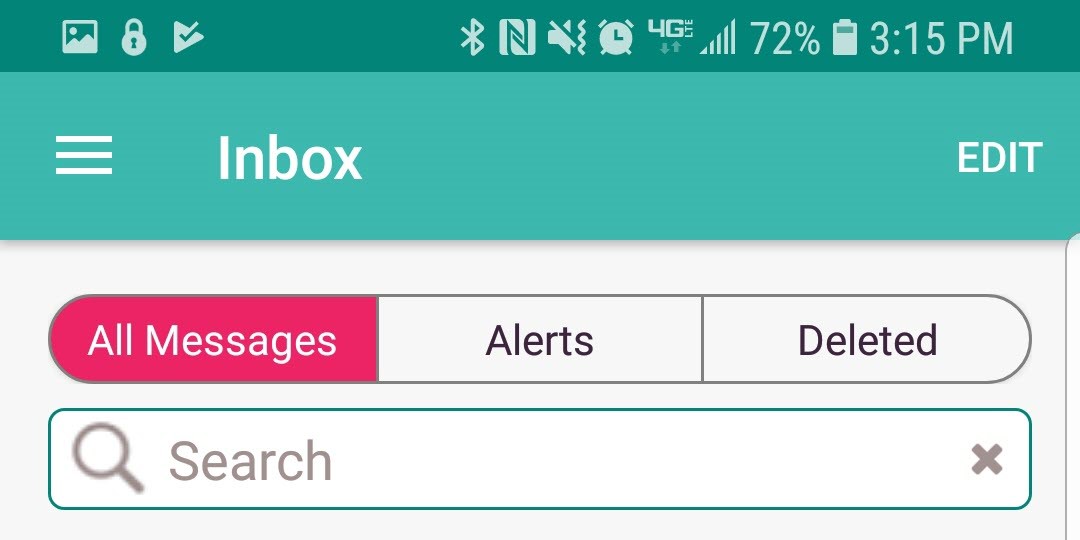
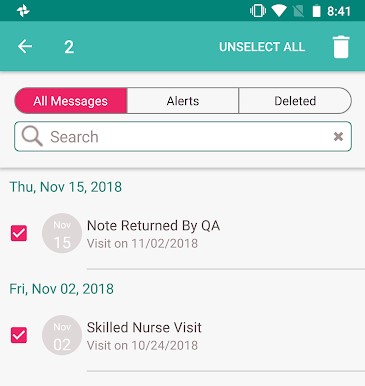
The Message center is split up into three tabs: Messages, Alerts and Deleted. The tab being viewed will be highlighted in pink. The number in parentheses to the right of the tab indicates how many new items there are in that tab. Use the Search bar to narrow down the list in each tab.
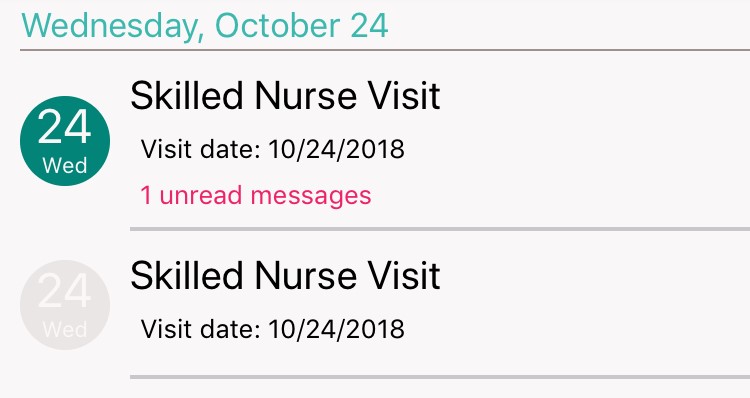
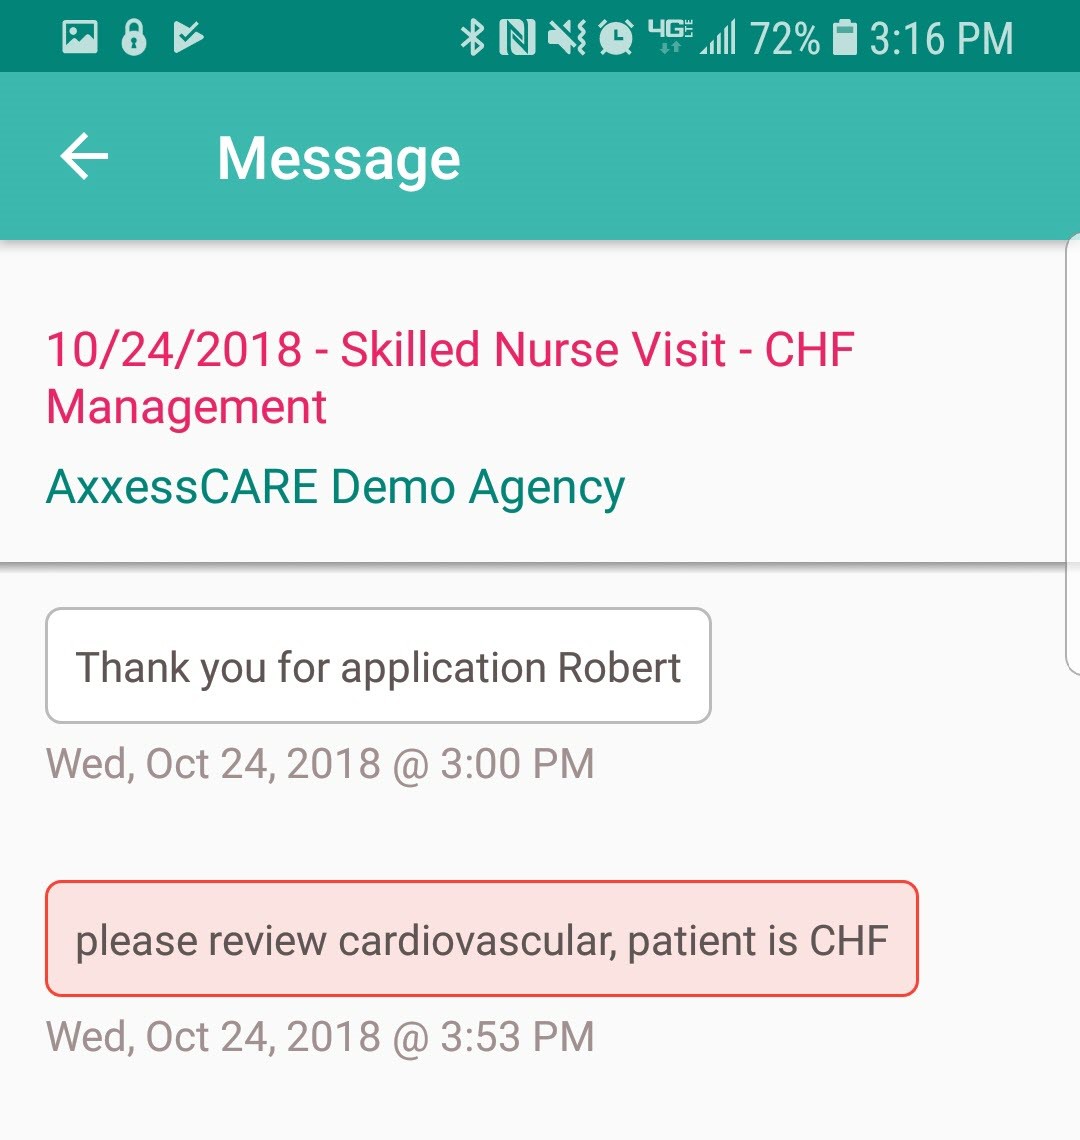
Messages are tied to previous, current and future visits. The visit date is listed to the left. The visit type is at the top followed by the visit date (unread will show in pink text). For unread messages, the date to the left is highlighted teal. Messages that have been read are light gray. Tap on a message to view.
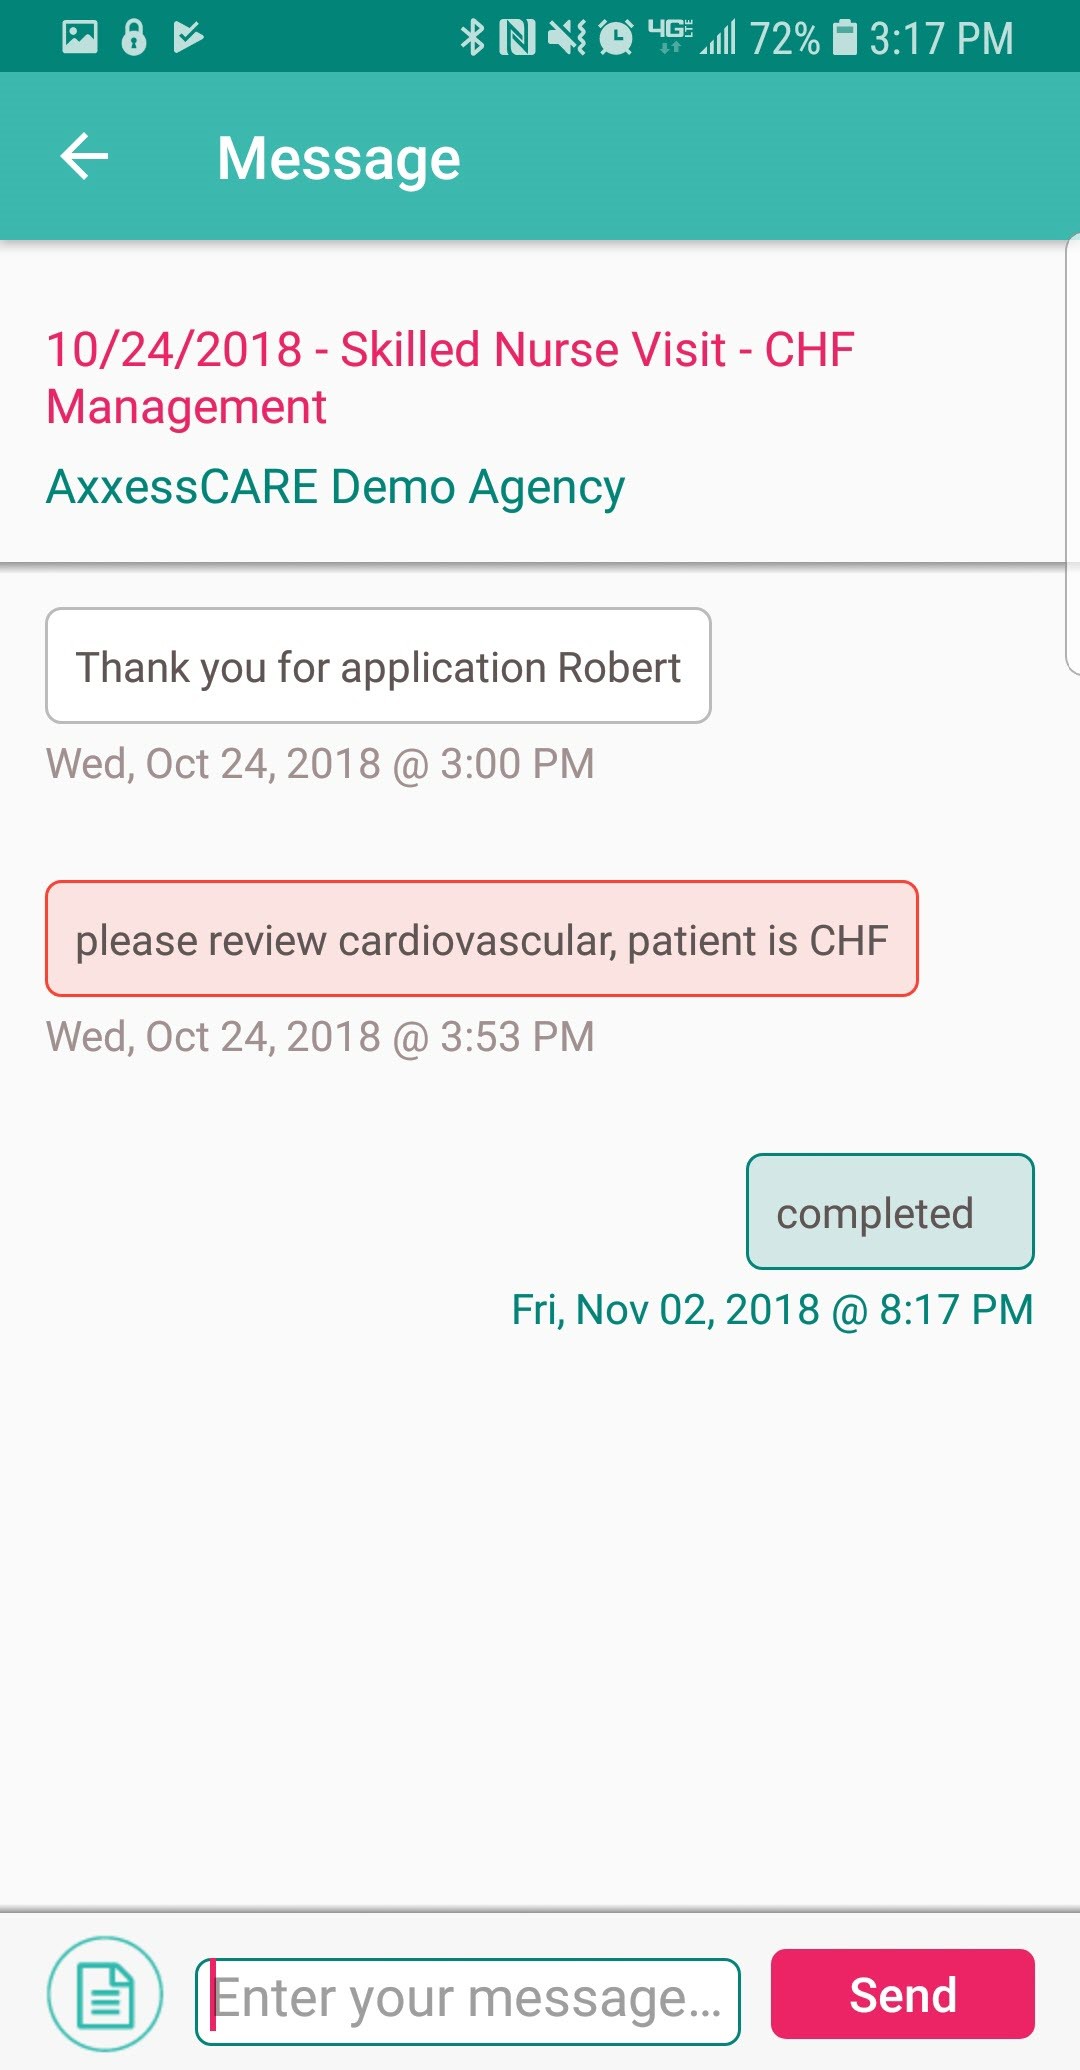
The visit information will be listed at the top. The messaging exchange is shown below. Messages from the organization appear on the left side of the page citing the date and time they were sent. QA returned notes will be listed in orange (more on QA process later). Messages sent by the user will be on the right side. To write a message, type in the free text space at the bottom of the page then tap the “Send” button.
Tap the paper ![]() icon to, “Take a photo, Choose a photo or Choose file.” Tap the back arrow in the top left when done messaging or viewing to get back to the Message center.
icon to, “Take a photo, Choose a photo or Choose file.” Tap the back arrow in the top left when done messaging or viewing to get back to the Message center.
Tap on the “Edit” option in the top right to remove one or more messages. Checkboxes will appear to the left of the message and one or more may be selected. Tap the “Select All” option in the top right to automatically check all messages. The number of messages that are selected will show in the top left. Tap the trash ![]() icon when ready to delete. Tap on “Done” in the top right when finished deleting visits. Removed messages will now be in the “Deleted” tab.
icon when ready to delete. Tap on “Done” in the top right when finished deleting visits. Removed messages will now be in the “Deleted” tab.
See previous Schedule section.
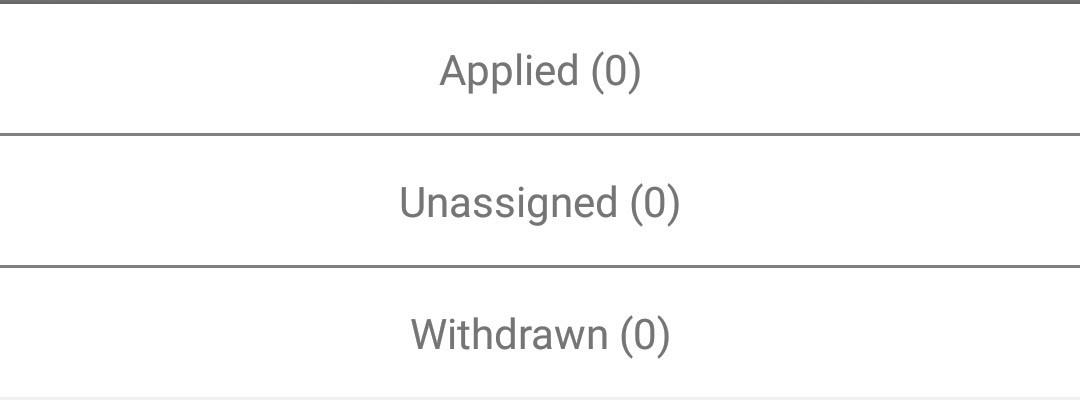
Shows a list of all visits that the user applied to perform. Visits are listed one by one with the date at the top, the type of visit, organization, Pay Rate and how far away the visit is. Tap on “Status” in the top right to see the total for all visits.
A table will expand from the bottom of the page to show the number of Applied, Unassigned and Withdrawn/Returned visits. Tapping outside will collapse it.
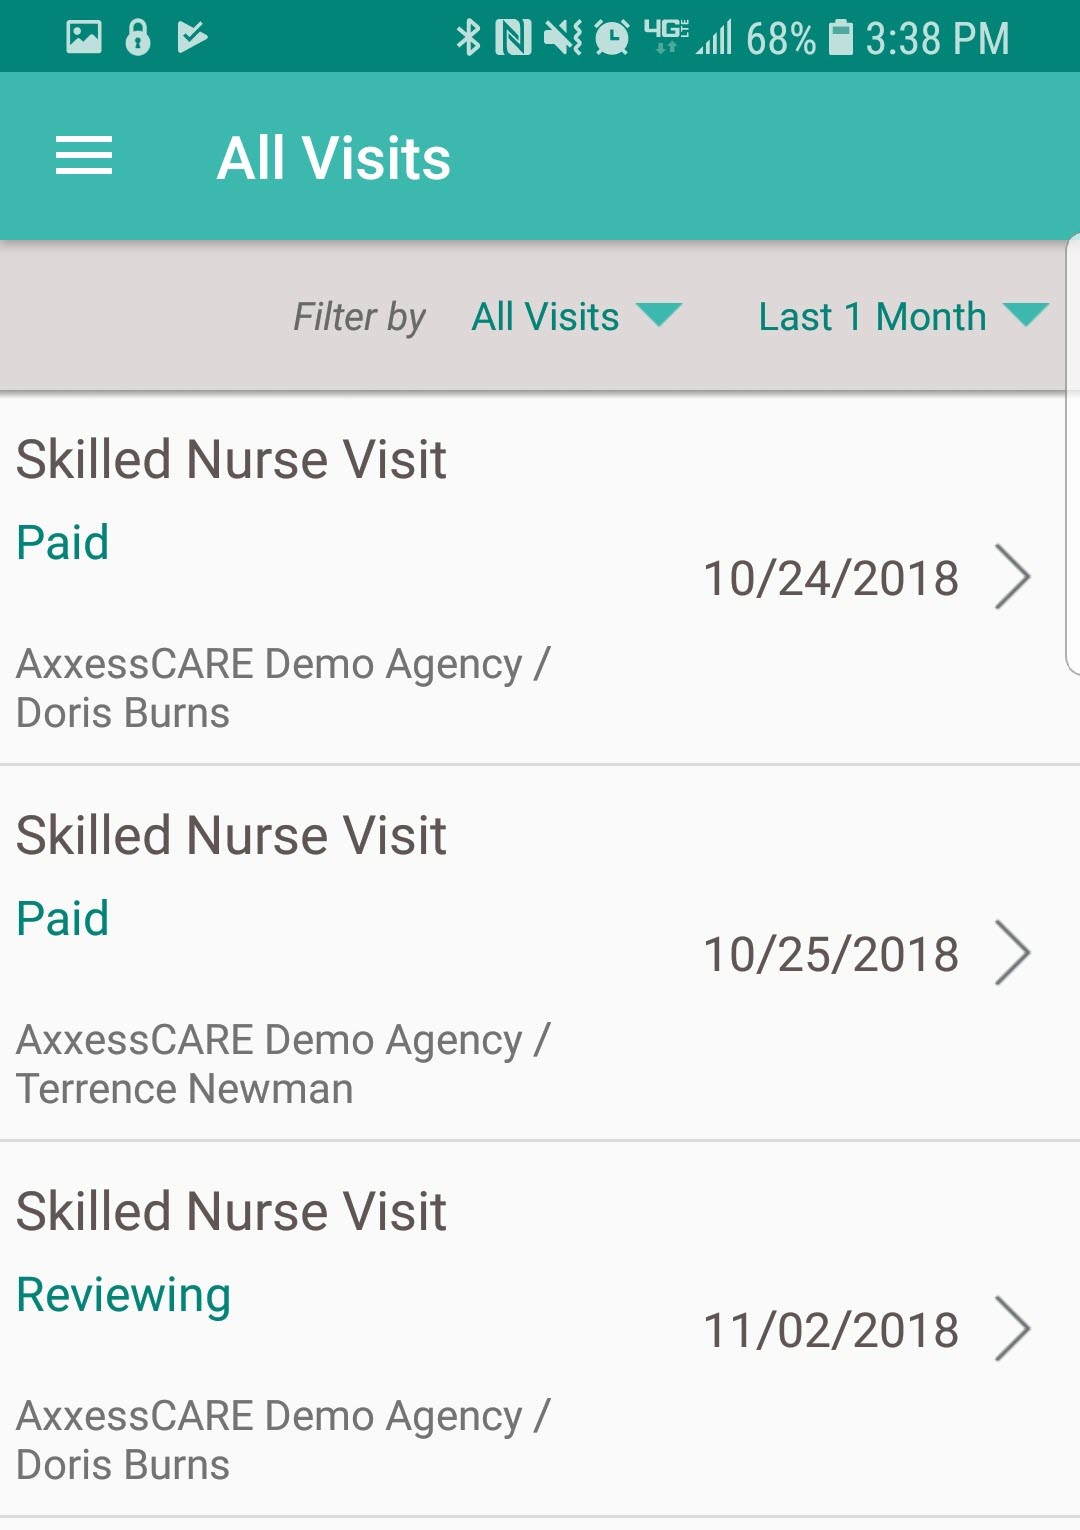
Shows all visits in every status. It will list the type of visit and the status below. Then the patient name and to the right the date of the visit. Tap on the visit to view more details. This page can be sorted by Status and Date by choosing either in the top right.
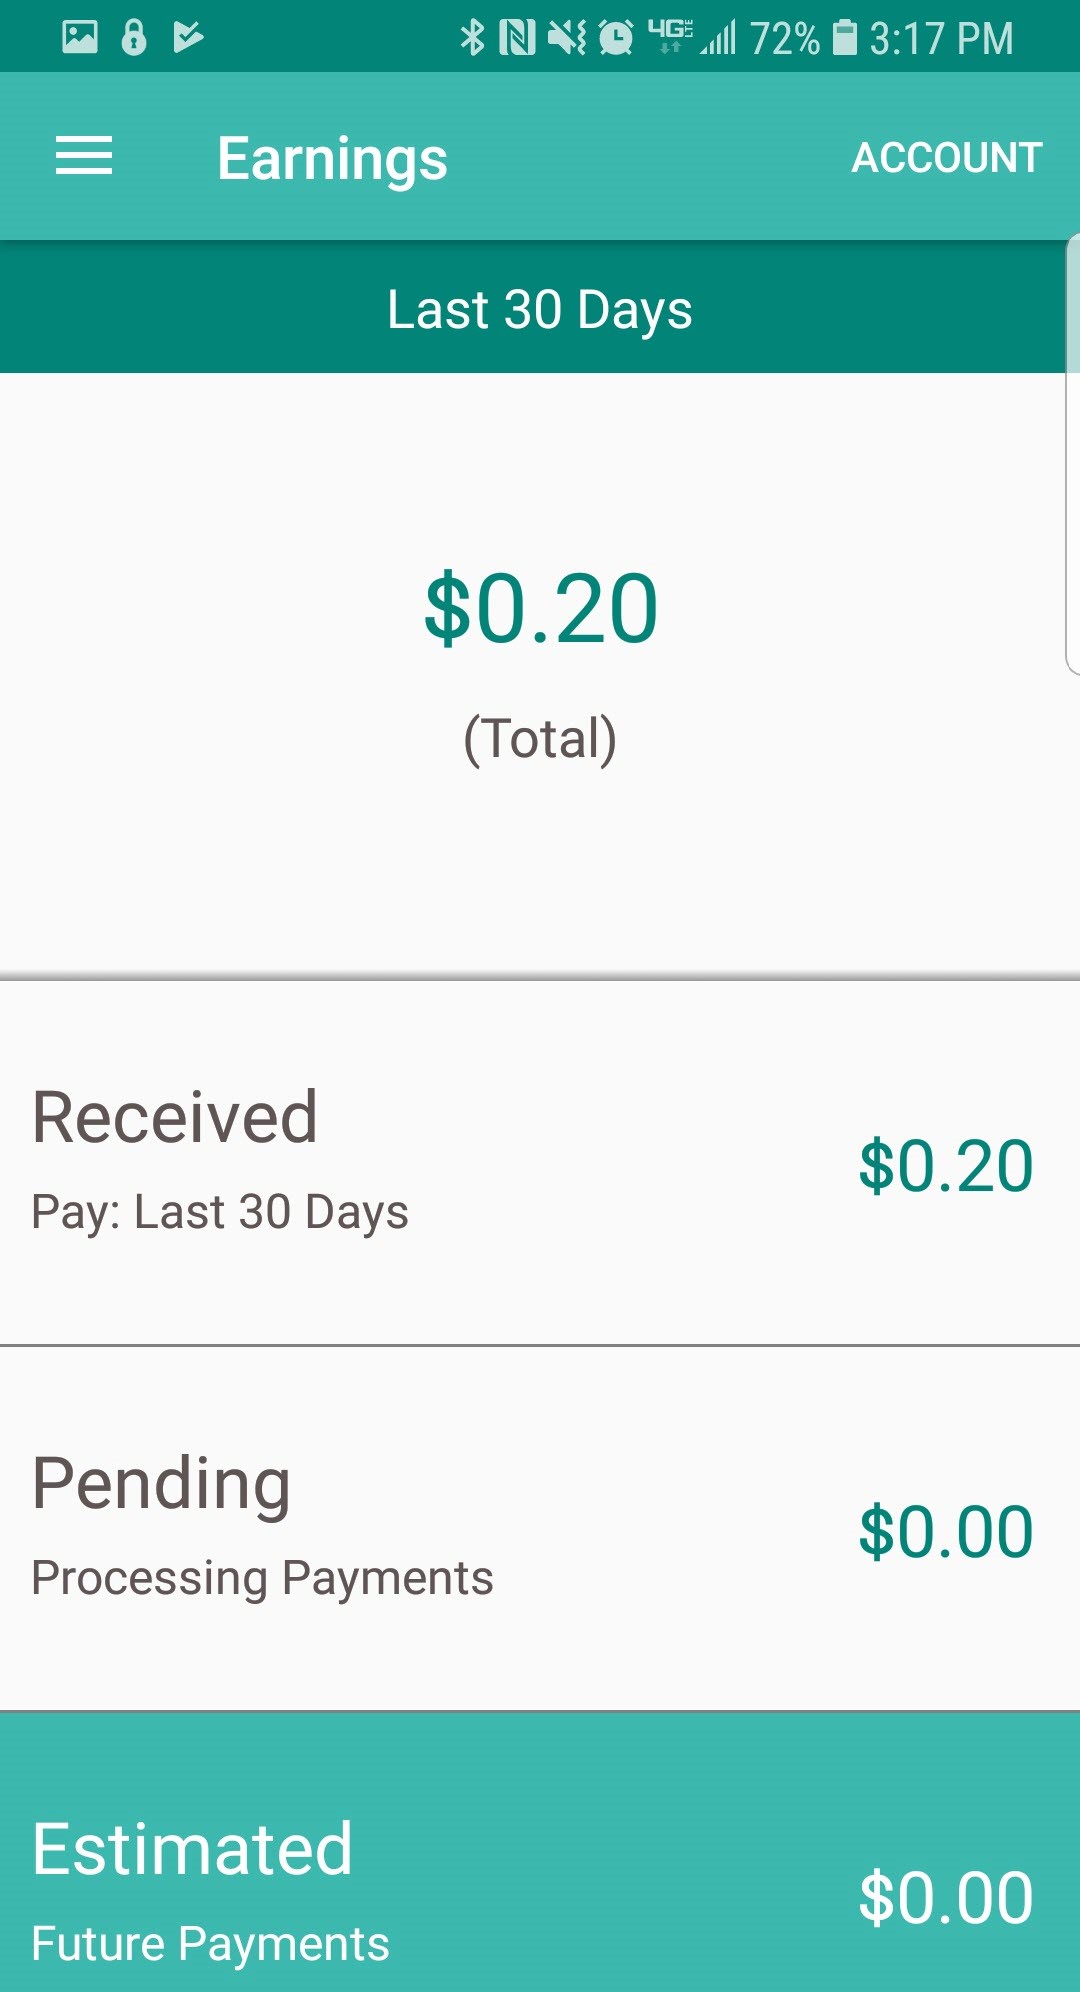
This page will show the total amount earned in the last 30 days. Below that shows the Received amount which is the amount deposited from the organization into the bank that is set up in the Payment Account. The Pending amount shows the total of payments currently being processed by the organization. The Estimated amount is reflective of any visits that have been started and finished pending a QA review with the organization.
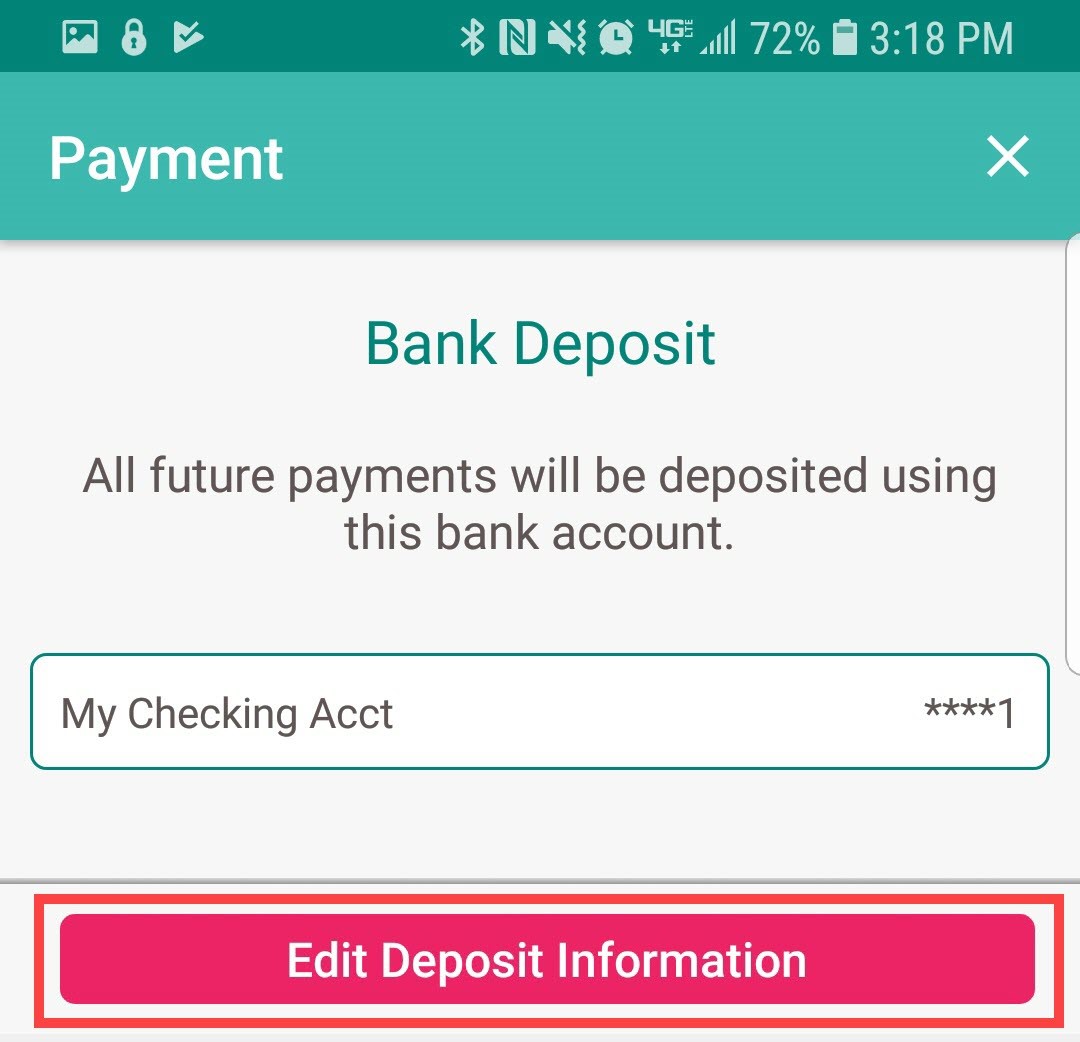
All payments from agencies will be deposited into the bank/checking account information listed by summary here. To update the bank/checking account, tap on the “Edit Deposit Information” button.
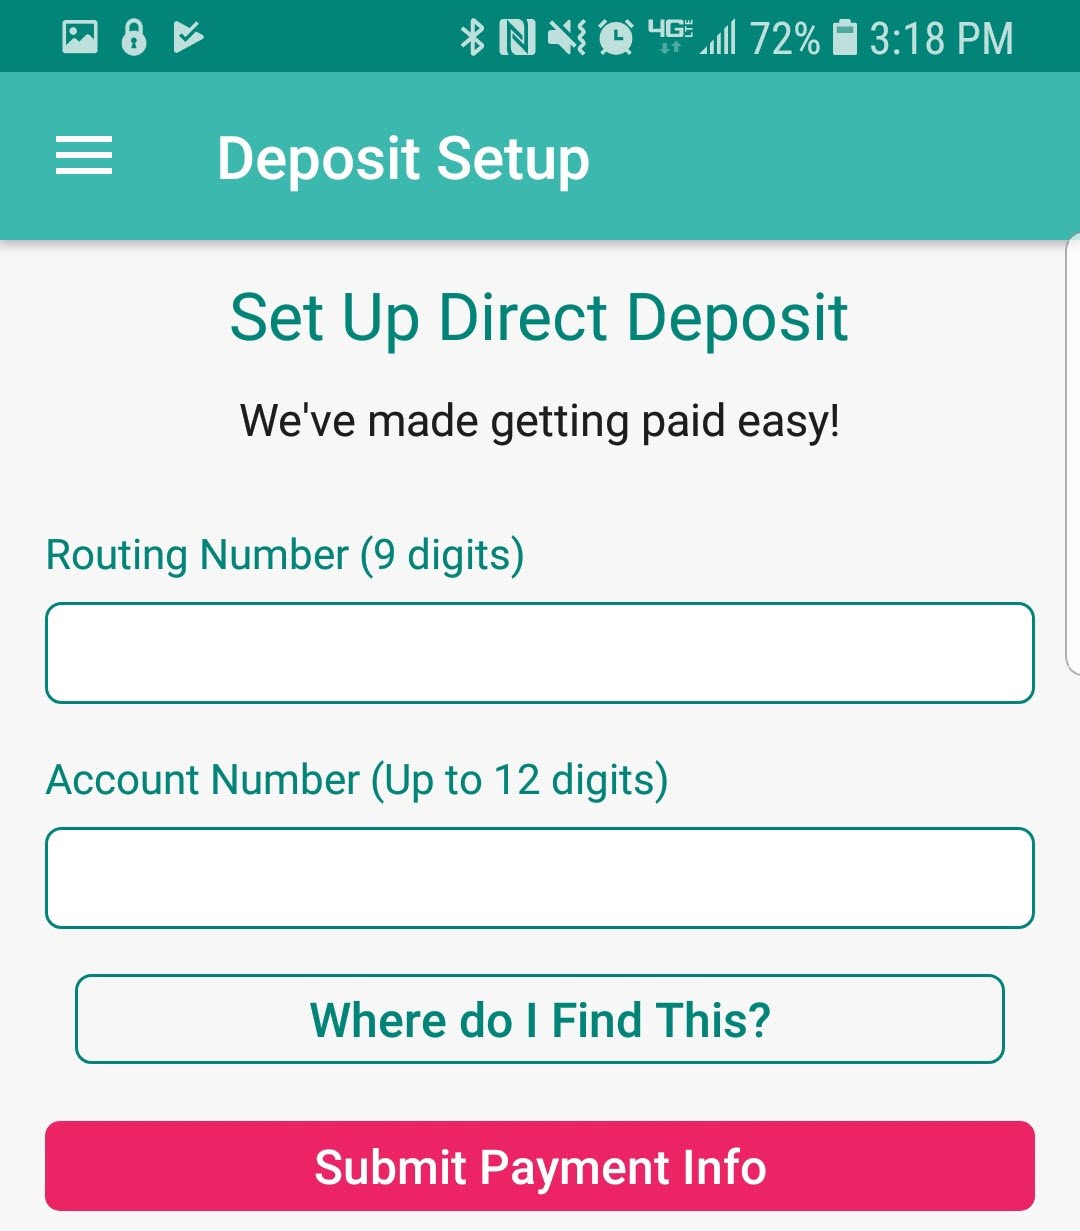
Enter the Routing and Account Number of the user’s bank/checking account. If those numbers cannot be found, tap the “Where Do I Find This?” button. Once entered, tap the “Submit Payment Info” button to complete.
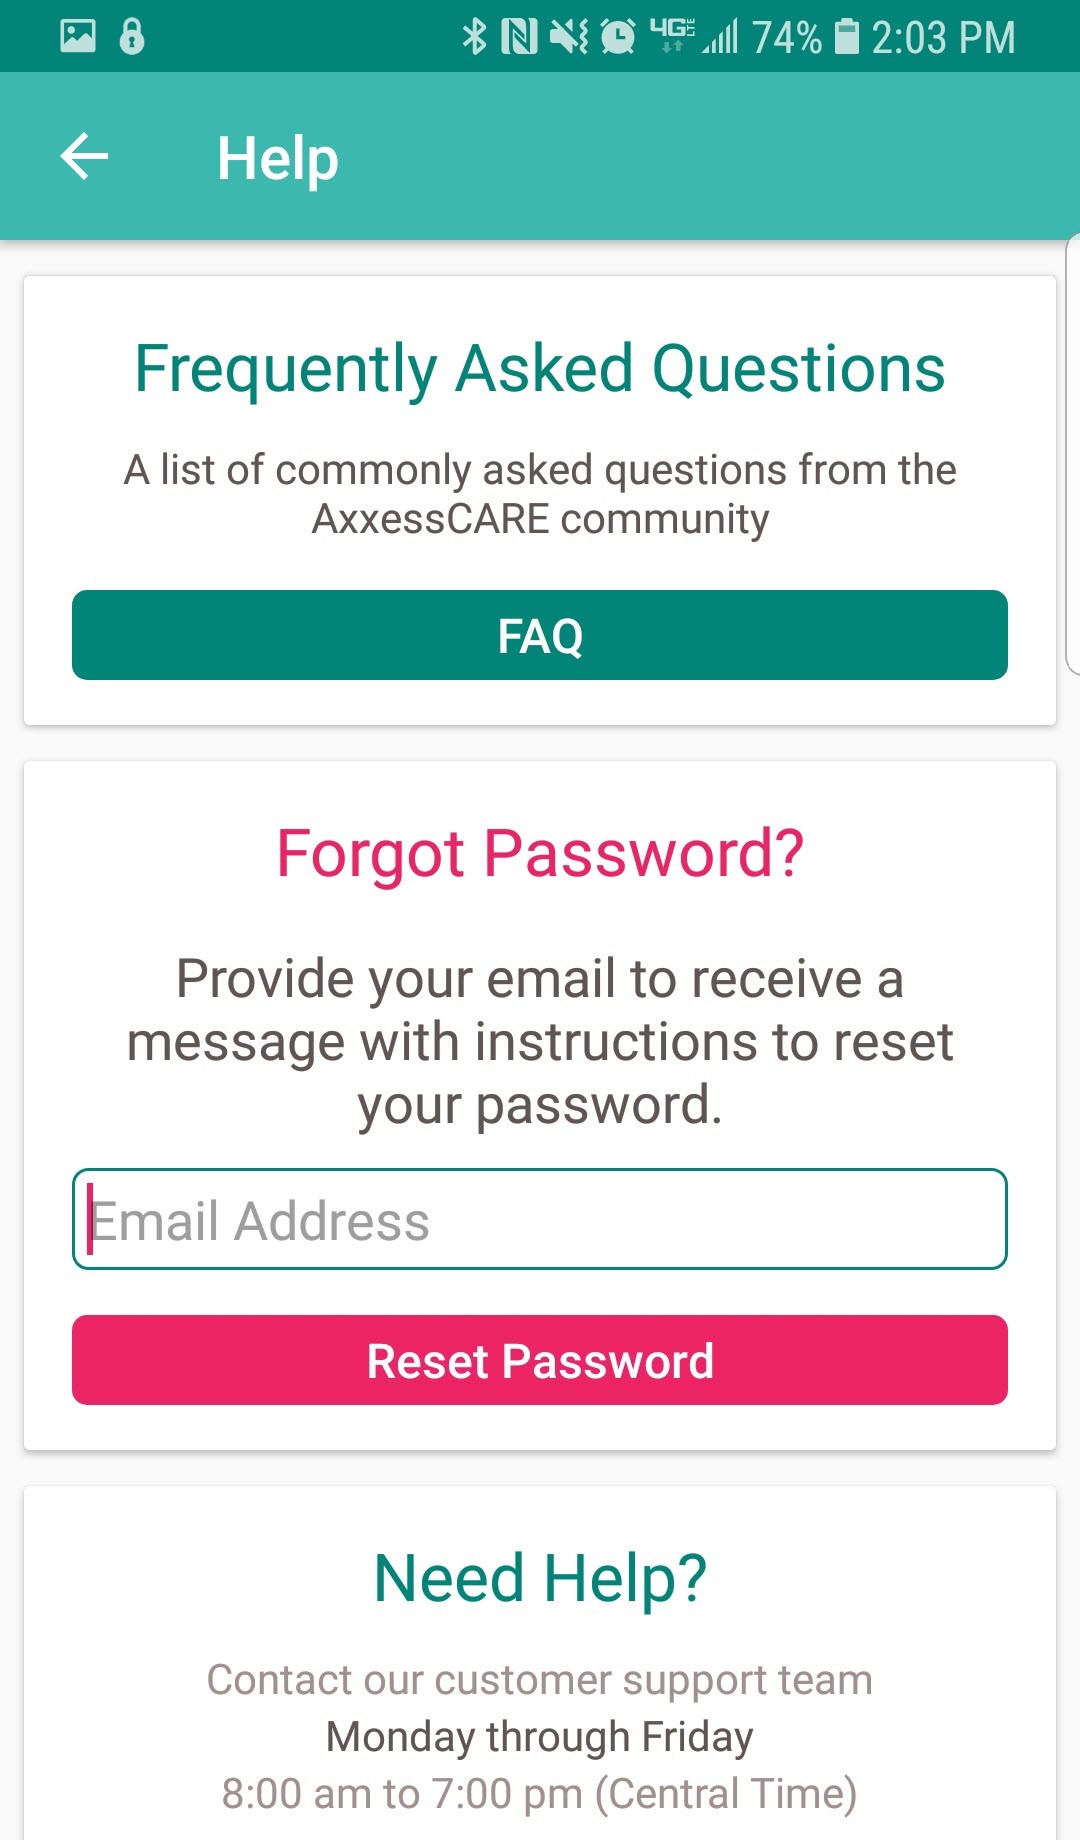
The top section is for Frequently Asked Questions (FAQ). If the password is forgotten, enter the email address associated with the account and tap “Reset Password.” Axxess Support is available Monday – Friday from 8:00 am – 7:00 pm CST. The phone number is (214) 575-7711.
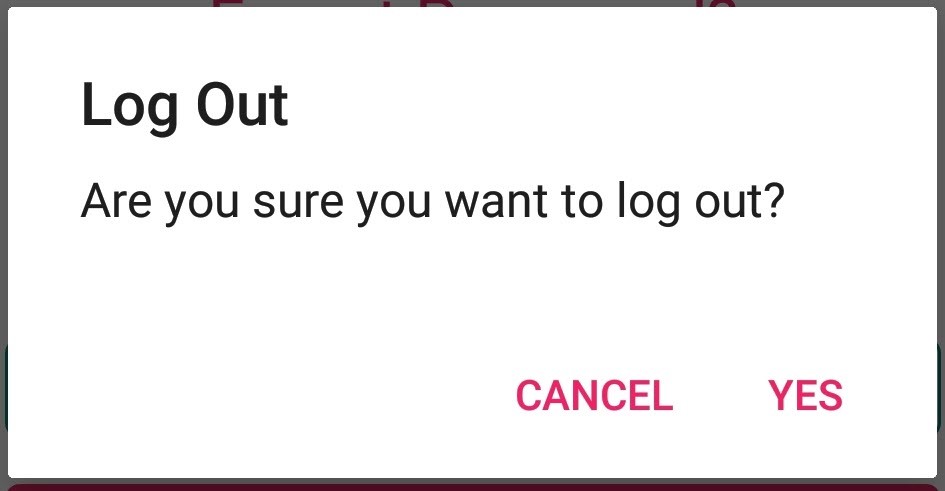
To leave the app, tap on Log Out. When logging out the following confirmation will display:
To get back into the app, re-enter the email address and password.
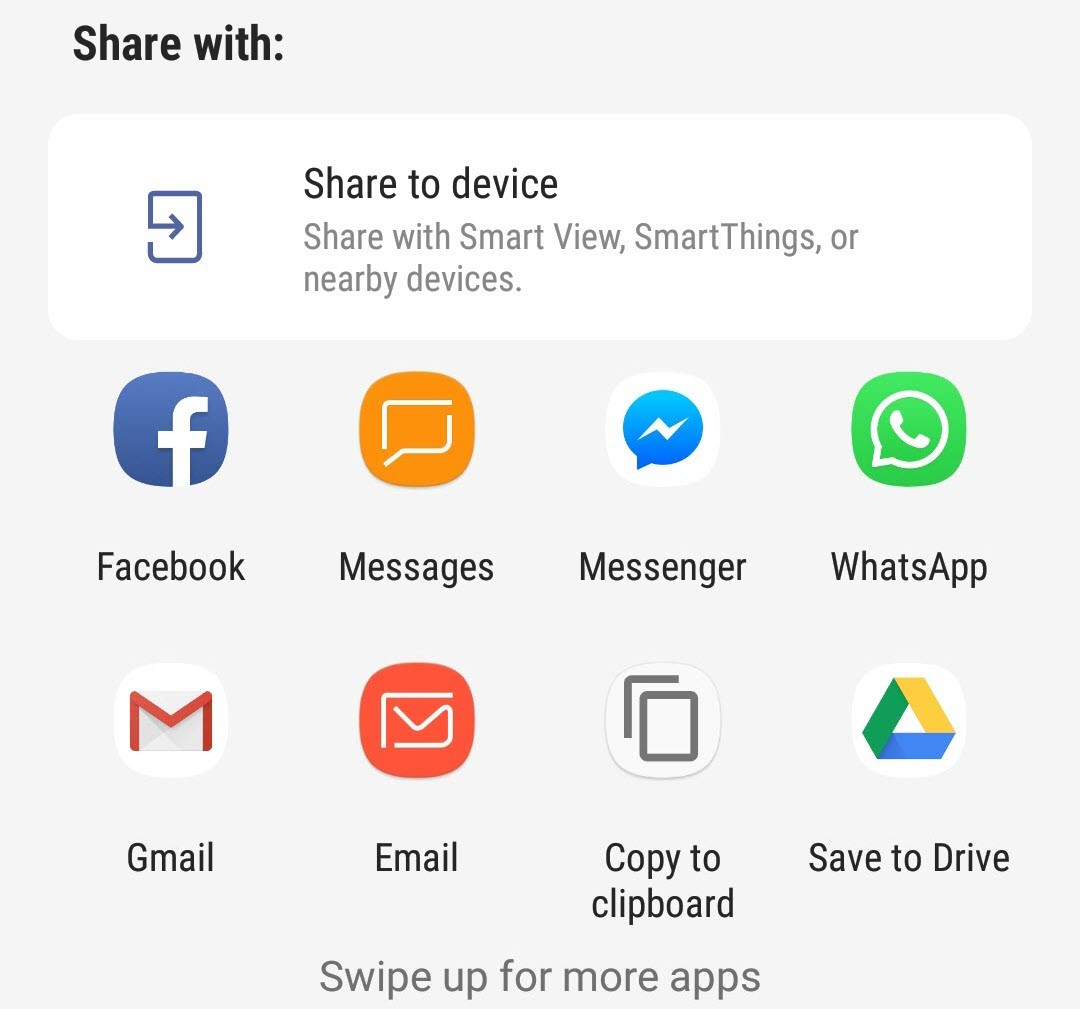
Tap on a visit from Main Menu/Visits. It will list the list the visit type, date, pay rate, how far away and the organization. Tap on “Share Visit.”

A window expands below. Choose an option to share the visit. Options/contacts will vary depending upon apps downloaded/available. Tap outside the window to collapse or tap the back arrow.
Tap on the “Apply” button.

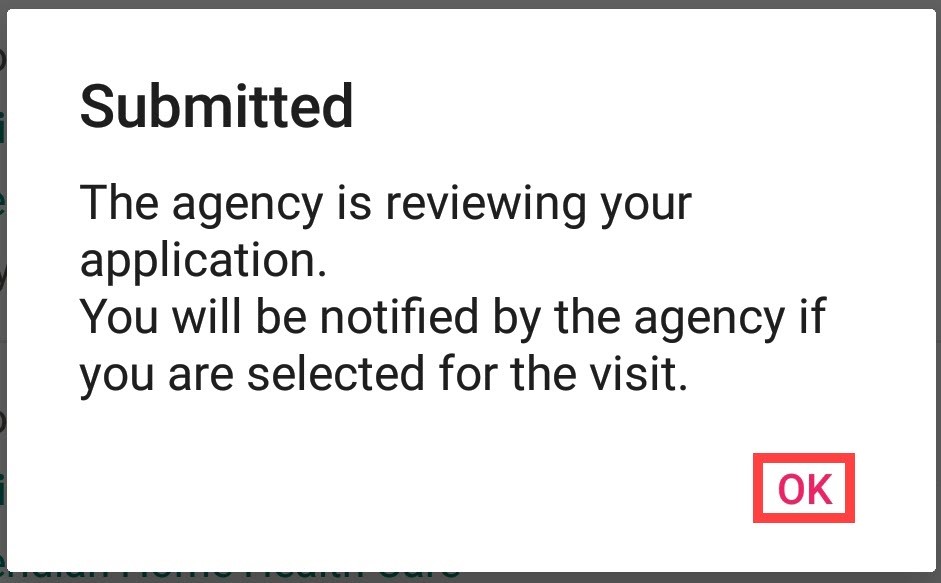
After applying for a visit, a confirmation window will appear. Tap “OK.” The visit will now be in the list of Applied Visits. The organization will now determine whose application they will accept (if there’s more than one) in the AxxessCARE desktop application.
There will be a purple notification bar towards the top of the screen whether in the Home, Schedule or Visits tab, if the organization accepts the application. There is also a one-hour timer to accept the visit. Tap on the notification bar.
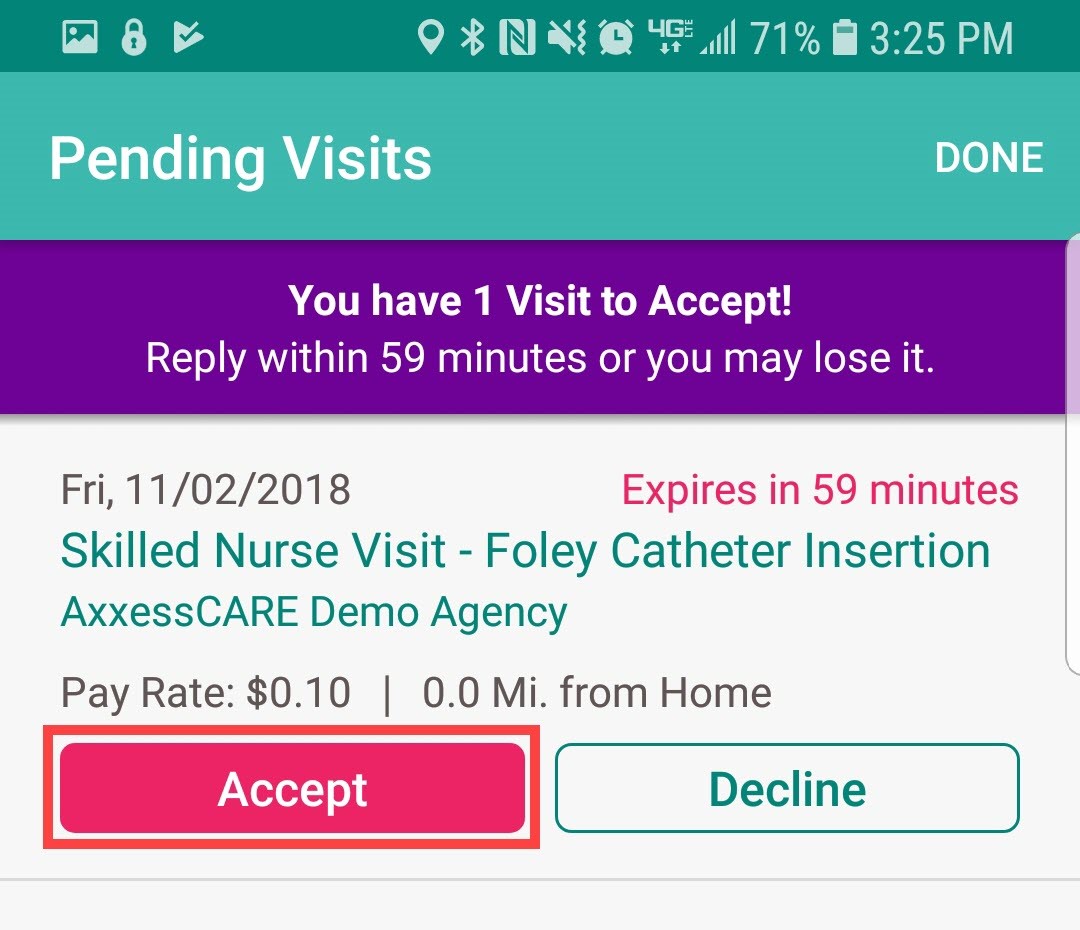
The next page is the Pending Visits screen. Tap on the “Accept” button.
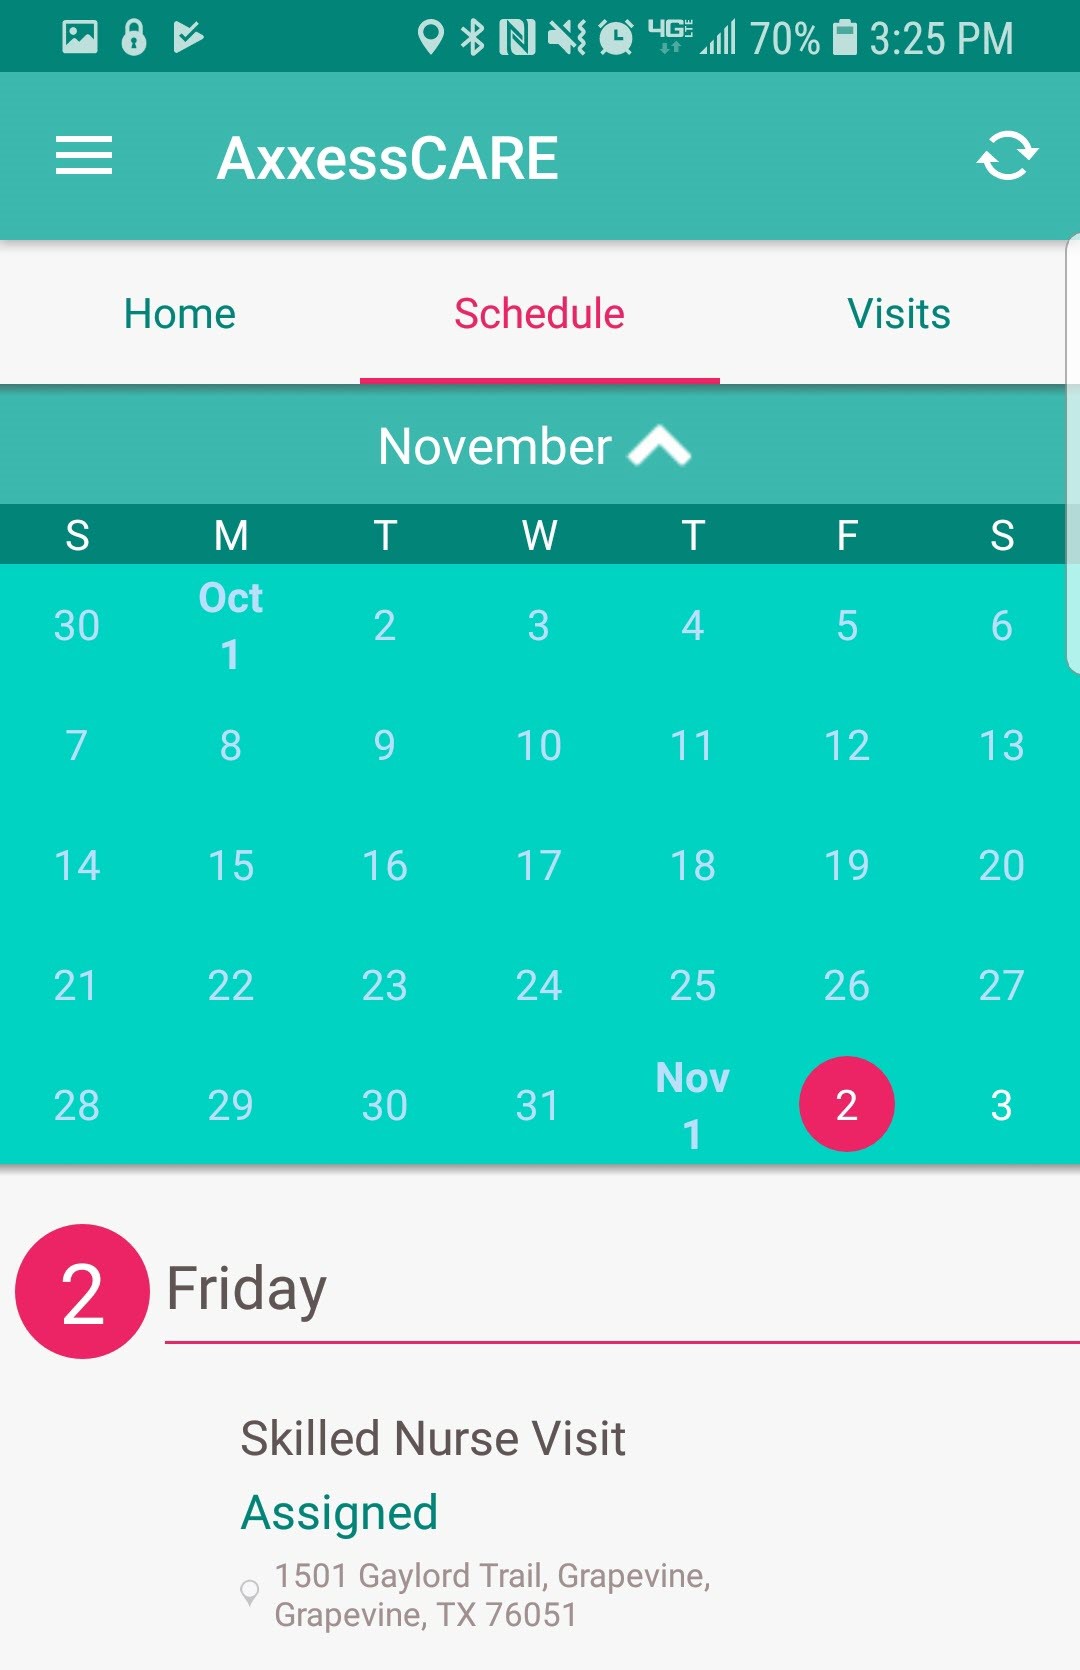
There will be a confirmation that the visit has been accepted. Tap on “OK.” The visit will now show on the Schedule as Assigned. Tap on the visit to go to the specifics including the Patient Profile and the ability to start the visit.
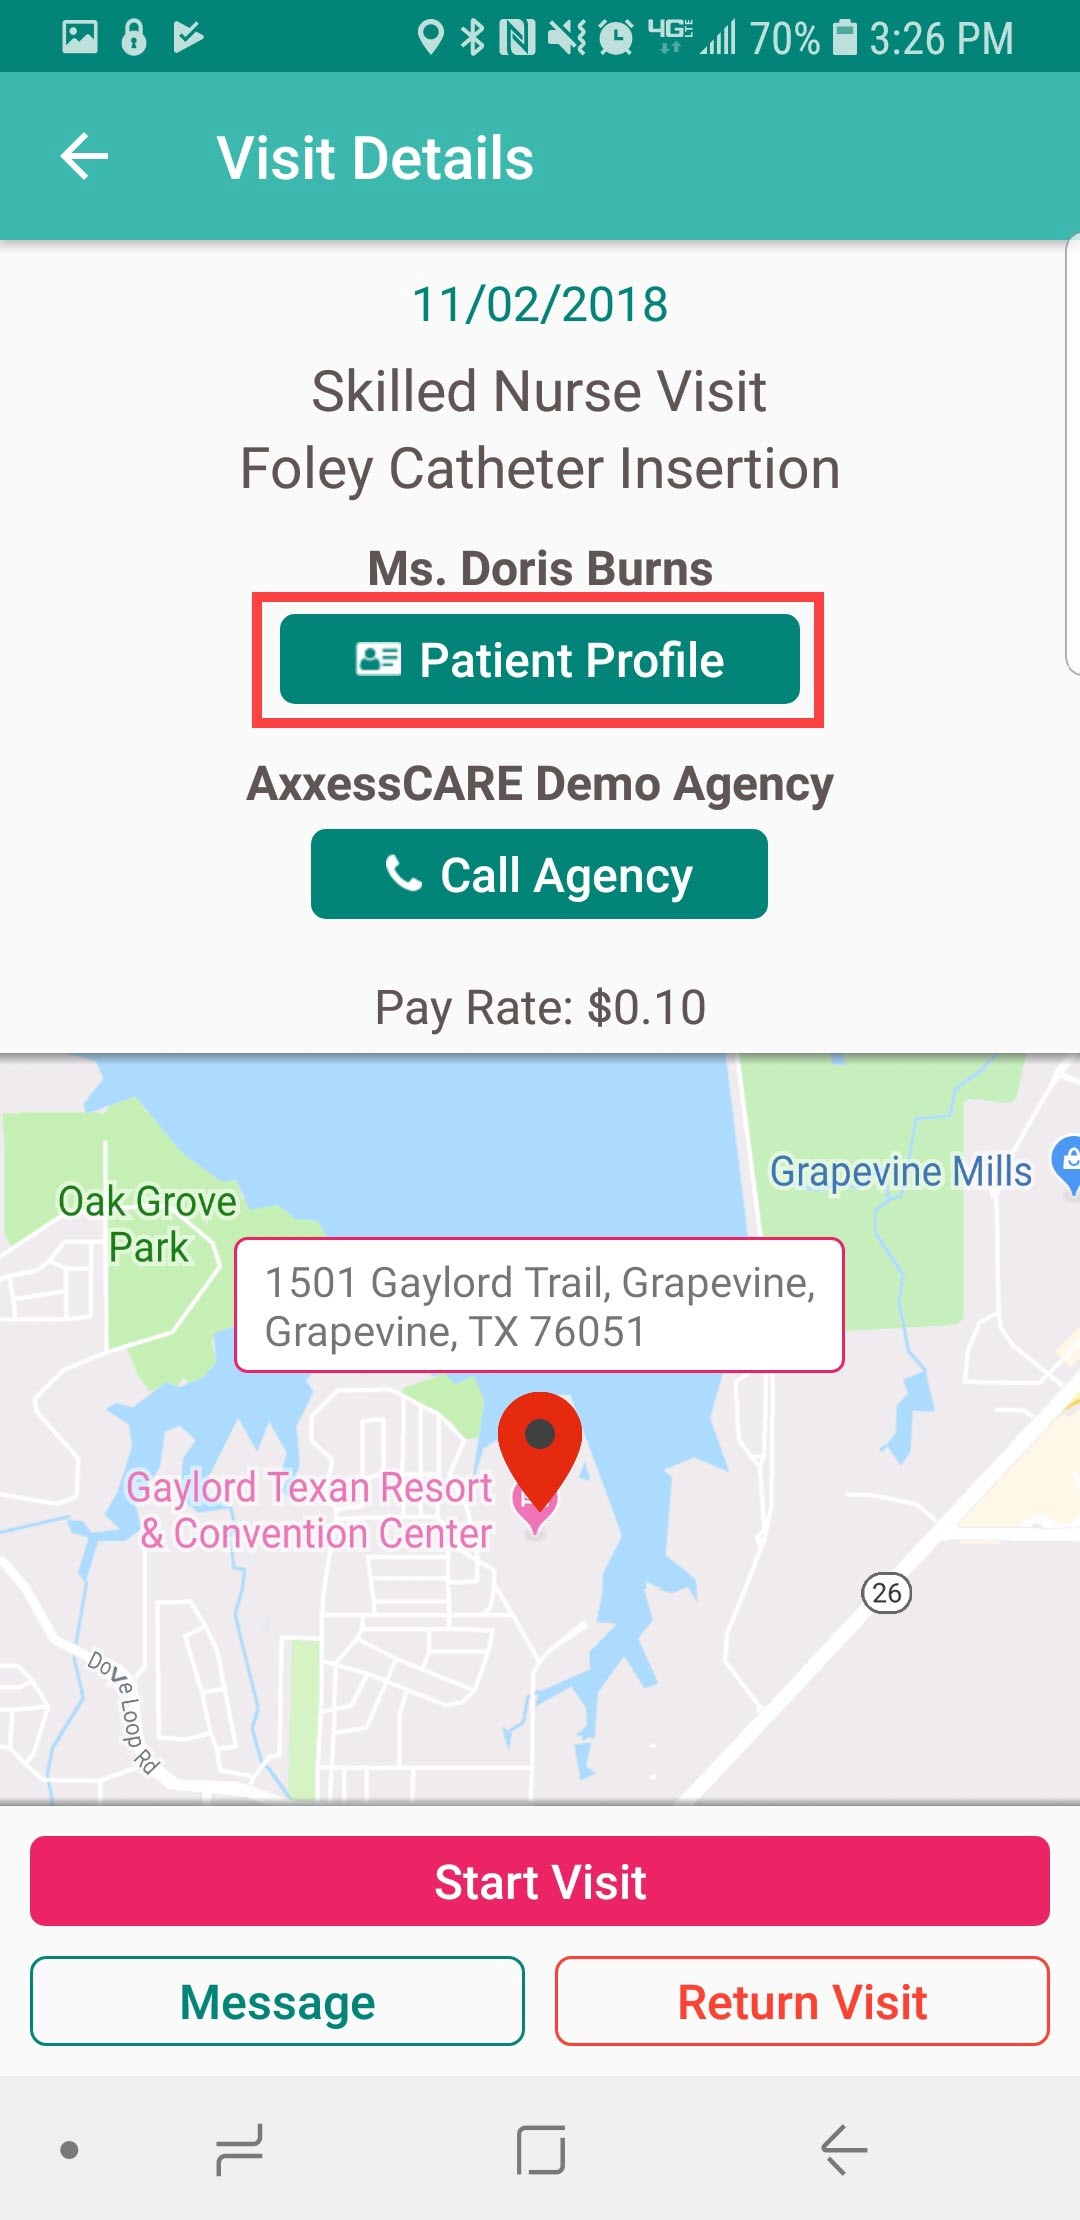
There is now an option to call the organization if there are any questions. Also, if the visit cannot be performed, tap on the “Return Visit” button.
Tap on the Patient Profile to look at the patient’s chart before starting the visit.
The following is the Patient Profile. All information shown has been entered through the Axxess AgencyCore application. It shows the patient’s DOB, MRN #, Gender, and Payer. Tap on “Call” to auto-dial the patient phone number. Tap on “Map” to see patient location in the map/directions apps available.
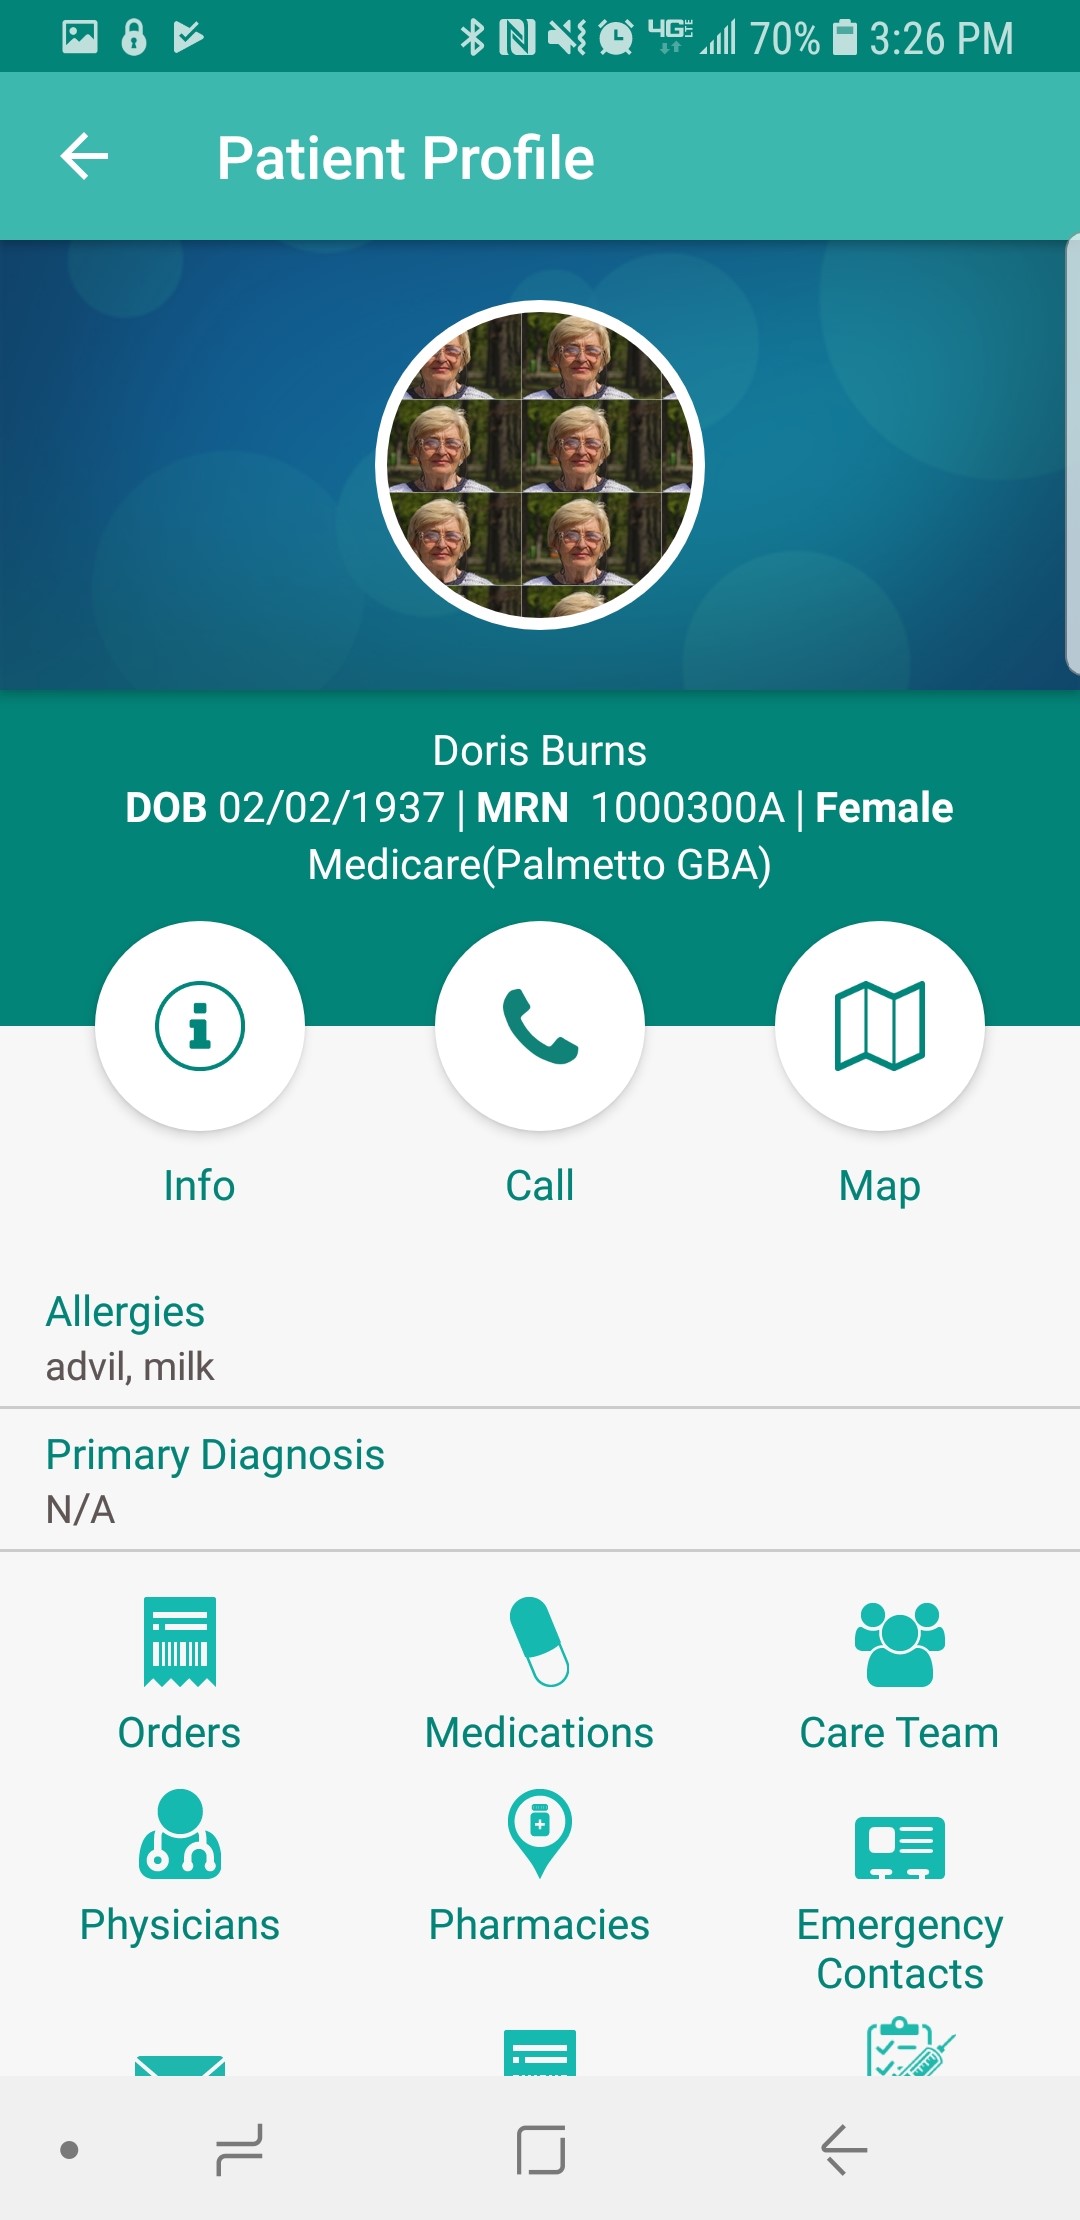
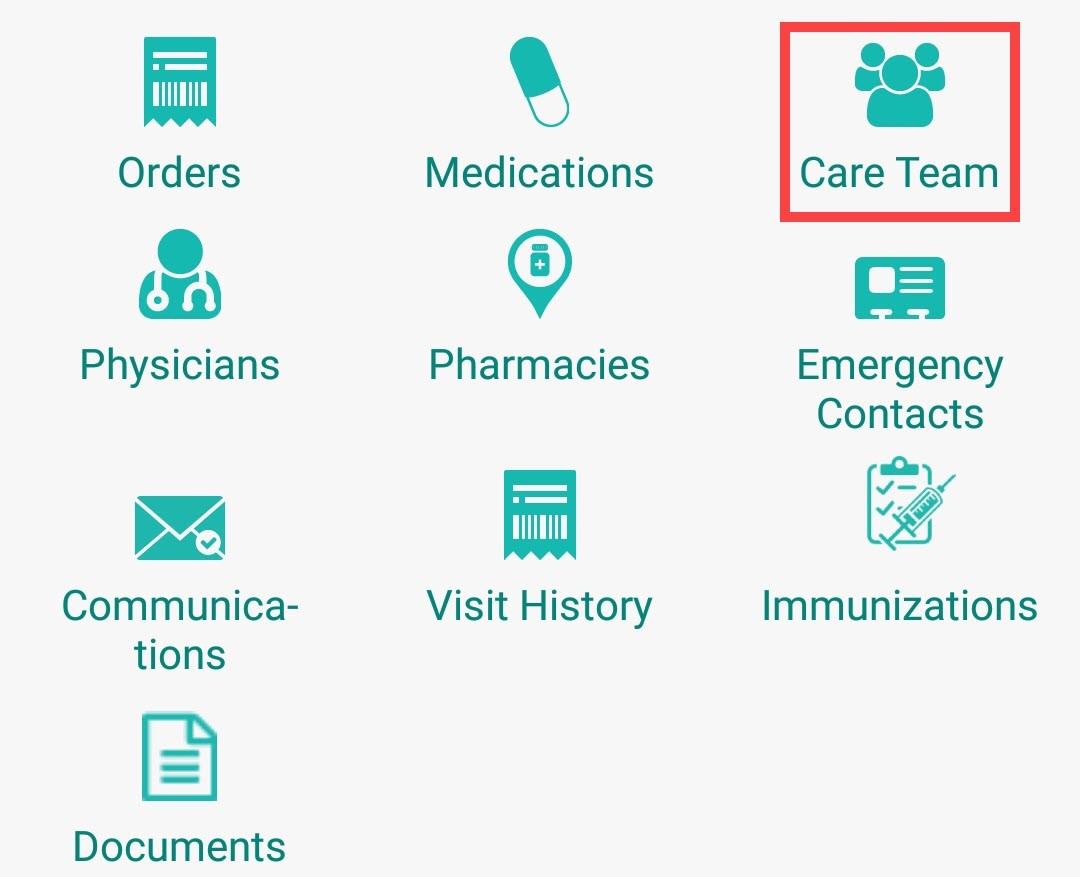
It will also show the patient’s Allergies, Primary Diagnosis and links to view, edit and/or add to their Orders, Medications, Care Team, Physicians, Pharmacies, Emergency Contacts, Communications, Visit History, Immunizations and Documents. Tap on the “Care Team” button.
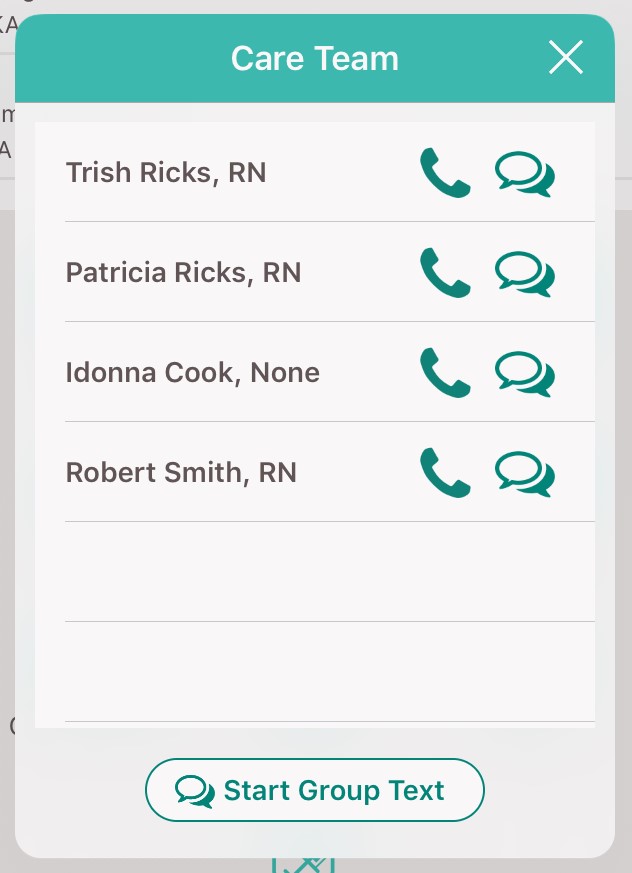
The Care Team window will show all users/clinicians that are tied to this patient.
Message team members individually by tapping on the message ![]() icon or call them by tapping on the phone
icon or call them by tapping on the phone ![]() icon. To message the group, tap on the “Start Group Text” button. Tap outside of the window to close or tap the “X.”
icon. To message the group, tap on the “Start Group Text” button. Tap outside of the window to close or tap the “X.”
To see the badge that identifies the staff member making the visit, tap the “ID Badge” from the Visit Details page.
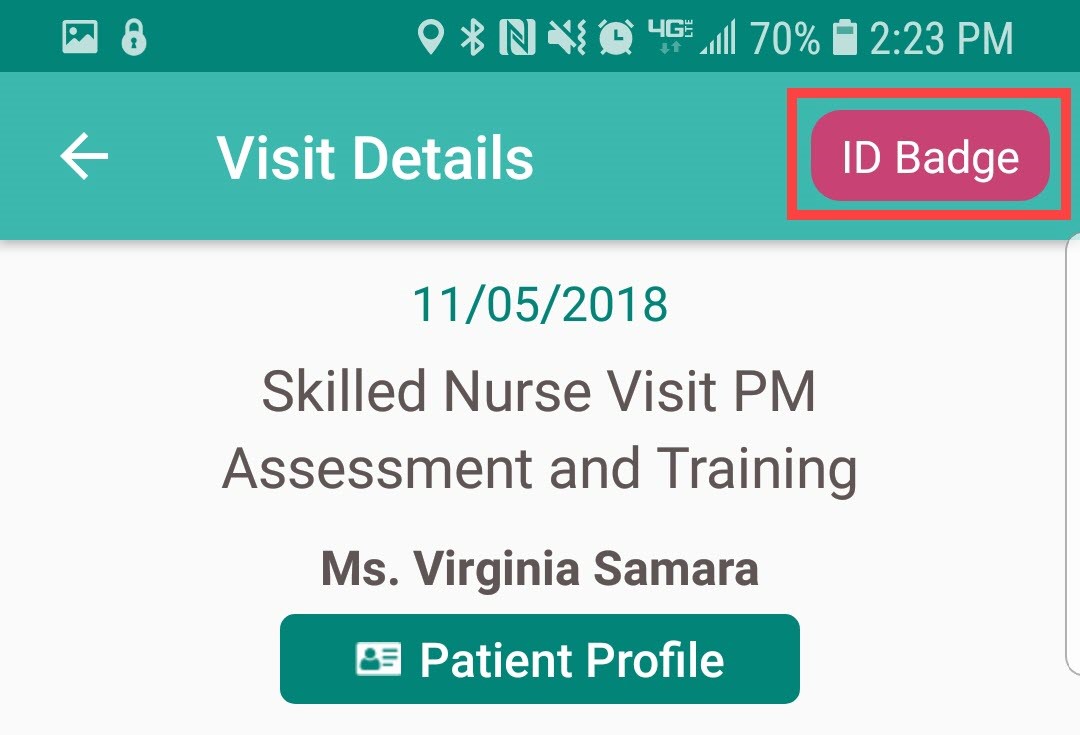
The following ID Badge will display for 60 seconds. When done, tap the back arrow in the top left to close the page.
From the Visit Details, tap on the “Start Visit” button.
![]()
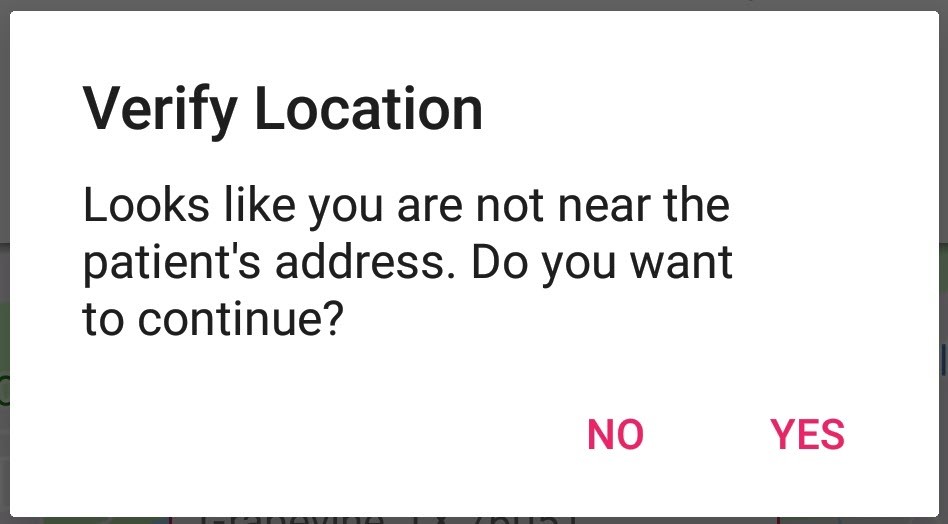
If the user is not in the area of the patient’s address, the following verification will display:
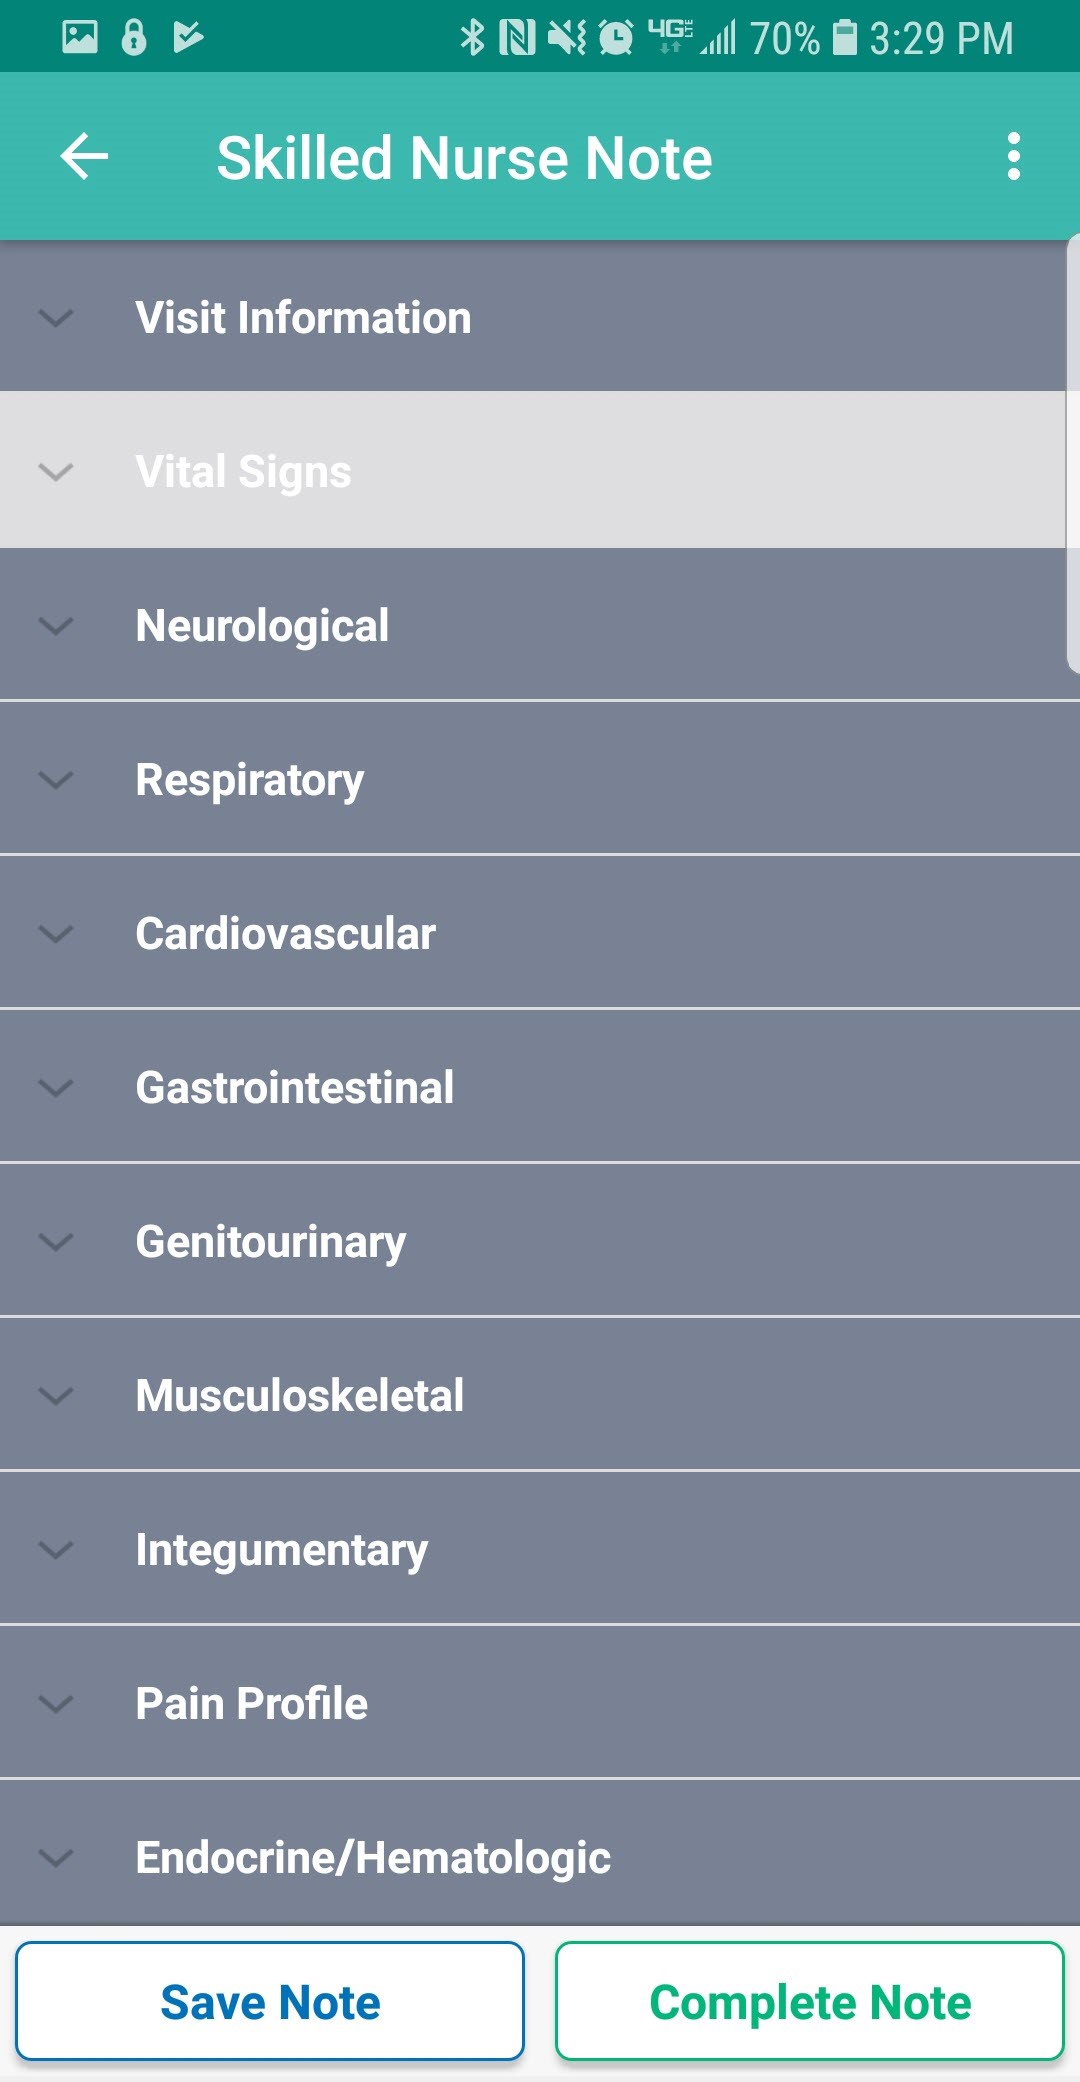
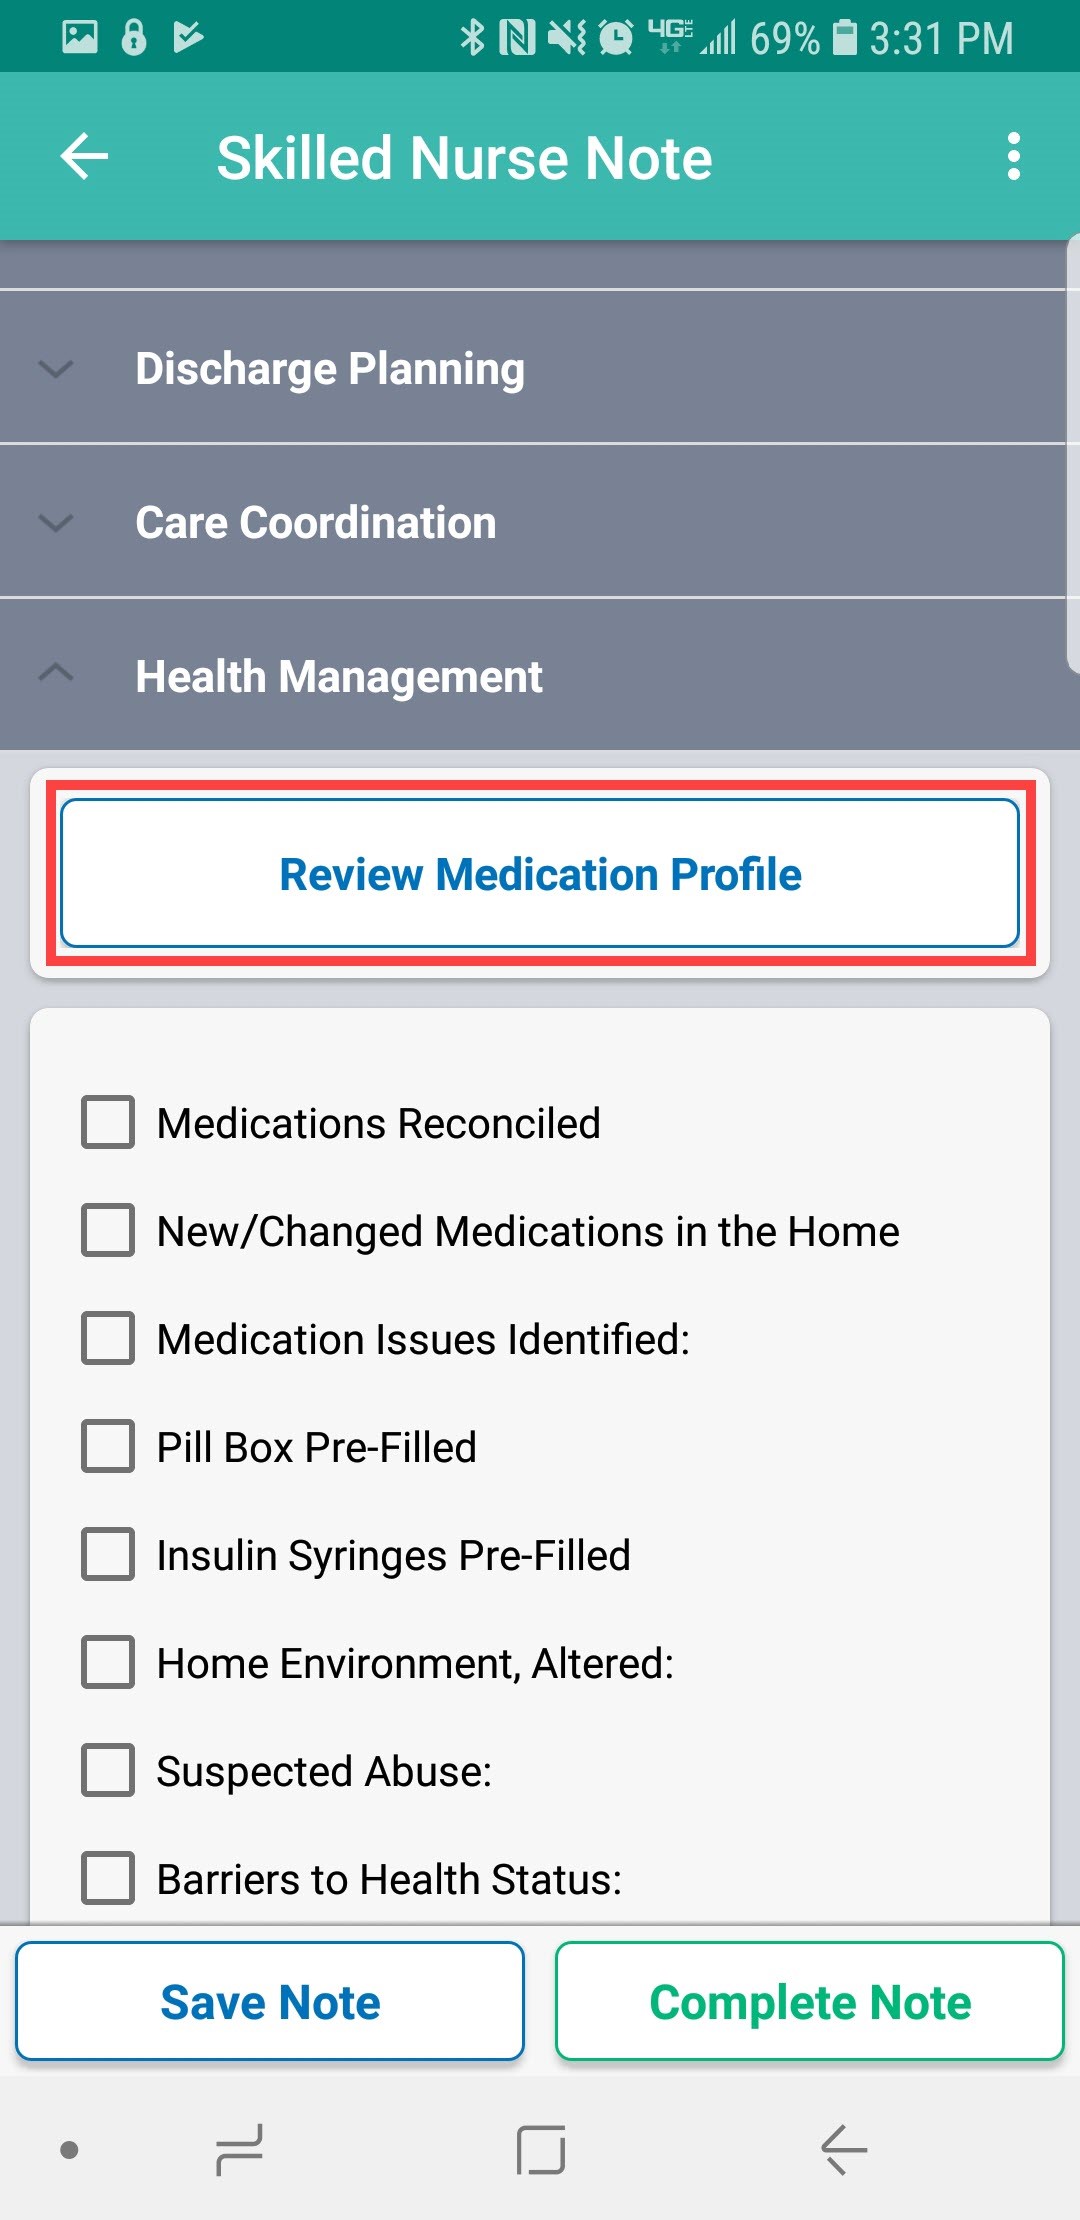
The following is the main menu of the visit. The following shows examples of a Skilled Nurse Note. The visit is split up into sections that can be expanded or collapsed. When categories are expanded, the arrow to the left (of category title) will face upward. Required questions will have either a red asterisk * or will be written that “At least one response is required” or “Must have answer.”
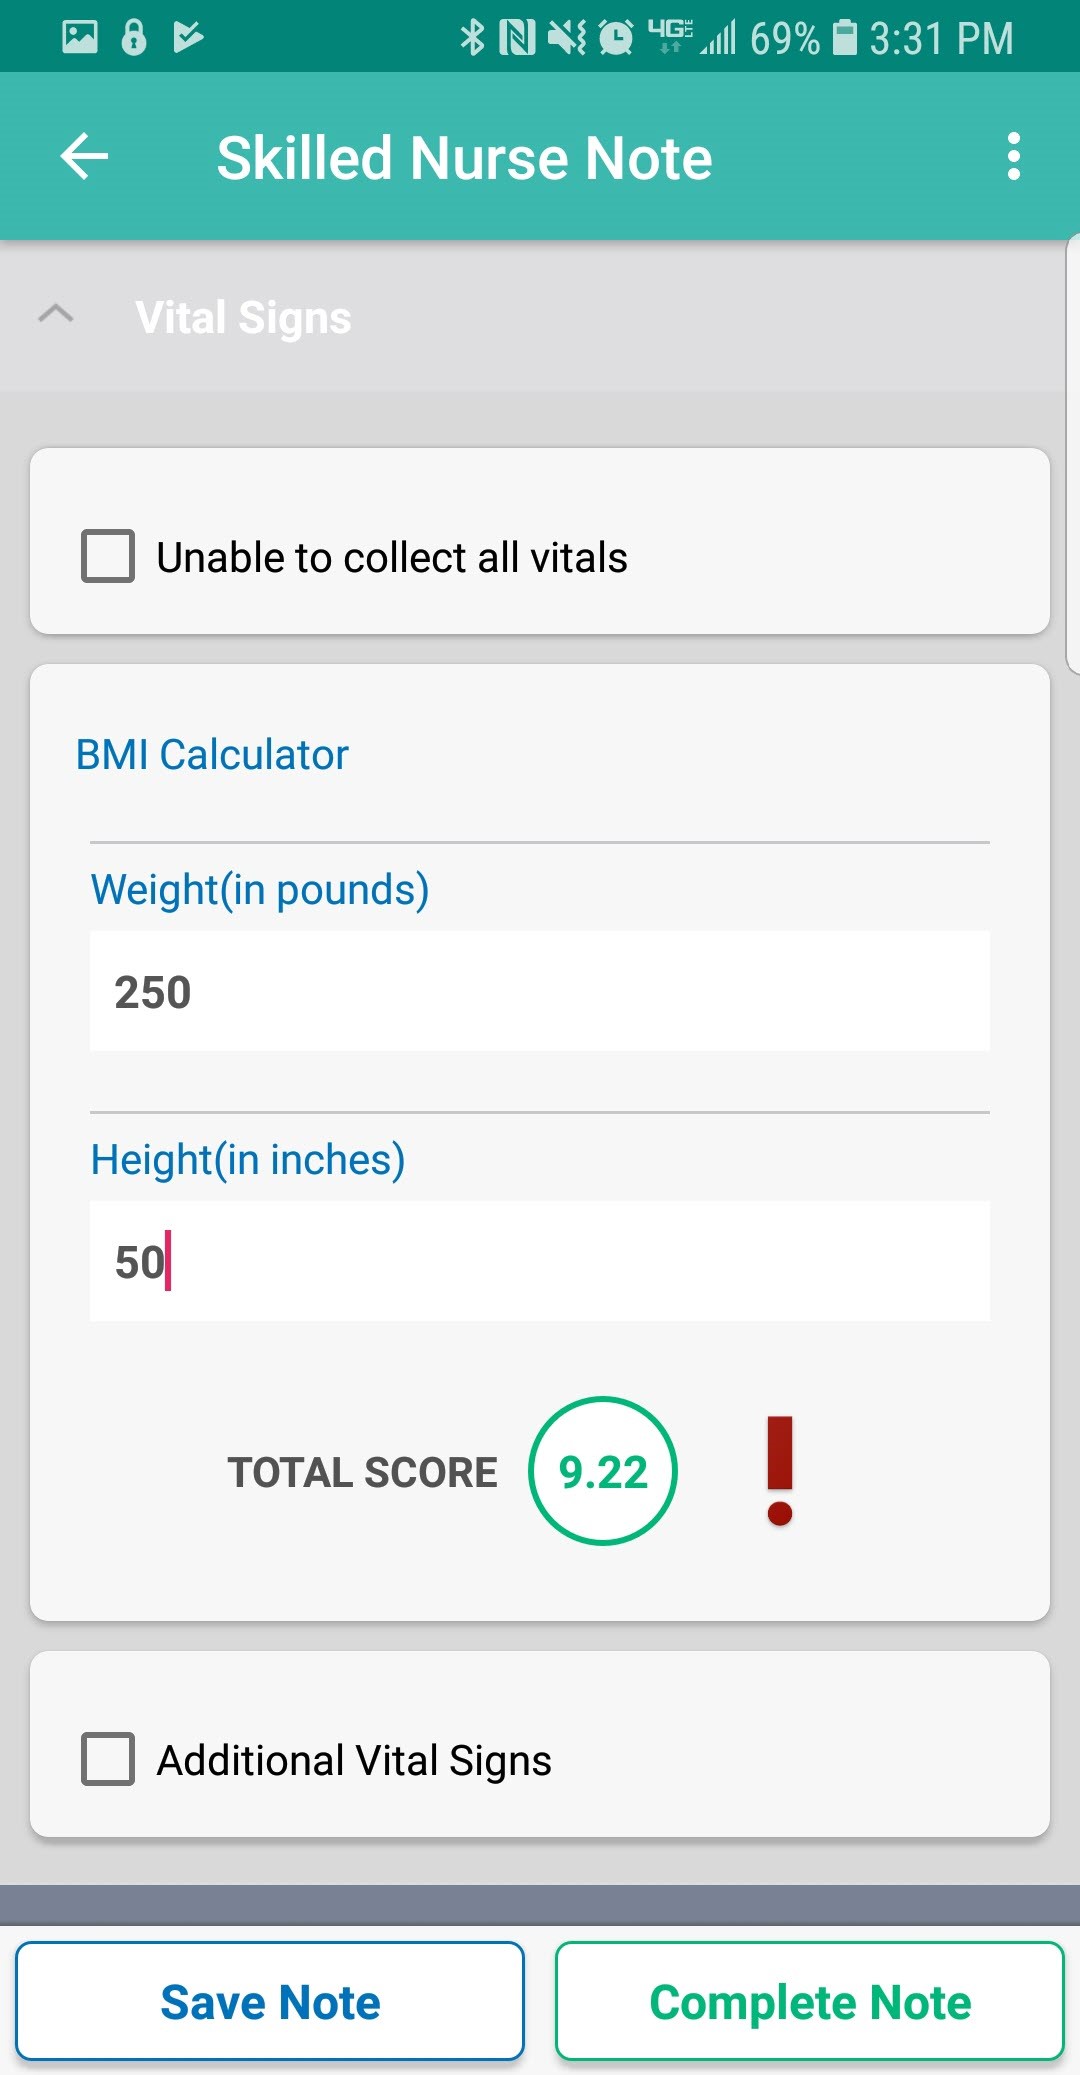
Depending on the assessment being completed, there might be some built-in tests. The following is an example of a BMI score. The score will be automatically updated while completing the test depending on how questions are answered. The Total Score will show (green text in circle), depending on the test, their score might put the patient in a group.
To add medications during a visit, tap the “Review Medication Profile” button.
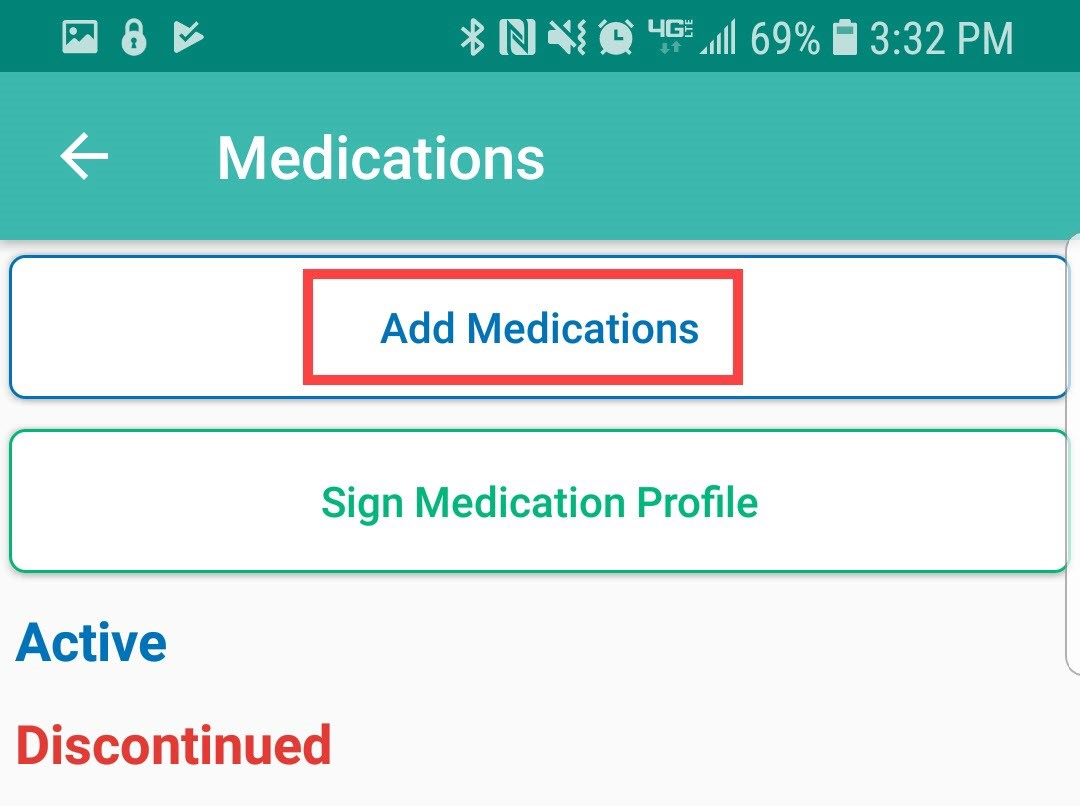
NOTE: The functionality of adding a medication works the same outside of the visit in the Patient Profile.
Inside the Medication Profile, tap on “Add Medications.”
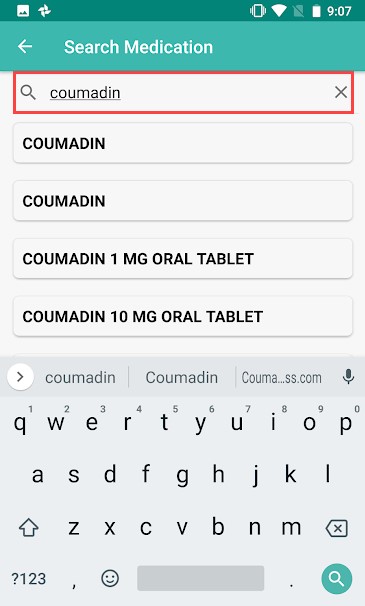
Then search for the medication in the text box. Once found, tap on the medication.
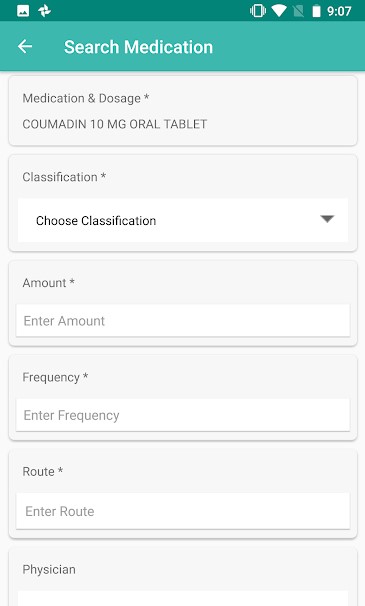
Choose the Classification from the drop-down. Enter the Amount, Frequency, Route and Physician. Continue to scroll down.
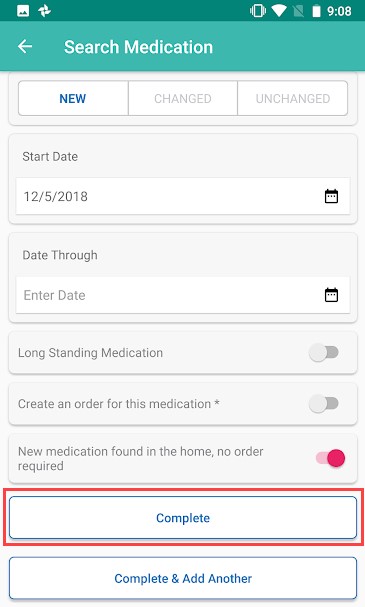
Choose whether medication is New, Changed or Unchanged. Enter Start Date and Date Through. Tap the sliders depending on whether this is a “Long Standing Medication”, to “Create an order for this medication” or New medication found in the home, no order required.” After finishing form, tap “Complete” unless another medication needs to be added, then tap “Complete & Add Another.”
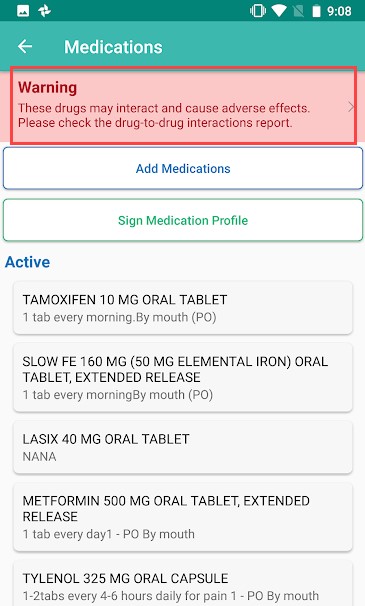
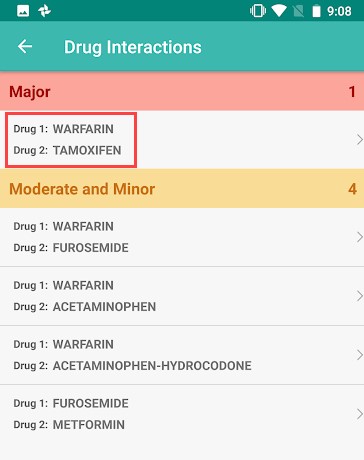
If more than one medication is added, the system will automatically run them for potential interactions. If the system finds any interactions, they will be listed as a Warning highlighted at the top of the page. Tap the Warning.
Then tap the combination of medications that are conflicting to read more.
Tap the back arrow in the top left to go back to the Med Profile.
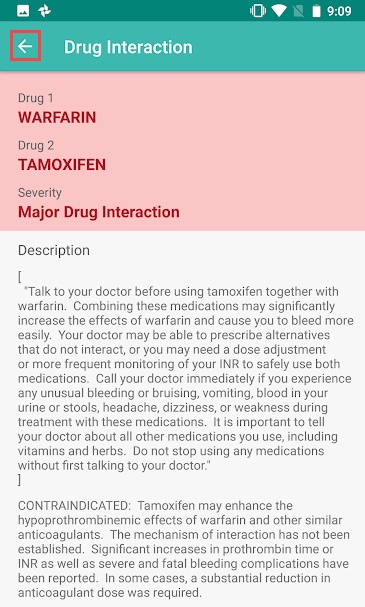
NOTE: Interactions are only run for medications currently listed in the AgencyCore database.
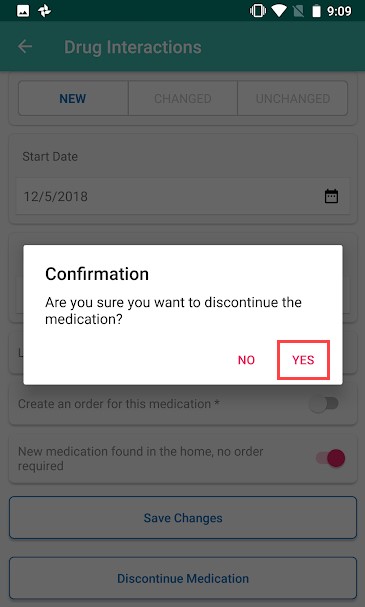
Once a medication has been entered, edit by tapping on the name of the medication. Scroll to the bottom of the page to Discontinue (patient no longer taking medication). After tapping Discontinue, confirm by tapping “Yes.” It will then be listed in the Discontinued section of the med profile.
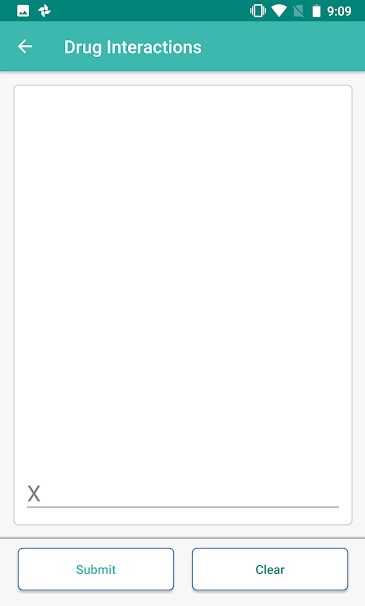
Once finished with the medication reconciliation, tap the “Sign Medication Profile” button to verify medications have been clinically reviewed. Sign with finger or stylus above the line after the X. When completed, tap “Submit.”
The medication profile will now show as reviewed.

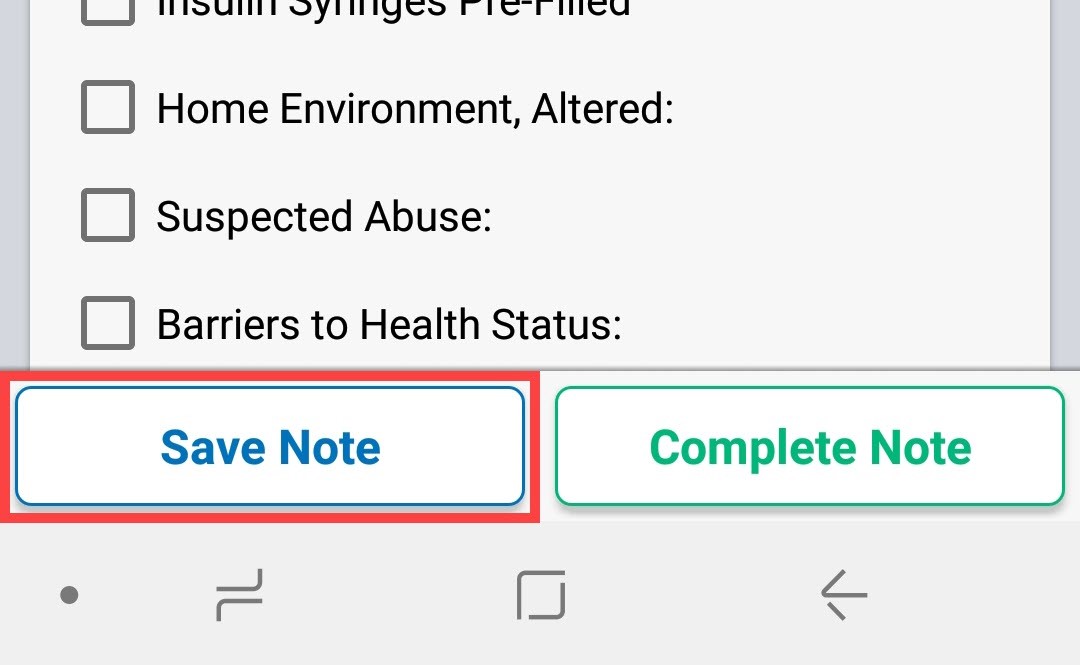
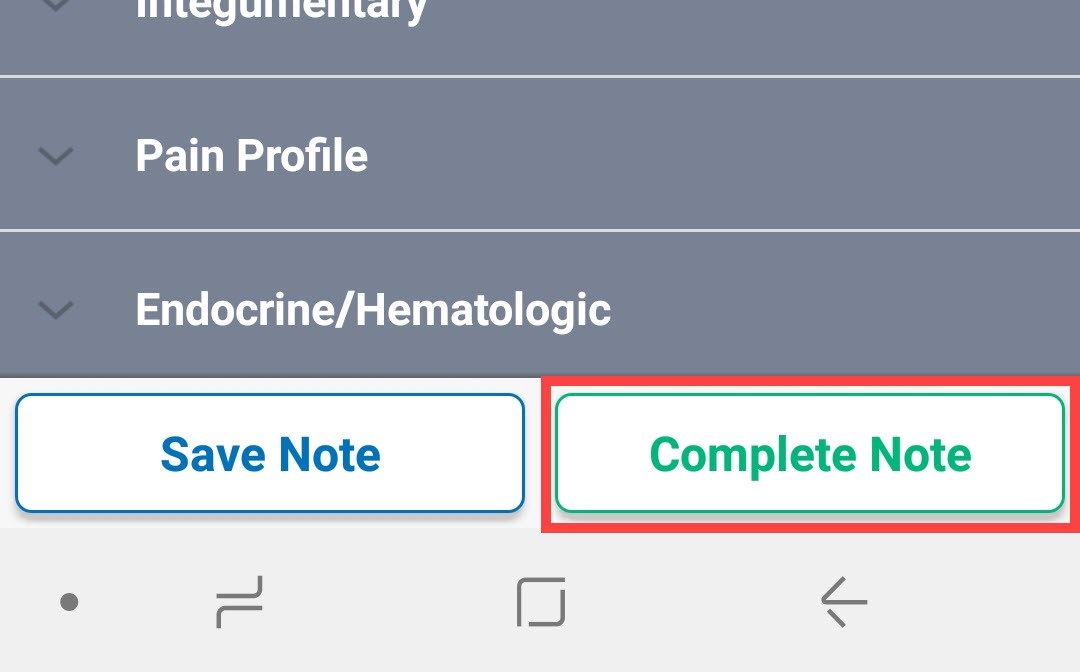
To leave the visit and save progress, tap on the “Save Note” button in the bottom left of the visit.
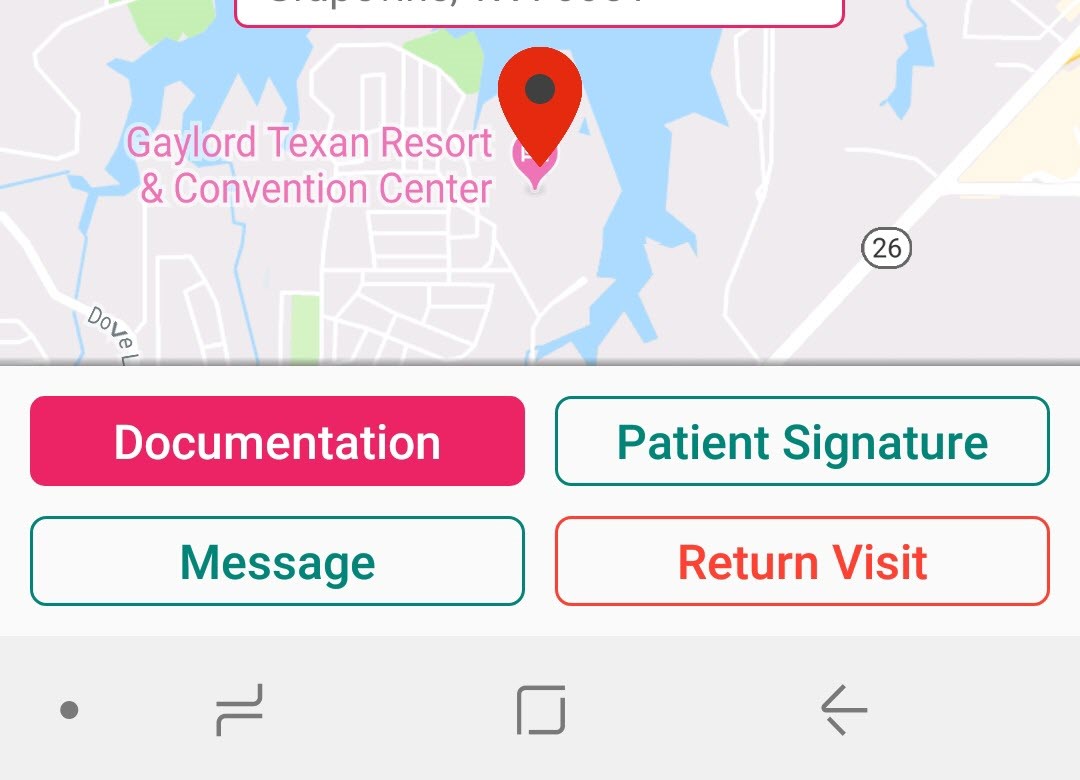
To return to the visit, tap on “Documentation” button. To leave the patient’s residence before documenting is finished, tap on the “Patient Signature” button.
When documentation is finished, tap on “Complete Note.”
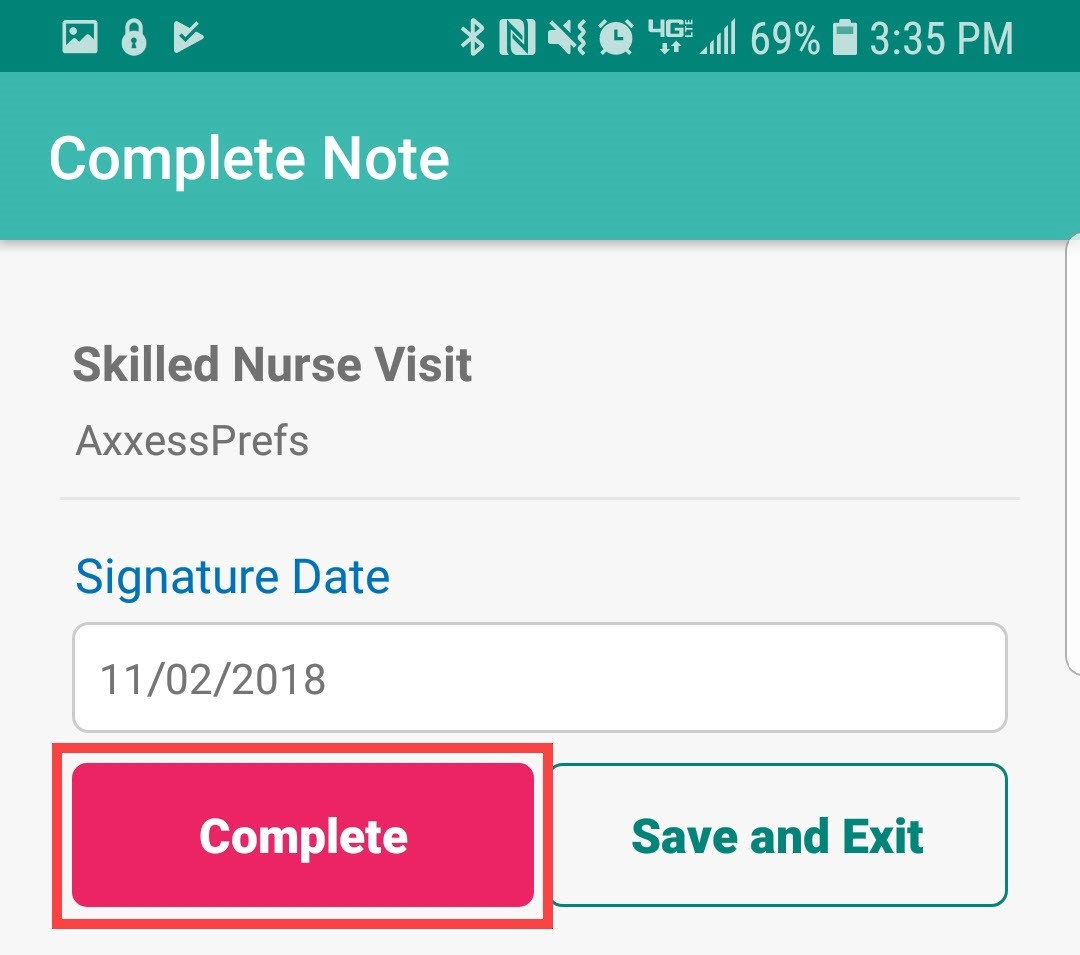
Confirm the Signature Date then tap on “Complete.”
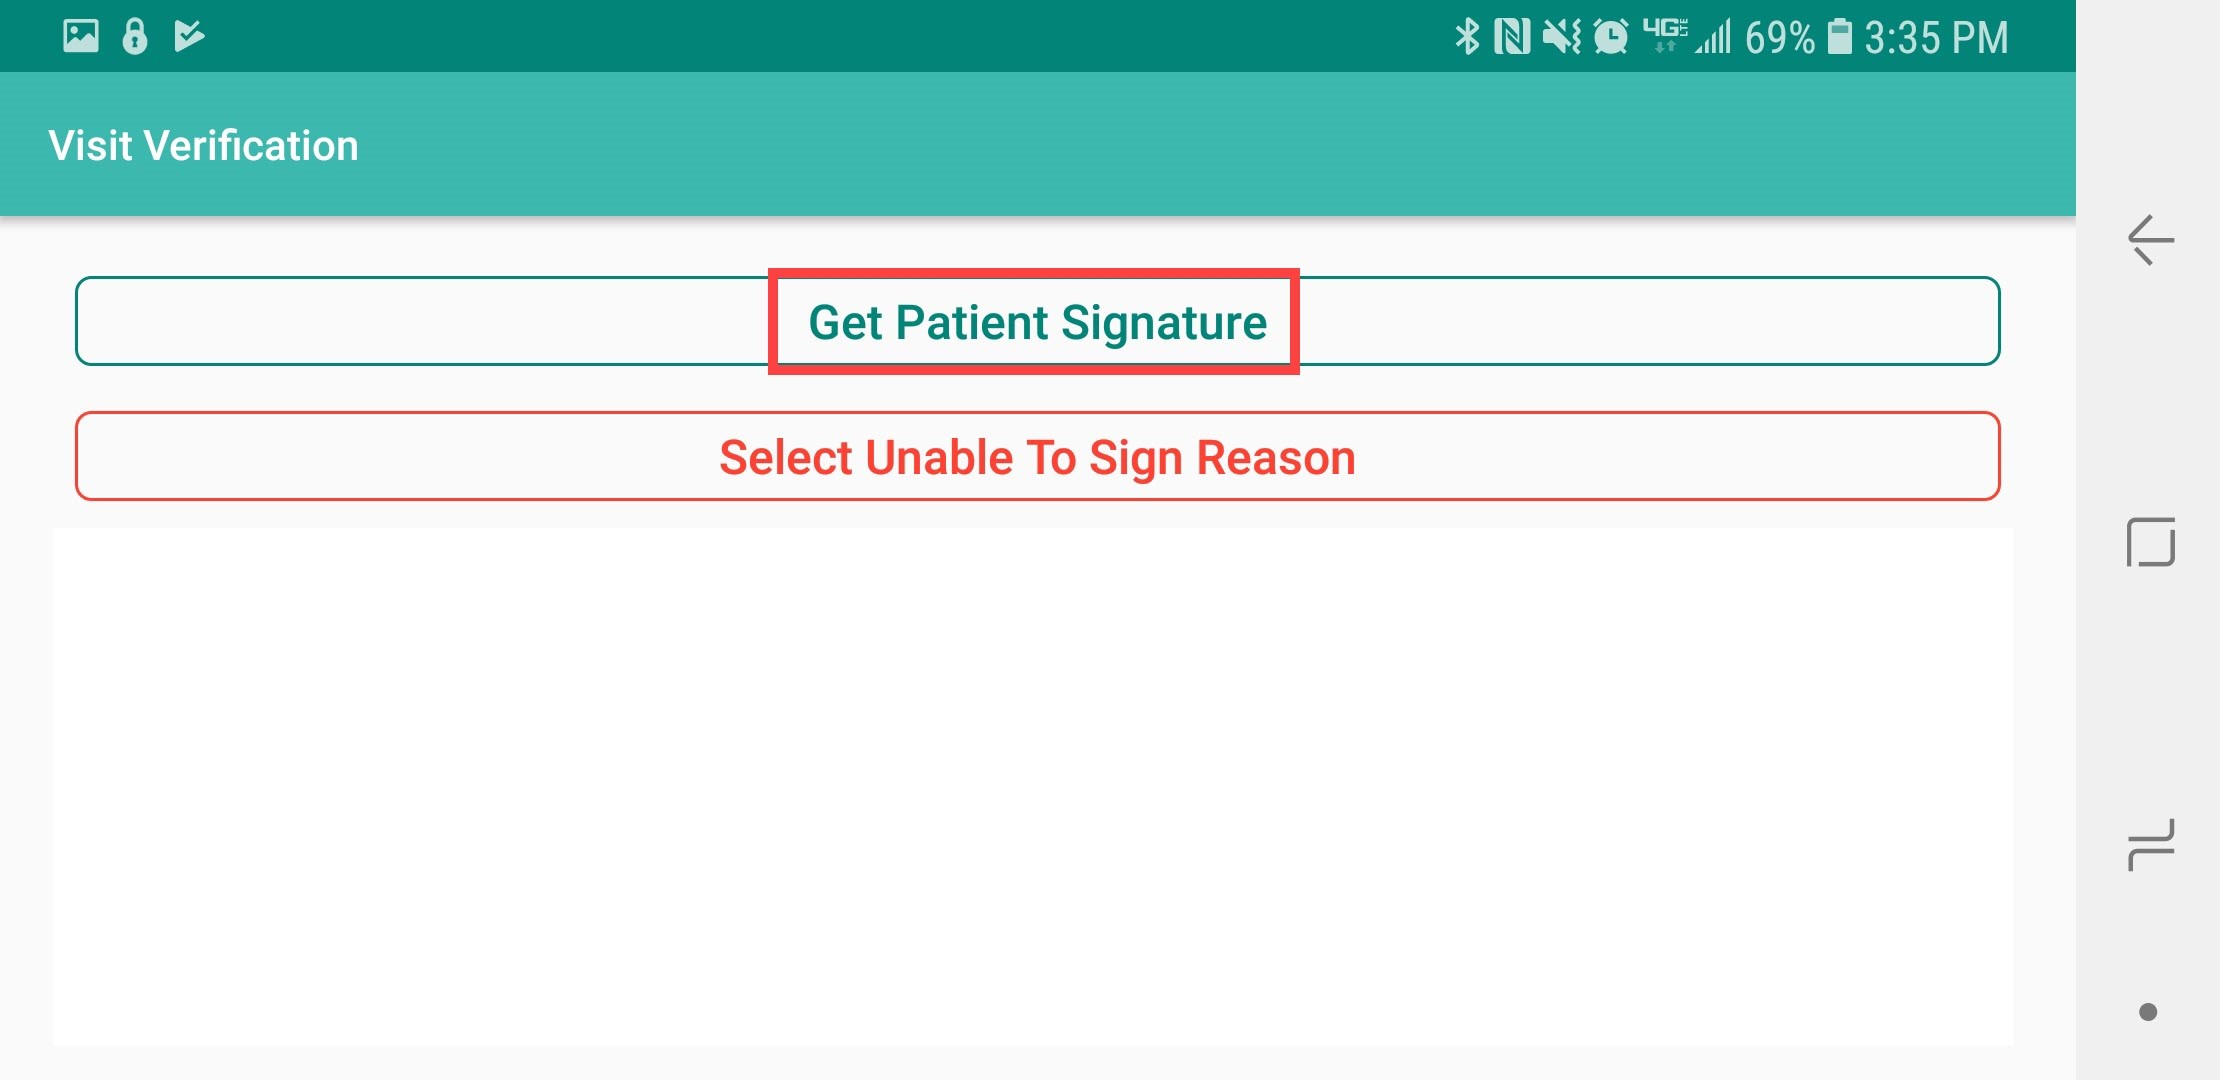
The Visit Verification completion process begins. If the patient is not able to sign, tap “Select Unable to Sign Reason” then choose the reason why they cannot sign from the following options:
Tap on the “Get Patient Signature” button.
The patient is then prompted to enter their signature. Either sign with a finger or use a stylus. When finished tap on “Submit” in the bottom right.

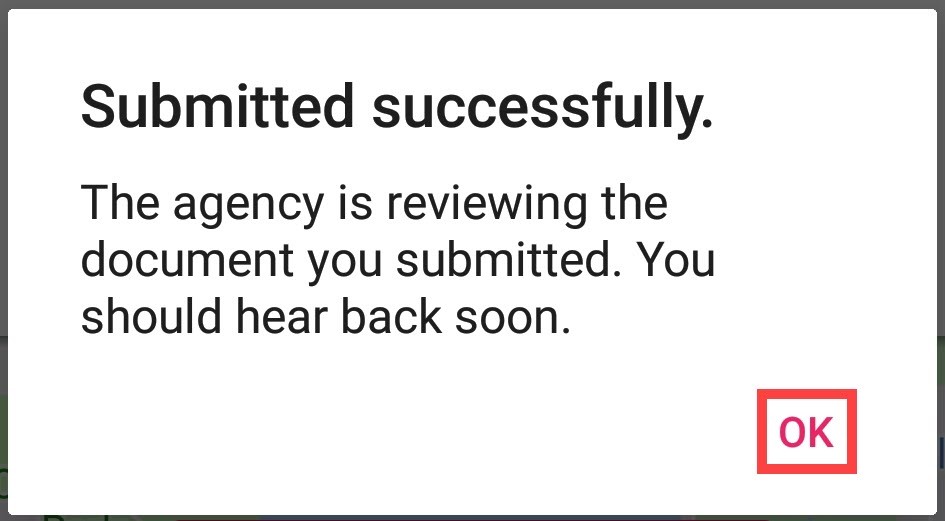
Tap on the “Get Staff Signature” button. The user will be prompted to enter their Staff Signature. Enter then tap on “Submit” in the bottom right. Then tap on the “Submit Signatures” button at the bottom. A completion confirmation will display along with the instruction that the organization’s QA department will be reviewing the visit. Tap on “OK.”
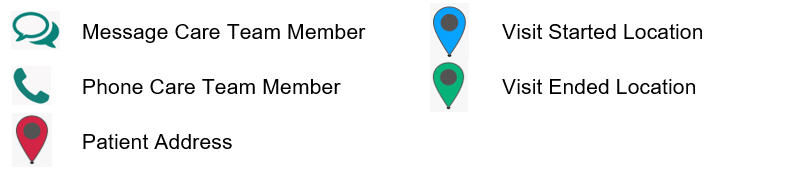
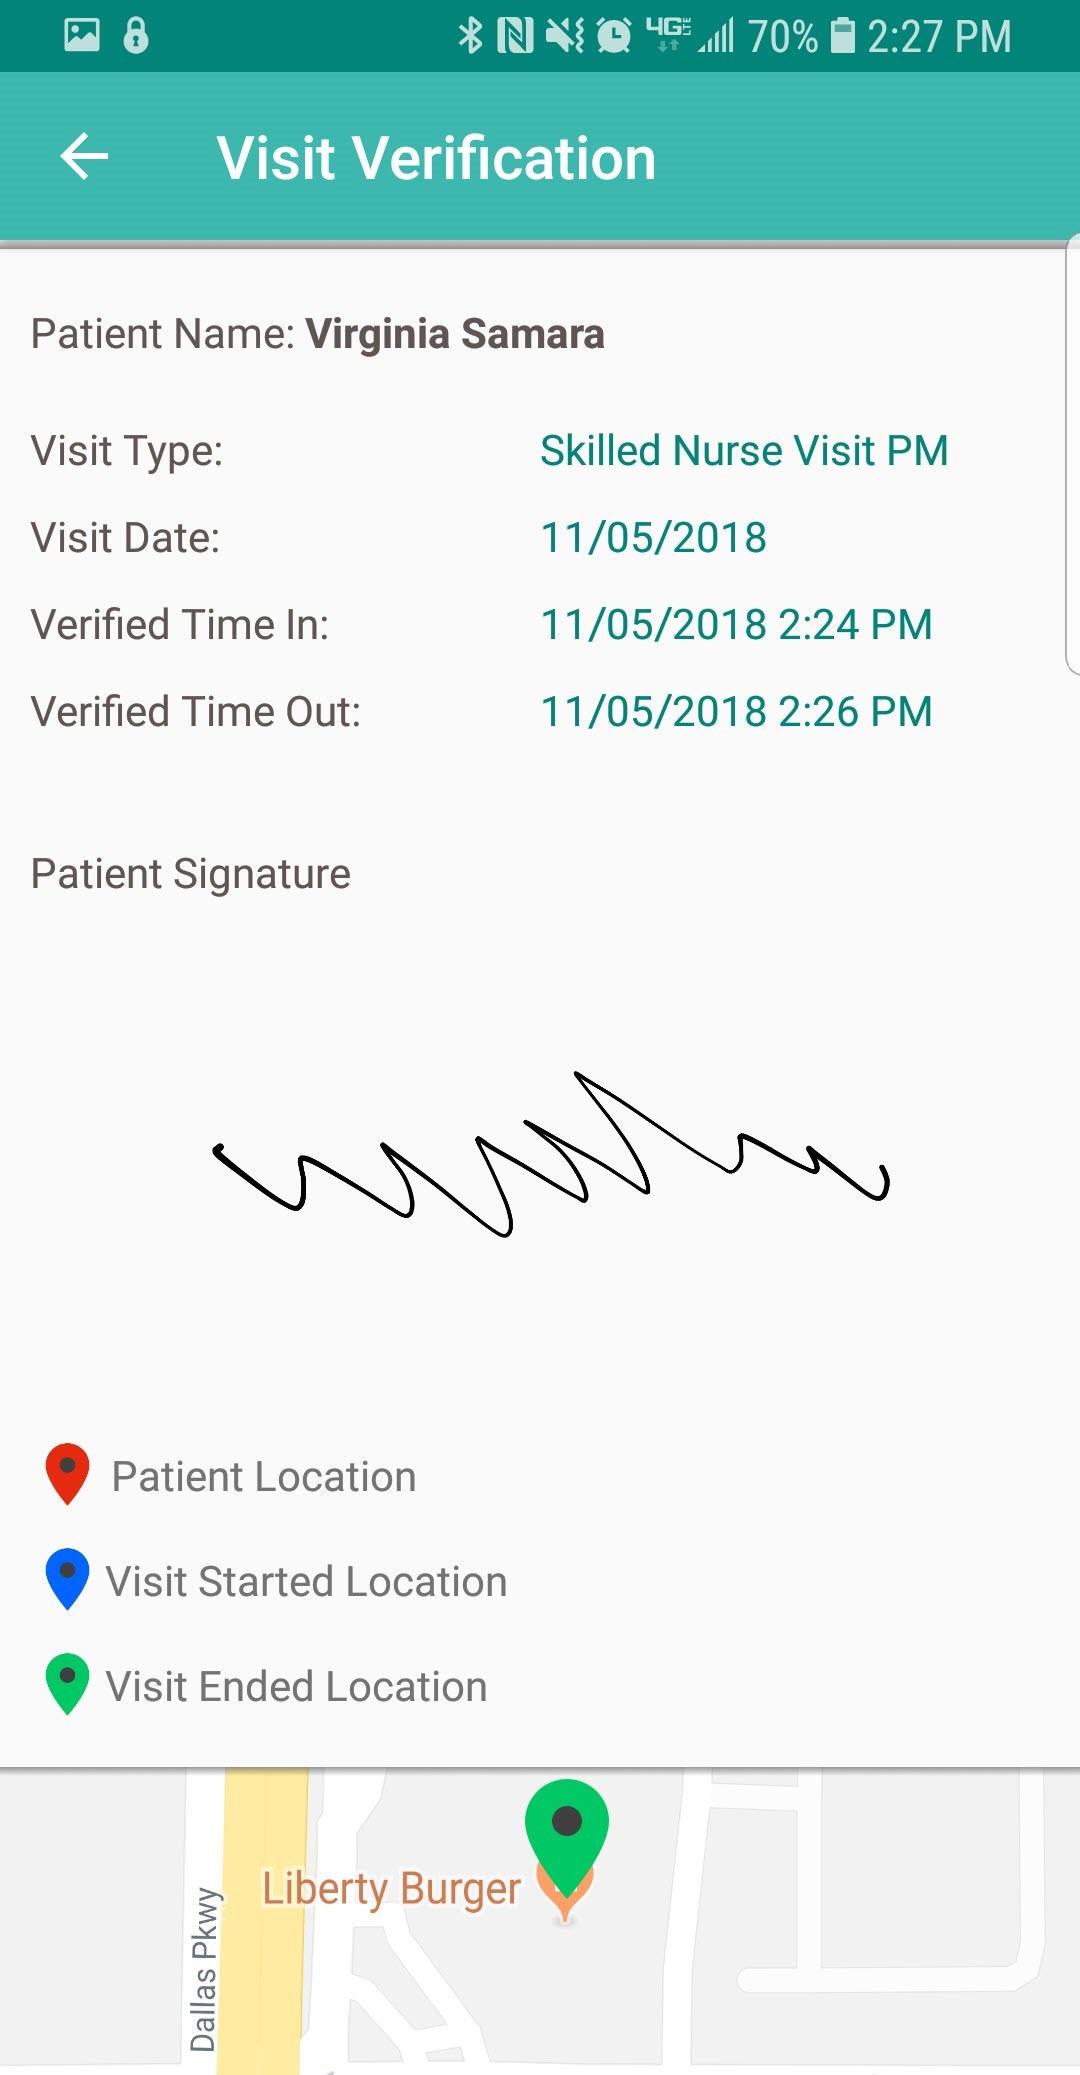
On the Visit Details page, to see the Visit Verification, tap on “Visit Log.” The Visit Verification page shows the Verified Time In & Out and the Patient Signature along with the:
![]() – Patient Location
– Patient Location
![]() – Visit Started Location
– Visit Started Location
![]() – Visit Ended Location
– Visit Ended Location
Tap on the back arrow in the top left to get back to the schedule.
From Visit Details, tap on “View Documents.” This will show the PDF printed version of the completed visit. Tap on the back arrow to go back.
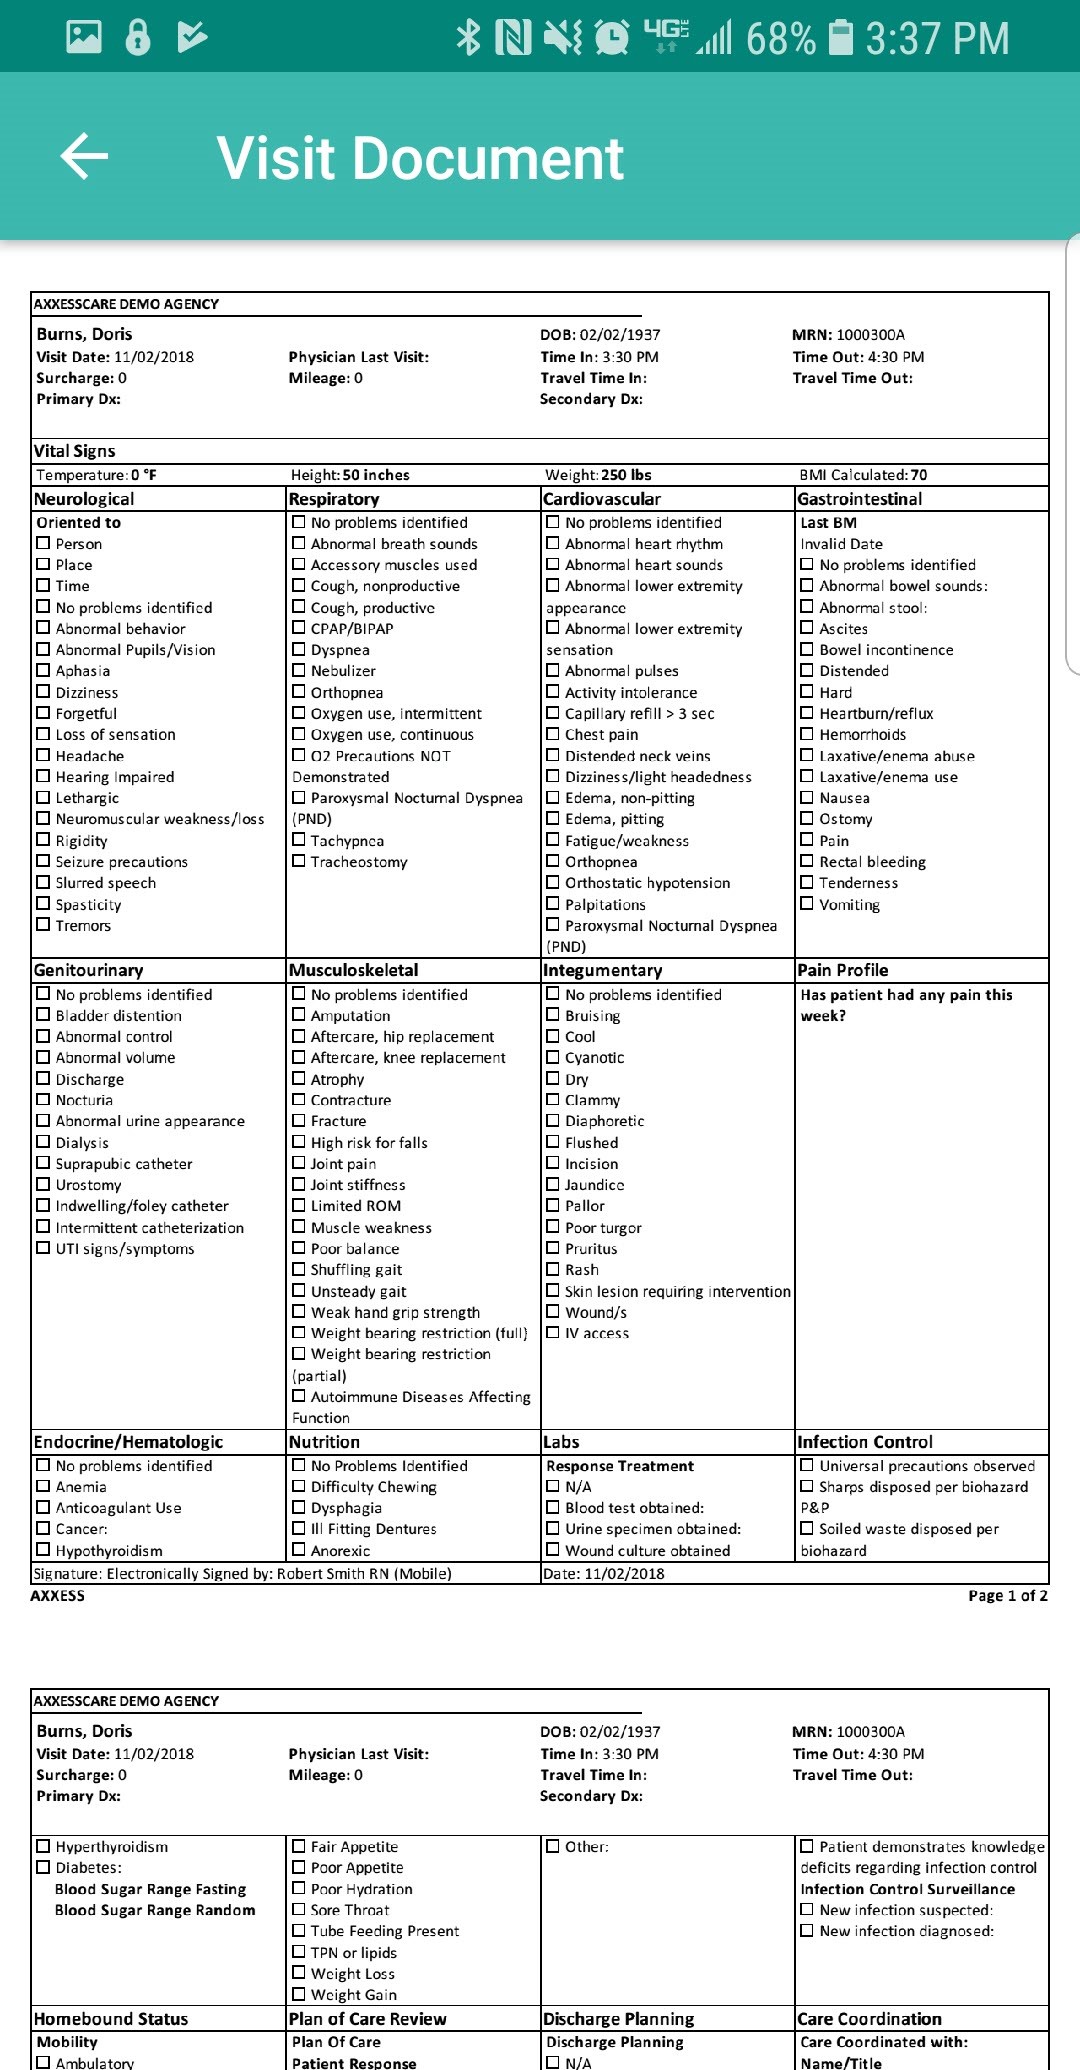
NOTE: EVV time in and out will not automatically pull to visit notes. Time In and Time Out must be documented inside visit note.
While the visit is being reviewed by the organization’s Quality Assurance (QA) staff, the visit status will show as Reviewing.

Once it has been returned from the QA staff, it will show as an “Alert” in the Message Center. Tap on the unread message/alert to view.
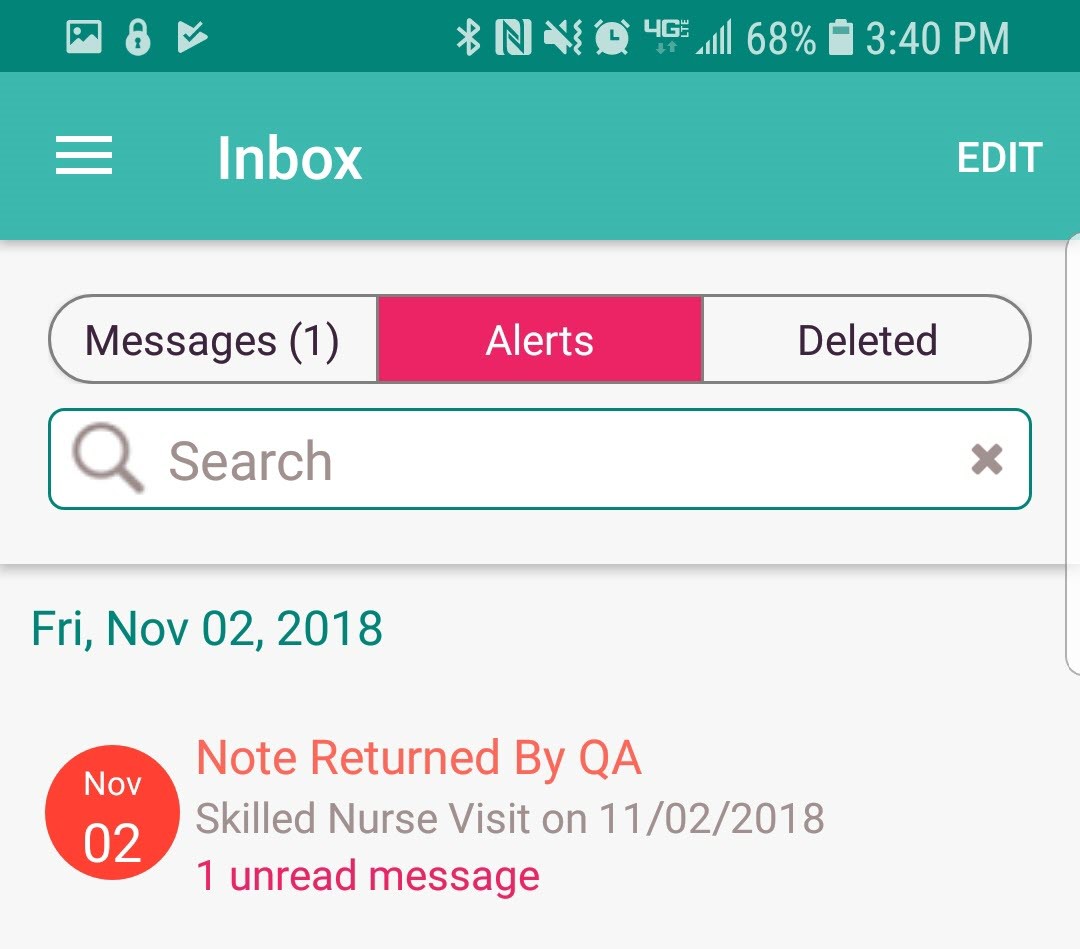
The message from the QA staff is listed in orange.
The orange counter on the home page will also change. Tap on “QA Returned.”
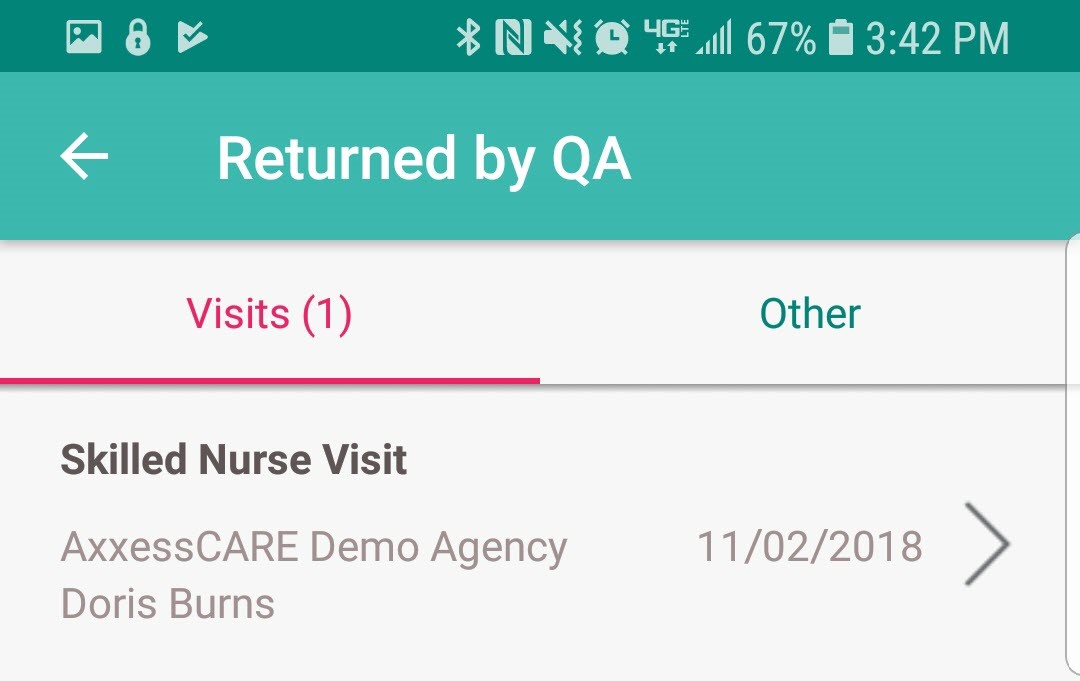
All visits that have been reviewed will be listed on the Returned by QA page. Tap on the visit to review the notes.
The reason why the document was returned will be listed at the bottom of the page in the Return Comments. Tap on “Edit Documents” to make the requested changes and return to the visit. Make requested updates inside the visit, Complete again and re-sign.

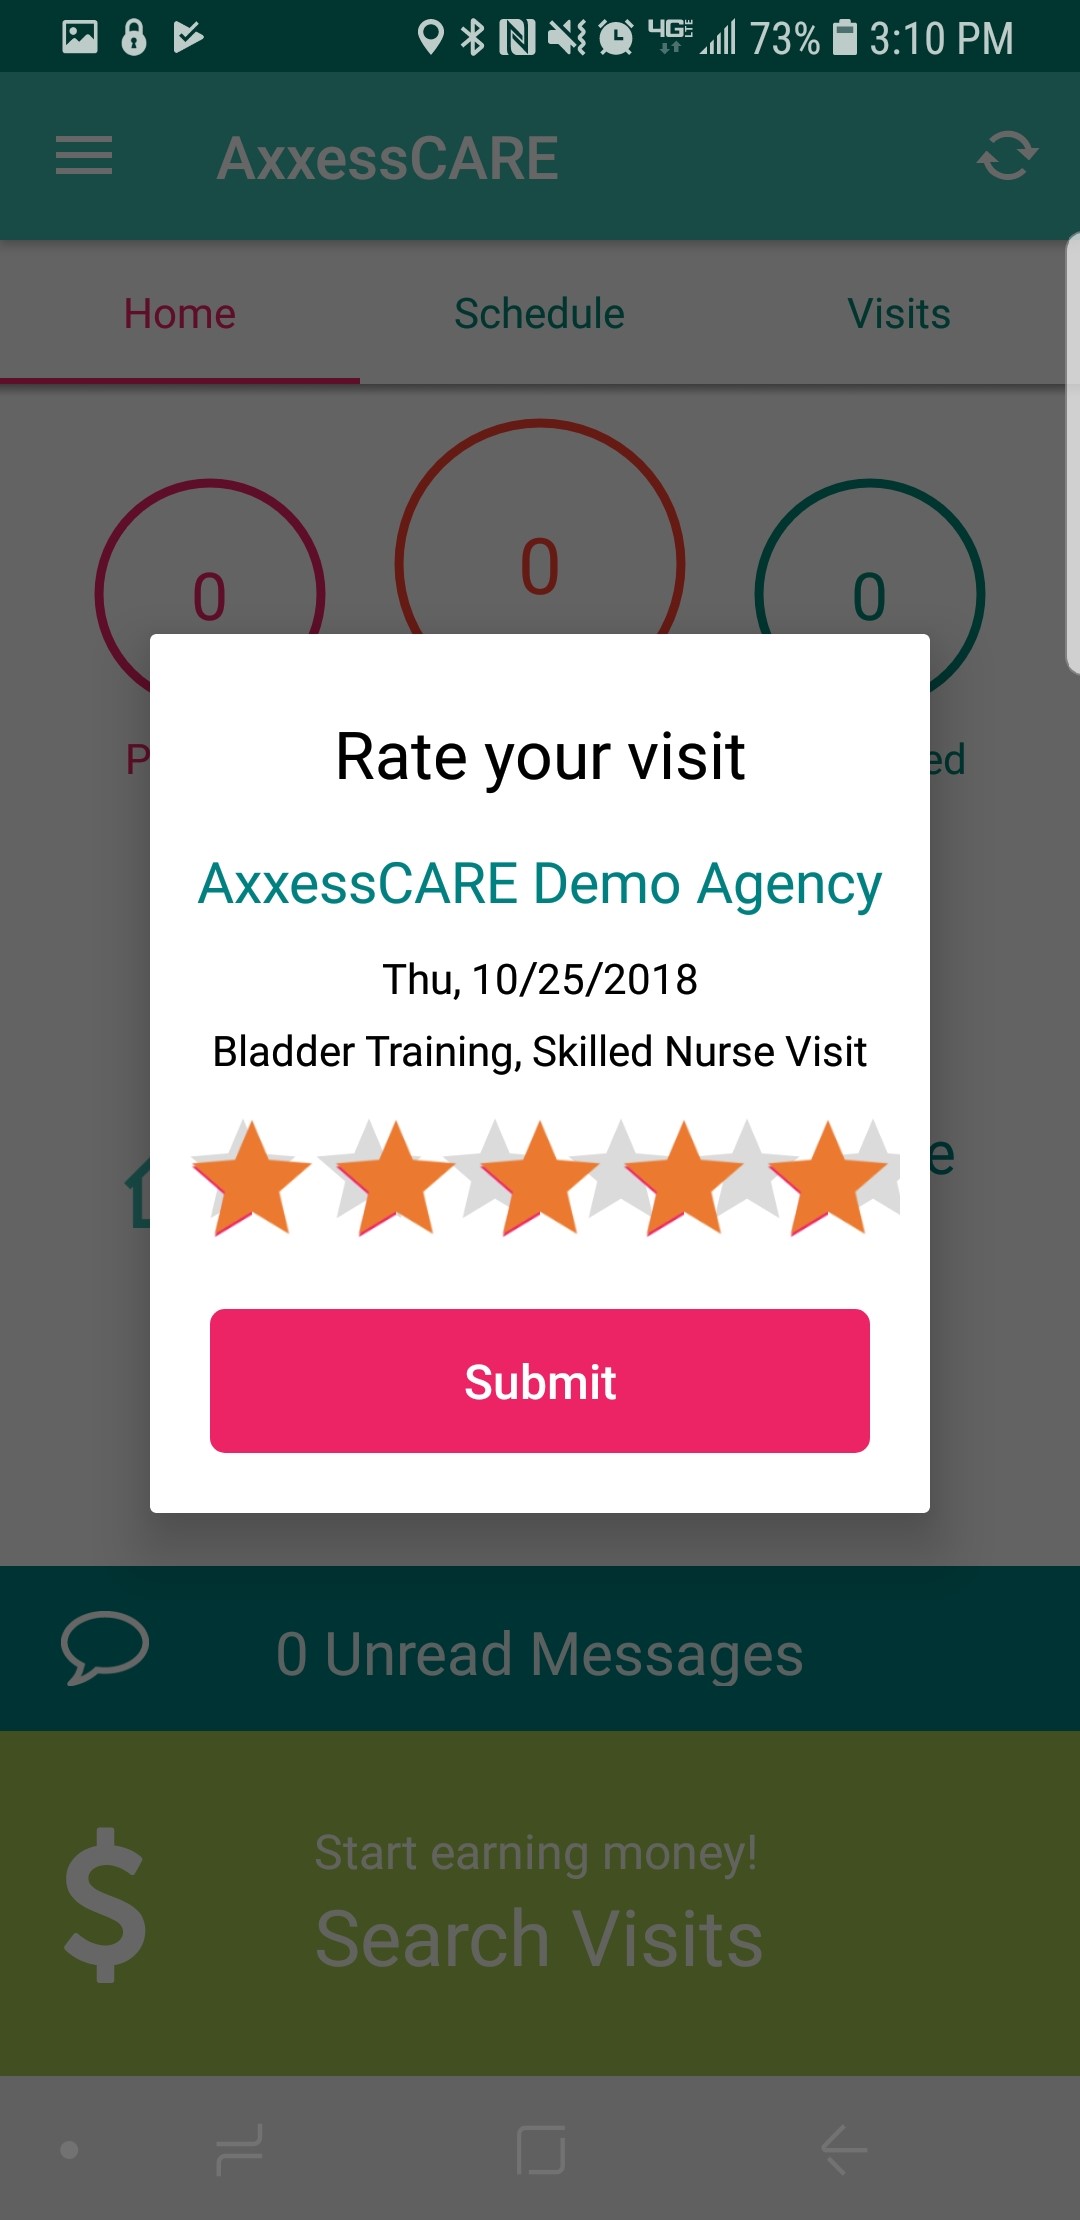
Once the visit has been reviewed, approved and/or co-signed by the organization, the status of the visit will update to “Paid.” The next time logging into AxxessCARE, the system will prompt for a review of the visit.
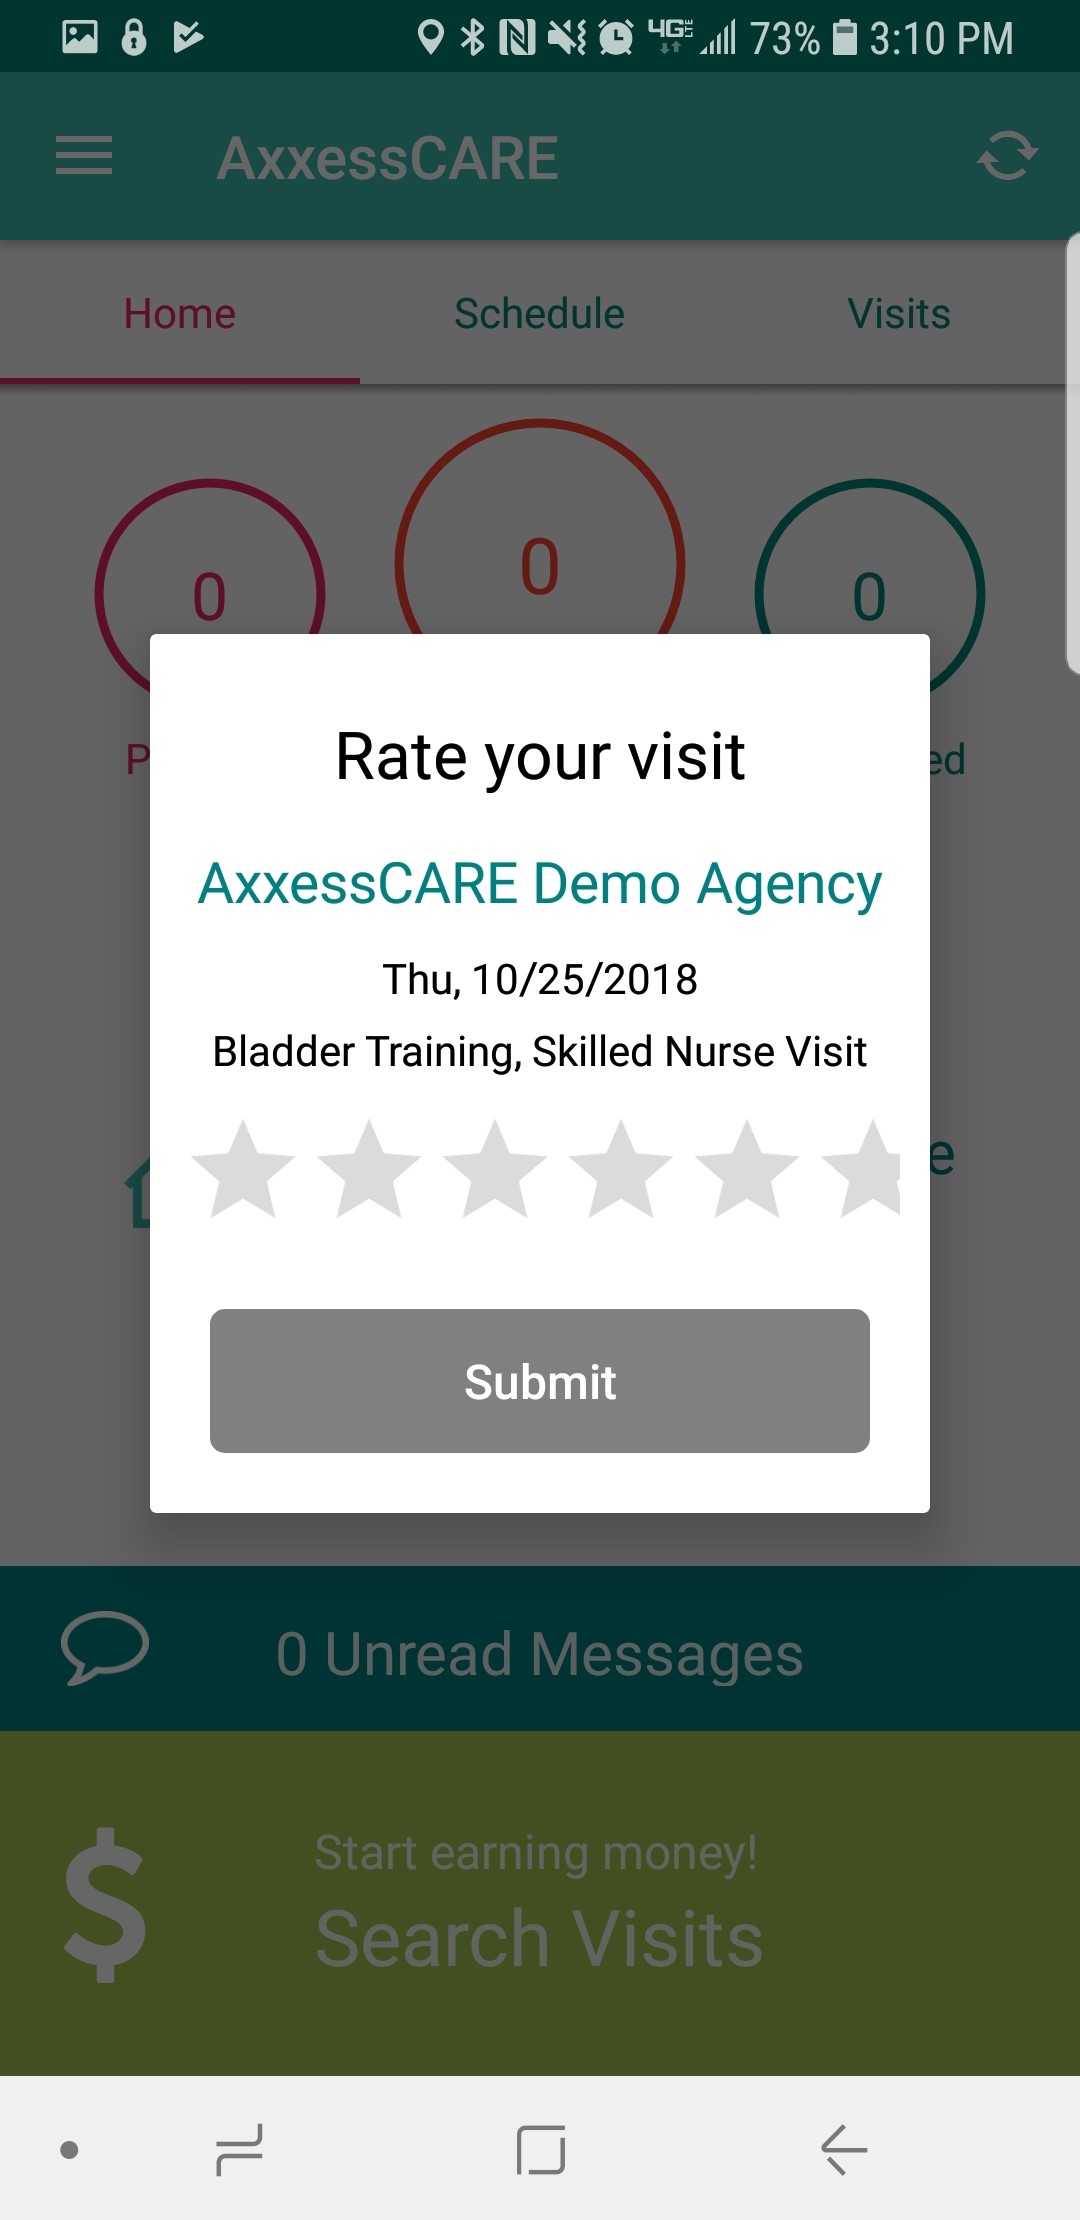
Tap on the star rating to rate the visit, the stars will change to yellow and the “Submit” button becomes active.
The Paid visit will now be housed in the All Visits section. Tap on the visit to view the specifics.
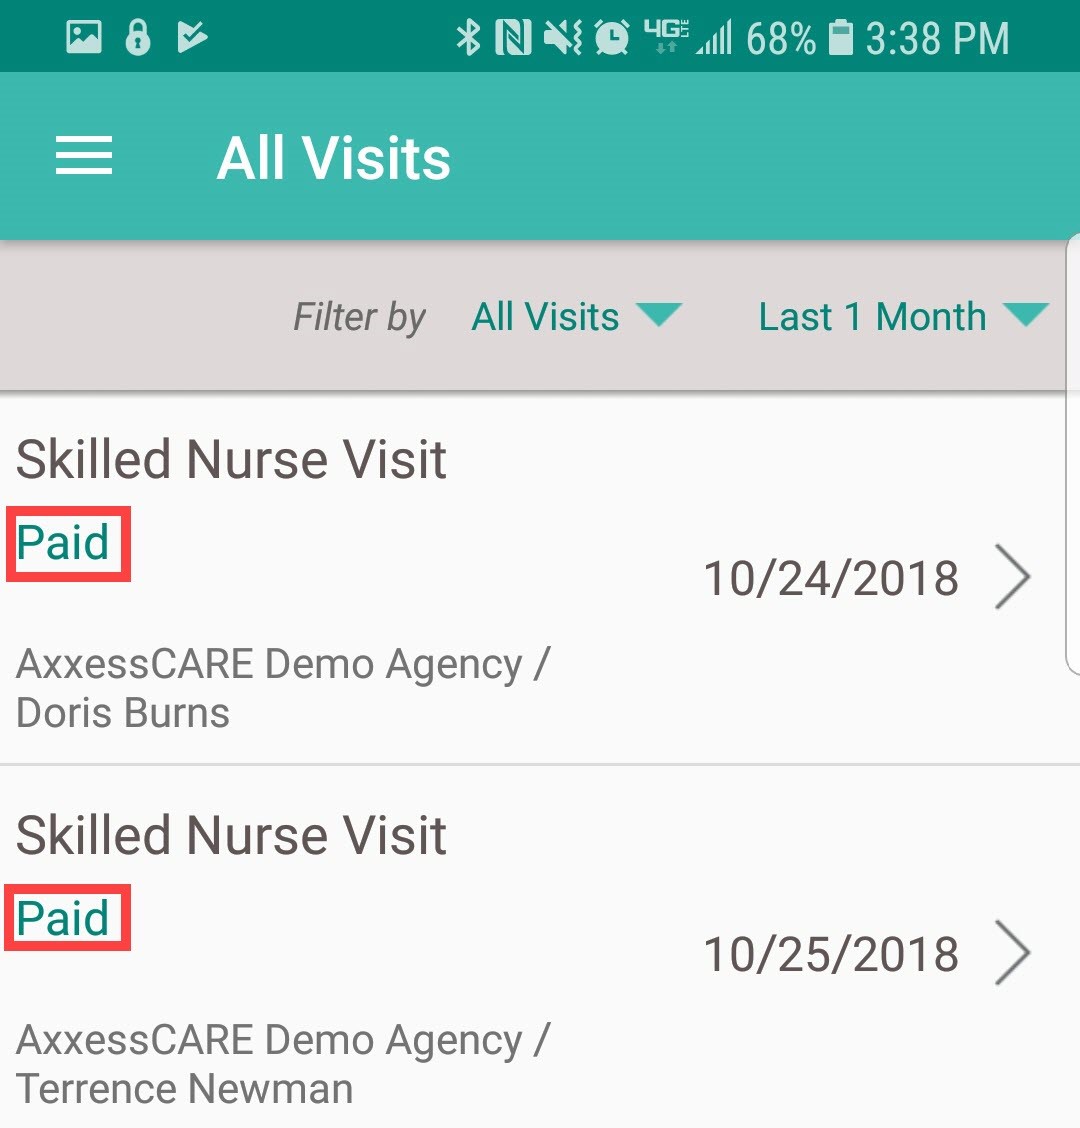
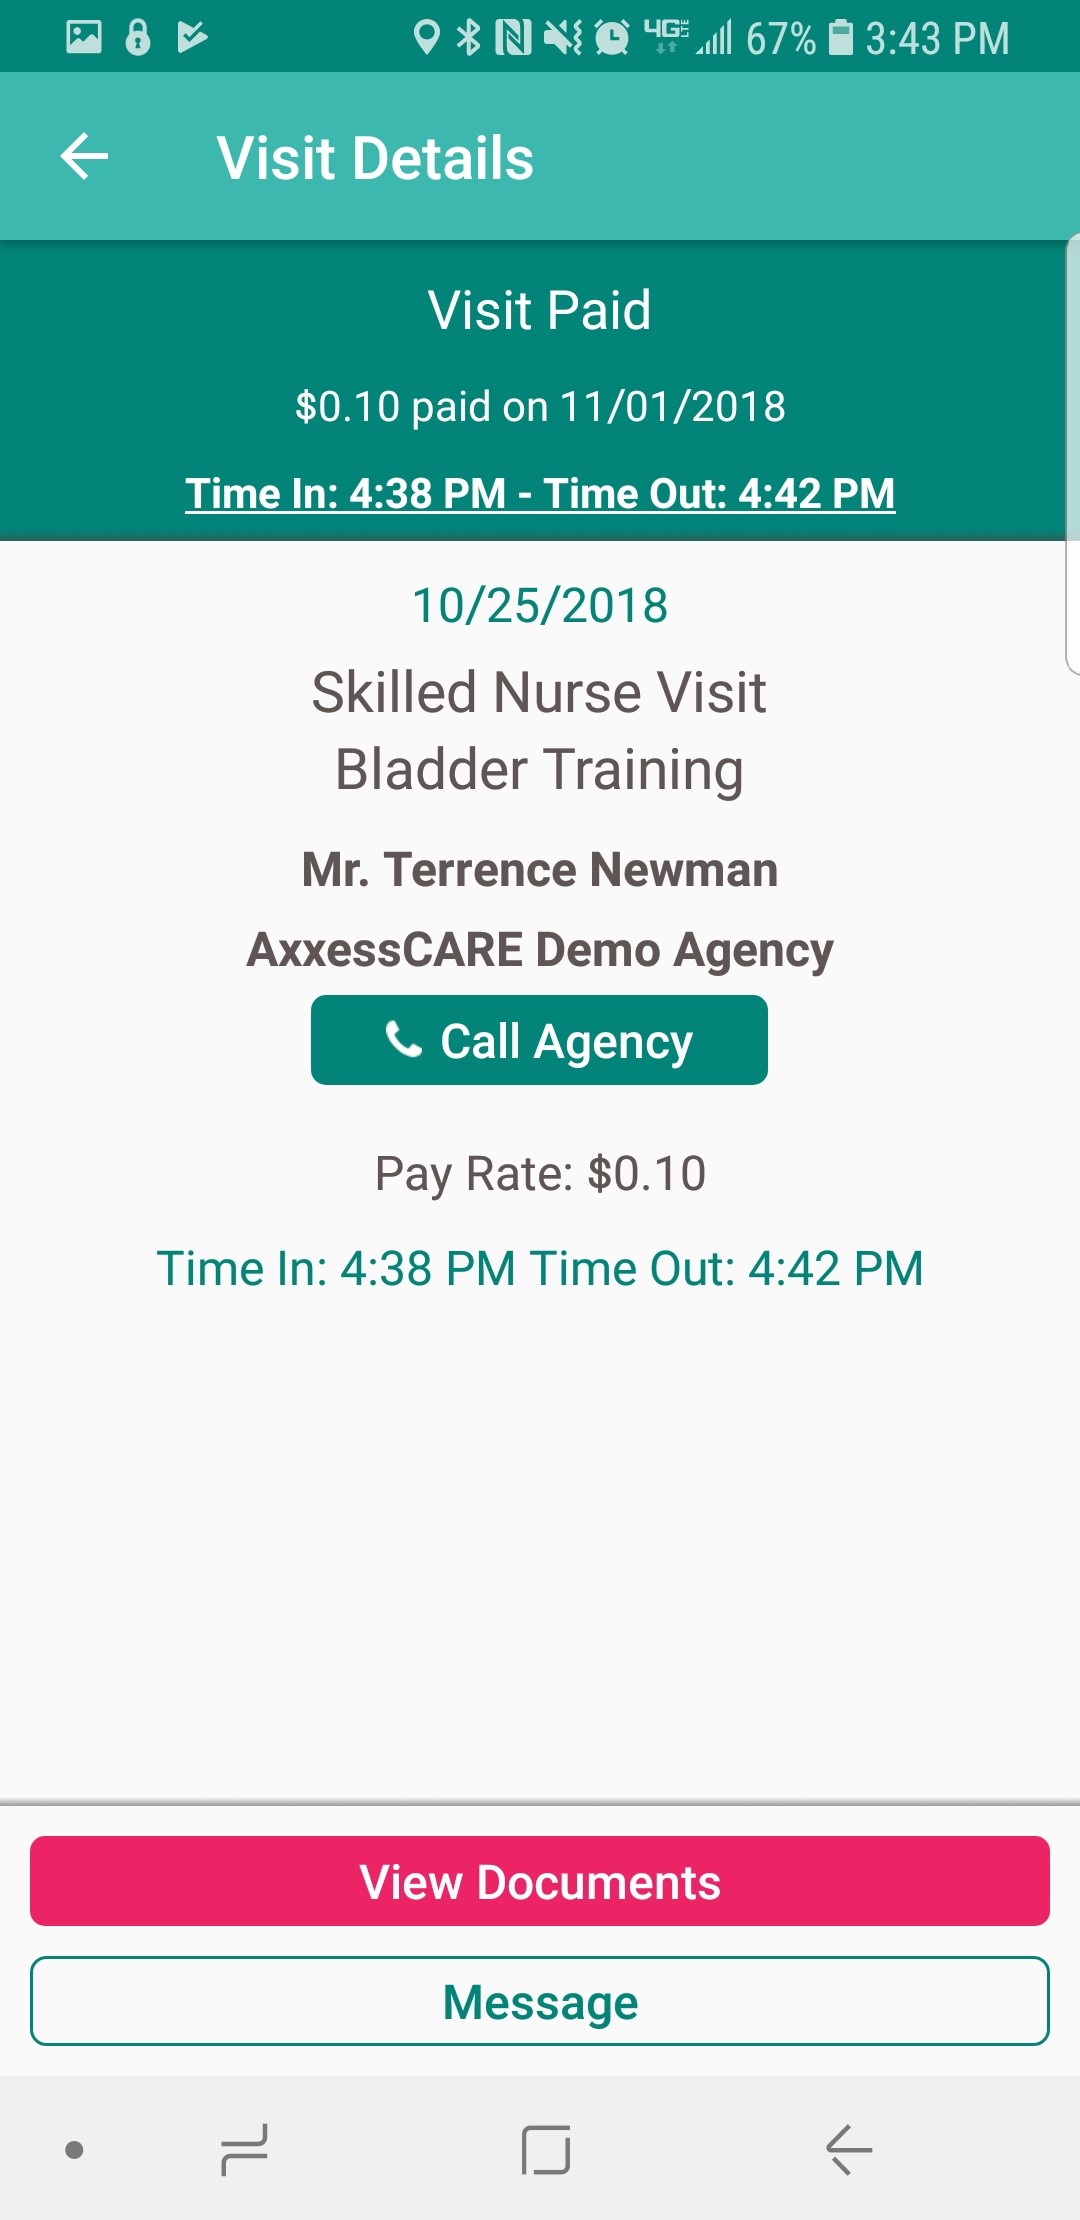
The Visit Details page shows the updated status, when and how much the user was paid for the visit.
The visit will also have an updated status in the schedule.
NOTE: Payments can take up to five business days to show up in the clinician’s bank account.