x
Join our new Axxess User Community to connect, share, learn and grow together.Learn More
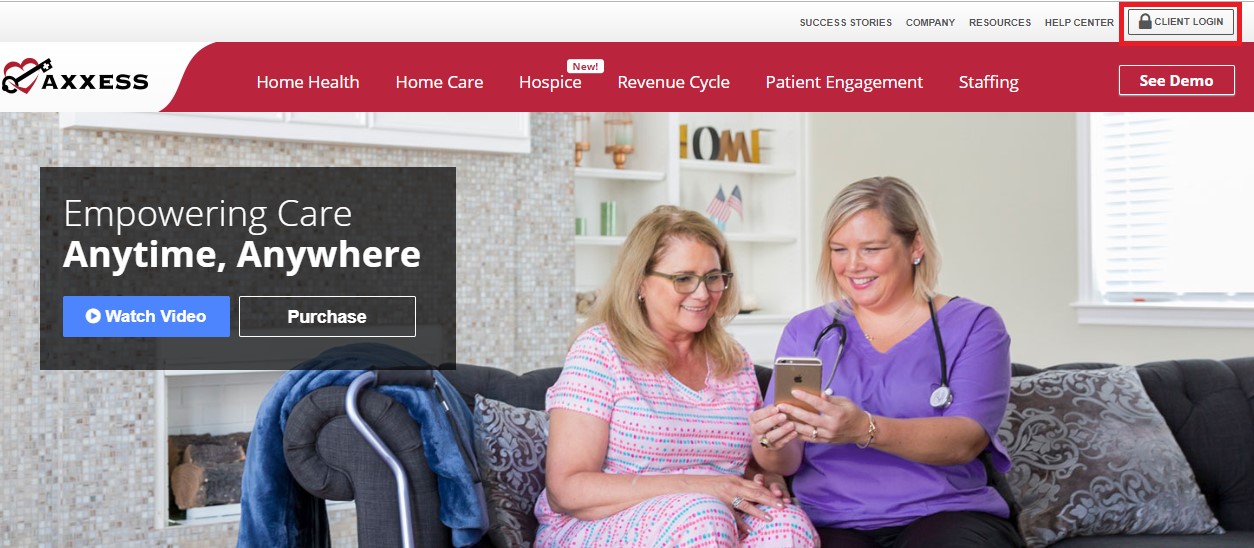
Go to www.axxess.com, and select “Client Login”, located in the upper, right-hand corner.
Enter the username and password then select “Secure Login.”
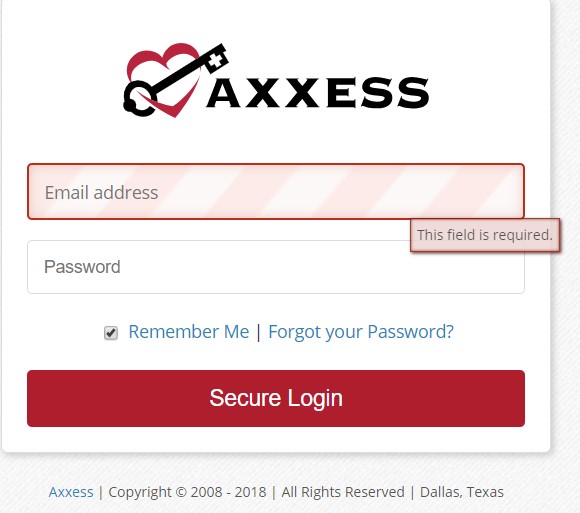
The username is the email address assigned to the user’s account when it was created. The password was created by the user, from a link that was sent to this email address. This password will also be the user’s electronic signature.
If the user forgets their password, select “Forgot your Password”, and a link will be sent to this email address. Here the user can reset their password, however the electronic signature will remain the same (Resetting Signature will be covered later). After the correct username and password are entered, the following message will display:
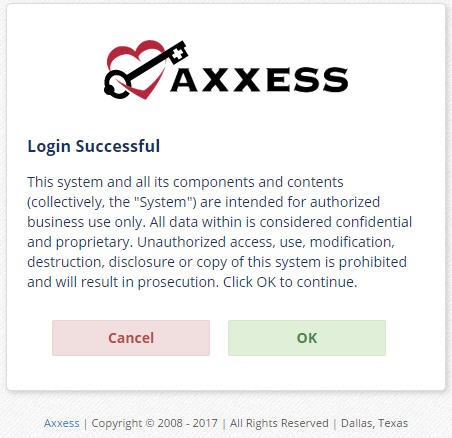
Select “OK” and the user will see the Clinician Planner.

On the left-hand side of the screen is a list of agencies that the user works with, as well all the products to which their organization is subscribed, select “Axxess Hospice” to move forward.
The Dashboard opens upon login. Below are the nine tiles will appear:
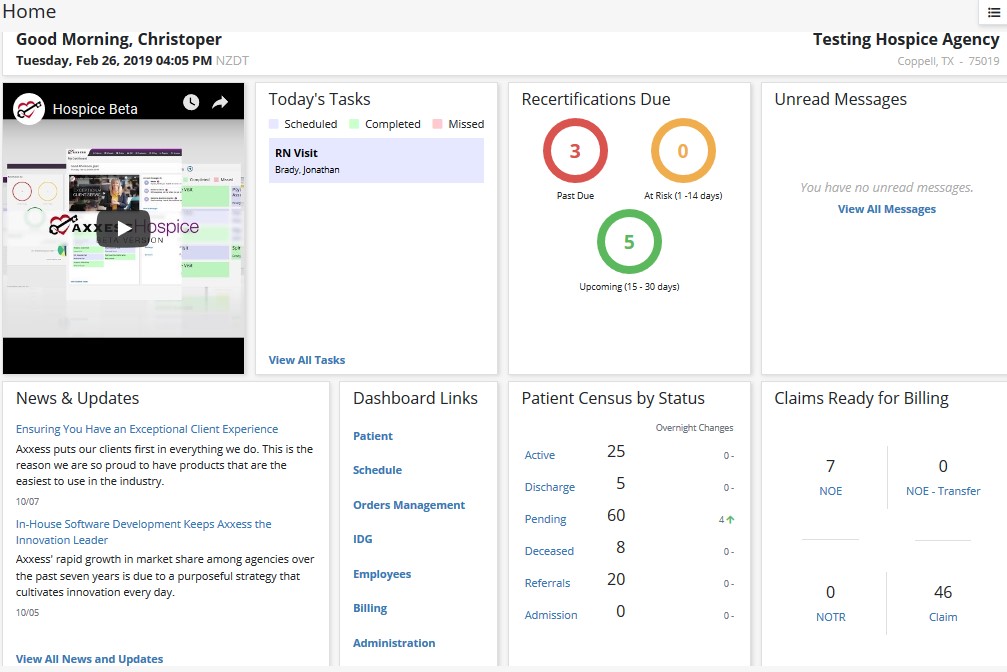
NOTE: Focus for clinician should be on Active, Discharge, Deceased, and Admission changes.
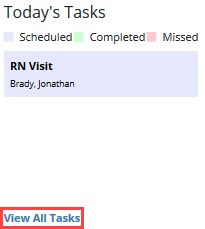
Select the “View All Tasks” hyperlink in the bottom left corner of the tile to view the entire list of scheduled tasks.
The top of the page will show user Name and email address tied to account and a hyperlink to “View Employee Center.” The top left of the page allows for filtering of employees. Filter by Search for specific employee, Branch, Status and/or Team to narrow results. Users can also scroll down the list of Employees.
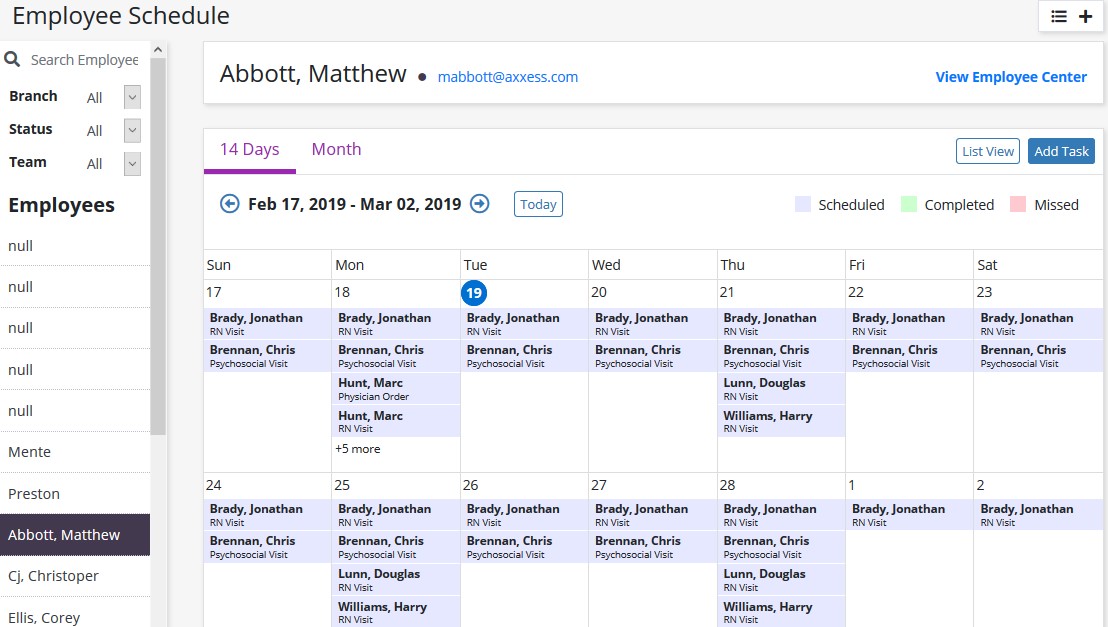
The default view for the Employee Schedule is 14 days. The calendar can be viewed as 14 days or by month. Toggle through Days and Months by selecting the ![]() or
or ![]() arrow with the date being shown in between them. Select the
arrow with the date being shown in between them. Select the ![]() button to get back to the current date.
button to get back to the current date.
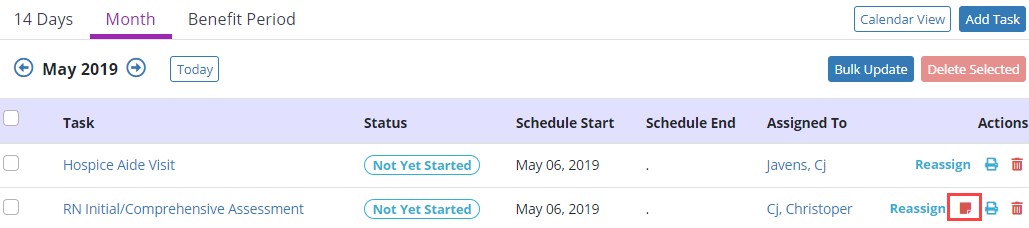
View the list of missed visits in the Schedule by selecting the List View button. The list view has a tab to view tasks by Benefit Period.
Visits are distinguished by the following colors:
![]()
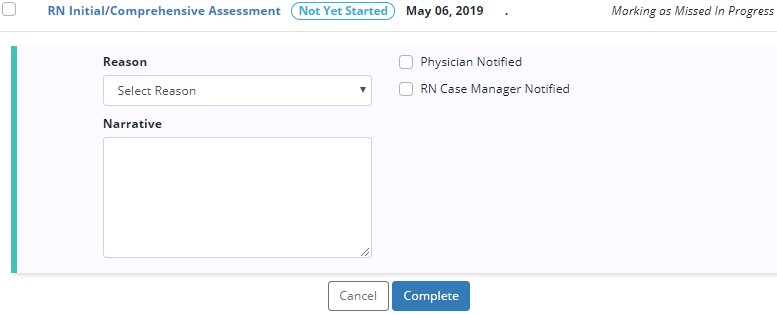
Mark visits as missed if they are scheduled either prior to or on the current date. Select the red sticky note icon.
Choose a Reason why the visit is being missed. Select whether the Physician and/or RN Case Manager was notified. When selected, find Physician and/or RN Case Manager by typing their name in the search field. Then write in the free text Narrative details about the missed visit. Then select the “Complete” button at the bottom.
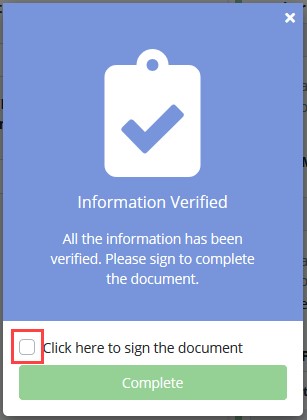
The clinician will then electronically sign the document by selecting the checkbox then select the “Complete” button.
User Name/Profile

While managing their profile, users can:
The user can then choose to go “Back to Axxess Hospice” or “Log out.”
Patients/Patient Charts

Filter by:
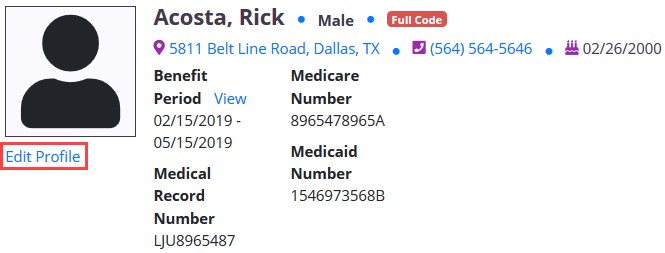
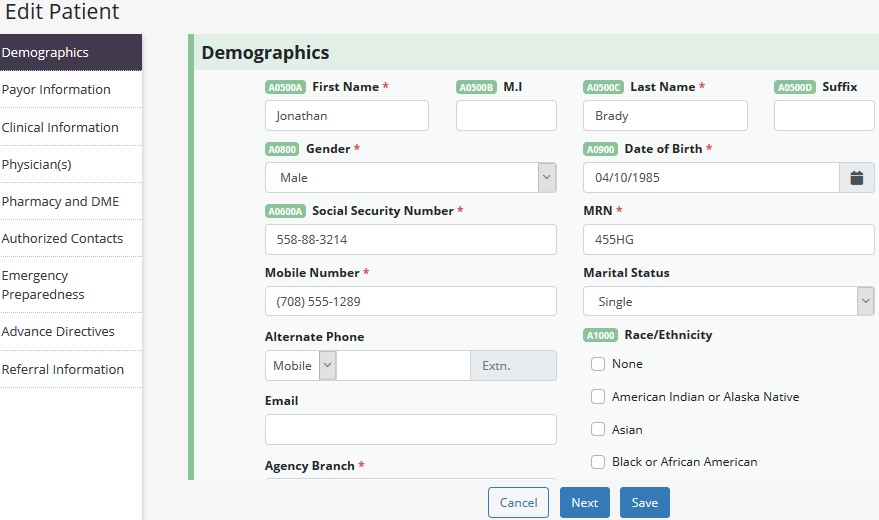
Patient’s snapshot at the top of the screen gives a quick view of the patient’s demographics. There are hyperlinks to the patient address and phone number. Select “Edit Profile” to view the patient’s full Demographics, Payer Information, Clinical Information, Physician(s), Pharmacy and DME, Authorized Contacts, Emergency Preparedness, Advance Directives and Referral Information.
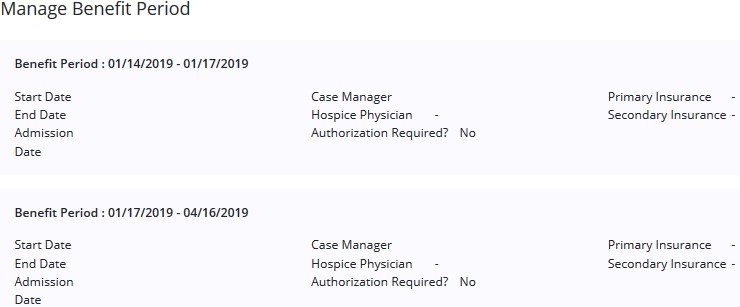
Select “View” next to the patient’s Benefit Period to view all Benefit Periods for this patient. This includes a pre-admission period from the time of initial referral to the time of Admission and change to Active status.
A list of visits/tasks in the current episode will display at the bottom of the screen. Filter the Benefit Period, Discipline and Task Status drop-down menus to change viewing parameters.
![]()
This link will take the user to the Plan of Care for the patient. It will be visible in three views: Plan of Care History, showing discontinued and prior Plans of Care for the patient; Plan of Care Profile, showing the Problems/Goals/Interventions, and Plan of Care, showing all areas of the Plan of Care in non-editable view.
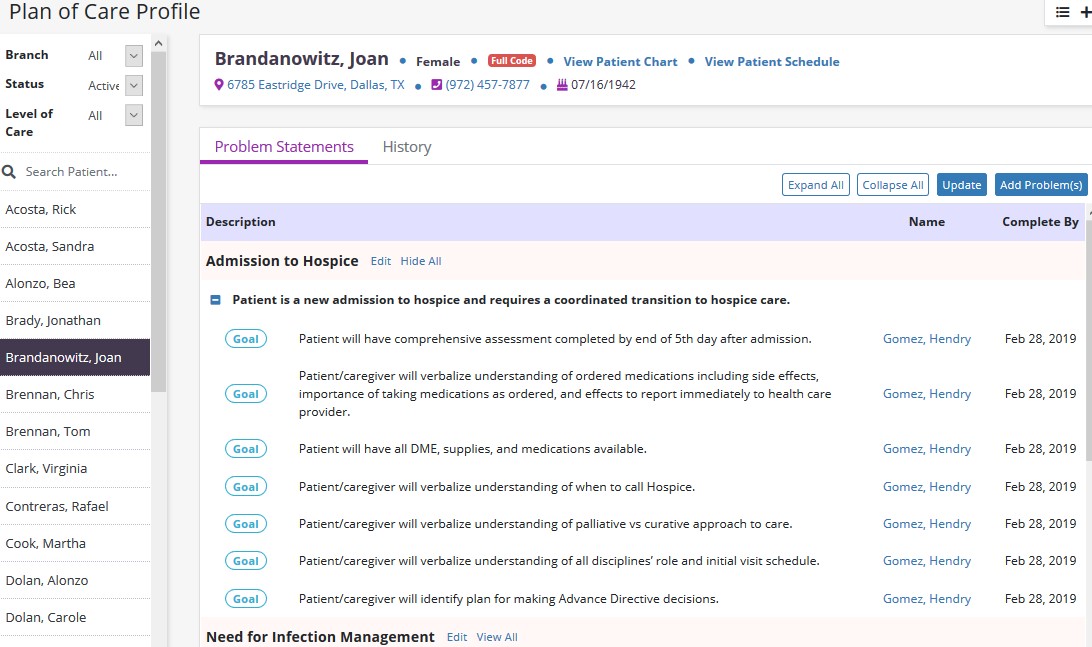
To see the Interventions of each Problem Statement, select the “View All” hyperlink to expand the statement.
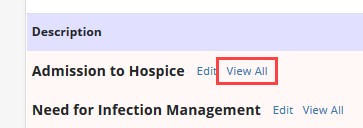
To view each goal associated with the intervention, select the ![]() icon. To view all interventions and associated goals at once, select the “Expand All” button in the top right of the profile or select “Collapse All” to close. To change the status of Plan of Care goals, select the “Update” button in the top right of the profile.
icon. To view all interventions and associated goals at once, select the “Expand All” button in the top right of the profile or select “Collapse All” to close. To change the status of Plan of Care goals, select the “Update” button in the top right of the profile.
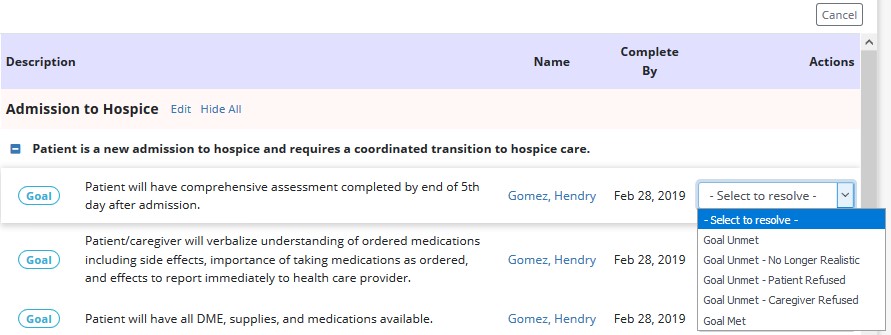
Each goal will now have a drop-down menu selection to update the status of each goal. To add additional Problem Statements, select the “Add Problem(s)” button in the top right. Search for a problem area by beginning to type the name or select the drop-down arrow to view all. Once the correct area is found, select the “Add” button.
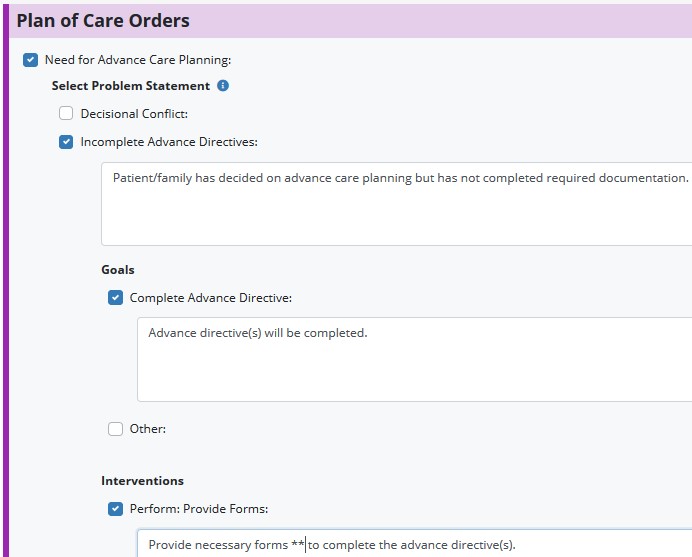
This takes users to the Plan of Care Orders screen. Select the Plan of Care order checkbox. Then select a Problem Statement checkbox. Confirm the problem statement text is applicable. Then select the applicable goal(s) and intervention(s) checkboxes then confirm the text is applicable.
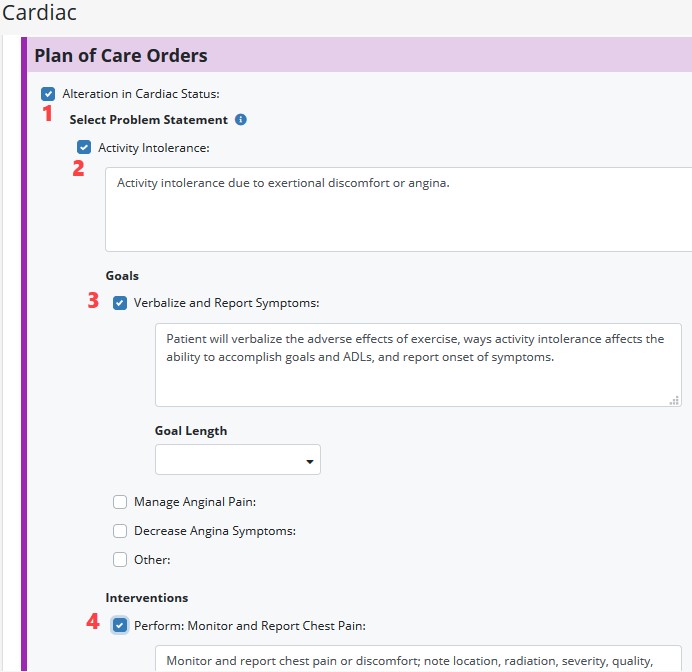
Choose whether the Plan of Care order should “Create Physical Order” then select “Complete” when finished.
NOTE: Asterisks must be removed with patient-related information to save.
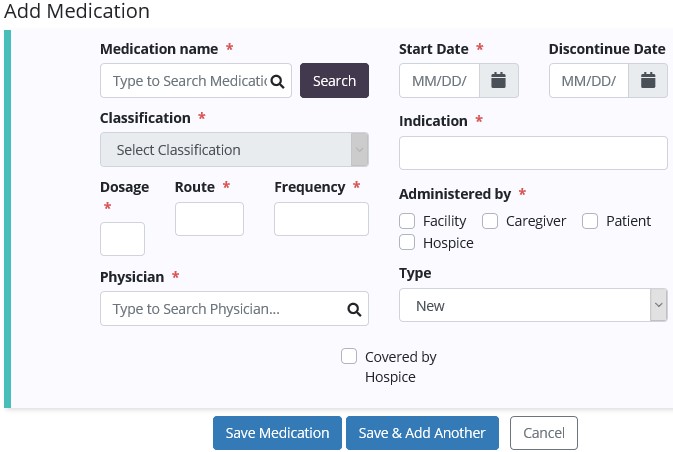
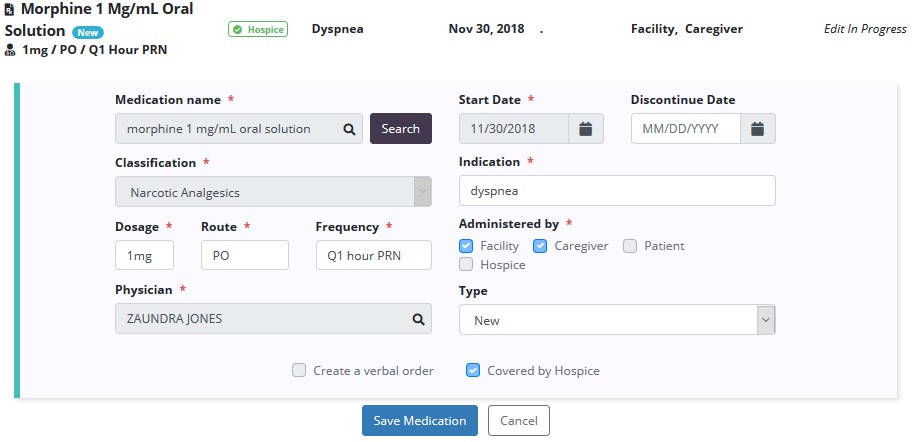
Select “Add Medication” button to add a new medication:
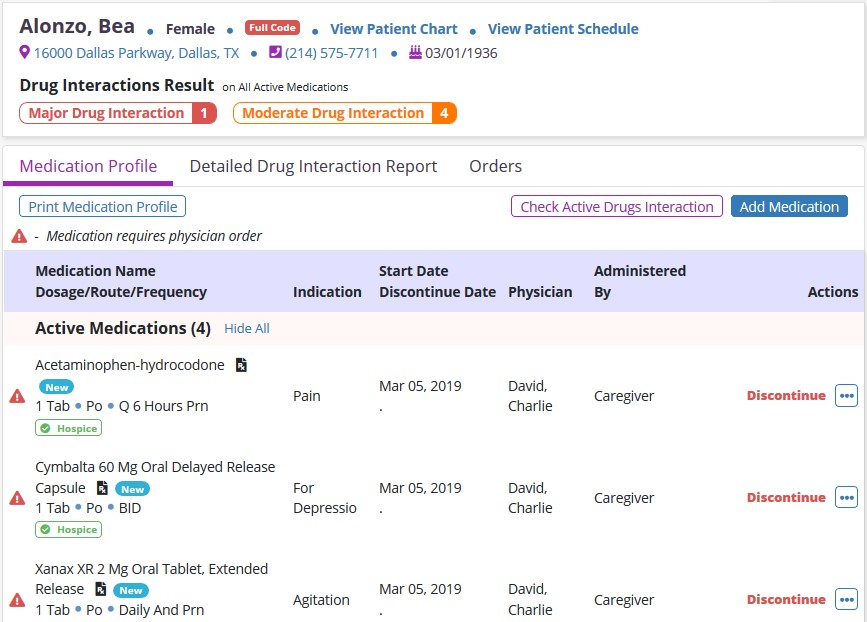
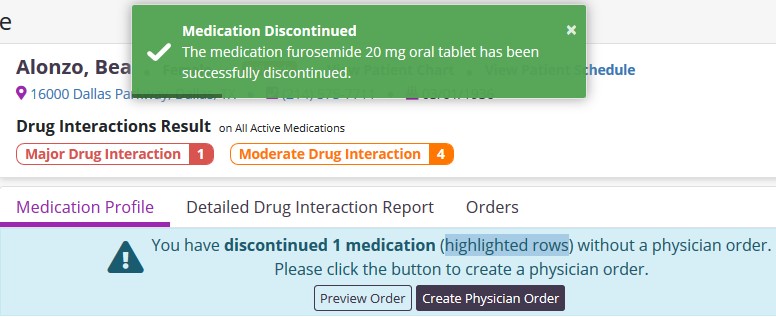
Once a medication is added, it will appear on the active Medications. Discontinue this medication by selecting the hyperlink on the right-hand side of the medication or select the small three dot button for “Discontinue & Copy” to make updates.
If the user decides to discontinue a medication, they will be asked to confirm that they want to discontinue the medication.

A green confirmation will appear and the medication (will be highlighted) will move to the discontinued medication list with access to “Create Physician Order.”
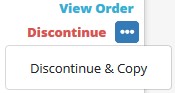
If users only want to change part of the order, select “Discontinue & Copy.” The original medication will automatically have a discontinue order written and an updated order will be added. This will keep the same fields chosen for the last medication except the Start Date. However, the other fields can be edited. Once edits are complete, select the “Save Medication” button.
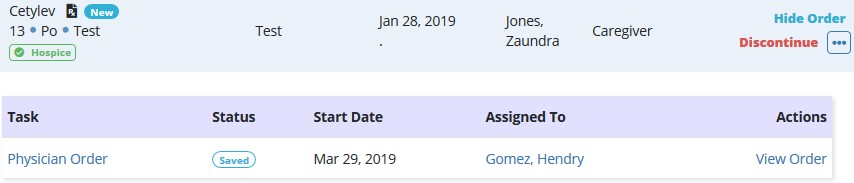
After changes have been saved, the previous medication order details will populate in the Discontinued Medications list, and there will be two lines created on the generated Physician’s Order. Discontinue Order for the previous data and New Medication Order for the newly entered data.
Select the “View Order” hyperlink to have access to view the medications associated order then another line appears and the user must select the “View Order” hyperlink again.
Drug interactions will be automatically checked with each new medication order. They also can be run manually by selecting the ![]() button.
button.
To view drug interactions, select the “Detailed Drug Interaction Result” tab.
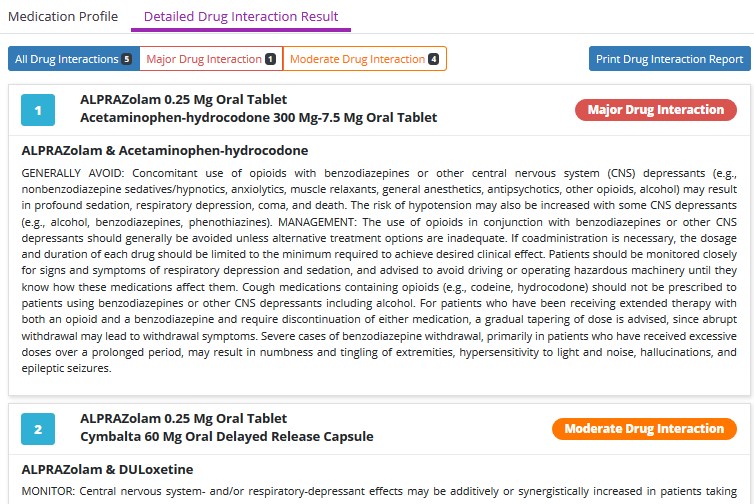
Drug interactions will be listed out one by one. Choose to view All or just Major or Moderate by selecting either tab at the top of the list. The whole report can be downloaded/printed as a PDF file by selecting the “Print Drug Interaction Report” button in the top right.
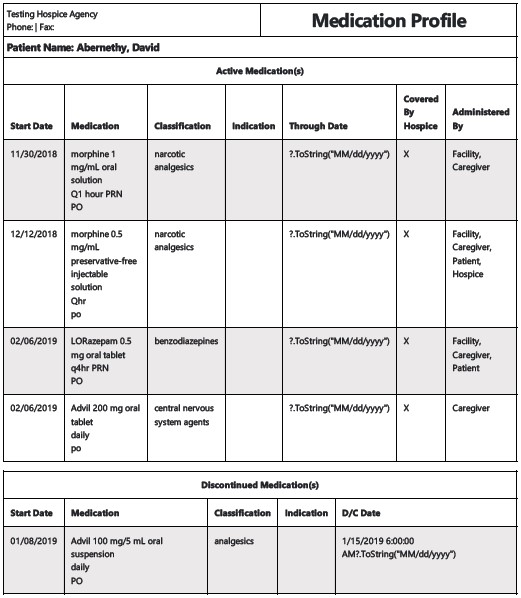
Select ![]() button to view and/or print the signed Medication Profile. Below is a printed medication profile.
button to view and/or print the signed Medication Profile. Below is a printed medication profile.
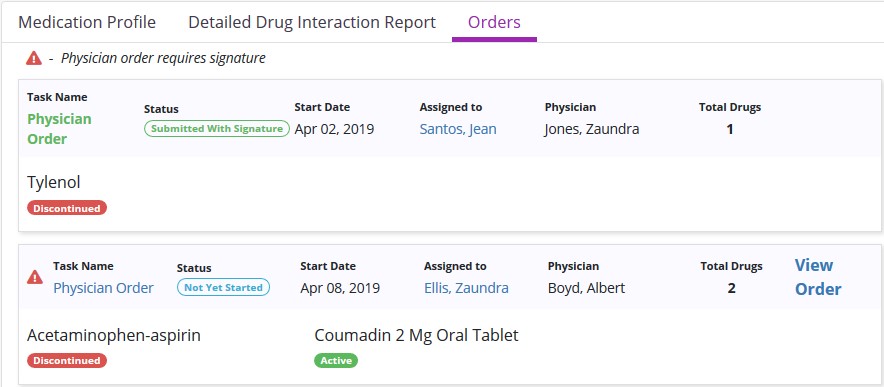
Users can view all associated medication orders in the Orders tab. Select the “View Order” hyperlink to view specifics.
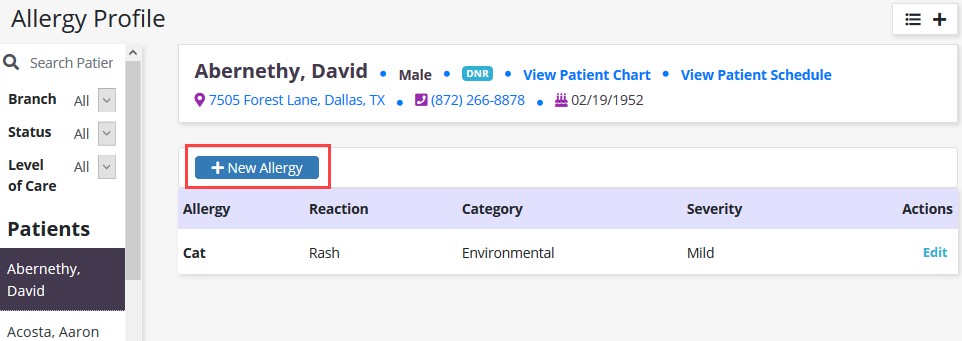
This pulls a list of all added allergies for the patient. To add an allergy, select “New Allergy.”
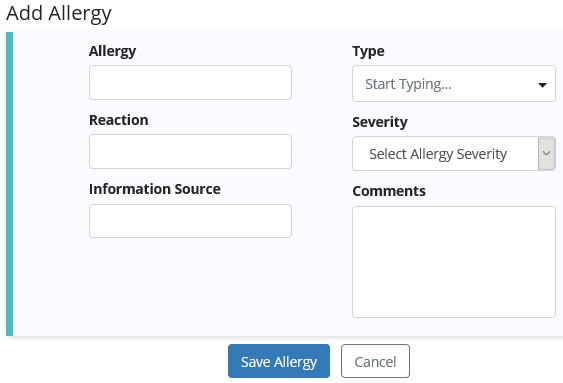
Enter the Allergy name, Type, Reaction, Information Source and choose the Severity. Select “Save Allergy” and the allergy will be added to the report.
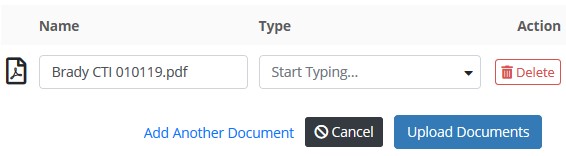
This will allow the user to view all documents uploaded to the patient’s chart as well as upload documents to the patient’s chart. Select the “Add Documents” button and find the file from the user’s computer.
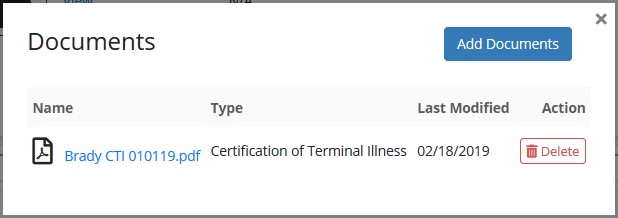
Enter the document Name and choose the Type. If there is more than one document, select “Add Another Document” to add the single document, select the “Upload Documents” button. Select the “Delete” button if the document was incorrectly added.
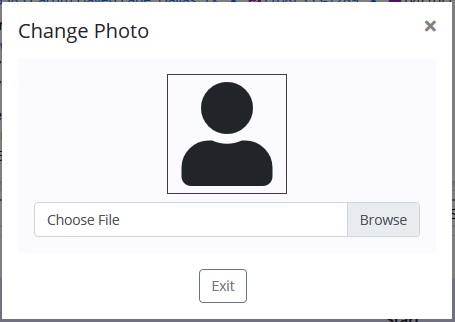
Upload/change a patient photo by selecting the Browse button and finding the file from the user’s computer.
Schedule/Patient Schedule/Add Task/Physician Order
Choose Physician Order when adding a new task then select the order on the calendar and fill out the following fields:
Select “Complete” button.
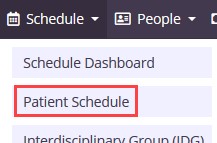
Schedule/Patient Schedule
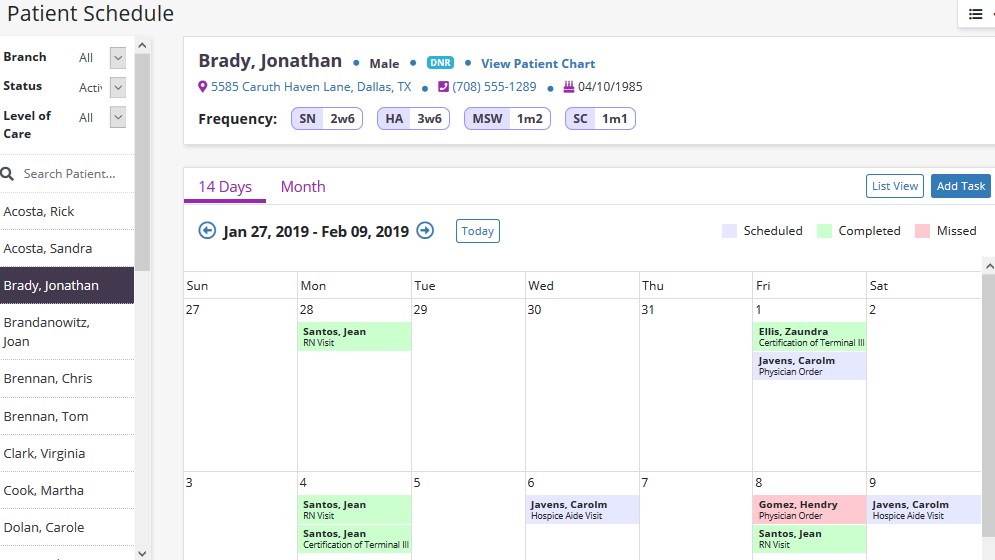
Functionality works the same as the Employee Calendar. See Task Calendar section above. Visit frequencies are seen in the Patient Information bar at the top of the Schedule view. Scheduled visits can be moved by selecting the visit, dragging and dropping inside another day in the Medicare week. Frequencies can be made monthly with visits being moved within the current month.
Select the ![]() button to schedule a visit.
button to schedule a visit.

Start typing the name of the Task or choose from the drop-down list. Then start typing the name of the Employee and results will narrow for choices. Repeat the Task either Weekly or Biweekly. Choose Flexible under the Repeat drop-down to add multiple tasks under the Date entry. Choose a Shift Length from 1-12 hours in hour increments. If a Shift Length is chosen, then a Shift Start Time must be chosen. Select the On-Call Visit check box if applicable. Select the “Save Task & Add Another” button if there is more than one Task to add or select “Save Task” for adding a single task.
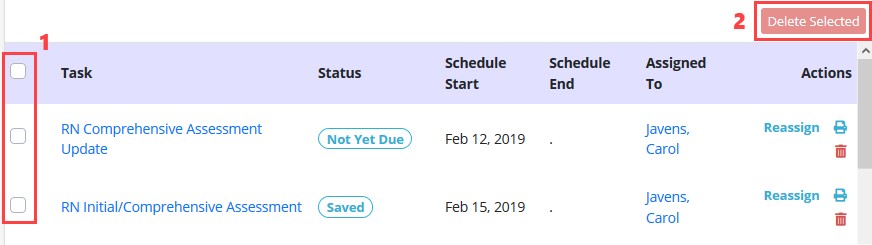
Manage individual tasks by choosing any of the three options under the Action column next to each task. Reassign, Print or Delete a task.
![]()
If the user chooses to reassign a single task, a search option will appear to find another clinician. Once found, select the “Save” button to complete.
![]()
To delete visits (before completion), select the check box to the left of the Task name and then select the “Delete Selected” button in the top right of the chart schedule. To delete all tasks (before completion), select the checkbox in the purple column header which selects all visits, then select “Delete Selected.”
When charting information in the RN Initial/Comprehensive Assessment visit, some information has already been pulled from the patient’s profile. Answer all required questions for the rest of the visit. These are indicated by red asterisks. Even though the following example is for RN, the colors below apply to all Clinical Documents for all disciplines.
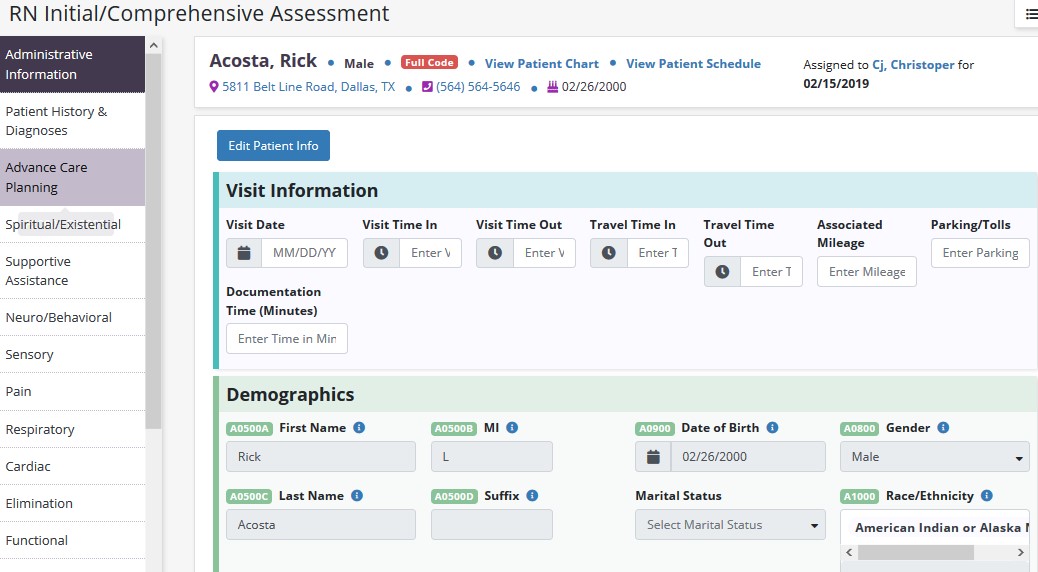
Initial Plan of Care (IPOC) – Hospice RN Initial/Comprehensive Assessment and RN Initial Assessment create the Initial Plan of Care (IPOC) for creating initial orders for care. Except for Demographic information, all data that will flow to the Initial Plan of Care is from the Summary Section, including Physician Orders section and Patient/Caregiver Goals. There is a button in the Plan of Care Review section to initiate a brief Initial Plan of Care to address the immediate care needs of the patient/caregiver.
Plan of Care Orders – In purple sections at bottom of RN Initial/Comprehensive and RN Comprehensive Assessments, there are areas to document on the Plan of Care needs for the problem area being assessed. If asterisks (*) are present, then the system is requiring customized information.
When all information is complete, select the “Check Errors” button. When the Inconsistency is selected, the user will be taken to the area of the inconsistency. The area will also slightly shake visibly.

If no warnings or errors are found, then a green disappearing notification will show confirming “Success.”
![]()
Select the “Save” button to keep the progress of the visit. Select “Complete” when the user is done with documentation. A popup will appear and the user must select the checkbox to sign the document then select “Complete.”
The Initial Plan of Care is visible after the RN Initial Assessment or RN Initial/Comprehensive Assessment has been approved from the QA Center. A draft view will be visible from the Action menu prior to final approval of content.
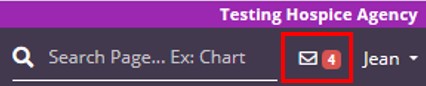
The Message Center is a place for all staff to communicate internally related to patient care with functionality to attach items and message groups as well as individuals. There are three ways to access notifications/messages:
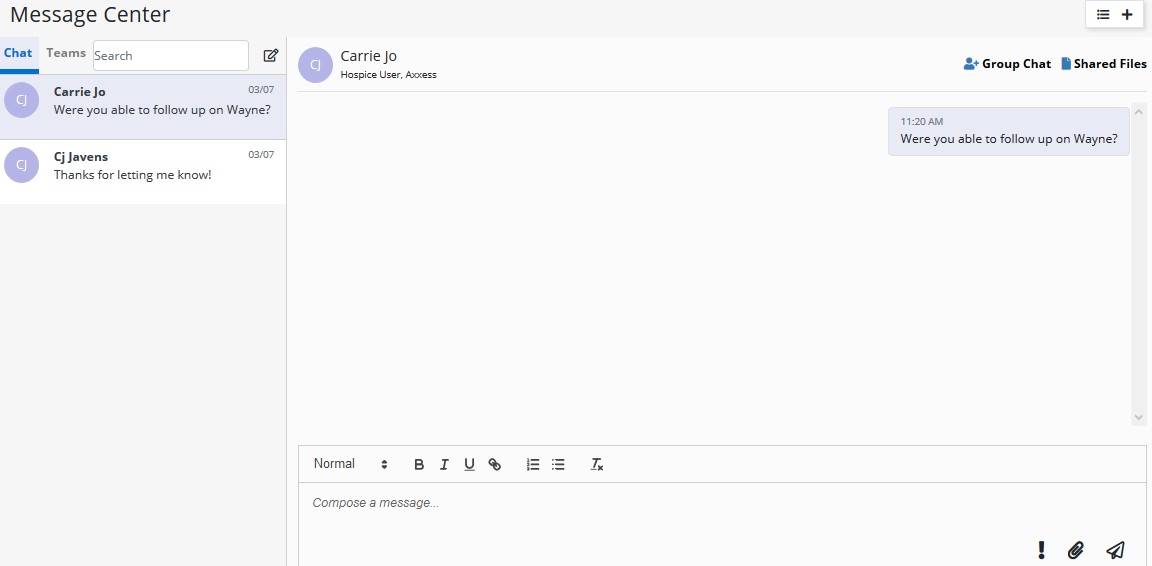
Messages are organized on the left side of the page:
![]()
Messages are split up between Chat and Teams. Chats are conversations between individuals or a group chat. Teams are conversations between pre-determined teams. Search through conversations by entering text in the search field. Select the ![]() icon is to create a new conversation.
icon is to create a new conversation.
New Conversation – Start typing the name of a desired user in the agency then select when given a choice from drop down options
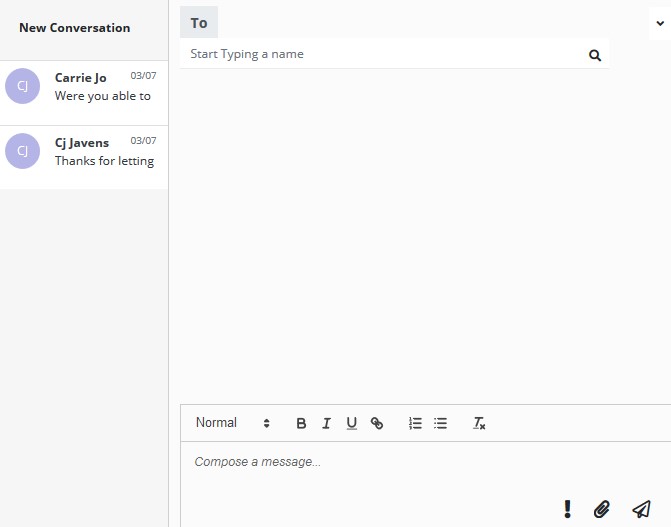
Start writing the conversation in the text box at the bottom of the page that says, “Compose a message.” Change text preferences in the bar right above the text box.
![]() – Mark the importance of a message.
– Mark the importance of a message.
![]() – Add attachment to message.
– Add attachment to message.
![]() – Send message.
– Send message.
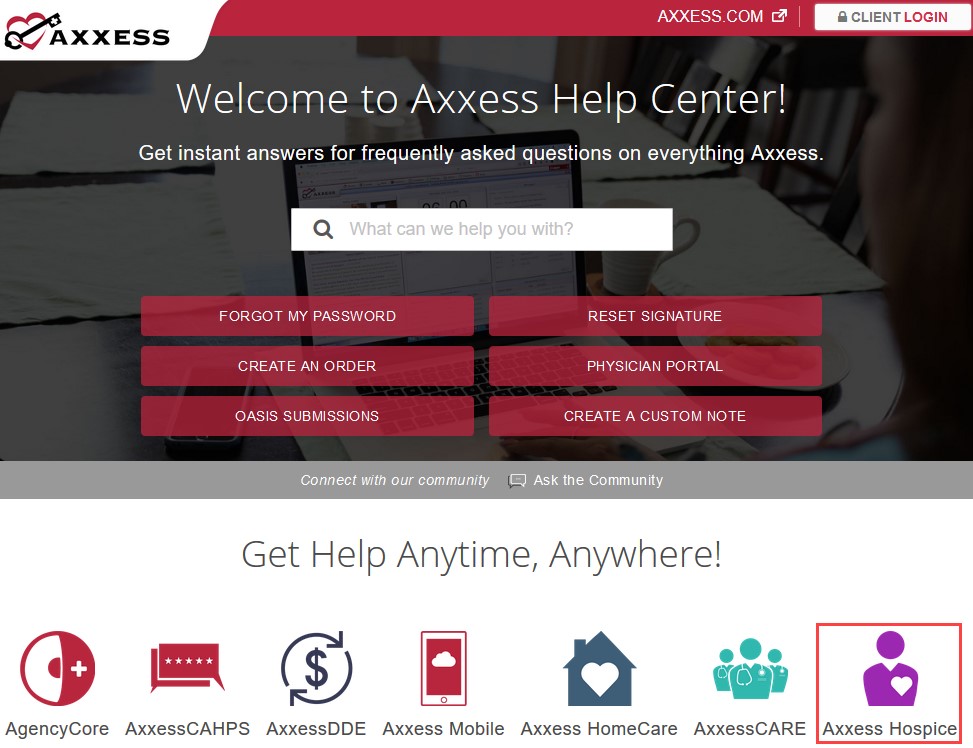
A great resource that is available 24/7 is our Help Center. It is a place to get answers to frequently asked questions or watch videos on all our Axxess products. Our Help Center can be accessed by selecting Help/Help Center or https://www.axxess.com/help/
