To create a new user, it is important to have a unique email address for the user you wish to add. Your agency may choose to assign/use a company email address or the employee’s personal email address when setting the user up in the Home Health solution.
Other information that is useful to have available includes basic demographic information, as well as the type of access the user will need in the system.
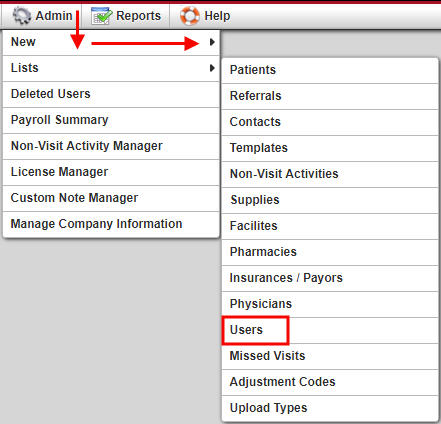
To start adding a new user, with Admin permissions, go to the Admin tab and toggle to New, then choose User at the bottom.
A window will populate allowing you to input the information for the new user.
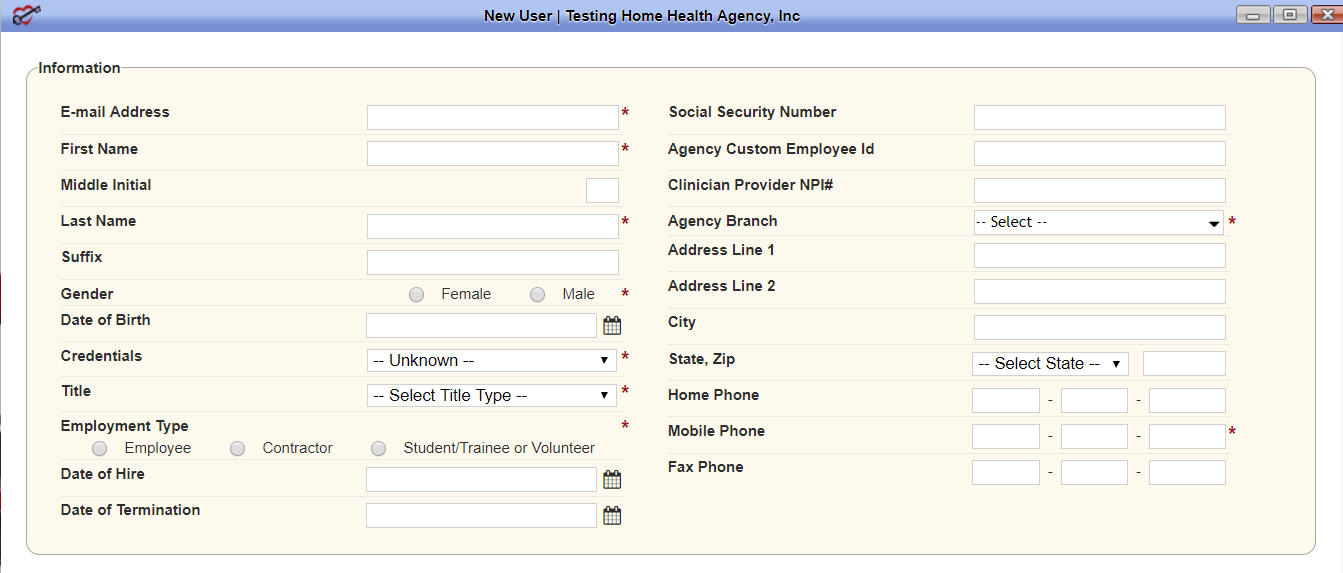
Section 1 of the new user set up includes user demographic information and user credentials.
Required fields in the information section include:
The next four sections will define a user’s access within the Home Health solution. Axxess recognizes that agencies are unique and thus we purposely kept role definition/access very basic. Specific access occurs in the permissions section.
Section 2, Duplicate Roles/Permissions/Restrictions from the Previous User, allows you to copy roles and permissions from an existing user to the new user.
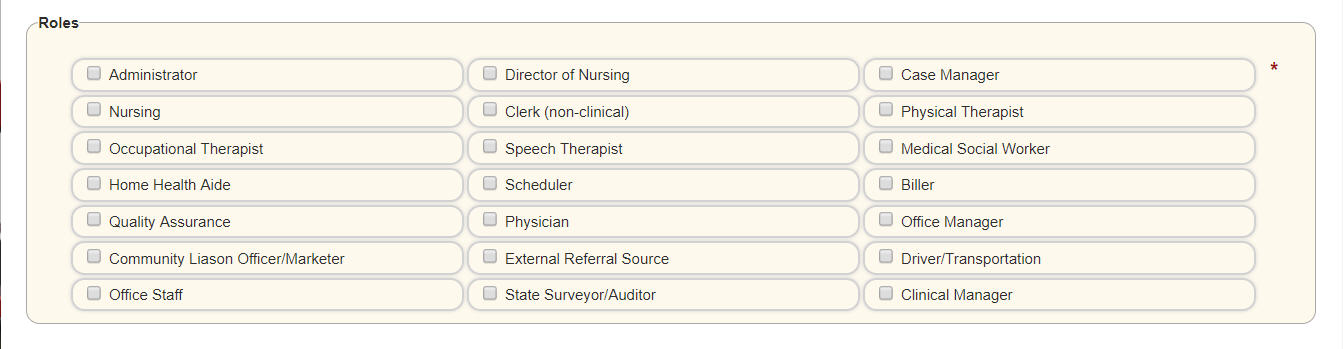
Section 3, Roles, defines a user’s role/s within the system.
Section 4, Access & Restrictions, gives the ability to define time access to the system.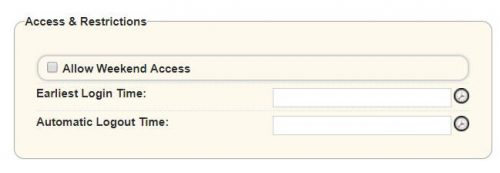
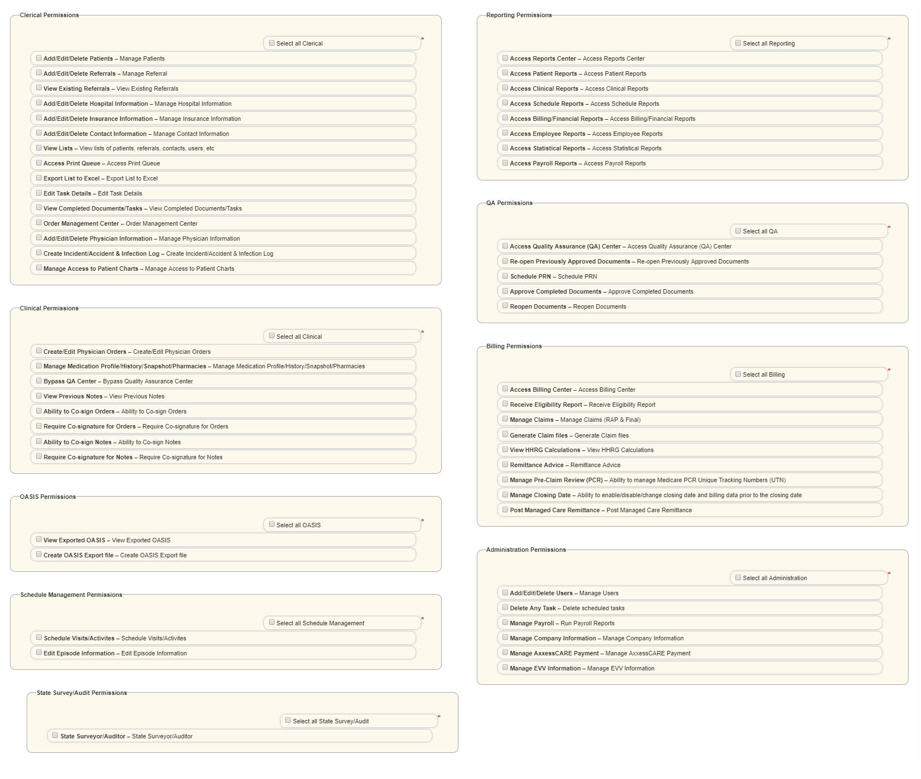
Section 5, Permissions, defines a user’s access within the Home Health solution. Choose permissions the staff member needs in order to perform his/her job functions. Permissions may be updated as needed.

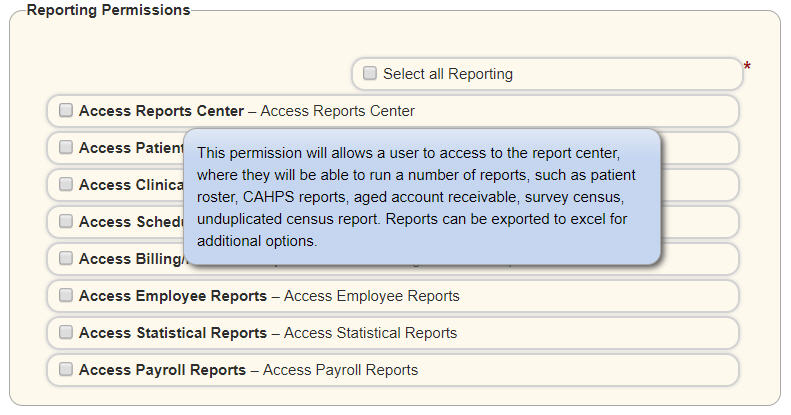 In the permissions section of the new user form, hovering over a permission will give you a definition of the permission.
Once you have verified all of the previous sections, the last area can be used to post comments. Once any comments you want to add are input into the comment field, select Add User to save the user information to the system or Cancel to disregard the information entered.

Once the user is added to the system, he/she will receive an automatic email notification sent to the email designated in the user setup. This email will provide a link and instructions on how to complete their setup and log into the Home Health solution.
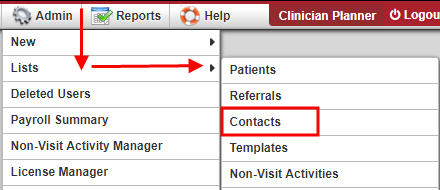
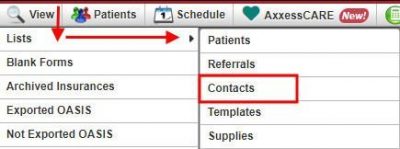
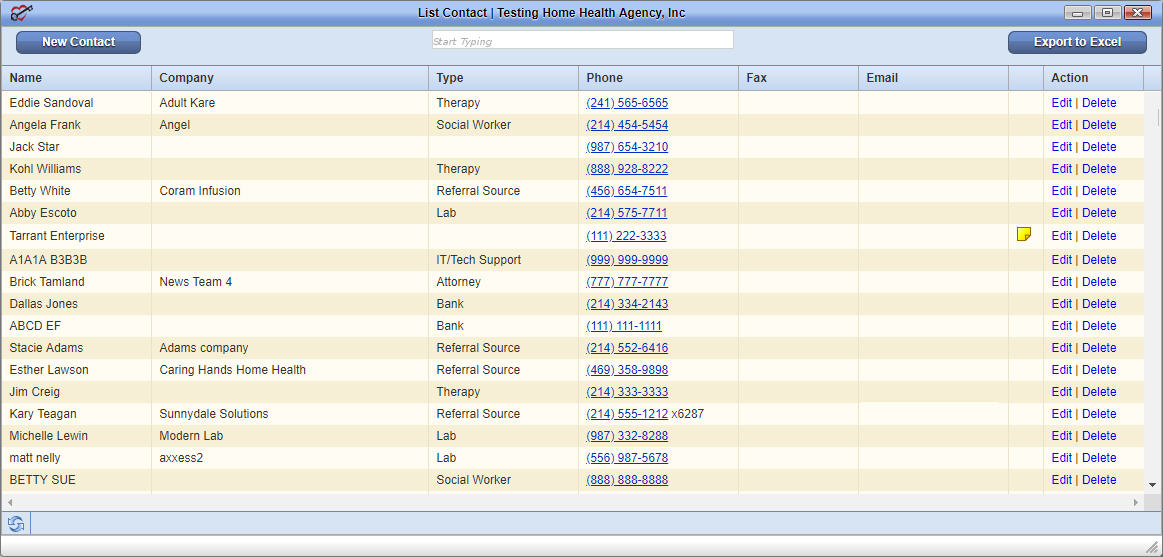
The contact list serves as an electronic ‘Rolodex’ for your agency. To view your current contacts, you can go to the View or Admin tab, toggle to Lists and choose Contacts.
From here, you can view your agency’s contact list, edit, delete, and add a comment, if needed. To print the list, simply export to Microsoft Excel and print the spreadsheet.
To create a new contact, you can start from the Contact List and click New Contact in the top left.
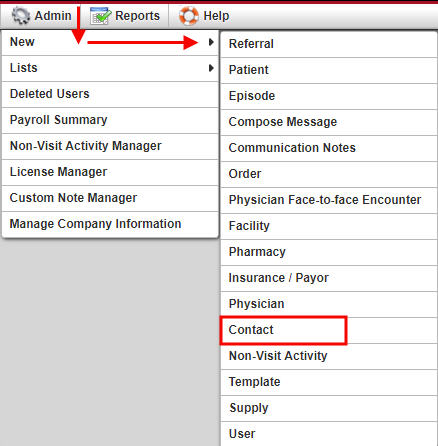
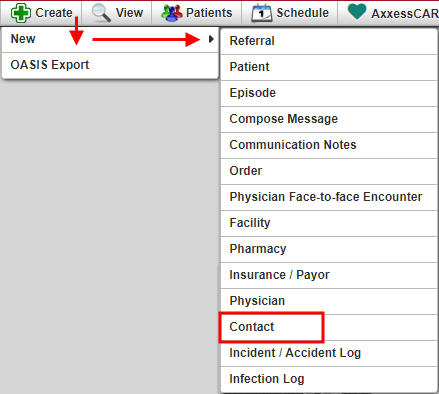
You can also add a new contact through the Create or Admin tabs, moving to New and choosing Contact.
When filling out the New Contact form, items with a red asterisk are required to save the contact information. Once complete, click Save.
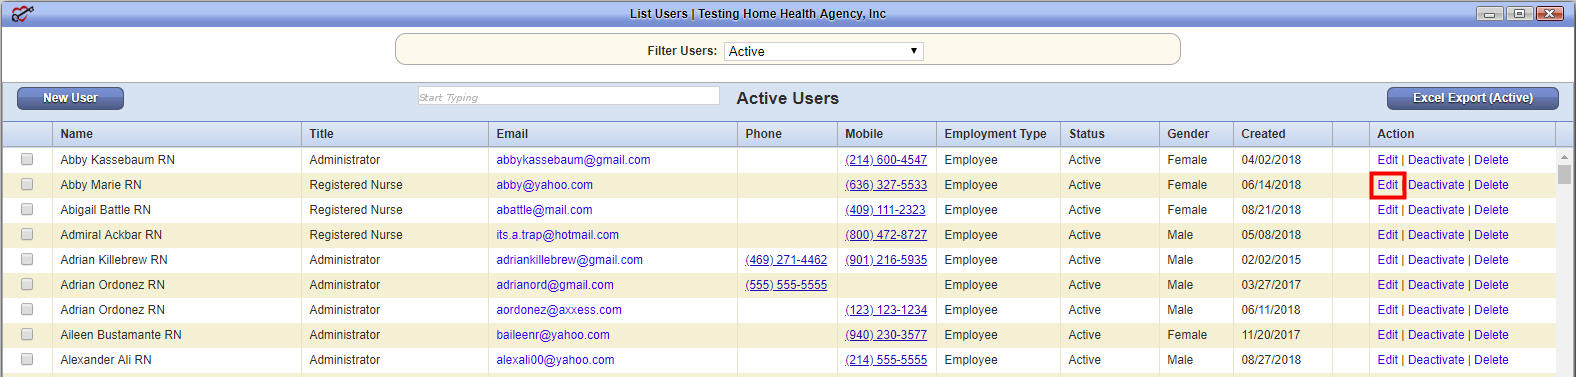
After a user is established in the system his/her license and compliance information may be added through either the View or Admin tabs, choosing Lists and then selecting Users.
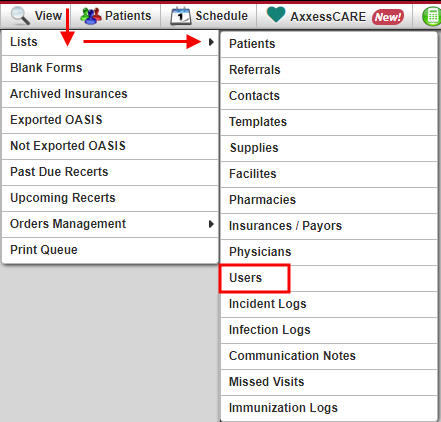

Locate the user/employee you wish to add license and compliance information. Select Edit under the Action column.
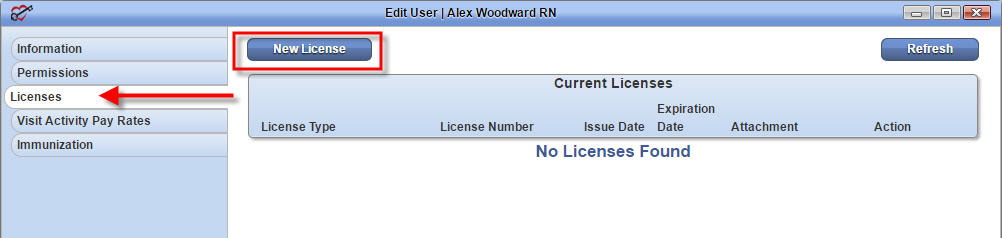
Once in the employee file, choose Licenses on the left-hand side. To add a licence or compliance information, click New License in the top left.
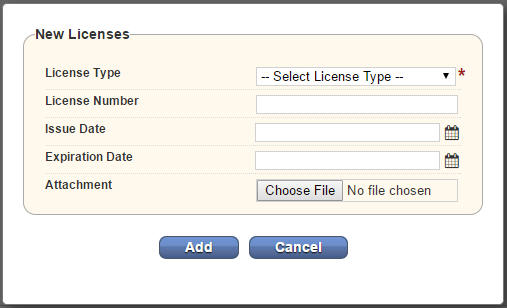 A popup window will appear for you to fill out license details. To add a license or compliance tracking item select the License Type from the drop-down selection. The drop-down includes both license and compliance tracking items. Then enter additional field information, as applicable.
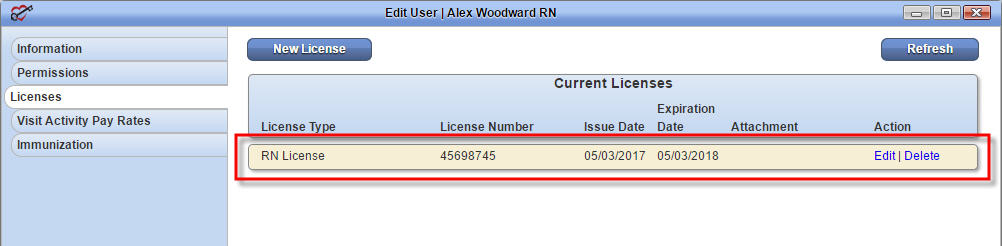
Once the information is entered select Add License to post the information to the employee file. Once a record is added, the License Type line item will appear under Current Licenses. You can Edit or Delete current licenses from this list as well.
NOTE: When adding a compliance item such as CEU credit or Other the user may include more descriptive information in the License number field. The CEU certificate may be scanned and attached to the item. Clicking on the link in the Attachment file will open the document for viewing.
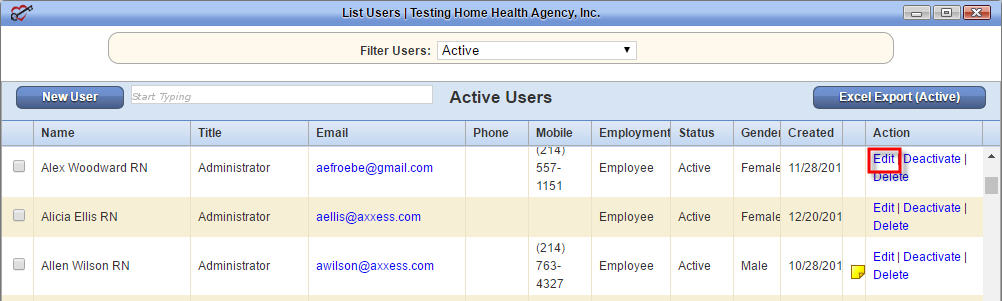
Once a user is initially set up in the system, you can add or manage their pay rates in the Home Health solution. To do this, go to the View or Admin tab and choose Lists, then select Users.
Locate the user/employee you want to make pay rate changes to and select Edit under the Action column on the right.
Once in the employee file, choose Visit Activity Pay Rates on the left. You can then add New Visit Pay Rate and New Non-Visit Pay Rate using the appropriate button. You can also import pay rates from another user by selecting the user you want to duplicate pay rates from and clicking Apply.
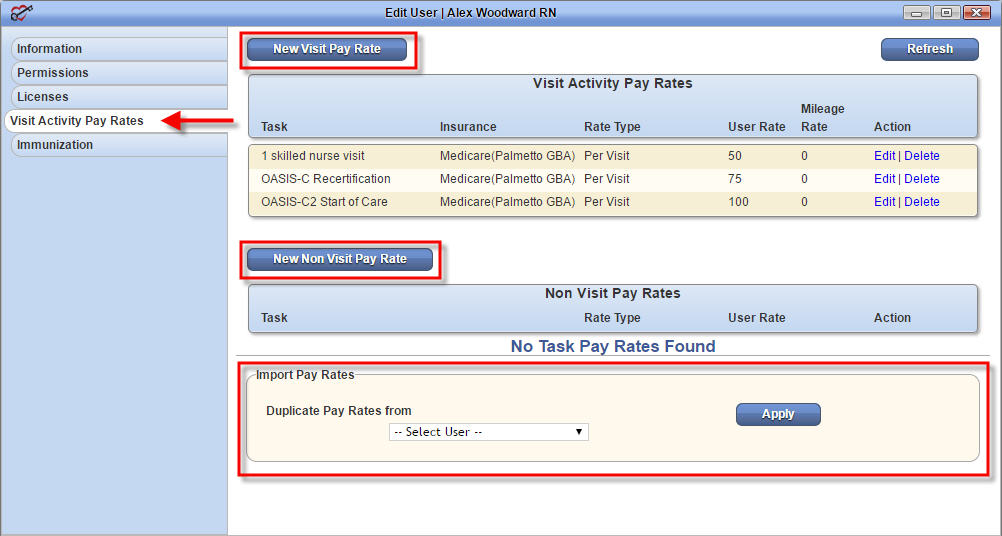
When duplicating pay rates from another user, the Home Health solution will ask you if you are sure you want to apply the same rates. Verify by clicking OK and the pay rates will be added or Cancel to disregard the rate file.
When adding pay rates individually, you can add New Visit Pay Rate or New Non-Visit Pay Rate with associated buttons. Either button will open up the corresponding pop up window for pay rate details.
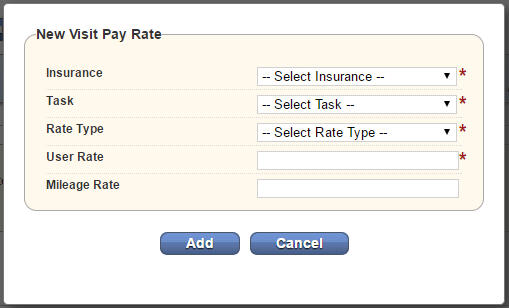
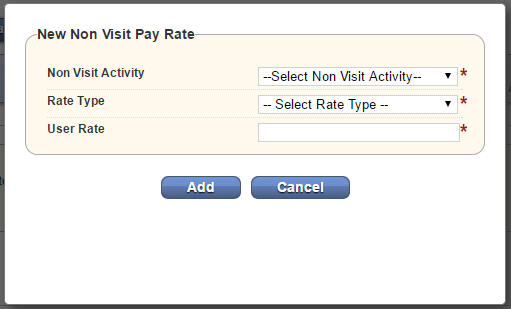
Once all fields are entered select Add to add the rate or Cancel to disregard the addition.
Once a rate is added it may be edited or deleted by choosing the Edit or Delete link under the Action column on the far right.
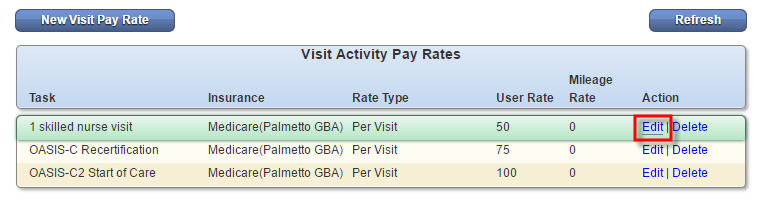
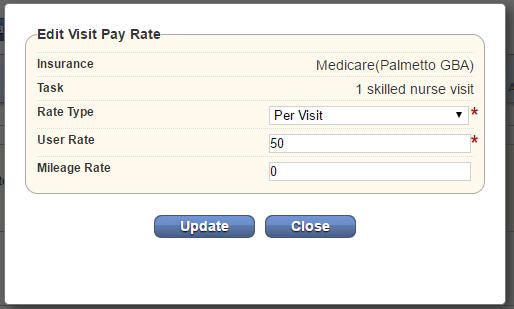 Selecting Edit will present the Edit Visit Pay Rate entry box. This window contains 2 required fields: Rate Type and User Rate. Once updated the user may choose to Update to record the changes or Close to disregard.
Clicking on Delete will delete a specific pay rate. Once you click Delete, you will be asked to confirm whether you want to delete the selected rate. Select OK to confirm the deletion or Cancel to disregard the deletion of the pay rate record.
 Patient documents not associated to a particular task, such as referral information, lab results, or patient consents can be added to the Patient Chart. To add such documents to a patient chart go to the Patients tab and access the Patient Charts.
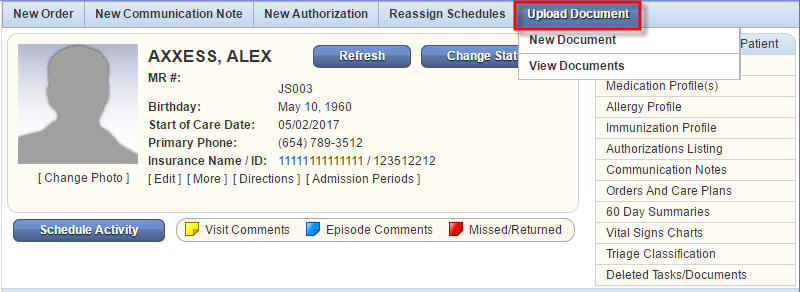
Locate and select the patient from the patient list. Once the patient is selected, click on Upload Document across the top menu bar above the patient information. You will be presented with the option for a New Document or to View Documents.
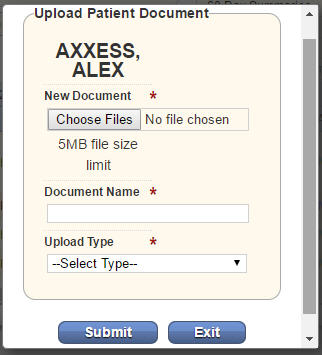 Selecting New Document opens a popup window titled Upload Patient Document, which allows you to attach a document to the patient chart.
The Upload Patient Document window contains three required completion fields:
Once the required fields are filled in, click Submit to add the document to the patient file or Exit to disregard the document upload.
To view existing patient documents select View Documents from the Upload Document menu.
Upon selection the Documents window displays containing all uploaded documents for the patient previously selected. From here, you can open, edit or delete a document.

To View the document click on the Document Name hyperlink, which then presents the standard open/save dialog box. You may choose to either save the document or open it for viewing.
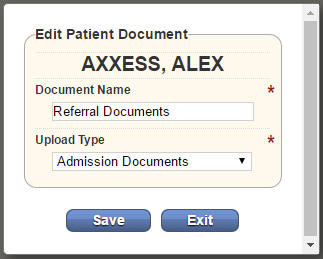 To make changes to the document details, click Edit from the Actions column on the far right. A popup window will appear, which allows you to edit the document name and upload type. Once updates are completed, choose to either Save the changes or Exit the screen.
To delete the document from the patient file select Delete from the Action column on the far right.
You will be asked to confirm whether you wish to delete the selected document from the patient file. OK removes the document from the patient chart, whereas Cancel disregards the deletions.
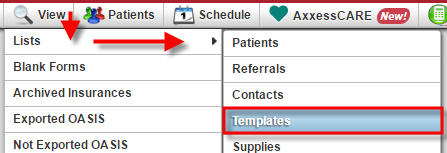
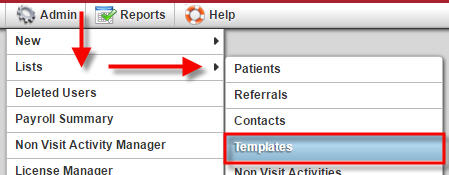
You can view your agency’s templates through the View or Admin tab, under Lists, choose Templates.
Here is where you will find a list of all your agency’s templates. You can Edit, Delete or create a New Template from this page by clicking the appropriate hyperlink or button.
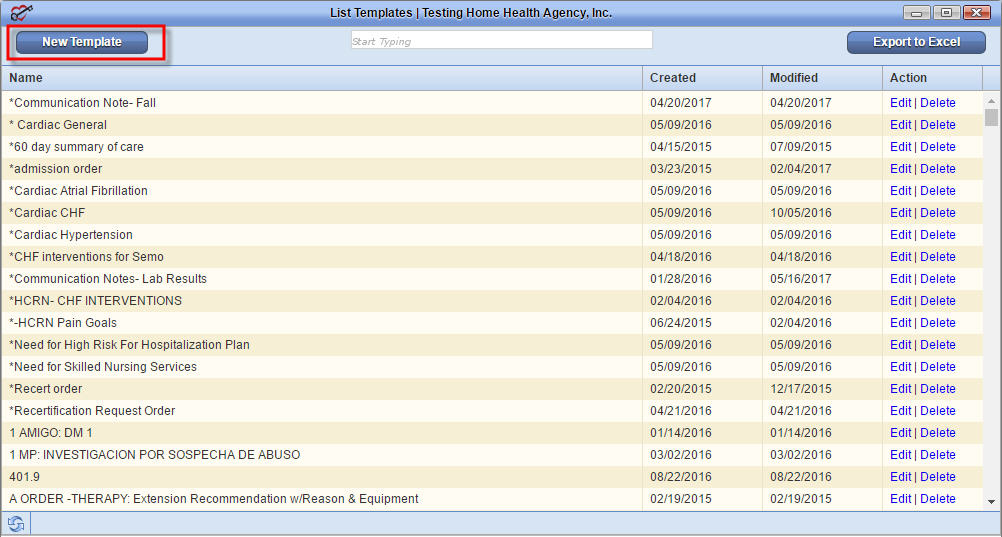
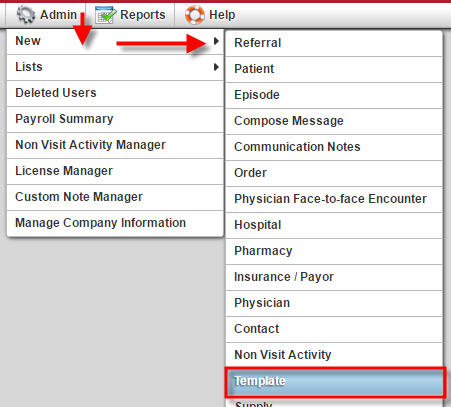
You can also create a new template from the main menu bar under the Admin tab, choose New and select Template.
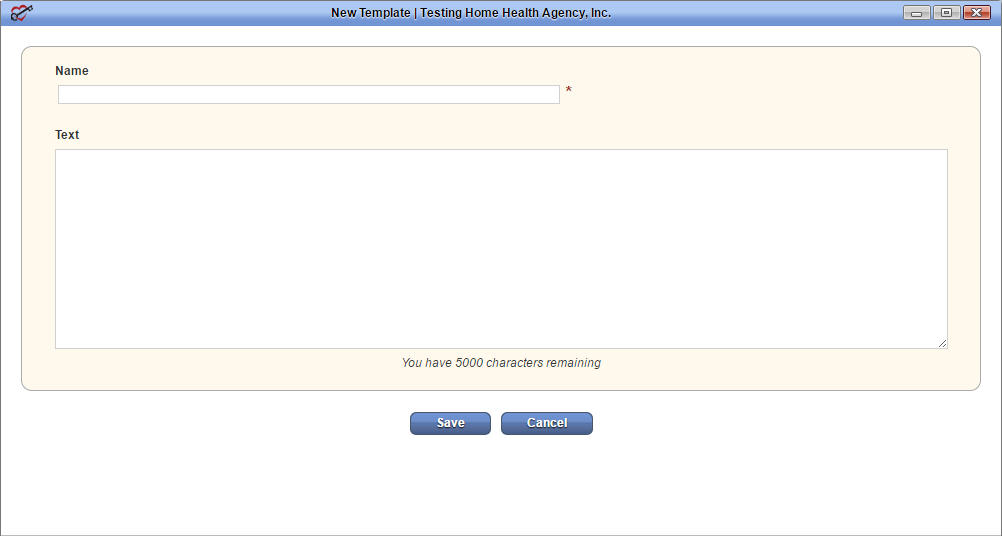
Either option will open the screen to enter the new template information. A template can be created by typing the information directly in or by copying and pasting from another text document. Once all the desired information is entered into the form, click Save to add the template to the list of available templates.
The new template will be listed alphabetically in the template list.
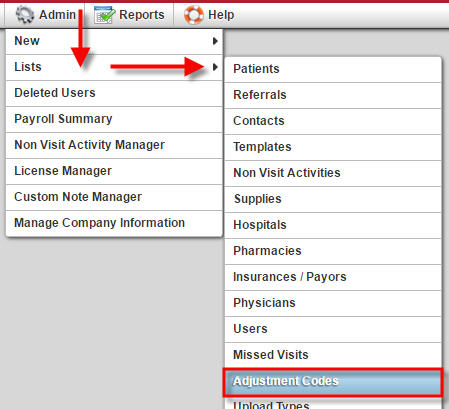 Axxess provides the ability for your agency to create and manage adjustment codes to use in the billing area of the Home Health solution. With Admin permissions, you can create and manage adjustment codes through the Admin tab under Lists, select Adjustment Codes.
You will be able to see your agency’s List Adjustment Codes. From here, you can add New Adjustment Code, Export to Excel, Edit or Delete an existing adjustment code by clicking on the appropriate hyperlink or button. You can also filter the existing adjustment codes by typing in the search bar at the top. This list highlights five major columns: Code, Description, Type, Created Date, and Modified Date.
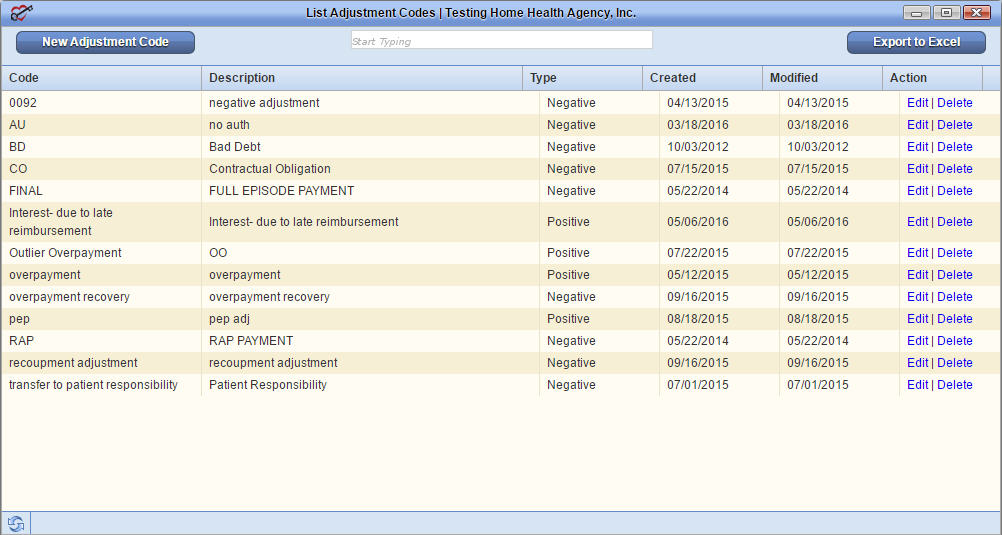
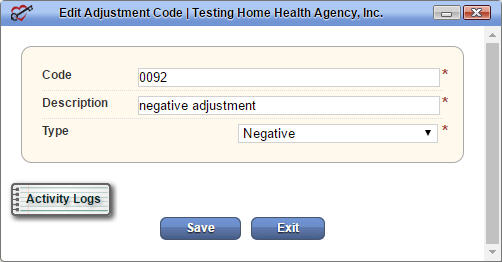 If you choose to Edit an existing adjustment code, click Edit in the Action column on the far right. A popup window will appear allowing you to make changes to the Code, Description and Type of adjustment code. You can view previous changes by clicking on the Activity Logs, Save your changes or disregard the edits made by clicking Exit.
The Activity Logs for the adjustment code tracks the username, action description and date of activity for that particular adjustment code.

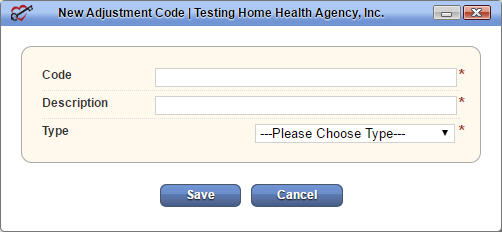 You can add a New Adjustment Code by clicking on the button in the top right of the adjustment code list. A popup window will appear allowing you to fill out the necessary information on your adjustment code. You are required to include the Code, Description and Type of adjustment code before saving. Click Save to add the code to your agency’s list or Cancel to disregard changes.
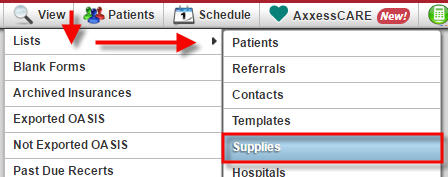
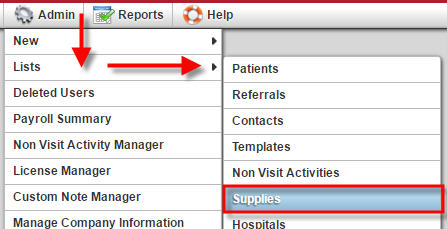
With the Home Health solution, you have the ability to add and manage your agency’s supplies. In addition, Axxess loads a supply list for your agency to use, edit, delete as you see fit. To manage your existing supplies, go to the View or Admin tab and toggle to Lists choosing Supplies.
This will take you to a list of your agency’s supplies. From this page, you can add New Supply, Export to Excel, Edit or Delete existing supplies by clicking on the appropriate hyperlink or button. You can also filter the list by typing in the search bar along the top of the page. This list shows five main columns: Description, HCPCS, Rev Code, Unit Cost, and Created Date.
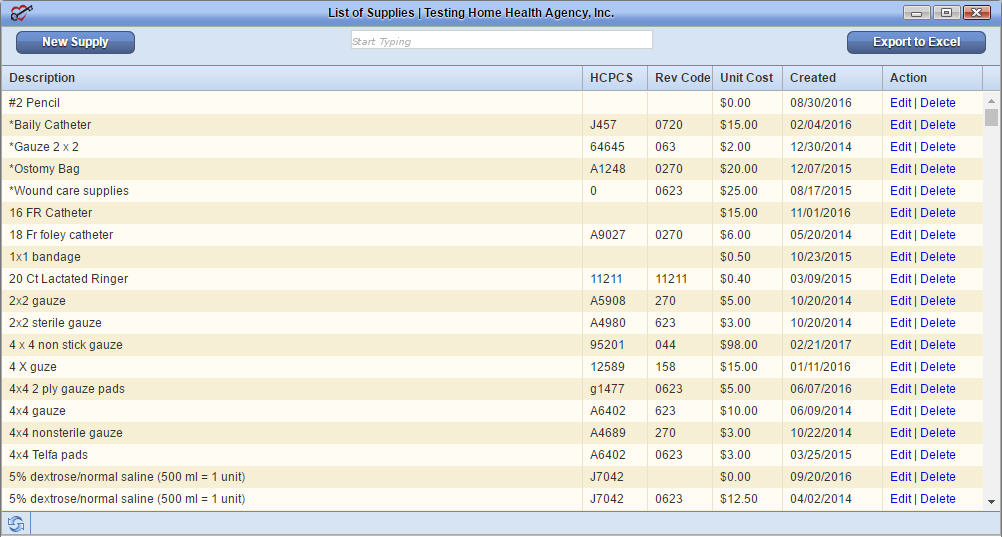
 To Edit an existing supply, click the Edit hyperlink on the far right of the supply you want to change. A popup window will appear allowing you to make changes to the supply. Once any edits are made, click Save to keep your edits or Exit to disregard any changes made. You can also see a history of changes made to this supply by clicking the Activity Logs button in the bottom left. The Activity Logs for the supply tracks the username, action description and date of activity for that particular supply.

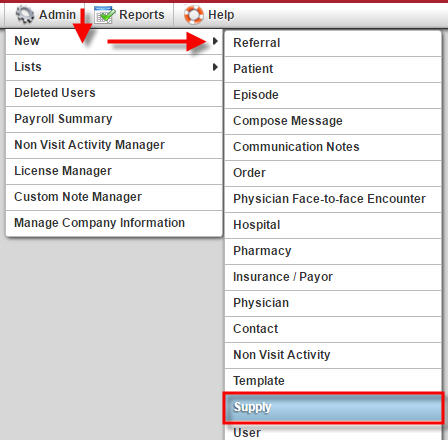 You can add a new supply directly in the supply list by clicking on the New Supply button on the top left. You can also create a new supply for your agency through the main menu bar under the Admin tab, choose New and select Supply.
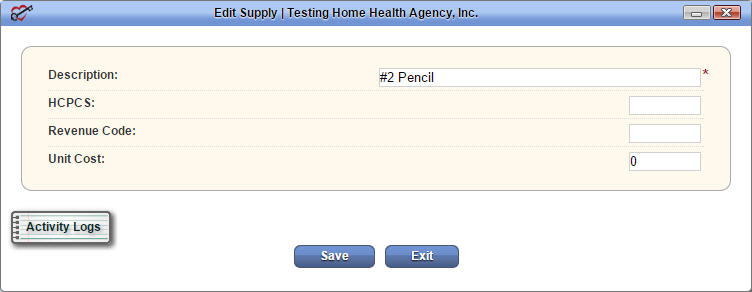
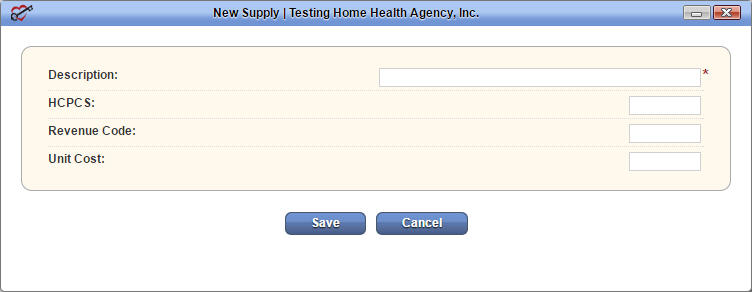
This brings up a new page for you to fill out the information for your new supply. The supply description is the only field required to save the supply to the supply list. The description is what identifies the supply in the supply list. The next three fields are optional and contain information for billing purposes. Users may enter obtain and enter a HCPCS code and/or Revenue Code for the supply. Medicare claims do not require HCPCS codes. The Home Health solution will not pull this field to a Medicare claim even if it is populated. The last field is the Unit Cost. The user enters the billing price for the supply item. Once complete, click Save to add the supply to your agency’s supply list or Cancel to disregard additions.
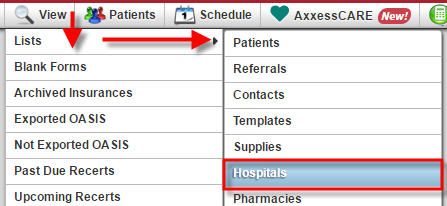
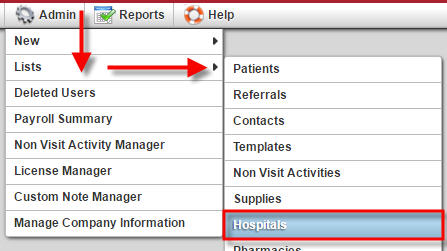
You can view a list of your agency’s hospitals by going to the View or Admin tab, choosing Lists and selecting Hospitals.
From here, you can add New Hospital, Export to Excel, Edit or Delete a hospital using the appropriate hyperlink or button.
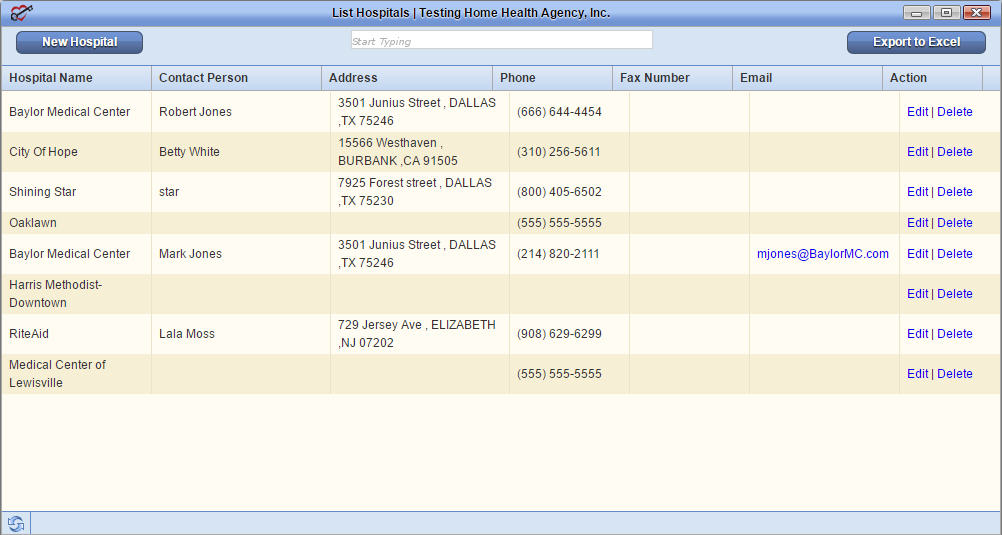
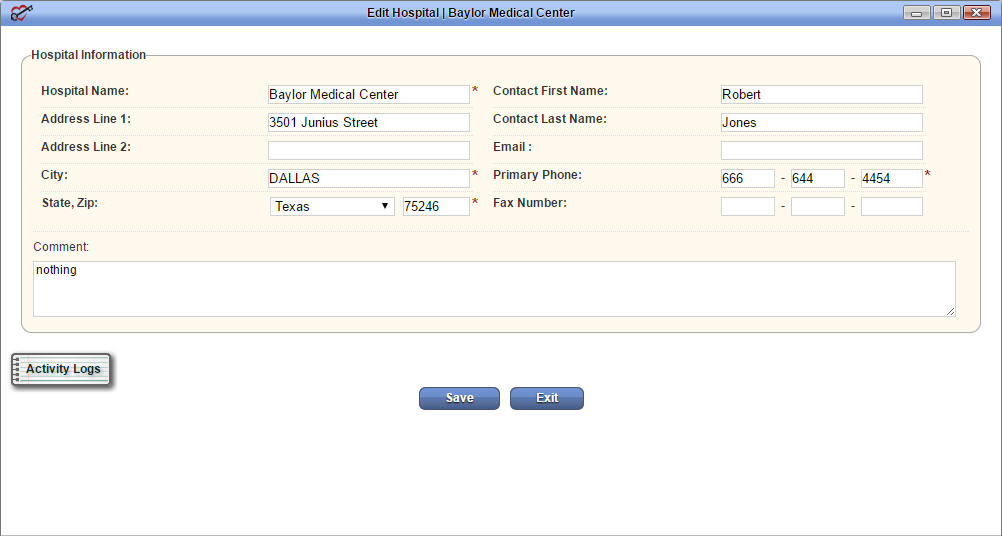
Edit a hospital’s information by clicking the Edit hyperlink on the right of the hospital you are looking to change. By doing this, a new window pops up to populate or change the hospital’s details. Click Activity Logs to see all previous changes made to this hospital. The Activity Log, like others, shows you the username, action description and date of activity for that particular hospital. Once you have made the changes you need, click Save to initiate the changes or Exit to disregard changes.
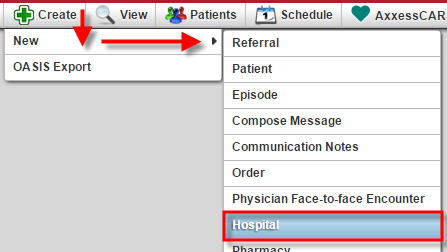
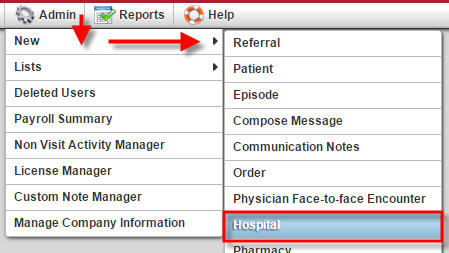
You can add a hospital directly in the hospital list using the New Hospital button in the top left. You can also add a hospital using the main menu bar with the Create or Admin tab, choose New and then Hospitals.
You will be taken to a blank form to fill out your hospital information. Items with a red asterisk are required fields for saving the information into the database. Click Save to add the hospital to your agency’s list of hospitals or Cancel to disregard changes.

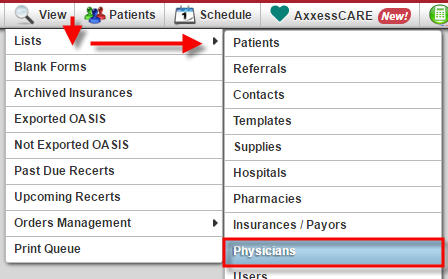
You can view your agency’s physicians through a couple avenues. Under the View or Admin tab, choose Lists and then select Physicians.
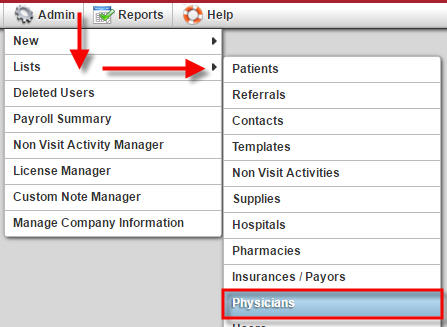
Here you will see an extensive list of physicians and their corresponding information for your agency. You can add New Physician, Export to Excel, Edit or Delete a physician from this page using the proper hyperlink or button.
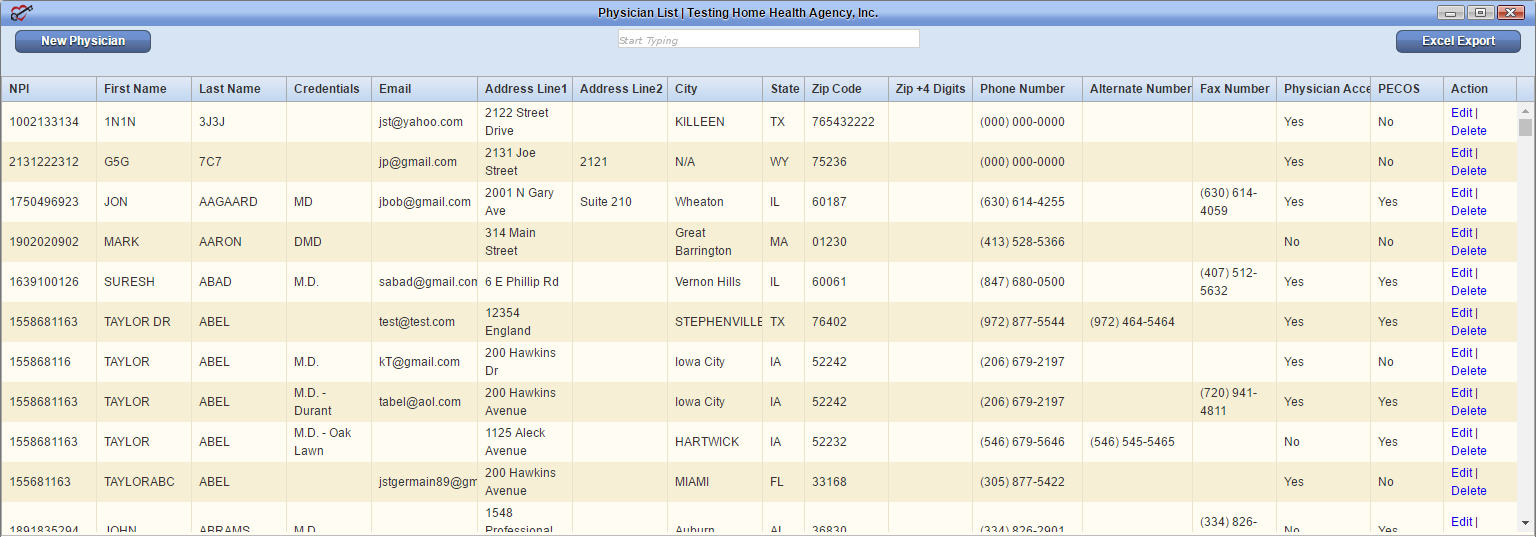
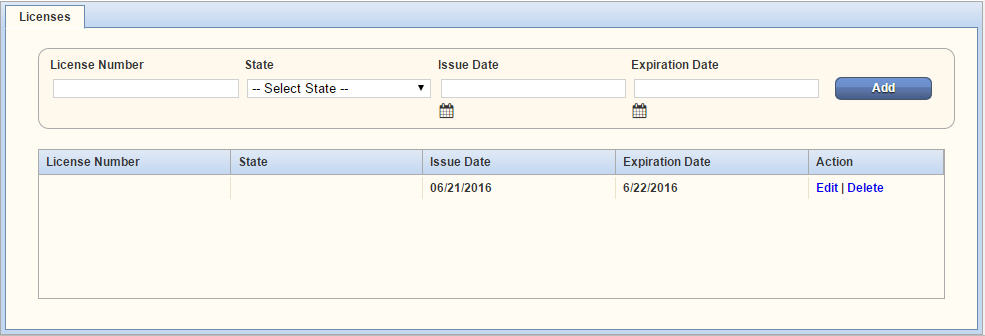
Make changes to any physician by clicking the Edit hyperlink on the right. Here you can review and update physician information and license details. Click on Activity Logs to see previous changes made to this physician. To save your changes, click Save or Exit to cancel any edits.

If you are missing a physician or simply want to add one to your list, you can do that directly in the physician list with the New Physician button or in the menu bar under the Create or Admin tab, choose New and then select Physicians. A new window will populate allowing you to fill in the appropriate information for your physician.
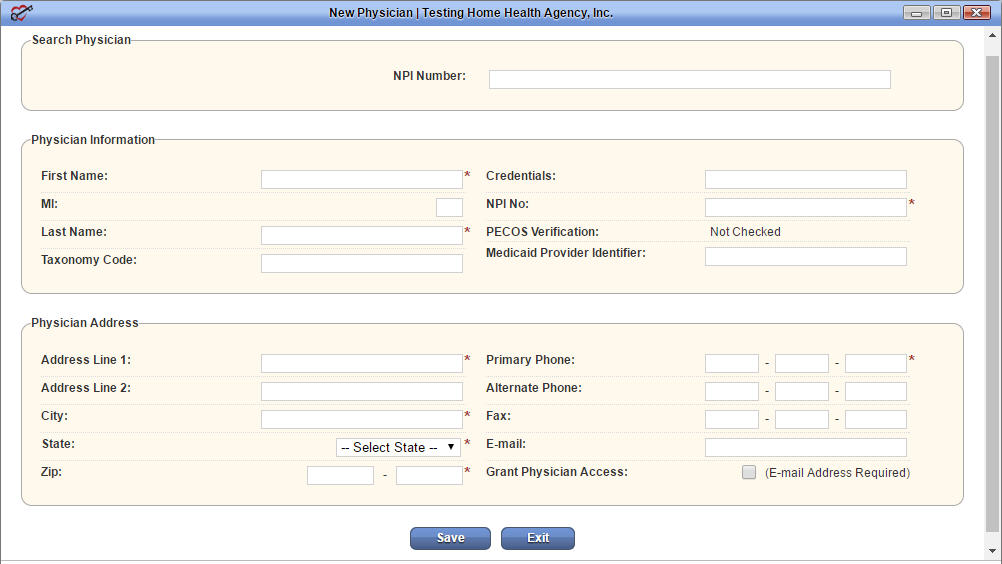
 For added convenience, you can also add a new physician when entering a new Referral, new Patient, or when creating a new Order by selecting the New Physician button.
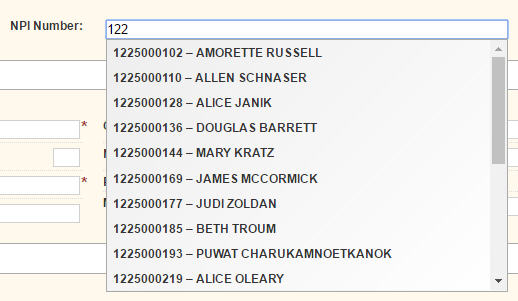 To add a physician into the Home Health solution, you will need the NPI number. We suggest you start by typing in the physician’s NPI number. A list of names will start auto-populating based on the numbers you are typing.
When the NPI number is entered in the NPI Number field in the Search Physician section, the Home Health solution completes a real-time NPI physician search. We then present a list of physicians who match the NPI numbers as they are typed in. The list will narrow as more characters of the NPI number are entered. When the physician you are adding appears in the drop-down list, you simply click on his or her name. Once the physician’s name is selected, their demographic information will auto-populate. The system allows for editing of the demographic information if needed.
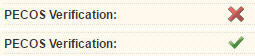 We also automatically check PECOS verification. You will see a very clear red X if the physician is not PECOS verified or green check mark if the physician is PECOS verified. This is in accordance with the NPI registration database.
If the physician wishes to electronically sign his or her orders, the physician’s email address needs to be entered into the physician’s file along with checking the grant physician access checkbox. Once the physician information is saved, the Home Health solution will send an email to the physician with instructions on how to set up his or her provider portal. Then, going forward, the physician will have the ability to electronically sign orders sent from your agency through the Axxess MD portal.
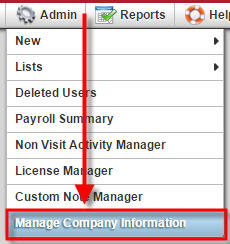 You have the ability to set calendars to your agency’s defined work week. To update the defined work week for your agency, go to the Admin tab and choose Manage Company Information.
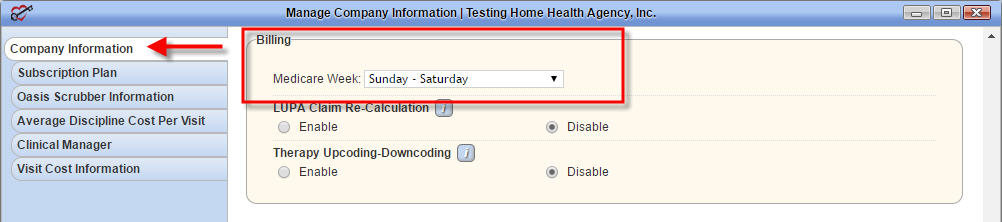
Provide your electronic signature when asked and you will be taken to the Manage Company Information page. In the first tab of this page, Company Information, scroll down to the Billing section. The first option within the Billing section is Medicare Week. From the drop-down, select the week preference your agency follows. Scroll to the bottom and click Save.
Note: You will need to log out, and log back into the Home Health solution to see the updated change.